4.3.18. USB/USB Gadget Debug Guide
4.3.18.1. Overview
The X5 SoC integrates USB2.0 and USB3.0 controllers, with the following features:
USB 2.0 OTG
Supports Host mode and Device mode
Compliance standard: USB Specification Revision 2.0
Supports High-Speed (HS), Full-Speed (FS), and Low-Speed (LS) modes
Supports Keep-Alive feature in LS mode, and (micro-)SOF (Start of Frame) signals in HS/FS modes
Hardware supports error handling at both bus and packet levels
USB 3.0 OTG
Supports Host mode and Device mode
Compliance standard: USB Specification Revision 3.0
Supports SuperSpeed (SS), High-Speed (HS), Full-Speed (FS), and Low-Speed (LS) modes
Supports PIPE3 PHY (125/250/500 MHz)
Supports Keep-Alive feature in LS mode, and (micro-)SOF (Start of Frame) signals in HS/FS modes
Hardware supports error handling at both bus and packet levels
4.3.18.2. Functional Description
Typical Applications
USB Gadget is a technology used to emulate USB composite devices. In Linux systems, “gadget” typically refers to virtual devices connected to a host via a USB interface, such as USB storage devices, network adapters, serial devices, audio devices, and HID devices.
One key feature of USB Gadget is its flexible and dynamic configuration and management through configfs. Configfs is a user-space accessible file system interface that allows developers to dynamically create and configure components of a USB device—such as device descriptors, interfaces, and endpoints—using file system commands. Unlike traditional methods that require kernel recompilation or system reboot, configfs makes USB gadget configuration more flexible, enabling real-time adjustments during system runtime, greatly simplifying development and debugging.
In summary, USB Gadget provides a way to quickly implement and manage virtual USB devices without modifying kernel code, enhancing the scalability and flexibility of Linux systems, enabling easier simulation of various USB device functions to meet diverse application requirements.
Functional Principles
The USB Gadget driver framework is shown below
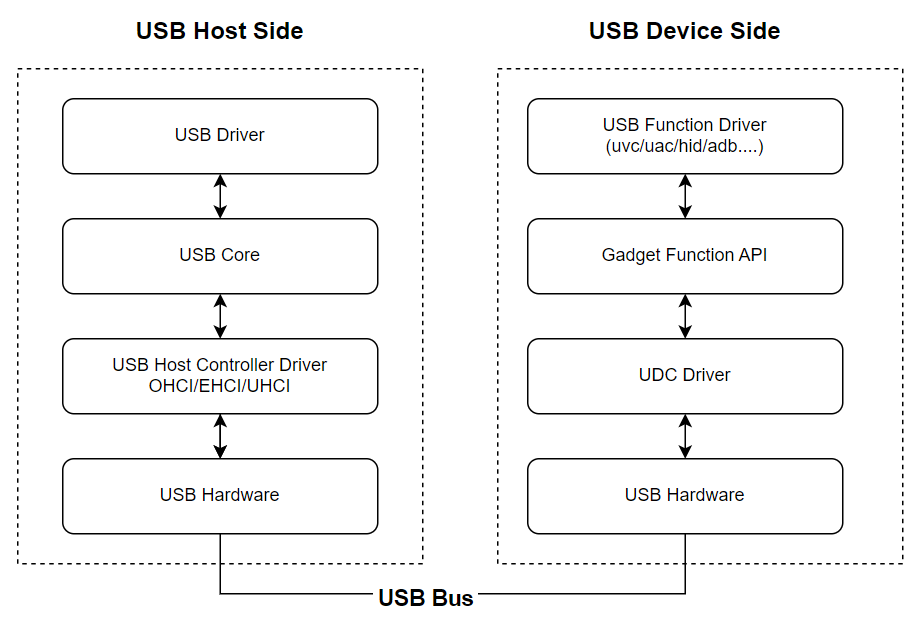
In the USB Gadget framework, the functionality and behavior of a USB device are implemented through the following layers:
USB Function Driver
The USB Function Driver is responsible for implementing the specific functions of the device. It defines the behavior and capabilities of the USB device when connected to a host, such as virtual serial ports, USB storage, or network adapters. A USB Gadget device typically has one or more function drivers, representing the different functions it supports.configfs
configfs is a user-space interface that allows dynamic configuration of USB devices through a file system. It provides a highly flexible way to set various parameters of a USB Gadget device, including device descriptors, configurations, interfaces, and functions.UDC Driver
The UDC Driver (USB Device Controller Driver) is the driver that interacts with the hardware USB controller, responsible for managing the physical connection and data transmission of the USB device. It acts as the low-level interface to the USB controller, interacting directly with the hardware layer of the USB device.
4.3.18.3. Code Analysis
USB Gadget Driver
Kernel Options
The following kernel options must be enabled:
CONFIG_USB_GADGET
CONFIG_USB_CONFIGFS
USB Gadget functionality is implemented via module loading. Specific USB functions can be enabled based on requirements:
CONFIG_USB_CONFIGFS_SERIAL
CONFIG_USB_CONFIGFS_ACM
CONFIG_USB_CONFIGFS_OBEX
CONFIG_USB_CONFIGFS_NCM
CONFIG_USB_CONFIGFS_ECM
CONFIG_USB_CONFIGFS_ECM_SUBSET
CONFIG_USB_CONFIGFS_RNDIS
CONFIG_USB_CONFIGFS_EEM
CONFIG_USB_CONFIGFS_MASS_STORAGE
CONFIG_USB_CONFIGFS_F_LB_SS
CONFIG_USB_CONFIGFS_F_FS
CONFIG_USB_CONFIGFS_F_UAC1
CONFIG_USB_CONFIGFS_F_UAC2
CONFIG_USB_CONFIGFS_F_HID
CONFIG_USB_CONFIGFS_F_UVC
Driver Code
The source code for USB drivers is located in the kernel’s drivers/usb directory:
.
├── Kconfig
├── Makefile
├── core            // Core code of the USB subsystem
├── dwc3            // dwc3 USB controller driver
└── gadget          // Contains USB gadget-related drivers, implementing functions like storage, serial, and network adapters
    ├── Kconfig
    ├── Makefile
    ├── composite.c // Create and manage USB composite devices
    ├── config.c
    ├── configfs.c  // Source code for configfs filesystem
    ├── configfs.h
    ├── function    // Function drivers for USB device-side functions, implementing various USB device types
    │   ├── Makefile
    │   ├── f_acm.c
    │   ├── f_ecm.c
    │   ├── f_eem.c
    │   ├── f_fs.c
    │   ├── f_hid.c
    │   ├── f_loopback.c
    │   ├── f_mass_storage.c
    │   ├── f_mass_storage.h
    │   ├── f_midi.c
    │   ├── f_ncm.c
    │   ├── f_obex.c
    │   ├── f_phonet.c
    │   ├── f_printer.c
    │   ├── f_rndis.c
    │   ├── f_serial.c
    │   ├── f_sourcesink.c
    │   ├── f_subset.c
    │   ├── f_tcm.c
    │   ├── f_uac1.c
    │   ├── f_uac1_legacy.c
    │   ├── f_uac2.c
    │   ├── f_uvc.c
    │   ├── f_uvc.h
    │   ├── g_zero.h
    │   ├── ndis.h
    │   ├── rndis.c
    │   ├── rndis.h
    │   ├── storage_common.c
    │   ├── storage_common.h
    │   ├── tcm.h
    │   ├── u_audio.c
    │   ├── u_audio.h
    │   ├── u_ecm.h
    │   ├── u_eem.h
    │   ├── u_ether.c
    │   ├── u_ether.h
    │   ├── u_ether_configfs.h
    │   ├── u_fs.h
    │   ├── u_gether.h
    │   ├── u_hid.h
    │   ├── u_midi.h
    │   ├── u_ncm.h
    │   ├── u_phonet.h
    │   ├── u_printer.h
    │   ├── u_rndis.h
    │   ├── u_serial.c
    │   ├── u_serial.h
    │   ├── u_tcm.h
    │   ├── u_uac1.h
    │   ├── u_uac1_legacy.c
    │   ├── u_uac1_legacy.h
    │   ├── u_uac2.h
    │   ├── u_uvc.h
    │   ├── uac_common.h
    │   ├── uvc.h
    │   ├── uvc_configfs.c
    │   ├── uvc_configfs.h
    │   ├── uvc_queue.c
    │   ├── uvc_queue.h
    │   ├── uvc_v4l2.c
    │   ├── uvc_v4l2.h
    │   ├── uvc_video.c
    │   └── uvc_video.h
    ├── functions.c      // Create and manage USB Functions
    ├── udc              // UDC drivers
    └── usbstring.c      // Create and manage USB device string descriptors
USB Gadget Scripts
usb-gadget.sh Script Configuration Flow
The usb-gadget.sh script is located at /etc/init.d/usb-gadget.sh. Its main purpose is to simplify the process of enabling USB device functions and provide an automated way to configure and manage USB gadget devices. The script performs the following:
Initializes the USB Gadget driver based on predefined USB configuration files
Configures function descriptors for USB composite devices and applies these configurations via the CONFIGFS interface
Enables USB composite device functionality
Help information for usb-gadget.sh, supporting the following USB device types:
Single USB devices: ADB / Rndis / ECM / HID / ACM / MSD / UVC / UAC
Composite USB devices: supporting multiple functions over a single USB device
Usage: /etc/init.d/usb-gadget.sh {start|stop|restart} [options]
 options:
 detail gadget-composite config, using .usb/.default-config in default
      adb                         launch adbd
      msd                         run as gadget mass storage device
      msd-ram                     run as gadget mass storage device (with DDR storage)
      hid                         run as hid gadget
      rndis                       run as rndis gadget
      ecm                         run as cdc ether gadget
      uvc                         run as uvc gadget
      uac1                        usb audio class specification 1
      uac2                        usb audio class specification 2
      uvc-hid                     uvc + hid composite gadget
      uvc-uac1                    uvc + uac1 composite gadget
      uvc-uac2                    uvc + uac2 composite gadget
      uvc-hid-uac1                uvc + hid + uac1 composite gadget
      uvc-hid-uac2                uvc + hid + uac2 composite gadget
      uvc-rndis                   uvc + rndis composite gadget
      uvc-ecm                     uvc + cdc ether composite gadget
      uvc-acm                     uvc + acm(serial) composite gadget
      uvc-rndis-uac1              uvc + rndis + uac1 composite gadget
      uvc-rndis-uac2              uvc + rndis + uac2 composite gadget
      uvc-ecm-uac1                uvc + ecm + uac1 composite gadget
      uvc-ecm-uac2                uvc + ecm + uac2 composite gadget
      rndis-hid                   rndis + hid composite gadget
      rndis-uac1                  rndis + uac1 composite gadget
      msd-uac1                    msd + uac1 composite gadget
      hid-uac1                    hid + uac1 composite gadget
      uvc-adb                     uvc + adb composite gadget
Configuration flow of usb-gadget.sh:
Mount configfs: configfs provides a user-space interface for configuring USB composite devices
Create USB Gadget directory: instantiate a new USB Gadget device
Configure USB Gadget information: set basic device information such as Vendor ID (VID), Product ID (PID), and device descriptors
Create and configure USB functions: create and configure corresponding USB functions based on required device capabilities (e.g., virtual serial, storage, networking)
Bind USB configuration with functions: associate configuration with functions to complete device setup
Enable USB controller: start and enable the USB controller to begin communication with the host
start_usb_gadget()
{
    echo "Creating the USB gadget"

    # Load libcomposite module, required by USB gadget
    echo "Loading composite module"
    modprobe libcomposite

    # Mount configfs
    echo "Mount ConfigFS and create Gadget"
    CONFIGFS_MOUNT_POINT=$(mount | grep configfs | awk '{ print $3 }')
    echo "configfs mount point: " ${CONFIGFS_MOUNT_POINT}
    if [[ -n ${CONFIGFS_MOUNT_POINT} ]]; then
        echo "Configfs already mounted..."
    else
        mount -t configfs none /sys/kernel/config
    fi

    # Create USB Gadget
    echo "Creating gadget directory g_comp"
    mkdir -p $USB_CONFIGFS
    cd $USB_CONFIGFS
    if [ $? -ne 0 ]; then
        echo "Error creating usb gadget in configfs"
        exit 1
    else
        echo "OK"
    fi

    # Create and configure USB Gadget configuration
    echo "init configfs..."
    configfs_init

    # Configure USB Functions
    echo "Init functions..."
    function_init
    echo "OK"

    # Bind USB configuration with Functions
    echo "Bind functions..."
    bind_functions

    # Start user-space daemons (e.g., adb)
    echo "Pre run userspace daemons(eg. adb)..."
    pre_run_binary

    # Wait for daemons to initialize
    echo "waiting"
    for i in `seq 0 $?`
    do
        echo "."
        sleep 0.1
    done

    echo "OK"

    # Enable UDC
    echo "Binding USB Device Controller"
    echo $UDC > UDC
    echo peripheral > $UDC_ROLE
    cat $UDC_ROLE
    echo "OK"

    echo "Run some userspace daemons(eg. usb_camera)..."
    run_binary
}
Configure USB Gadget device information via configfs_init():
configfs_init()
{
    # Set Vendor and Product IDs
    echo "Setting Vendor and Product ID's"
    echo $USB_VID > idVendor
    echo $USB_PID > idProduct
    echo "OK"

    if $USE_RNDIS; then
        echo 0100 > bcdDevice   # v1.0.0, otherwise Win10 RNDIS may fail to install
    fi

    # Set USB device class
    if $IS_MULTI_FUNC; then
        echo "Setting Multi-func Gadget for Windows"
        echo 0xEF > bDeviceClass
        echo 0x02 > bDeviceSubClass
        echo 0x01 > bDeviceProtocol
    elif $USE_UAC1; then
        echo 0xEF > bDeviceClass
        echo 0x02 > bDeviceSubClass
        echo 0x01 > bDeviceProtocol
    else
        echo "single function gadget"
        if $USE_RNDIS; then
            echo 0x02 > bDeviceClass        # same as legacy/ether.c
        fi
    fi

    # Set USB string descriptors
    echo "Setting English strings"
    mkdir -p strings/0x409
    echo $SERIAL > strings/0x409/serialnumber  # Serial number
    echo $MANUF > strings/0x409/manufacturer   # Manufacturer
    echo $PRODUCT > strings/0x409/product      # Product model
    echo "OK"

    # Create USB configuration
    echo "Creating Config"
    mkdir configs/c.1
    mkdir configs/c.1/strings/0x409
    echo "Conf 1" > configs/c.1/strings/0x409/configuration
    echo 0xC0 > configs/c.1/bmAttributes
    echo 0x01 > configs/c.1/MaxPower
}
4.3.18.4. USB Gadget Function Usage
ADB (Android Debug Bridge)
ADB (Android Debug Bridge) is a versatile command-line tool that allows developers to interact with Android devices, commonly used for development and debugging of embedded systems.
Code Analysis
Create ADB Function via create_adb():
create_adb()
{
    CONFIG=$1
    FUNCTION=$2

    echo "Creating ADB gadget functionality"
    mkdir functions/$FUNCTION

    ln -s functions/$FUNCTION configs/c.1
}
USB ADB functionality depends on the ADBD background service:
mkdir -p /dev/usb-ffs/adb
mount -o uid=2000,gid=2000 -t functionfs adb /dev/usb-ffs/adb  # Mount FunctionFS filesystem
start-stop-daemon -S -b -q -n adbd -a /usr/bin/adbd            # Start ADBD daemon
Usage
Run on device:
/etc/init.d/usb-gadget.sh restart adb
For usage instructions, refer to Using ADB section.
Rndis Network Interface
RNDIS (Remote Network Driver Interface Specification) is a standard protocol for network communication over USB, commonly used to connect devices (e.g., smartphones, embedded systems) to a computer and provide network functionality via USB. RNDIS enables data transfer between the device and computer over USB, appearing as a virtual Ethernet interface, allowing the device to communicate like a traditional networked device.
Code Analysis
Create USB Rndis Function via create_rndis():
create_rndis configs/c.1 rndis.0

create_rndis()
{
    CONFIG=$1
    FUNCTION=$2

    echo "Creating RNDIS gadget functionality"
    mkdir functions/$FUNCTION                 # Create USB Rndis Function directory

    mkdir -p os_desc
    echo 1 > os_desc/use
    echo 0xcd > os_desc/b_vendor_code
    echo MSFT100 > os_desc/qw_sign

    mkdir -p functions/$FUNCTION/os_desc/interface.rndis  # Create Rndis directory for device description
    echo RNDIS > functions/$FUNCTION/os_desc/interface.rndis/compatible_id  # Write Rndis protocol ID
    echo 5162001 > functions/$FUNCTION/os_desc/interface.rndis/sub_compatible_id # Set Rndis compatibility ID and version

    ln -s functions/$FUNCTION configs/c.1    # Bind Rndis Function to configuration
    ln -s configs/c.1/ os_desc
}
Other parameter notes:
dev_addr sets the MAC address of the network interface
Example:echo "00:11:22:33:44:55" > functions/$FUNCTION/dev_addr
Usage
Run on device:
/etc/init.d/usb-gadget.sh restart rndis
For usage instructions, refer to Virtual Network Interface (rndis) section.
ECM Network Interface
ECM (Ethernet Control Model) is a protocol for Ethernet communication over USB, allowing devices (e.g., phones, embedded systems, routers) to establish a virtual Ethernet connection with a host (typically a computer or network device) via USB. ECM makes USB-based network connections behave like traditional Ethernet, defining how Ethernet packets are transmitted over USB, enabling Ethernet-layer communication between the device and host.
Code Analysis
Create USB ECM Function via create_ecm():
create_ecm()
{
    CONFIG=$1
    FUNCTION=$2

    echo "Creating CDC ECM gadget functionality"

    mkdir functions/$FUNCTION                  # Create USB ECM Function directory
    ln -s functions/$FUNCTION configs/c.1      # Bind ECM Function to configuration
}
Usage
Run on device:
/etc/init.d/usb-gadget.sh restart ecm
For usage instructions, refer to Virtual Network Interface (cdc-ecm) section.
MSD (Mass Storage Device)
MSD (Mass Storage Device) refers to high-capacity storage devices connected via USB. It allows a device to provide data storage and retrieval functions like hard drives, USB flash drives, or SD cards, and communicate with a host (such as a PC, smartphone, or embedded system).
Code Analysis
MSD requires allocating a storage space on the device as the backend. This space can be a directory in the filesystem, a storage image, or a ramfs image. The host can read and write this storage backend as if accessing local storage. The choice of backend (directory, image, or ramfs) depends on application needs and system architecture. Ramfs images are typically used for high-speed, temporary storage, while filesystem directories or images are used for persistent storage.
The BSP package defaults to using filesystem images and ramfs images. To modify the storage source, adjust the variables $MSD_FILE and $MSD_BLOCK_SIZE.
Using filesystem image as backend
| Source Path | Image Size | Mount Point | Filesystem Format |
|---|---|---|---|
/userdata/mass_storage.img |
128M | /media/mass_storage |
FAT32 |
Command:
/etc/init.d/usb-gadget.sh restart msd
Using ramfs image as backend
| Source Path | Image Size | Mount Point | Filesystem Format |
|---|---|---|---|
/dev/shm/msd_ram.img |
512M | /media/mass_storage |
FAT32 |
Command:
/etc/init.d/usb-gadget.sh restart msd-ram
Usage
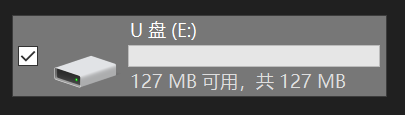
Host shows mass storage device inserted
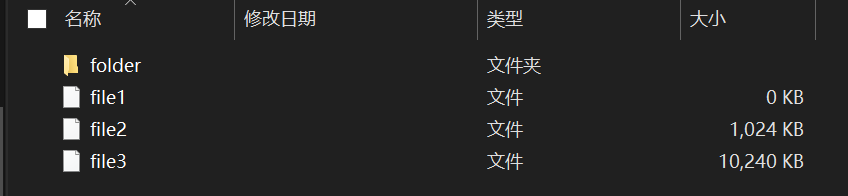
Compare source directory and host directory contents:
Source directory
root@buildroot:/media/mass_storage# ls -al
total 11282
drwxr-xr-x 3 root root    16384 Jan  1 00:00 .
drwxrwxrwt 3 root root       60 Jan  1 00:00 ..
-rwxr-xr-x 1 root root        0 Jan  1  1980 file1
-rwxr-xr-x 1 root root  1048576 Jan  1  1980 file2
-rwxr-xr-x 1 root root 10485760 Jan  1  1980 file3
drwxr-xr-x 2 root root     2048 Jan  1  1980 folder
Host side
HID (Human Interface Device)
USB HID (Human Interface Device) is a device class defined in the USB protocol for connecting human interaction devices (e.g., mice, keyboards, game controllers, touchscreens) to computers or other host systems.
Code Analysis
When creating a HID function, a Report Descriptor must be provided to define the format of HID reports. The SDK provides a default report descriptor binary file: /etc/init.d/hid_report_desc.bin. Users can replace this file according to their HID report format needs.
The report descriptor is central to communication between the HID device and host, defining input, output, and feature data. Correct configuration is critical for proper HID device operation.
create_hid()
{
    CONFIG=$1
    FUNCTION=$2

    echo "Creating HID gadget functionality"
    mkdir functions/$FUNCTION
    echo 1 > functions/$FUNCTION/protocol
    echo 1 > functions/$FUNCTION/subclass
    echo 1024 > functions/$FUNCTION/report_length            # Set HID report length
    cat $HID_REPORT_DESC > functions/$FUNCTION/report_desc   # Set HID report descriptor to define the HID report format

    ln -s functions/$FUNCTION configs/c.1

    echo "OK"
}
Usage
Run the command on the device:
/etc/init.d/usb-gadget.sh restart hid
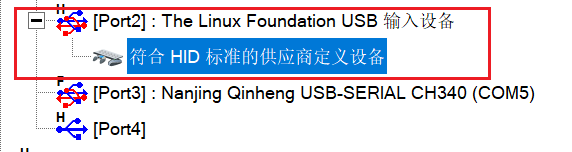
The host will detect the HID peripheral insertion
ACM Serial Port
ACM (Abstract Control Model) is a protocol within the USB Communication Device Class (CDC), primarily used to support devices based on serial communication. Through the USB ACM protocol, a device can emulate a standard serial port (such as an RS-232 port).
USB ACM is commonly used to replace traditional RS-232 or other serial interface communications.
Code Analysis
create_acm()
{
    CONFIG=$1
    FUNCTION=$2

    echo "Creating ACM gadget functionality"
    mkdir functions/$FUNCTION                   # Create USB ACM Function directory
    ln -s functions/$FUNCTION configs/c.1       # Link USB ACM Function to configuration
}
Usage
Run the command on the device:
/etc/init.d/usb-gadget.sh restart acm
A TTY node /dev/ttyGS0 will be created on the device side.
The host will detect the serial port insertion (in this example, COM4)

The following demonstrates a simple serial data transmission test to verify USB ACM functionality
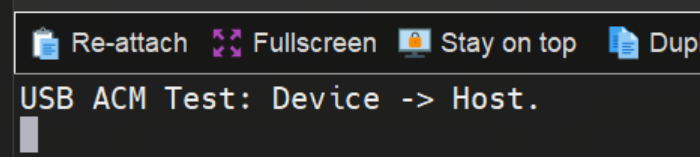
ACM Path Test - Direction Device->Host
Run test command on the device:
echo "USB ACM Test: Device -> Host." > /dev/ttyGS0
Open the corresponding virtual serial port on the host (in this example, COM4, default baud rate 9600), and the same string will be received
ACM Path Test - Direction Host -> Device
Open the corresponding virtual serial port on the host (in this example, COM4, default baud rate 9600), and send a string
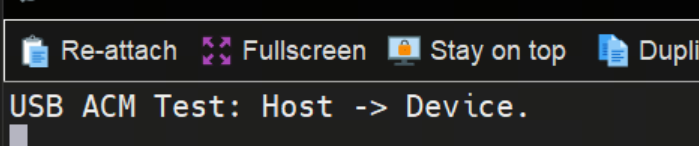
Run test command on the device to receive the same string:
root@buildroot:/userdata# cat /dev/ttyGS0
USB ACM Test: Host -> Device.
UAC (USB Audio Class)
UAC (USB Audio Class) is part of the USB device class specification, designed as a standard protocol for connecting audio devices via USB. UAC allows devices such as headphones, microphones, speakers, audio interfaces, and USB sound cards to transmit audio data over the USB bus to computers or other USB hosts. USB UAC provides a universal, standardized method for connecting audio devices, enabling plug-and-play operation across various operating systems such as Windows, Linux, and macOS.
Code Analysis
The usb-gadget.sh script configures UAC parameters through the create_uac1() function:
create_uac1()
{
    CONFIG=$1
    FUNCTION=$2

    echo "Creating UAC1 gadget functionality : $FUNCTION"

    mkdir functions/$FUNCTION
    echo 0x3 > functions/$FUNCTION/p_chmask    # Enable left and right playback channels
    echo 48000 > functions/$FUNCTION/c_srate   # Set sample rate, e.g., 48kHz
    echo 0x3 > functions/$FUNCTION/c_chmask    # Enable left and right capture channels

    ln -s functions/$FUNCTION configs/c.1      # Bind UAC Function to configuration

    echo "OK"
}
Common parameter settings are as follows:
p_srate, c_srate: Sample rate; multiple rates supported, separated by commas, e.g.,
echo 8000,16000,32000 > c_sratec_chmask, p_chmask: Channel mask; supports multi-channel or disabling specific channels
p_ssize, c_ssize: Data bit width; e.g., 16-bit corresponds to value 2
Usage
Run the command on the device to create a UAC device:
/etc/init.d/usb-gadget.sh restart uac1
UAC1 sound card is created on the device
Check UAC1 sound card:
root@buildroot:~# cat /proc/asound/cards
 0 [guaaudio       ]: gua-audio - gua-audio
                      gua-audio
 1 [UAC1Gadget     ]: UAC1_Gadget - UAC1_Gadget
                      UAC1_Gadget 0

root@buildroot:~# ls -al /proc/asound/card1
total 0
dr-xr-xr-x  5 root root 0 Jan  1 00:06 .
dr-xr-xr-x 11 root root 0 Jan  1 00:04 ..
-r--r--r--  1 root root 0 Jan  1 00:06 id
dr-xr-xr-x  4 root root 0 Jan  1 00:06 pcm0c
dr-xr-xr-x  4 root root 0 Jan  1 00:06 pcm0p

root@buildroot:~# ls /dev/snd/pcmC1D0*
/dev/snd/pcmC1D0c  /dev/snd/pcmC1D0p
UAC1 corresponds to card1 (UAC1Gadget), with one playback device node (pcmC1D0p) and one capture device node (pcmC1D0c).
Host detects audio device insertion
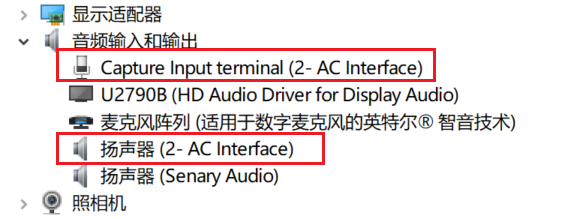
Test UAC1 Playback Functionality
Note: Since the X5 EVB board lacks actual audio playback hardware, we verify playback functionality by recording the audio output.
On the host, open an audio player and select the UAC1 playback device.
Using Audacity as an example, select a test audio clip and choose the UAC1 playback device (in this example, 2-AC Interface), then click play.
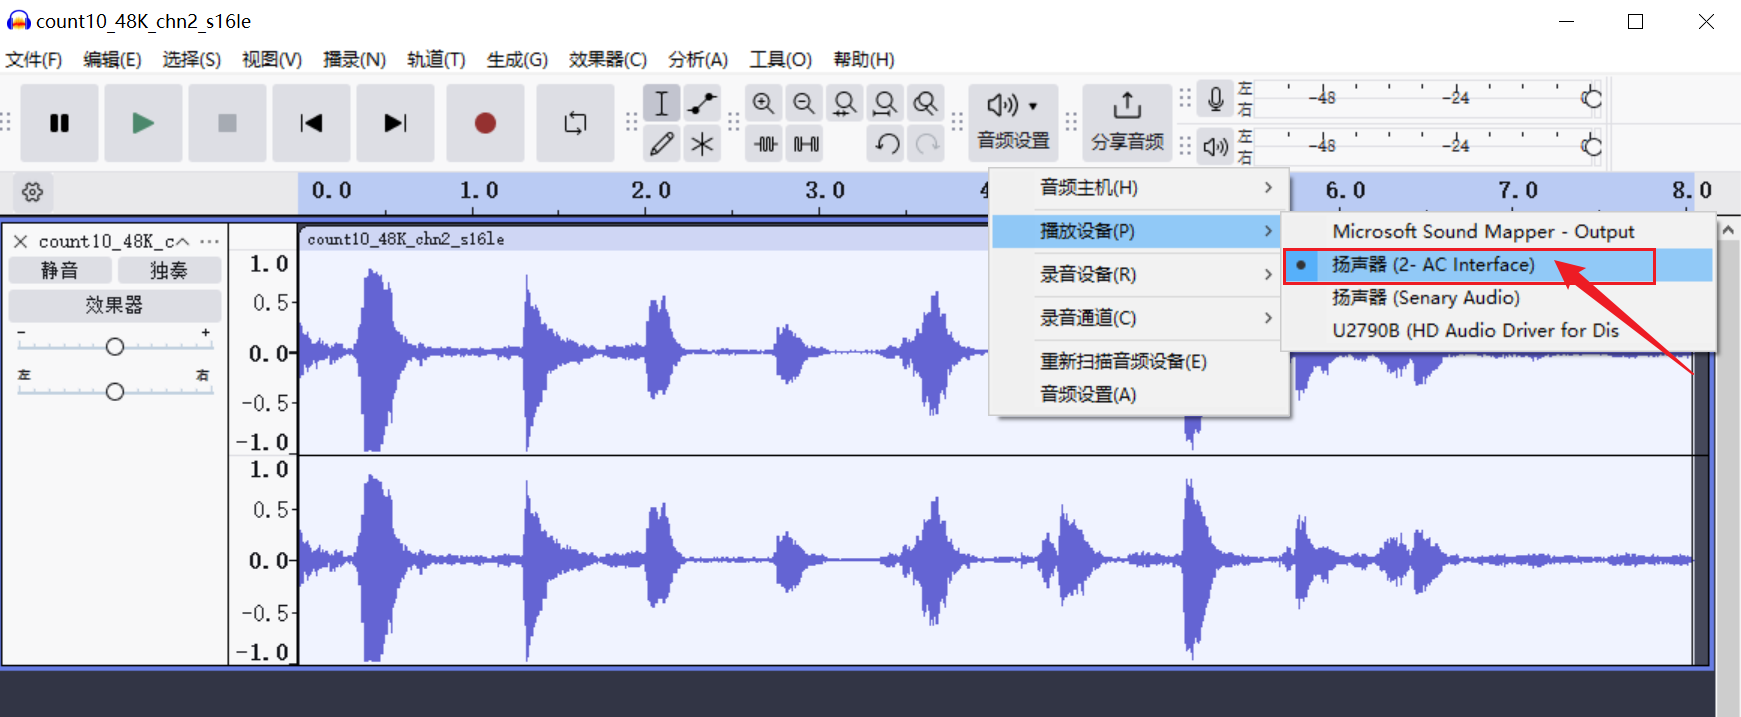
Run the following command on the device:
arecord -f dat -t wav -r 48000 -c 2 -D hw:1,0 /userdata/rec.wav
This command records from Card1 (UAC1Gadget), specifying WAV format, 48kHz sample rate, stereo, and saves it as /userdata/rec.wav.
Test UAC1 Recording Functionality
Note: Since the X5 EVB board lacks a microphone, we verify recording functionality by playing an audio file through the UAC1 device.
Use Windows’ audio loopback (listen to recording) feature to monitor the recorded audio in real time:
On the host, go toSound Settings -> Sound Control Panel -> Recording -> Properties -> Listen, check “Listen to this device” (in this example, 2-AC Interface), and select a speaker for output.
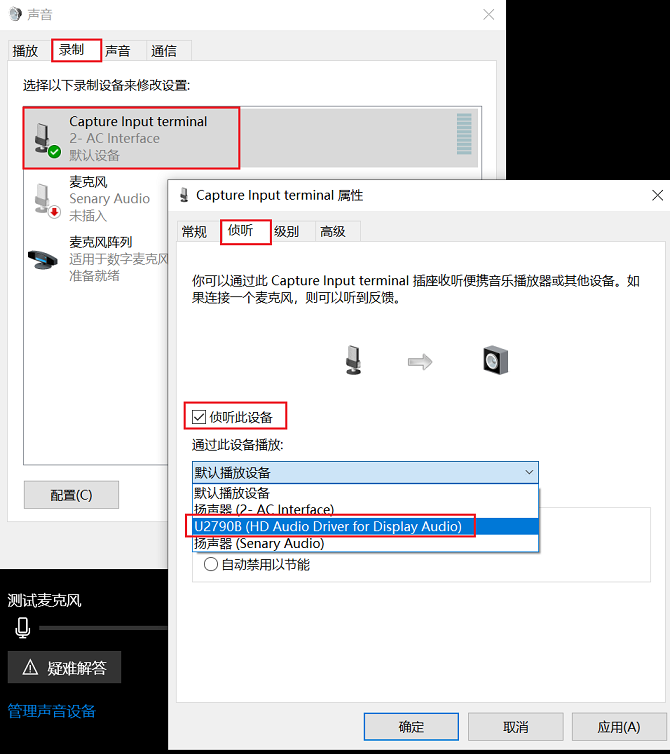
Run the following command on the device:
aplay /userdata/play.wav -c 2 -r 48000 -D hw:1,0
This command plays the audio file through Card1 (UAC1Gadget), specifying WAV format, 48kHz sample rate, and stereo.
UVC (USB Video Class)
UVC (USB Video Class) is one of the USB device classes, providing a standard protocol for video devices (such as webcams, video capture cards, etc.) to transfer video data over the USB bus to computers or other USB hosts. UVC enables video devices to connect in a plug-and-play manner with operating systems like Windows, Linux, and macOS, supporting real-time video streaming and control.
Code Analysis
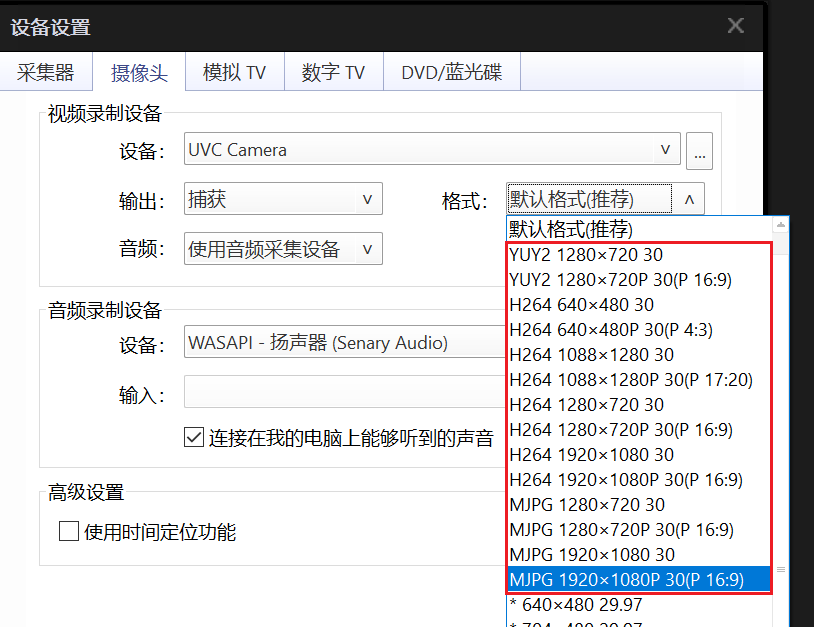
Current X5 UVC supported resolutions and formats:
| Format | Resolution |
|---|---|
| YUV | 1280 x 720 |
| H264 | 640 x 480 1088 x 1280 1280 x 720 1920 x 1080 |
| MJPEG | 1280 x 720 1920 x 1080 |
The UVC resolution list is set in two locations below. If users customize the list, ensure content and order remain consistent.
Add via
create_frame()function inusb-gadget.sh:
create_uvc() {
	CONFIG=$1
	FUNCTION=$2

	echo "	Creating UVC gadget functionality : $FUNCTION"
	mkdir functions/$FUNCTION

    # Add resolution and format to supported list
	create_frame $FUNCTION 1280 720 uncompressed u
	create_frame $FUNCTION 640 480 uncompressed f h264
	create_frame $FUNCTION 1088 1280 uncompressed f h264
	create_frame $FUNCTION 1280 720 uncompressed f h264
	create_frame $FUNCTION 1920 1080 uncompressed f h264
	create_frame $FUNCTION 1280 720 mjpeg m
	create_frame $FUNCTION 1920 1080 mjpeg m

	mkdir functions/$FUNCTION/streaming/header/h
	cd functions/$FUNCTION/streaming/header/h
	ln -s ../../uncompressed/u
	ln -s ../../uncompressed/f
	ln -s ../../mjpeg/m
	cd ../../class/fs
	ln -s ../../header/h
	cd ../../class/hs
	ln -s ../../header/h
	cd ../../class/ss
	ln -s ../../header/h
	cd ../../../control
	mkdir header/h
	ln -s header/h class/fs
	ln -s header/h class/ss
	cd ../../../

	# Set packet size: uvc gadget max size is 3k...
	echo 3072 > functions/$FUNCTION/streaming_maxpacket
	echo 2048 > functions/$FUNCTION/streaming_maxpacket
	echo 1024 > functions/$FUNCTION/streaming_maxpacket

	# Use usb2.0 isoc max bandwidth, using 3072 max packet size
	echo 3072 > functions/$FUNCTION/streaming_maxpacket

	ln -s functions/$FUNCTION configs/c.1
}
Add via libguvc source code
Path:app/samples/platform_samples/sample_usb/gadget/libguvc/src/uvc_gadget.c
// YUV format resolution list
static struct uvc_frame_info uvc_frames_yuyv[] = {
	{ 1280, 720, { 333333, 0 }, 3072 }, /* Note: 720p */
	{ 0, 0, { 0, }, 0},
};

// MJPEG format resolution list
static struct uvc_frame_info uvc_frames_mjpeg[] = {
	{ 1280, 720, { 333333, 0 }, 384 }, /* Note: 720p, 80KB */
	{ 1920, 1080, { 333333, 0 }, 800 }, /* Note: 1080p, 200KB */
	{ 0, 0, { 0, }, },
};

// H264 format resolution list
static struct uvc_frame_info uvc_frames_h264[] = {
	{ 640,  480, { 333333, 0 }, 3072 }, /* Note: 480p */
	{ 1088, 1280, { 333333, 0 }, 3072 }, /* Note: 1280p */
	{ 1280, 720, { 333333, 0 }, 3072 }, /* Note: 720p */
	{ 1920, 1080, { 333333, 0 }, 3072 }, /* Note: 1080p */
	{ 0, 0, { 0, }, },
};

// Supported UVC formats and resolutions
static struct uvc_format_info uvc_formats[] = {
	{V4L2_PIX_FMT_YUYV, uvc_frames_yuyv},
	{V4L2_PIX_FMT_H264, uvc_frames_h264},
	{V4L2_PIX_FMT_MJPEG, uvc_frames_mjpeg},
};
Obtain UVC resolution list using PotPlayer
Usage
For usage of X5 UVC on the host side, refer to the uvc_gadget_camera section.
4.3.18.5. Common Issues
Which interfaces correspond to USB 2.0 and USB 3.0 on the X5 EVB board?
USB 2.0 corresponds to the Micro-USB interface
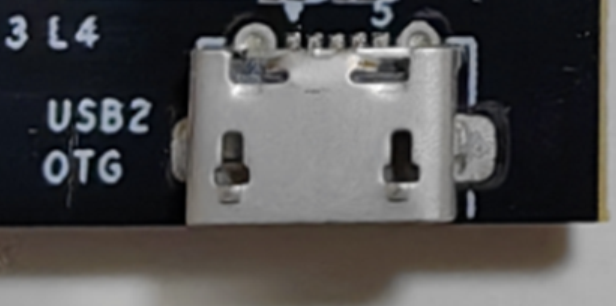
USB 3.0 corresponds to the USB Type-A interface

When using USB 2.0 to emulate a device, getting error: “usb-gadget is already running”
By default, the X5 EVB generates an ADB device over USB 2.0 at boot. If you attempt to create another USB device over USB 2.0 and see this error, it means a USB gadget is already running. Stop it first using:/etc/init.d/usb-gadget.sh stop
How to use USB 3.0 Gadget
Use the /etc/init.d/usb3.0-gadget.sh script for USB 3.0
Usage is the same as for USB 2.0.
How to switch USB 3.0 between Host and Device modes
USB 3.0 defaults to Host mode. Users can switch to Device mode via software or hardware methods:
Hardware method
Short the jumper pins; after boot, USB 3.0 will automatically switch to Device mode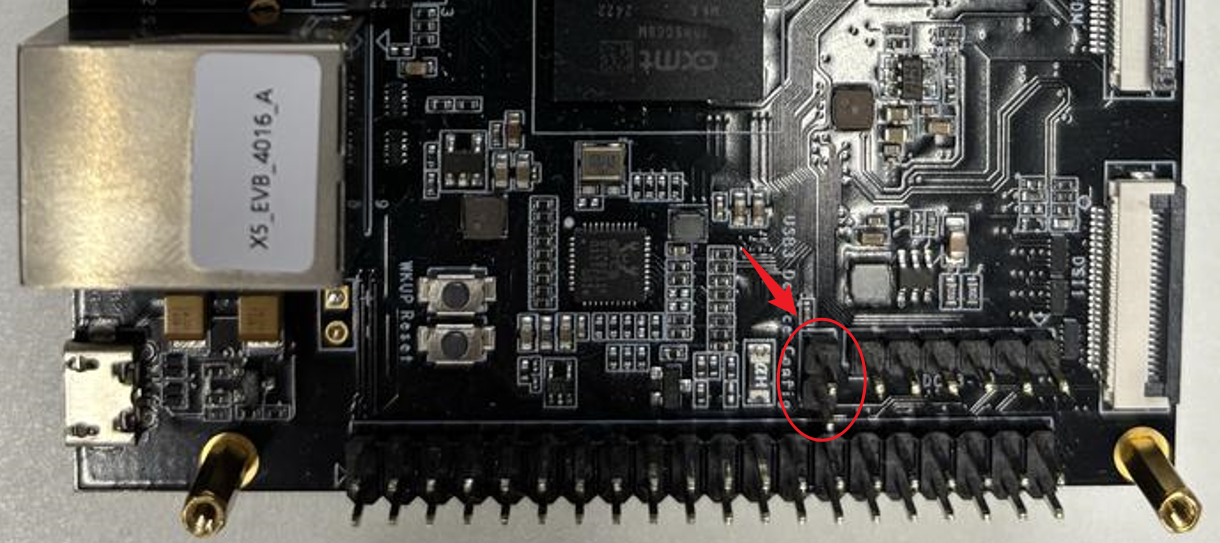
Software method
Set USB 3.0 to Host mode:
echo host > /sys/class/usb_role/35100000.usb-role-switch/role
Set USB 3.0 to Device mode:
echo device > /sys/class/usb_role/35100000.usb-role-switch/role