4.1. Setting Up the Development Environment and Compilation Instructions
4.1.1. Overview
This chapter aims to guide users in quickly setting up a development environment suitable for X5 BSP (Board Support Package), understanding the source code organization, and mastering the correct procedures for compiling system images. After completing this chapter, users will be able to achieve the following objectives:
Set up the development environment:
Understand software and hardware requirements for development, including operating system versions, necessary toolchains, compilers, and related dependency libraries.
Configure the cross-compilation environment.
Source code directory structure:
Detailed explanation of the X5 BSP source code directories, including functionality and file organization of each module.
Clarify the role of each module in system development, and how to locate and modify relevant code.
System image compilation:
Step-by-step compilation process from source code to generating a complete system image.
Covering preparation of configuration files, usage of build scripts, common issues during image generation and their solutions.
Detailed explanation of the main files generated by X5 BSP compilation and their functions.
By reading this chapter, users will gain the ability to set up a development environment and successfully compile X5 system images, laying the foundation for subsequent system and application development and optimization.
4.1.2. Setting Up the Development Environment
X5 BSP adopts a cross-compilation development approach, meaning that program development and compilation targeting ARM-based embedded devices are performed on an x86 architecture host. The cross-compilation environment uses a specific toolchain to compile source code into binary programs suitable for running on target hardware. The resulting binaries must be transferred to the development board via serial port, network, USB, or other means for execution and debugging.
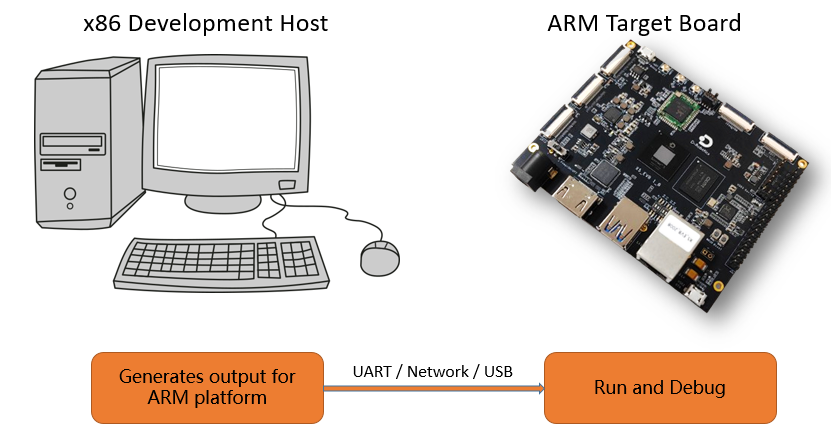
4.1.2.1. Host Machine Specifications
To efficiently and smoothly complete system image compilation, the host machine should meet the following requirements:
| Hardware / Operating System | Requirements |
|---|---|
| CPU | I3 or higher with 8+ cores, or equivalent E3/E5 processors; more cores reduce kernel compilation time |
| Memory | 16GB or above |
| Operating System | Ubuntu 20.04 is recommended; other versions may require adjustments to packages and environment configuration. |
4.1.2.2. Configuring the Host Build Environment
To ensure smooth setup of the X5 BSP development environment, follow the detailed steps below for host environment configuration, including installation of required packages and Python dependencies.
Installing Ubuntu Packages (Recommended Method)
The following script automatically checks the host OS version and installs required build packages accordingly. Supported OS versions include Ubuntu 18.04, 20.04, and 22.04.
Run the command:
sudo build/install_host_deps.sh
This script automatically installs all necessary dependencies without manual configuration.
Installing Python Packages (Required)
Depending on the Ubuntu version, install the following Python packages to support BSP development:
Ubuntu 18.04
pip3 install cryptography -i https://pypi.tuna.tsinghua.edu.cn/simple
Ubuntu 20.04 and Ubuntu 22.04
pip3 install cryptography==40.0.2 -i https://pypi.tuna.tsinghua.edu.cn/simple
Manual Installation of Ubuntu Packages (Optional Method)
If not using the automatic script, you can manually install required packages. Below are common development tools and dependencies.
Install based on your Ubuntu version:
Ubuntu 18.04
sudo apt update

sudo apt-get install -y \
        tzdata tree bc hashdeep kmod file wget curl cpio unzip rsync liblz4-tool jq \
        build-essential make cmake bison flex ccache zlib1g-dev libssl-dev \
        libncurses-dev u-boot-tools device-tree-compiler cryptsetup-bin \
        android-sdk-libsparse-utils e2fsprogs dosfstools mtools mtd-utils

sudo apt-get install -y python3 python3-pip
pip3 install cryptography -i https://pypi.tuna.tsinghua.edu.cn/simple
Ubuntu 20.04
sudo apt update

sudo apt-get install -y \
        tzdata tree bc hashdeep kmod file wget curl cpio unzip rsync liblz4-tool jq \
        build-essential make cmake bison flex ccache zlib1g-dev libssl-dev \
        libncurses-dev u-boot-tools device-tree-compiler cryptsetup-bin \
        android-sdk-libsparse-utils e2fsprogs dosfstools mtools mtd-utils

sudo  apt-get install -y python3 python3-pip
pip3 install cryptography==40.0.2 -i https://pypi.tuna.tsinghua.edu.cn/simple
Ubuntu 22.04
sudo apt update

sudo apt-get install -y \
        tzdata tree bc hashdeep kmod file wget curl cpio unzip rsync liblz4-tool jq \
        build-essential make cmake bison flex ccache zlib1g-dev libssl-dev \
        libncurses-dev u-boot-tools device-tree-compiler cryptsetup-bin \
        android-sdk-libsparse-utils dosfstools mtools mtd-utils

sudo apt-get install -y python3-pip
pip3 install cryptography==42.0.2 -i https://pypi.tuna.tsinghua.edu.cn/simple
Notes
If Python package downloads are slow, consider switching to a domestic mirror, such as the Tsinghua source used above (https://pypi.tuna.tsinghua.edu.cn/simple).
4.1.2.3. Installing the Cross-Compilation Toolchain (GCC)
X5 BSP uses the arm-gnu-toolchain-11.3.rel1 cross-compilation toolchain. This toolchain is provided as a compressed file in the BSP’s toolchain directory, named:
arm-gnu-toolchain-11.3.rel1-x86_64-aarch64-none-linux-gnu.tar.xz
Before compiling the BSP, extract the toolchain and place it in the directory specified by the board configuration file. Board configuration files are typically located in the device/horizon/x5 directory, offering multiple configurations. The example below uses board_x5_soc_debug_config.mk.
Default Toolchain Path
Using device/horizon/x5/board_x5_soc_debug_config.mk as an example, the toolchain path is typically set to /opt/, for example:
export TOOLCHAIN_PATH=/opt/arm-gnu-toolchain-11.3.rel1-x86_64-aarch64-none-linux-gnu
Extracting and Installing the Toolchain
Choose one of the following methods based on user permissions to extract the toolchain to the designated directory:
Users with
sudoprivileges If you have access to the/opt/directory, run:sudo tar -xvf toolchain/arm-gnu-toolchain-11.3.rel1-x86_64-aarch64-none-linux-gnu.tar.xz -C /opt/
Users without
sudoprivileges If you cannot access/opt/, extract the toolchain to a user directory, e.g.,/home/hobot/:tar -xvf toolchain/arm-gnu-toolchain-11.3.rel1-x86_64-aarch64-none-linux-gnu.tar.xz -C /home/hobot/
Then update the
TOOLCHAIN_PATHvariable in the board configuration file:export TOOLCHAIN_PATH=/home/hobot/arm-gnu-toolchain-11.3.rel1-x86_64-aarch64-none-linux-gnu
Notes
Directory Permissions If the extraction path requires
sudo, ensure you have the appropriate permissions. Otherwise, choose a directory where you have write access.Updating Configuration Files After changing the toolchain installation path, always update the
TOOLCHAIN_PATHvariable in the board configuration file to ensure the correct path is used during compilation.
4.1.3. BSP Source Code Directory Structure
4.1.3.1. Top-Level Directory Structure
Below is the top-level directory structure of the X5 BSP source code:
.
├── bd.sh -> build/xbuild.sh      # Symbolic link to main build script; users can execute this to start compilation
├── device                        # Board configuration directory, containing hardware configuration files, build options, and partition tables
├── build                         # Build system code directory, containing build scripts and tools
├── miniboot                      # Minimal boot firmware source directory, including BL2, DDR, BL3x, etc.
├── uboot                         # U-Boot source code
├── kernel                        # Linux Kernel source code
├── system                        # Root filesystem, including initramfs, buildroot, and Ubuntu root filesystem
├── hbre                          # Source code for user-space programs such as multimedia libraries and on-board tools
├── app                           # Application and test program source code
├── toolchain                     # Cross-compilation toolchain
├── prebuilts                     # Pre-built modules, such as closed-source libbpu and bpu-hw_io drivers
├── README.md -> build/README.md  # Built-in English xbuild usage guide, providing basic environment setup and command usage
└── out                           # Output directory for compiled system images
For methods to create and modify root filesystems under the
systemdirectory, refer to Root Filesystem Adaptation Guide.
4.1.3.2. bd.sh File
bd.sh is the main entry script for BSP compilation. It simplifies user operations by linking to build/xbuild.sh. Users can simply execute bd.sh to start the full BSP compilation. Its functionality is identical to build/xbuild.sh.
4.1.3.3. device Directory
The device directory contains board-level hardware configurations, system partition tables, and configurable options for the BL2 stage:
device/
└── horizon
    └── x5
        ├── board_cfg                                  # Contains basic hardware configurations
        │   └── soc
        │       ├── bl2_cfg
        │       │   ├── bl2_cfg.json                   # BL2 stage configuration, e.g., DDR parameters, watchdog settings
        │       │   ├── bl2_rot_prikey.pem              # Private key used in BL2 stage
        │       │   └── user_root.key                   # User root key
        │       ├── boot_its
        │       │   ├── x5-common.its                   # ITS configuration for system image
        │       │   ├── x5-enc-common.its               # ITS configuration for encrypted mode
        │       │   ├── x5-enc-recovery.its             # ITS configuration for recovery mode
        │       │   └── x5-recovery.its                # ITS configuration for recovery mode
        │       ├── initramfs_configs
        │       │   └── recovery_ramfs_recipe_extern    # Initramfs configuration
        │       ├── key_files                           # Key files used for image encryption
        │       │   ├── fde-origin-128.key
        │       │   ├── fit_enc_iv.bin
        │       │   └── fit_enc_key.bin
        │       ├── sub_config                          # Sub-partition tables; multiple tables can be combined in one JSON and referenced in the main table
        │       │   ├── miniboot.json
        │       │   └── miniboot_nand.json
        │       ├── x5-soc-debug-ab-gpt.json            # AB partition table used in Debug mode
        │       ├── x5-soc-debug-gpt.json               # GPT partition table for Debug mode
        │       ├── x5-soc-debug-nand-ab-ota-gpt.json    # NAND and OTA partition configuration
        │       ├── x5-soc-debug-nand-gpt.json          # NAND partition configuration
        │       ├── x5-soc-recovery-ota.json            # OTA partition table for recovery mode
        │       ├── x5-soc-release-gpt.json            # Partition table for Release mode, using single partition to reduce image size
        │       ├── x5-soc-ubuntu-debug-gpt.json        # GPT partition table for Ubuntu Debug mode
        │       └── x5-soc-ubuntu-release-gpt.json      # GPT partition table for Ubuntu Release mode
        ├── board_x5_evb_debug_config.mk               # Board config for X5 EVB, enabling Kernel Debug options
        ├── board_x5_evb_jammy_debug_config.mk         # Board config for X5 EVB with Jammy as main storage, enabling Kernel Debug
        ├── board_x5_evb_jammy_release_config.mk       # Board config for X5 EVB with Jammy, disabling Kernel Debug
        ├── board_x5_evb_nand_debug_config.mk          # Board config for X5 EVB with NAND Flash, enabling Kernel Debug
        ├── board_x5_evb_nand_release_config.mk        # Board config for X5 EVB with NAND Flash, disabling Kernel Debug
        ├── board_x5_evb_release_config.mk             # Board config for X5 EVB Release mode, disabling Kernel Debug
        ├── board_x5_soc_debug_config.mk               # Board config for X5 SoC Debug mode, enabling Kernel Debug
        ├── board_x5_soc_release_config.mk             # Board config for X5 SoC Release mode, disabling Kernel Debug
        └── dr_release_version.mk                      # System image version definition
For detailed explanation of board configuration files, refer to Adding New Board Configuration.
For detailed explanation of partition table files, refer to Partition Configuration.
4.1.3.4. build Directory
The build directory is used to compile and package various BSP modules:
build/
├── common                # Common Makefiles and configurations; mk_hbre.sh uses source code from this directory when compiling hbre
├── Dockerfile            # Used to generate BSP build Docker container, used with start_docker.sh
├── hbre_config           # hbre compilation configurations, defines which hbre modules to compile
├── install_host_deps.sh  # Installs host dependency packages
├── mk_app.sh             # Compiles app directory and generates app.img
├── mk_hbre.sh            # Compiles hbre and prebuilts/hbre, generates hbre.img
├── mk_boot.sh            # Compiles kernel and prebuilts/kernel, generates boot.img
├── mk_miniboot.sh        # Packages miniboot, generates miniboot.img
├── mk_system.sh          # Packages system root filesystem, generates system.img
├── mk_uboot.sh           # Compiles U-Boot, generates uboot.img
├── mk_appsdk.sh          # Packages APPSDK (cross-compilation SDK for applications), generates platform-appsdk-<ver>.deb + bundle .tar.gz
├── mk_fde.sh             # Example script for compiling encrypted partitions
├── pack_uart_usb.sh      # Packages images for UART/USB flashing
├── quickcmd.sh           # Provides common shortcut commands
├── README.md             # Built-in English xbuild usage guide, provides basic environment setup and command usage
├── start_docker.sh       # Used to generate and start Docker container for BSP compilation
├── tools                 # Tools for compilation, packaging, and signing
├── utils_funcs.sh        # Common utility functions
└── xbuild.sh             # Main build entry point
4.1.3.5. out Directory
The out directory stores all generated compilation files, including intermediate build artifacts, logs, system images, partition images, and configuration files:
out/
├── build                             # Out-of-source build output for U-Boot, Kernel, hbre, app, etc.
│   ├── app
│   ├── hbre
│   ├── hbre_deps
│   ├── kernel                        # Kernel output directory, specified by HR_KERNEL_OUTPUT_DIR in board config
│   └── uboot                         # U-Boot output directory, specified by HR_UBOOT_OUTPUT_DIR in board config
├── build_log
│   └── build_20250110_101641.log     # Compilation log; all output from bd.sh or xbuild.sh is saved here
├── deploy                            # Contents of each partition image; compiled data is packaged into *.img files in product directory
│   ├── app
│   ├── appsdk                        # APPSDK packaging artifacts (platform-appsdk-<ver>.deb + bundle .tar.gz + install/verify scripts), generated by ./bd.sh appsdk
│   ├── boot
│   ├── hbre
│   ├── miniboot
│   ├── ota_packages
│   ├── system
│   ├── uboot
│   └── vbmeta
└── product                           # Final compiled outputs: full system image and partition images; flashing tools use files from this directory
    ├── app.img                       # app partition image
    ├── board_config.mk               # For easy viewing of board configuration; not used during upgrade
    ├── boot.img                      # Linux Kernel partition image
    ├── emmc_disk.img                 # Complete system image, including miniboot_all.img, uboot.img, ubootenv.img, boot.img, and all filesystem images
                                      # emmc_disk.img can be used for fastboot, DFU, or TFTP upgrade
    ├── emmc_disk.simg                # Sparse format full image, smaller than emmc_disk.img; DFU upgrade does not currently support this format
    ├── gpt_back.img                  # Not packed into disk.img, currently unused, temporary build file
    ├── gpt.img                       # Partition table stored at eMMC address 0
    ├── hbre.img                      # hbre partition image
    ├── mbr.img                       # Partition info parsed by ROMCODE, records positions of BL2, DDR parameters, BL3x, etc.
    ├── miniboot.img                  # Contains BL2, BL31, optee, DDR parameters
    ├── miniboot_all.img              # miniboot_all.img = gpt.img + mbr.img + miniboot.img + misc.img
                                      # Can be directly written to eMMC or NAND Flash address 0
    ├── misc.img                      # Empty; runtime records upgrade info and current active partition in AB mode
    ├── ota_packages                  # Images used for OTA upgrade, generated via bd.sh otapackage
    ├── system.img                    # Root filesystem image
    ├── uart_usb                      # Firmware used by flashing tools when upgrading blank chips
    ├── ubootenv.img                  # Initially empty; stores U-Boot environment variables after saveenv command
    ├── uboot.img                     # U-Boot partition image
    ├── vbmeta.img                    # When secure boot is enabled, stores integrity verification info for Boot and System images
    └── x5-soc-release-gpt.json       # Partition table info; flashing tools read this file to get partition list
For usage of images in the product directory, refer to Quick Start - Flashing System Firmware.
4.1.4. Compilation Process and Commands
4.1.4.1. Compilation Process
All build scripts for the BSP project are located in the build directory, with xbuild.sh as the main entry point. For user convenience, a symbolic link bd.sh pointing to xbuild.sh is provided in the BSP root directory. Users can directly execute bd.sh from the root to start compilation. Below is a diagram of the complete compilation and firmware packaging process:
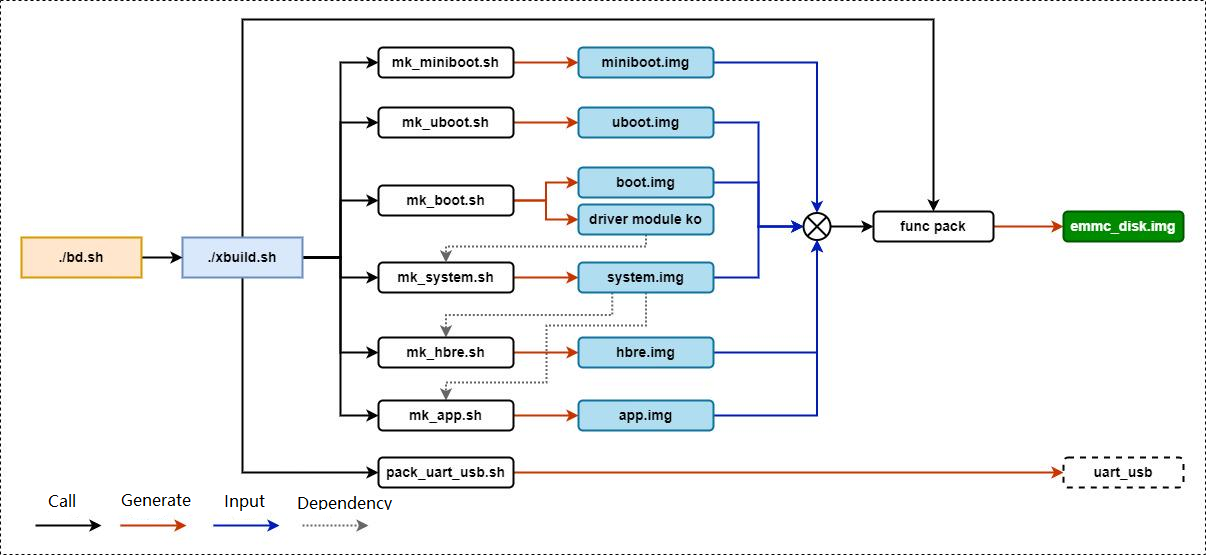
Functionality of Generated Images:
miniboot.img: Low-level bootloader responsible for DDR initialization and loading U-Boot.uboot.img: Bootloader that performs necessary initialization before launching the Linux Kernel.boot.img: Contains the Linux Kernel image, device tree, and a minimal initramfs-based root filesystem.system.img: Root filesystem image containing glibc libraries, Shell, utilities, and scripts.hbre.img: Multimedia library image containing multimedia-related libraries.app.img: Application image, defaults to test programs; users can replace with functional applications.emmc_disk.img: Complete system firmware containing all above images; suitable for fastboot, DFU, TFTP upgrades.uart_usb: Firmware dedicated for flashing tools.
4.1.4.2. Using the lunch Command to Select Board Configuration
Running ./bd.sh lunch allows the system to select a board configuration from files named board_***_config.mk under the device directory for BSP compilation (exact list may vary by BSP version). For detailed information on board configuration files, refer to Adding New Board Configuration.
Configuration Flow
After running ./bd.sh lunch, a symbolic link board_config.mk pointing to the selected board configuration file is created under the device directory (check current selection via ls -lha device/). This link persists until distclean is executed, so configuration usually needs to be done only once.
Usage Methods
Initial Configuration If
./bd.shis run without prior selection, the system prompts to choose a configuration.Switching Board Configurations To change the configuration, manually run:
./bd.sh lunch
Directly Specifying Configuration For script convenience,
lunchsupports direct selection by number or filename:./bd.sh lunch 5 ./bd.sh lunch board_x5_evb_release_config.mk
Examples
First-time execution of
./bd.sh lunchdisplays configuration options:$ ./bd.sh lunch You're building on #1 SMP PREEMPT_DYNAMIC Mon Apr 21 17:08:54 UTC 2025 Lunch menu... pick a combo: 0. horizon/x5/board_x5_evb_debug_config.mk 1. horizon/x5/board_x5_evb_jammy_debug_config.mk 2. horizon/x5/board_x5_evb_jammy_release_config.mk 3. horizon/x5/board_x5_evb_nand_debug_config.mk 4. horizon/x5/board_x5_evb_nand_release_config.mk 5. horizon/x5/board_x5_evb_release_config.mk 6. horizon/x5/board_x5_soc_debug_config.mk 7. horizon/x5/board_x5_soc_release_config.mk Which would you like? [0]: 5 You are selected board config: horizon/x5/board_x5_evb_release_config.mkEnter the corresponding number to complete configuration (e.g., entering 5 selects
horizon/x5/board_x5_evb_release_config.mk).Upon successful selection, a symbolic link
board_config.mkis created in thedevicedirectory pointing to the selected configuration, eliminating the need for re-selection unless switching or cleaning the build environment.Direct configuration via number or filename:
$ ./bd.sh lunch 5

You're building on #140~20.04.1-Ubuntu SMP Wed Dec 18 21:35:34 UTC 2024
You are selected board config: horizon/x5/board_x5_evb_release_config.mk

$ ./bd.sh lunch board_x5_evb_release_config.mk

You're building on #140~20.04.1-Ubuntu SMP Wed Dec 18 21:35:34 UTC 2024
You are selected board config: horizon/x5/board_x5_evb_release_config.mk
4.1.4.3. Compilation Commands
The build system supports two compilation modes: Full Command Mode and Shortcut Command Mode.
Full Command Mode
Supports all build commands and options.
No need to configure environment variables; can be run from any terminal.
Execute in the BSP root directory:
./bd.sh [all | function] [module] [clean | distclean]
Command help:
==================================================================================
   \  //   Welcome to the D-Robotics xbuild system!
    \//    Working directory: /home/hobot/1-work/6-x5/02-dev-x5
    //\
   //  \
==================================================================================
Available commands for bd.sh:
./bd.sh [all | function] [module] [clean | distclean]
Support functions :
        help all lunch miniboot uboot factory boot hbre system app pack otapackage
Usage example:
        ./bd.sh all
        ./bd.sh miniboot [clean | distclean]
        ./bd.sh uboot [clean | distclean]
        ./bd.sh boot [clean | distclean]
        ./bd.sh boot module [clean]  -- eg: ./bd.sh boot spi
        ./bd.sh system [clean | distclean]
        ./bd.sh hbre [help | all ] [modules] [pack | clean | distclean]
        ./bd.sh hbre module [pack | clean | distclean] -- eg: ./bd.sh hbre liblog
        ./bd.sh app [help | all ] [modules] [pack | clean | distclean]
        ./bd.sh app module [pack | clean | distclean]
        ./bd.sh clean
        ./bd.sh distclean
        ./bd.sh uboot menuconfig
        ./bd.sh boot menuconfig
        ./bd.sh help
==================================================================================
Shortcut Command Mode
Tip: If developing long-term in the same directory, add source <BSP workspace>/build/quickcmd.sh to ~/.bashrc or ~/.profile so shortcuts are available upon login.
Run source build/quickcmd.sh to bind common commands to short aliases for faster operations.
Shortcut Features:
Simplified commands with
Tabcompletion.Supports quick directory navigation (e.g.,
crto jump to BSP root).All shortcuts work from any directory (e.g., run
bfrom $HOME to compile BSP source).One terminal supports only one sourced source tree.
Only supports the listed command set.
Shortcut help:
==================================================================================
   \  //   Welcome to the D-Robotics xbuild system!
    \//    Working directory: /home/hobot/1-work/6-x5/02-dev-x5
    //\
   //  \
==================================================================================
Available commands for bd.sh:
        help all clean distclean lunch miniboot uboot factory boot system hbre app pack

Shortcut commands for build:
        b      : bd.sh             - default build all
        ball   : bd.sh all         - build all
        bm     : bd.sh miniboot    - only build miniboot
        bu     : bd.sh uboot       - only build uboot
        bf     : bd.sh factory     - build uart_usb image
        bb     : bd.sh boot        - only build kernel
        bs     : bd.sh system      - only build rootfs
        bh     : bd.sh hbre        - build hbre
        bhm    : bd.sh hbre module - build hbre module, user interactive mode
        ba     : bd.sh app         - build app
        bam    : bd.sh app module  - build app module, user interactive mode
        bp     : bd.sh pack        - pack all image into emmc_disk.img

Shortcut commands for changing directory:
``````bash
        croot  - go to root directory
        cr     - go to root directory
        cout   - go to out directory
        co     - go to out directory
        cuboot - go to uboot directory
        cub    - go to uboot directory
        cboot  - go to kernel directory
        cb     - go to kernel directory
        cdev   - go to device directory
        cbuild - go to device directory
        capp   - go to app directory
        chbre  - go to hbre directory
        go <regex> -- go to directory matching the specified <regex>

Shortcut commands for configuring U-Boot and the kernel defconfig
        bumc   : bd.sh uboot menuconfig       - Edit and save uboot menuconfig
        bbmc   : bd.sh boot menuconfig        - Edit and save kernel menuconfig

Usage example for build kernel and hbre module
        bb spi      : bd.sh boot spi          - Compile driver under kernel
        bh liblog   : bd.sh hbre liblog       - Compile modules under hbre
==================================================================================
Note: After entering the shortcut command mode, the terminal will display something similar to the following:
<xbuild>(base) sxq@DESKTOP-6VORLA0:~/projects/sdk_x5_1$
The quickcmd.sh script modifies the PS1 prompt by adding the <xbuild> string, indicating that you have entered the shortcut command mode. If you no longer need this mode, simply open a new terminal.
4.1.4.4. Full Build
Execute ./bd.sh without any parameters to compile all modules:
./bd.sh
After a successful build, all image files will be generated by default in the output directory (out).
4.1.4.5. Modular Build
Use the bd.sh script to build individual modules; the generated image files will be output to the out directory.
./bd.sh [all | function] [module] [clean | distclean]
Support functions :
        help lunch miniboot uboot factory boot hbre system app pack appsdk
The options miniboot, uboot, boot, hbre, system, and app are used to generate corresponding firmware images. All compilation logs are displayed during the process, making it convenient to review logs when building a single module. Typically, each partition with actual content has a corresponding function option for image generation. Users can debug a single module independently and update only that module on the target board. All modular build functions support the clean and distclean commands. For example:
# Build uboot only
./bd.sh uboot
# Clean uboot only
./bd.sh uboot clean
# Distclean uboot only
./bd.sh uboot distclean
After building all modules, or after updating one or several module images, you can execute the pack command to repack the full image emmc_disk.img:
./bd.sh pack
The hbre and app builds support finer-grained compilation, allowing convenient debugging of smaller submodules. For example, to build only liblog under the hbre directory:
# Build liblog only
./bd.sh hbre liblog

# Build liblog and repack hbre.img
./bd.sh hbre liblog pack

# If you don't remember the module name, run the following command to enter interactive mode and select the module by number
./bd.sh hbre module
The factory command generates firmware used by flashing tools, which is stored in out/uart_usb. This command requires that miniboot and uboot have already been built. The flashing tool downloads firmware via UART into the board’s memory and runs it to enter U-Boot, then allows downloading the full image via USB to flash it to the board’s eMMC or NAND Flash.
./bd.sh factory
The appsdk command packages the APPSDK (Application SDK, a cross-compilation SDK for applications), producing a self-contained SDK package for application developers. APPSDK includes a cross-toolchain copy, sysroot (sourced from out/deploy/system runtime libraries + hbre artifacts + toolchain libc), hbre libraries and headers, environment setup script, etc. Application developers can compile X5 applications without the full project source code. The version number is automatically extracted from the BSP major version HR_V_VER and lower-cased (e.g. _V1.1.2 → v1.1.2), no manual specification needed.
# Package APPSDK (requires system unpack + hbre build to be completed first)
./bd.sh appsdk
After a successful build, the artifacts are in the out/deploy/appsdk/images/ directory:
out/deploy/appsdk/images$ ls platform-appsdk-*
platform-appsdk-v1.1.2.deb         # SDK body (deb format)
platform-appsdk-v1.1.2.tar.gz      # Bundle (contains deb + install.sh + relocate-paths.sh + test-sdk.sh)
After application developers get the tar.gz bundle, they extract it, run install.sh to install, and source environment-setup to activate the environment for compilation. For complete usage instructions on APPSDK installation, verification, and compiling applications, refer to Root Filesystem Adaptation Guide - Using APPSDK for Application Development.
Note: APPSDK packaging does not depend on the Buildroot host sysroot; after modifying hbre, just run ./bd.sh hbre && ./bd.sh appsdk to repackage. It is not part of the ./bd.sh full build flow (./bd.sh all does not automatically package APPSDK) and must be run separately.
Note: Users can also directly enter the build directory and run the corresponding ./mk_*.sh build scripts to compile individual modules. For example:
cd build

./mk_boot.sh
./mk_boot.sh clean

./mk_uboot.sh
./mk_uboot.sh clean
./mk_uboot.sh distclean

./mk_hbre.sh
./mk_hbre.sh liblog
./mk_hbre.sh camsys/libvpf
4.1.4.6. Non-secure Firmware
Overview
X5 chips can be categorized into Secure chips and Non-secure chips based on whether a Hash key has been programmed. For more information about Hash keys, refer to X5 eFuse Introduction
Secure chip: Has a pre-programmed D-Robotics Hash key; does not support customer-defined keys.
Non-secure chip: Contains no Hash key; customers may program their own custom keys. See Customer-defined Hash Key for details.
Secure chips require Secure firmware, while Non-secure chips require Non-secure firmware. By default, the X5 SDK compiles Secure firmware. The following section describes how to compile Non-secure firmware.
Build
Before building Non-secure firmware, modify the current board configuration file to enable the HR_ENABLE_CUSTOMER_KEY option as follows:
export HR_ENABLE_CUSTOMER_KEY="yes"
The build process for Non-secure firmware is the same as for Secure firmware. Refer to Full Build and Modular Build for instructions.
Boot log information
Non-secure firmware does not verify firmware during boot. The boot log appears as follows:
NOTICE:  Welcome to Horizon X5 ASIC BOOTROM - V4.1
NOTICE:                 OTP config:
NOTICE:                         otp exist: true
NOTICE:                         test region size: 304
NOTICE:                         secure region size: 120
NOTICE:                         none secure region size: 56
NOTICE:   Enable MMU
NOTICE:  Booting Trusted Firmware
NOTICE:  BL1: v2.8(release):
NOTICE:  BL1: Built : 17:42:12, Oct 19 2023
NOTICE:  Enter eMMC Mode......
NOTICE:  USER AREA.
NOTICE:   eMMC clk_rate = CLK_12M
NOTICE:   eMMC emmc_data_width == WIDTH_DATA_1
NOTICE:   eMMC emmc_cfg.emmc_clk_latch == CLK_RISING
NOTICE:  Enter media_source_select process(1).
NOTICE:  BL1: BL2 memory layout address = 0x1fe9f000
NOTICE:  BL1: Booting BL2
NOTICE:                 OTP config:
NOTICE:                         otp exist: true
NOTICE:                         test region size: 304
NOTICE:                         secure region size: 120
NOTICE:                         none secure region size: 56
NOTICE:  BL2: v2.8(release):v1.0.8-77-g72e4fe066
NOTICE:  BL2: Built : 20:14:26, Jun 11 2025
NOTICE:  Enter eMMC Mode......
NOTICE:  eMMC partition: User
NOTICE:  Enter media_source_select process(1).
NOTICE:  BL2 config file
NOTICE:  ab slot is : 0
NOTICE:  fip index:0
NOTICE:  start to load bl2 cfg image
NOTICE:  BL2 CFG ADDR:0x1ff00000, MAGIC:0x474643324c424248
NOTICE:  bypass update efuse
NOTICE:  calibration_offset 12
NOTICE:  trimming_value 9
NOTICE:  ADC read channel[2]: 295mv
NOTICE:  ddr info:[LPDDR4]-[DUAL_RANK]-[DIE: 1 GB]-[ECC OFF]-[DVFS ON]-[4266M]
NOTICE:  JTAG ENABLE
NOTICE:  disable wdt
NOTICE:  start to load ddr image
NOTICE:  run ddr Fw
NOTICE:  matching profile: profile_2 from aon config
NOTICE:  type: LP4, freq: 4266, ecc: 0(0x7f), rank: 2, dvfs: 1, die_dencity: 1 GB, version: 10.04
NOTICE:  ddr cost: 147151 us, ddr size: 4 GB, manuid: 0x13
NOTICE:  ddr ready
NOTICE:  start to load bl31 image
NOTICE:  start to load optee image
NOTICE:  start to load uboot image
NOTICE:  BL1: Booting BL31
NOTICE:  multicore_init: sec_entrypoint = 0x2000010c
NOTICE:  BL31: v2.8(release):v1.0.8-77-g72e4fe066
NOTICE:  BL31: Built : 20:12:37, Jun 11 2025
NOTICE:  plat_setup_psci_ops: sec_entrypoint = 0x2000010c
4.1.4.7. Clean Functions
clean
Removes generated images and intermediate files, but does not remove BSP project configuration files such as board configuration file links, or .config files for U-Boot and Linux Kernel. Supports both full project and per-module clean.
# Full project clean
./bd.sh clean

# Per-module clean
./bd.sh uboot clean
./bd.sh boot clean
./bd.sh appsdk clean      # Clean SDK artifacts under out/deploy/appsdk/images/ (platform-appsdk-*.deb, *.tar.*, install.sh, relocate-paths.sh, test-sdk.sh)
distclean
Removes generated images and intermediate files, and clears all configuration files, including board configuration file links, .config files for U-Boot and Linux Kernel, etc. Supports both full project and per-module distclean.
# Full project distclean, aiming to restore the BSP to its pre-build state
./bd.sh distclean
# Per-module distclean
./bd.sh uboot distclean
./bd.sh boot distclean
./bd.sh appsdk distclean  # Equivalent to appsdk clean, cleans SDK artifacts under out/deploy/appsdk/images/
Help Information
$ ./bd.sh help
Available commands for bd.sh:
./bd.sh [all | function] [module] [clean | distclean]
Support functions :
        help lunch miniboot uboot factory boot hbre system app pack appsdk
... (repeated from earlier sections, omitted) ...
4.1.5. Building BSP Using Docker
To improve compatibility and flexibility of the build system, BSP supports building within Docker. Docker provides an isolated containerized environment without requiring complex dependencies to be installed directly on the host machine, enabling fast and consistent cross-platform builds.
4.1.5.1. Install Docker
Step 1: Install Docker
Run the following commands to install Docker:
sudo apt update
sudo apt install -y docker.io
Start the Docker service:
sudo systemctl start docker
Enable Docker to start automatically at system boot:
sudo systemctl enable docker
Step 2: Add User to Docker Group
Ensure your user account is part of the docker group. Run the following command:
sudo usermod -aG docker $USER
Note: $USER refers to your current login username. Make sure to replace it with the correct username if necessary.
Step 3: Configure Docker Proxy Settings
Docker Hub may be restricted in certain regions, preventing direct access. It is recommended to use a domestic Docker mirror accelerator.
Edit the daemon.json file (usually located at /etc/docker/ or ~/.docker/; create it manually if it doesn’t exist). Below is an example daemon.json configuration with multiple mirror sources:
{
    "registry-mirrors": [
      "https://mirror.ccs.tencentyun.com",
      "https://hub-mirror.c.163.com",
      "https://registry.docker-cn.com",
      "https://docker.ustc.edu.cn",
      "https://nrbewqda.mirror.aliyuncs.com",
      "https://dmmxhzvq.mirror.aliyuncs.com",
      "https://docker.1panel.live",
      "https://docker.1ms.run",
      "https://docker.chenby.cn",
      "https://docker.m.daocloud.io"
    ]
}
Docker will attempt to pull images in the order listed in registry-mirrors. If the first mirror fails, it will automatically try the next. It is recommended to place the most stable mirror at the top based on your network conditions.
After saving the daemon.json file, run the following commands to reload and restart Docker for the changes to take effect:
sudo systemctl daemon-reload
sudo systemctl restart docker
Step 4: Verify Docker Installation
Run the following command to check if Docker is installed correctly:
docker --version
Use the following command to run a simple container to verify Docker is working properly:
docker run hello-world
4.1.5.2. Build Container Image
cd build
docker build -t dr_xbuild/ubuntu20.04:1.0 .
docker build: Command used to build Docker images.-t dr_xbuild/ubuntu20.04:1.0: The-tflag specifies the tag; the following argument is the image name and version. In this example, the image name isdr_xbuild/ubuntu20.04, and the version is1.0..: This is the build context path. Docker needs a context when building an image, which contains all files and information required for the build. Here,.refers to the current directory—the directory where the Dockerfile is located. Docker will look for the Dockerfile in this path and use it to build the image.
4.1.5.3. Start Container
Enter the BSP root directory and run the following command to start the Docker container and enter it:
hobot@ubuntu:~/1-work/6-x5/01-x5-gerrit$ ./build/start_docker.sh
c6a097021fd6d1adb2b8036204ecc510e37043ee5aff468dc90ebefb6e3da1c6
Starting Docker container dr_xbuild ...
Setting user and password ...
Installing cross-compilation toolchain ...
hobot@c6a097021fd6:~/1-work/6-x5/01-x5-gerrit$
4.1.5.4. Remove Container
# Stop container
docker stop dr_xbuild
# Forcefully remove a running Docker container
docker rm -f dr_xbuild
Note: dr_xbuild is the default container name. If you used ./build/start_docker.sh -n to change the container name, replace dr_xbuild in the above commands with the actual container name.
4.1.5.5. start_docker.sh Usage Guide
This script helps you start a Docker container with specified configurations. If the container is not already running, it starts a new one; otherwise, it attaches to the existing container.
Usage
./build/start_docker.sh [-u username] [-p password] [-i image] [-w workdir] [-n container_name] [-h]
Options
-u username: Specify a new username. Default is the current host username.-p password: Specify a password for the new user. Default is the predefined password (123456).-i image: Specify Docker image version. Default is the predefined image (dr_xbuild/ubuntu20.04:1.0).-w workdir: Specify the working directory inside the container. Default is the current directory.-n container_name: Specify the container name. Default isdr_xbuild.-h: Show help message.
Example
Running the script without any parameters will start the Docker container using default settings: the current host username, predefined password (123456), and the current script directory as the working directory.
./build/start_docker.sh
4.1.6. Use Podman to compile BSP
4.1.6.1. Podman Introduction
Podman is an open source container management tool that can be used as a replacement for Docker. It can be used to create and maintain containers, and has the characteristics of running without daemons and root privileges. Podman provides flexible container management capabilities and supports running containers as the root user or an unprivileged user. Through the libpod library, Podman can efficiently manage the entire container ecosystem, covering key components such as Pods, containers, container images, and container volumes. Podman focuses on providing comprehensive OCI container image management functions, including pulling, marking and other operations, making it easy to maintain and modify container images.
4.1.6.2. Podman installation
The process of installing Podman on Ubuntu is as follows:
Update the system:
sudo apt update && sudo apt upgrade -y
Add Podman repository:
. /etc/os-release
echo "deb https://download.opensuse.org/repositories/devel:/kubic:/libcontainers:/stable/xUbuntu_${VERSION_ID}/ /" | sudo tee /etc/apt/sources.list.d/devel:kubic:libcontainers:stable.list
curl -L "https://download.opensuse.org/repositories/devel:/kubic:/libcontainers:/stable/xUbuntu_${VERSION_ID}/Release.key" | sudo apt-key add -
Install Podman:
sudo apt install podman -y
Verify installation:
podman --version
Finally you can see:
hobot@hobot-ThinkPad-T14-Gen-1:~/project/sdk_x5_cs1.0/build$ podman --version
podman version 3.4.4
At this point you can simply test Podman to verify whether Podman is working properly:
hobot@hobot-ThinkPad-T14-Gen-1:~/project/sdk_x5_cs1.0/build$ podman run hello-world

Hello from Docker!
This message shows that your installation appears to be working correctly.

To generate this message, Docker took the following steps:
 1. The Docker client contacted the Docker daemon.
2. The Docker daemon pulled the "hello-world" image from the Docker Hub.
    (amd64)
 3. The Docker daemon created a new container from that image which runs the
    executable that produces the output you are currently reading.
 4. The Docker daemon streamed that output to the Docker client, which sent it
    to your terminal.

To try something more ambitious, you can run an Ubuntu container with:
 $ docker run -it ubuntu bash

Share images, automate workflows, and more with a free Docker ID:
https://hub.docker.com/

For more examples and ideas, visit:
 https://docs.docker.com/get-started/
You can see that hello-world has run successfully.
4.1.6.3. Configure Podman basic environment
The key files that need to be configured for Podman are as follows. If these files do not exist, you can use sudo vi to create them in sequence:
hobot@hobot-ThinkPad-T14-Gen-1:/etc/containers$ tree
.
├── policy.json
├── registries.conf
└── registries.conf.d
    └── 999-mirror.conf

1 directory, 3 files
policy.json
policy.json is Podman’s signature policy file, which is used to define how to verify the signature of the image. Podman uses this file to decide whether to trust the image pulled from the remote repository. An example is as follows:
{
    "default": [
        {
            "type": "insecureAcceptAnything"
        }
    ],
    "transports":
        {
            "docker-daemon":
                {
                    "": [{"type":"insecureAcceptAnything"}]
                }
        }
}
A brief description is as follows:
default: -The default signature policy is configured to insecureAcceptAnything, which means that Podman will accept any image without signature verification. This is common in development environments, but is not recommended in production environments as it reduces security.
transports:
Configure the signature policy of the docker-daemon transmission method, which is also set to insecureAcceptAnything. This is typically used for images pulled by the local Docker daemon.
registries.conf
registries.conf is Podman’s image repository configuration file, which is used to define how Podman resolves image names and which repositories to pull images from. Examples are as follows:
unqualified-search-registries = ["docker.io", "quay.io"]
Brief description:
unqualified-search-registries:
Defines the list of repositories that Podman will search when parsing incompletely qualified image names. Two warehouses are configured here: docker.io and quay.io. This means that when running podman pull ubuntu:20.04, Podman will first try to pull the image from docker.io, and if that fails, then try to pull it from quay.io.
registries.conf.d/999-mirror.conf
registries.conf.d is a directory used to store additional image warehouse configuration files. These files will be merged into the main registries.conf file.
999-mirror.conf is a specific configuration file, usually used to configure the mirror accelerator. The example is as follows:
[[registry]]
prefix = "docker.io"
location = "docker.m.daocloud.io"
Brief description:
[[registry]]:
Defines a specific mirror warehouse configuration.
prefix:
Specifies that the image name is prefixed with
docker.io.
location:
The actual image warehouse address is specified as
docker.m.daocloud.io, which is the public image accelerator address of DaoCloud (other public image accelerator addresses or private accelerator addresses can also be used).
4.1.6.4. Use Podman to build container images
Enter the build/ directory in the X5 BSP source code package and you can see the existing Dockerfile file. Execute the following command in the BSP source code directory to build the container image:
cd build
sudo podman build -t dr_xbuild/ubuntu20.04:1.0 .
podman build: Command used to build Podman image.-t dr_xbuild/ubuntu20.04:1.0:-trepresents the label, and the following parameters are the name and version number of the image. In this example, the image name isdr_xbuild/ubuntu20.04and the version number is 1.0..: This is the path to build context. When building a Podman image, a context is required, which contains all the files and information required for the build. In this command,.represents the current directory, which is the directory where the current Dockerfile is located. Podman will look for the Dockerfile file in this path and use it to build the image.
Note: In order to avoid some permission errors, sudo is used to execute commands throughout the build process.
After the build is completed, you can use the following command to view the generated image:
hobot@hobot-ThinkPad-T14-Gen-1:~/project/sdk_x5_cs1.0/build$ sudo podman images
REPOSITORY TAG IMAGE ID CREATED SIZE
localhost/dr_xbuild/ubuntu20.04 1.0 e61c819842c6 18 minutes ago 603 MB
4.1.6.5. Start the Podman container
Execute the start_podman.sh script to start the Podman container and enter Podman.
hobot@hobot-ThinkPad-T14-Gen-1:~/project/sdk_x5_cs1.0$ sudo ./build/start_podman.sh
Using container image: dr_xbuild/ubuntu20.04:1.0
Using container name: dr_xbuild
Using project directory: /home/hobot/project/sdk_x5_cs1.0
Using container workdir: /project
Starting a new container dr_xbuild...
f023213d8cce778fef4df273a1497ee60a788d0f24b99e3221d797bc2148277c
Starting podman container dr_xbuild ...
Setting user and password...
Installing cross-compilation toolchain ...
root@f023213d8cce:/project# ls
README.md adsp app bd.sh build device hbre kernel miniboot out prebuilts system toolchain uboot
After the execution is completed, you will automatically enter the directory in the container. At this time, you can execute ./bd.sh to compile the X5 image.
4.1.6.6. Delete Podman container
# Stop the container
sudo podman stop dr_xbuild
# Force deletion of a running Podman container even if the container is running
sudo podman rm -f dr_xbuild
Note: dr_xbuild is the default container name. If you use ./build/start_podman.sh -n to modify the container name, you need to replace dr_xbuild in the above command with the actual container name.
4.1.6.7. start_podman.sh Instructions for use
This script helps you start a Podman container with a specified configuration. If the container is not already running, it will start a new container; otherwise, it will drop into an existing container. How to use:
./build/start_podman.sh [-u user] [-p password] [-i image] [-w working directory] [-n container name] [-h]
Options:
-uuser: Specify a new username. Defaults to the current host username.-ppassword: Specify the password of the new user. Defaults to the predefined password (123456).-iimage: Specify the Podman image version. Defaults to the predefined Podman image ( dr_xbuild/ubuntu20.04:1.0 ).-wworking directory: Specify the working directory of the container. Defaults to the current directory.-ncontainer name: Specify the container name, the default is dr_xbuild.-h: Display help message.
Example:
If you run the script without any arguments, it will start the Podman container with the default configuration, including using the current host username, a predefined password ( 123456 ), and the current directory where the script is running as the working directory.
./build/start_podman.sh
4.1.6.8. Podman FAQ
Missing cache file
The error log is as follows:
hobot@hobot-ThinkPad-T14-Gen-1:~/project/sdk_x5_cs1.0$ sudo ./build/start_podman.sh
Using container image: dr_xbuild/ubuntu20.04:1.0
Using container name: dr_xbuild
Using project directory: /home/hobot/project/sdk_x5_cs1.0
Using container workdir: /project
Starting a new container dr_xbuild...
Error: statfs /root/.ccache: no such file or directory
Just create /root/.ccache manually:
sudo mkdir /root/.ccache