3.16. Sunrise camera User Instructions
3.16.1. Function description
Sunrise camera is an officially developed application that facilitates users to quickly evaluate Camera, VIO, Codec, BPU and other modules. Users can conveniently configure parameters of the program through the web browser on the PC, and preview video streams, algorithm rendering results and other information in real time. The main functions of the program are as follows:
Support smart camera function mode
Supports access to up to 4 channels of Camera Sensor
Supports controlling ISP parameters through a graphical interface in the browser
Supports intelligent multi-channel decoding and analysis box function mode
Encoding and decoding capabilities: supports encoding or decoding of up to 8 channels of 1080p@30 video streams
Box mode decodes video files first and then encodes them before transmitting them, so box mode supports up to 4 channels of 1080p@30
Support parameter configuration of the program through PC browser, such as camera sensor, encoding bit rate, algorithm model, video source and other parameters
Supports previewing image effects through PC browser, VLC streaming, HDMI output and other methods
Algorithm switching between multiple models, such as mobilenet_v2, yolov5s, fcos, etc.
3.16.2. Hardware environment preparation
Before running Sunrise camera, you need to prepare the following accessories:
Development board supporting cameras, such as SC230AI, SC132GS, F37, etc.
One network cable to ensure that the PC and development board can ping
One Micro USB cable (when there is no network port), the development board can communicate with the PC through the USB virtual network port
The overall connection method is shown in the figure below:
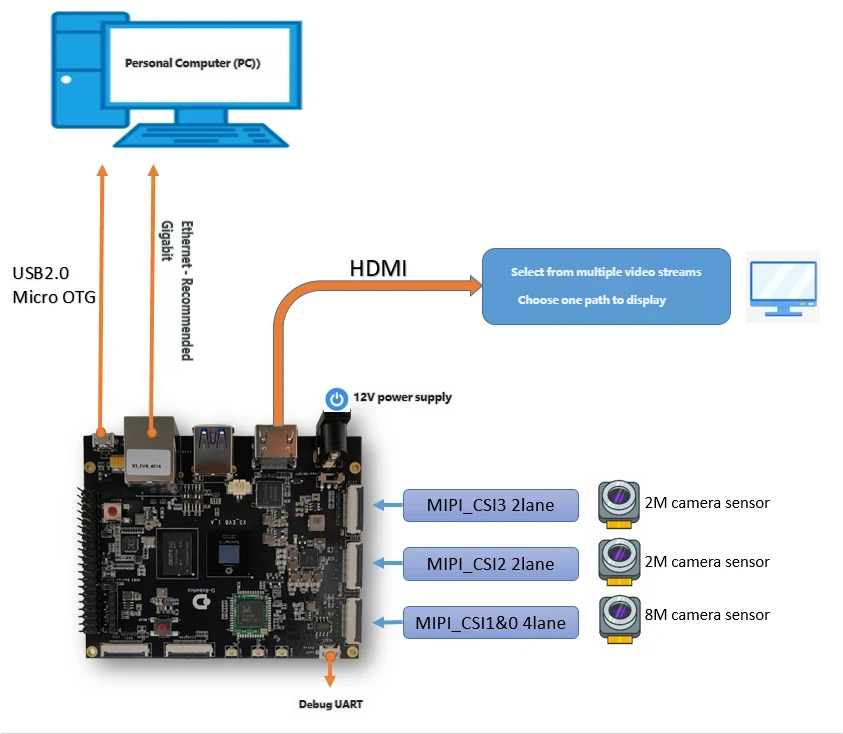
For the method of connecting the Camera sensor on the development board, please refer to the Camera (MIPI CSI) chapter.
3.16.2.1. Network connection requirements
In order to ensure the stability of 4K encoding and streaming, it is recommended that the development board and the PC be directly connected using a Gigabit Ethernet port.
3.16.3. Deploy Sunrise camera
The Sunrise camera software deployment package is named sunrise_camera_vxxx.tar.gz (for how to generate the deployment package, see: Compilation method), and the precompiled deployment package is stored in the sample directory. It is recommended to extract it to the /app directory:
tar -xvf sunrise_camera_v3.1.0.tar.gz -C /app/
The files generated by decompression include: sunrise_camera main program directory, WebServer directory (httpd service program and web page directory), start_app.sh startup script, the detailed directory structure is as follows:
.
├── start_app.sh #Start the script to start the web service and main program in order
├── sunrise_camera
│ ├── bin # Main program
│ ├── include # Common header file (spare)
│ ├── lib # Compiled static library (standby)
│ ├── model_zoom # Algorithm model used in the application
│ └── test_data # Apply default configuration file and test file
└── WebServer
    ├── fcgi # fcgi program (standby)
    ├── sc_lighttpd # httpd and web pages
    ├── pcre # lighttpd dependency
    ├── README.txt # fcgi, lighttpd, pcre compilation and deployment instructions
└── start_lighttpd.sh # web service startup script
3.16.3.1. Program startup method
Manual start:
After deploying Sunrise camera (taking deployment in the /app directory as an example), log in to the development board, enter the /app directory, and execute sh ./start_app.sh to start.
Auto-start after power-on:
After deploying Sunrise camera (taking deployment in the /app directory as an example), log in to the development board, enter the /app directory, and modify start_app.sh to startup.sh. That is, the automatic startup configuration is completed, and you can restart the device to check the results.
cd /app
cp start_app.sh startup.sh
sync
reboot
3.16.4. Web client usage instructions
3.16.4.1. Main interface
After the Sunrise camera starts normally, enter the IP address in the address bar through the chrome browser (the default IP of the development board is 192.168.1.10) to log in to the user control main interface, for example: http://192.168.1.10
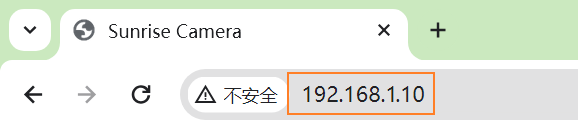
After successful login, the interface is displayed as follows:
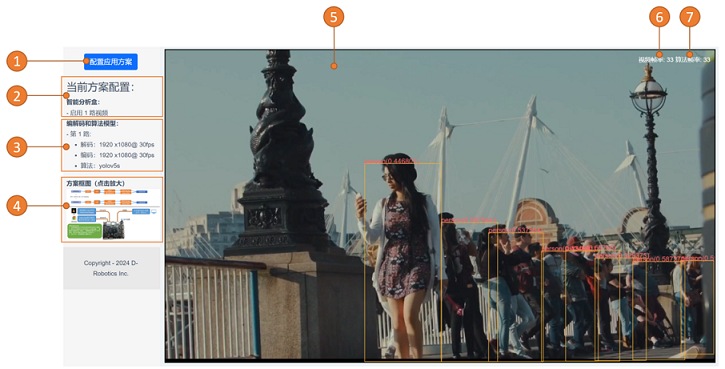
The detailed description of the interface menu is as follows:
| Function number | Description |
|---|---|
| 1 | Configure the application plan, click to open the application plan selection and parameter configuration page |
| 2 | Display the currently running scene information |
| 3 | Displays the main information of the current application solution, such as the sensor model used, encoding and decoding parameters, and algorithm model |
| 4 | Application solution block diagram to understand the data flow of the current application solution. Click to enlarge the image |
| 5 | Video display main screen, automatically adjust the number of display screens according to the number of video channels running in the application solution |
| 6 | Preview the real-time frame rate of the video |
| 7 | Real-time frame rate of algorithm operation |
3.16.4.2. Parameter configuration method
Sunrise camera supports two application solutions:
smart cameraandintelligent analysis box(the default application solution issingle-channel video analysis box)Sunrise camera supports online modification of application plans, selection of camera sensor models, setting of decoding and encoding parameters, and selection of algorithm models through the Web terminal.
Smart camera configuration method
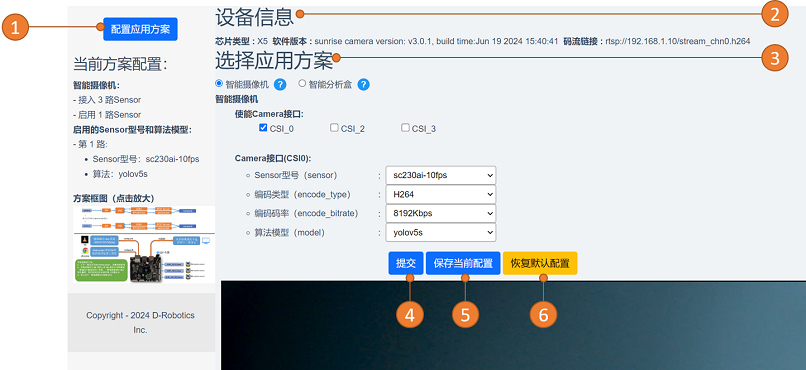
The specific modification steps are as follows:
Start the sunrise_camera program, open the chrome browser and enter the IP address of the device, for example: http://192.168.1.10
Click the
Configure Application Solutionbutton, labeled1in the above figureYou can view the current device information, including chip type, software version, and rtsp stream link (this link supports pulling up the rtsp video stream in the vlc software and can support operations such as recording and screenshots), labeled
2in the above figureSelect the application plan, labeled
3in the above figure. Please click thequestion markbutton to learn about the parameter settings and precautions for each application solution.Click the
Submitbutton to switch the application plan immediately. (Note: Just clicking Submit will not modify the configuration file of the development board and can be used to temporarily modify parameters for debugging)Click the
Save current configurationbutton to write the set configuration to the configuration file on the development board. Sunrise_camera will start according to the current configuration the next time you restart it.Click
Restore Default Configuration, and the user configuration will be reset to the configuration ofSingle-channel Video Analysis Box.
Notice:
The Camera interface corresponds one-to-one with the CSI interface in the circuit board. Only the Camera that is actually connected to the hardware circuit and has been adapted will be displayed in the enabled Camera interface.
If the
Save current configurationbutton is clicked, but a new camera is replaced when the power is turned on again, the newly inserted camera will be disabled by default.
Intelligent analysis box configuration method
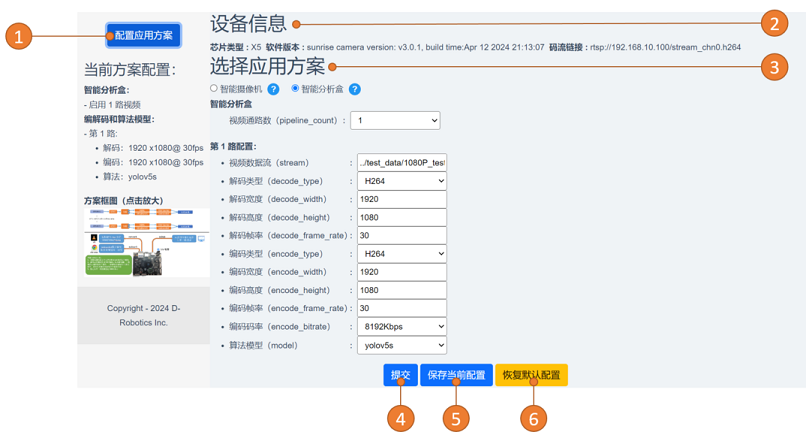
The specific modification steps are as follows:
Start the sunrise_camera program, open the chrome browser and enter the IP address of the device, for example: http://192.168.1.10
Click the
Configure Application Solutionbutton, labeled1in the above figureYou can view the current device information, including chip type, software version, and rtsp stream link (this link supports pulling up the rtsp video stream in the vlc software and can support operations such as recording and screenshots), labeled
2in the above figureSelect the application plan, labeled
3in the above figure. Please click thequestion markbutton to learn about the parameter settings and precautions for each application solution.Click the
Submitbutton to switch the application plan immediately. (Note: Just clicking Submit will not modify the configuration file of the development board and can be used to temporarily modify parameters for debugging)Click the
Save current configurationbutton to write the set configuration to the configuration file on the development board. Sunrise_camera will start according to the current configuration the next time you restart it.Click
Restore Default Configuration, and the user configuration will be reset to the configuration ofSingle-channel Video Analysis Box.
3.16.5. Smart camera configuration
The smart camera solution implements functions such as camera sensor image collection, processing, encoding, rtsp streaming and intelligent calculation, which can help users quickly experience multimedia images and algorithm effects. The functional block diagram of the solution is as follows:
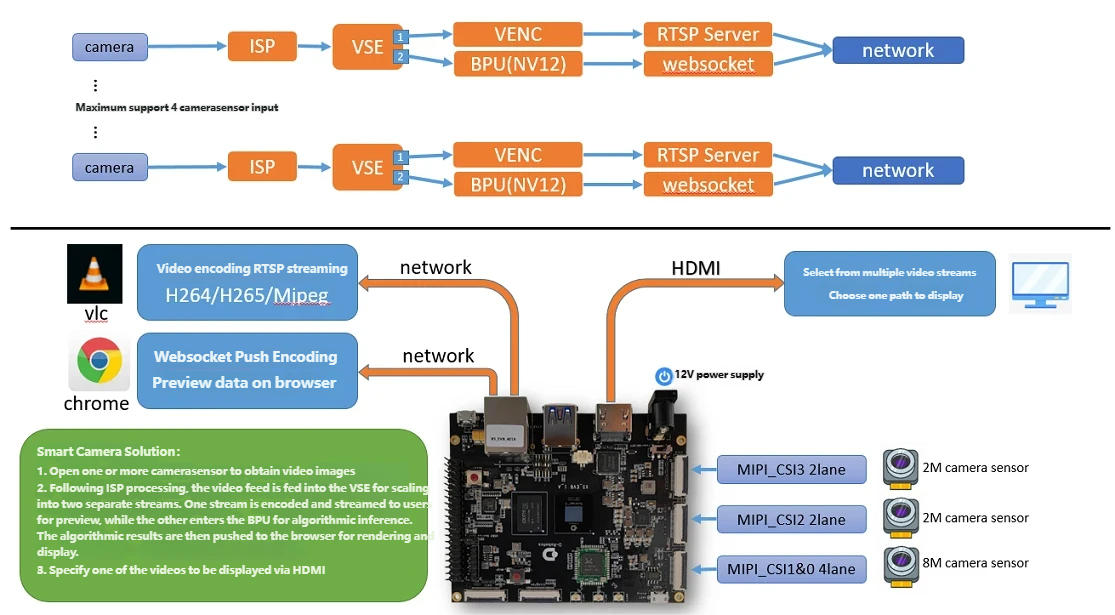
The smart camera solution provides the following functions:
Real-time video surveillance
Run the specified algorithm
When multiple Camera Sensors are connected, support enabling multi-channel video preview
Support dynamic adjustment of ISP parameters through browser
3.16.5.1. Parameter description
The smart camera solution has the following adjustable parameters:
Enable Camera interface: Displays a list of CSI interfaces that are actually connected to the camera, and you can enable different interfaces as needed
Sensor model: The program will detect the available Camera Sensor model connected to the device and configure it as needed.
Encoding type: Controls the video encoding format, supports H264\H265\Mjpeg, and will vary depending on hardware capabilities and software support.
Encoding bit rate: Control the bit rate of video encoding. The following are the reference bit rates of videos with different resolutions.
SD video (480p): 256, 512, 768, 1024, 1536, 2048
HD video (720p): 512, 1024, 2048, 3072, 4096, 6144
Full HD video (1080p): 1024, 2048, 4096, 6144, 8192, 12288
2K video: 2048, 4096, 8192, 12288, 16384, 24576
4K video: 4096, 8192, 16384, 24576, 32768, 49152
Algorithm model: Select the algorithm model to run
3.16.5.2. Dynamic adjustment of ISP parameters
Function description
ISP parameter dynamic adjustment function can dynamically control image quality and supports two modes
automatic mode
In automatic mode, the ISP will automatically adjust the image quality internally. At this time, you cannot drag the slider to control the ISP parameters.
The browser page will refresh the current values of each parameter in real time every 1 second.
Manual mode
In manual mode, the ISP no longer automatically adjusts the image quality internally. At this time, you can drag the slider to control the ISP parameters.
How to use
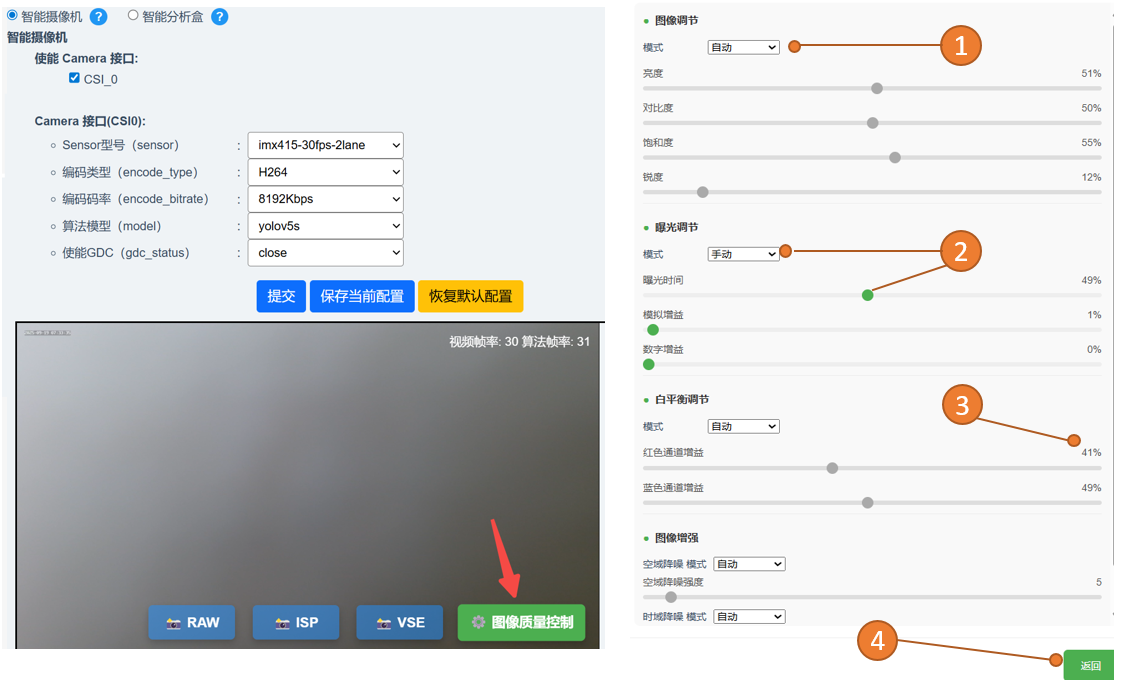
Left: Enter the ISP parameter dynamic adjustment page
Right side: ISP parameter adjustment method. The explanations marked in the figure are as follows:
Note 1: The current mode is automatic mode and can be switched to manual mode.
Note 2: The current mode is manual mode, and parameters can be configured through the slider
Annotation 3: Current parameter value
Note 4: Return to the main page
When using smart camera solutions, please note the following:
Make sure the connection between the Camera Sensor and the development board is stable
Adjust encoding bitrate as needed to balance video quality and network bandwidth
3.16.6. Intelligent analysis box configuration
The smart box solution implements functions such as single-channel and four-channel 1080p video decoding, splicing, encoding, RTSP streaming, and intelligent computing. Users can preview the effects through the Web, HDMI, or streaming methods. The functional block diagram of the solution is as follows:
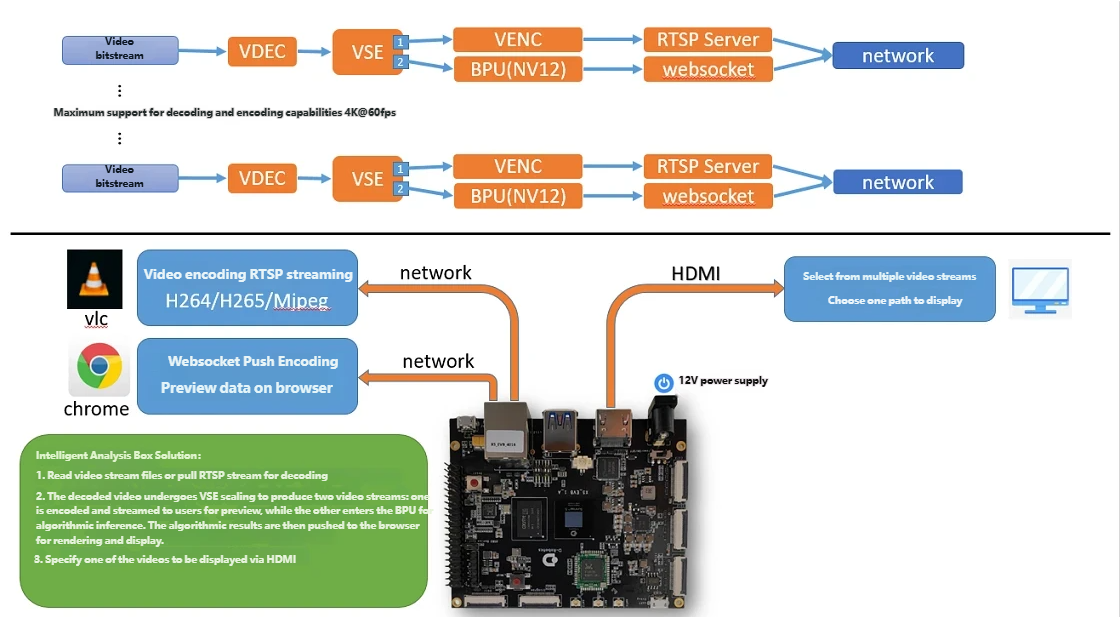
The intelligent analysis box solution provides the following functions:
Run the algorithm after decoding the code stream and re-encode the stream
Supports reading local video stream files on the development board
Support using RTSP code stream
Supports scaling decoded video files before encoding
Supports control of code rate and frame rate
Run the specified algorithm
3.16.6.1. Parameter description
The intelligent analysis box solution has the following adjustable parameters:
Number of video channels: Choose how many video analysis channels to enable
The number of enabled channels capable of decoding and encoding combined cannot exceed 4K@60fps (hardware limit)
The device’s default ION memory allocated to codecs and algorithms is 1408MB. If too many channels are enabled, insufficient memory may occur. Please refer to ION System Debugging Guide to adjust the ION memory size
Video data stream (stream): Supports reading local video stream files and RTSP stream on the development board
Decoding type (decode_type): Controls the video decoding format, supports H264\H265\Mjpeg
Decode width (decode_width): Control the width of video decoding
Decode height (decode_height): Control the height of video decoding
Decode frame rate (decode_frame_rate): Control the frame rate of video decoding
Encoding type (encode_type): Controls the video encoding format, supports H264\H265\Mjpeg
Encoding width (encode_width): Controls the width of video encoding
Encoding height (encode_height): Controls the height of video encoding
Encoding frame rate (encode_frame_rate): Controls the frame rate of video encoding
Encoding bitrate (encode_bitrate): Controls the bitrate of video encoding. The following are the reference bitrates of videos with different resolutions.
SD video (480p): 256, 512, 768, 1024, 1536, 2048
HD video (720p): 512, 1024, 2048, 3072, 4096, 6144
Full HD video (1080p): 1024, 2048, 4096, 6144, 8192, 12288
2K video: 2048, 4096, 8192, 12288, 16384, 24576
4K video: 4096, 8192, 16384, 24576, 32768, 49152
Algorithm model (model): Select the algorithm model to run
3.16.6.2. Notes
When using the smart analysis box solution, please pay attention to the following:
Ensure that the network connection is stable and the network bandwidth meets the requirements for data transmission volume
Adjust the number of analysis channels and analysis algorithms as needed to meet application needs
The number of enabled channels capable of decoding and encoding combined cannot exceed 4K@60fps (hardware limit)
The device’s default ION memory allocated to codecs and algorithms is 1GB. If too many channels are enabled, there may be a problem of insufficient memory, and you need to increase the ION memory.
3.16.7. Use VLC player to play RTSP stream
When the Sunrise camera program is running, the rtsp video stream will be pushed synchronously. Users can play the RTSP stream through the vlc player to realize screen preview, video recording, screenshots and other functions.
3.16.7.1. Play method
Open vlc player, select the Media menu, then select the Open Network Streaming option.
Fill in the url address in the Open Media dialog box and click the Play button to start playing, as shown below:
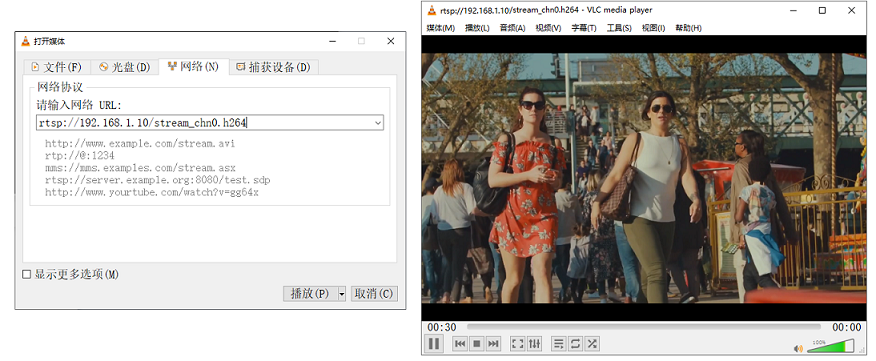
The code stream network URL link of rtsp can be viewed on the device information on the web. The default supported code stream link is: rtsp://192.168.1.10/stream_chn0.h264
3.16.7.2. 4K@30fps streaming configuration instructions
When 4K@30fps is configured with a high bit rate (above 8192Kbps), in order to ensure smooth video playback without frame loss, it is recommended to use a Gigabit network, otherwise video mosaics and blurred screens will easily occur.
vlc buffer_size setting, vlc receiving buffer modification: the default is 250000, it is recommended to change it to 1200000.
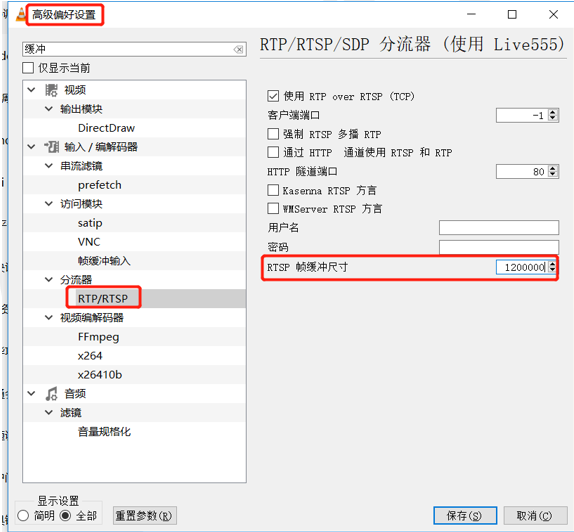
Using http mode can effectively solve the problem of screen blur caused by frame loss during playback.
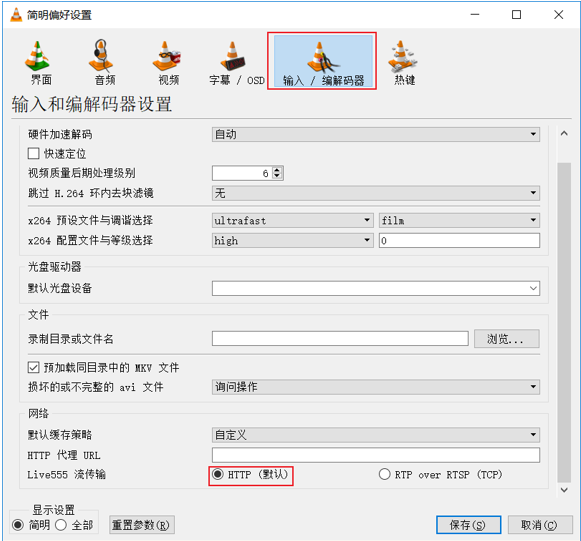
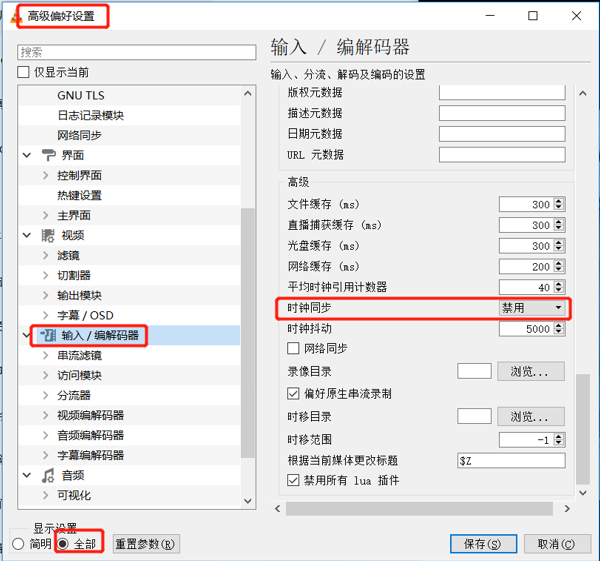
Disable clock synchronization in advanced settings