3.8. sample_vot Usage Instructions
Function Description: The sample_vot example program, based on the DRM framework, implements the following functions:
sample_vot: Read an image or create a frame buffer, fill it with color, and output to HDMI for displaysample_rotation_square: Demonstrates rotation of a square (currently does not support 90-degree or 270-degree rotation of rectangles)sample_blend: Demonstrates blending of 3 layerssample_vot_drm_hotplug: Read an image or create a frame buffer, fill it with color, and output to HDMI for display. Supports HDMI hot-plug detection and asynchronous display based on Page Flip
For instructions on connecting HDMI to the development board, refer to the HDMI Interface section.
Note: HDMI driver must be manually loaded first: ./insmode_driver.sh
3.8.1. sample_vot
3.8.1.1. Function Overview
Function Description: sample_vot demonstrates the following functions by accepting different input parameters:
List the resolutions supported by the HDMI display
Read an image and display it via HDMI
Create a frame buffer, fill it with color, and display it via HDMI
Software Architecture Description
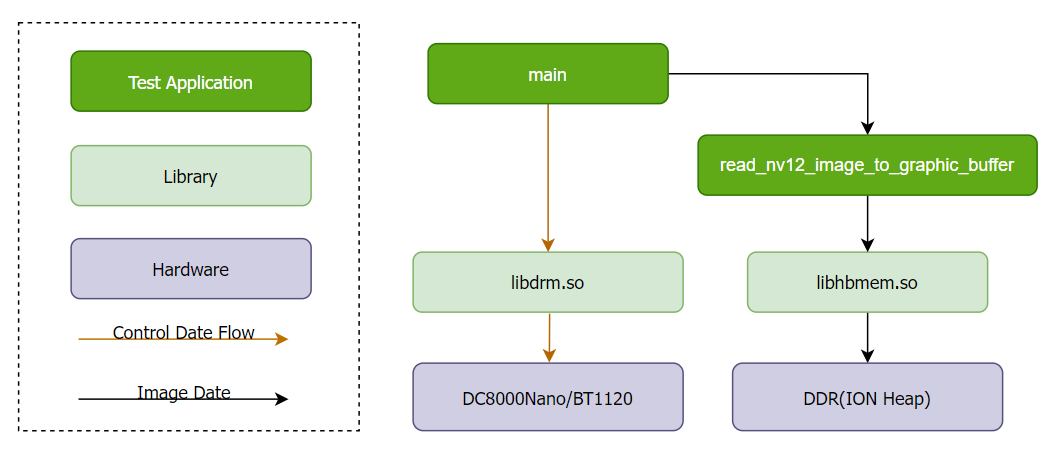
Code Location and Directory Structure
Code location:
app/samples/platform_samples/sample_votDirectory structure
sample_vot/
├── Makefile
├── sample_vot
├── sample_vot.c
└── sample_vot.o
API Flow Description
Depending on the input parameters, the processing flow is divided into two cases:
| Case Description | Characteristics | Differences (Function background color in diagram) |
|---|---|---|
| Directly display data in memory | Allocate memory from the DRM framework | Yellow |
| Read file and display | Allocate memory externally and pass to DRM framework | Green |
sample
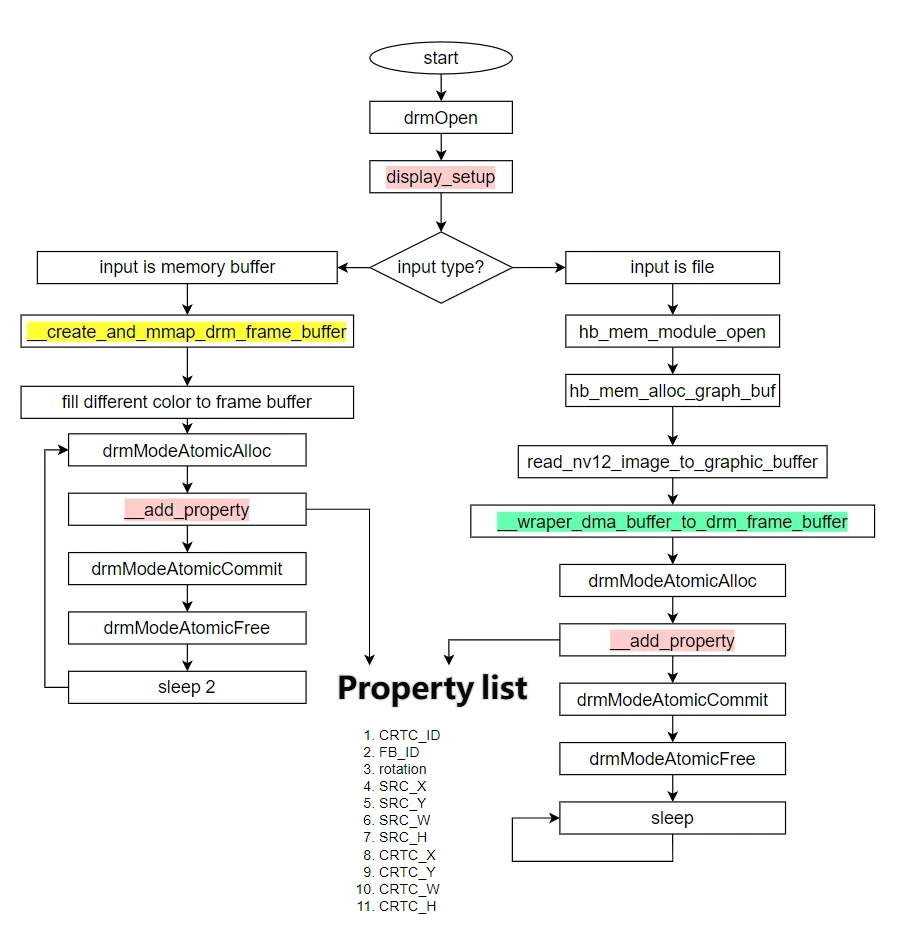
Functions with background colors in the diagram are wrappers for DRM interfaces. Below is a detailed explanation of each function’s functionality and flow:
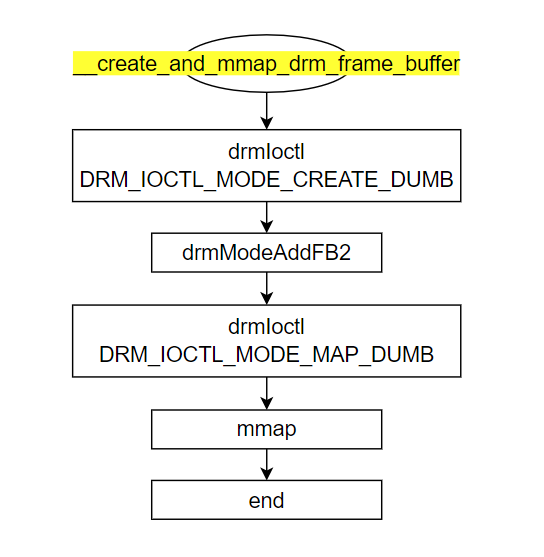
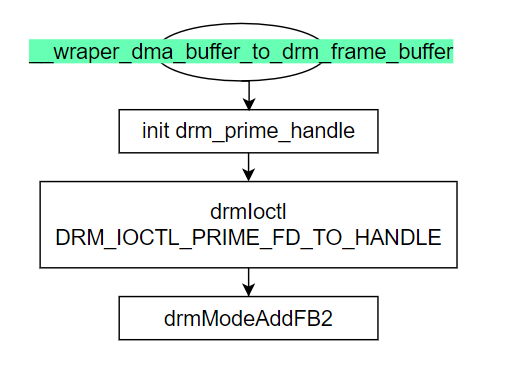
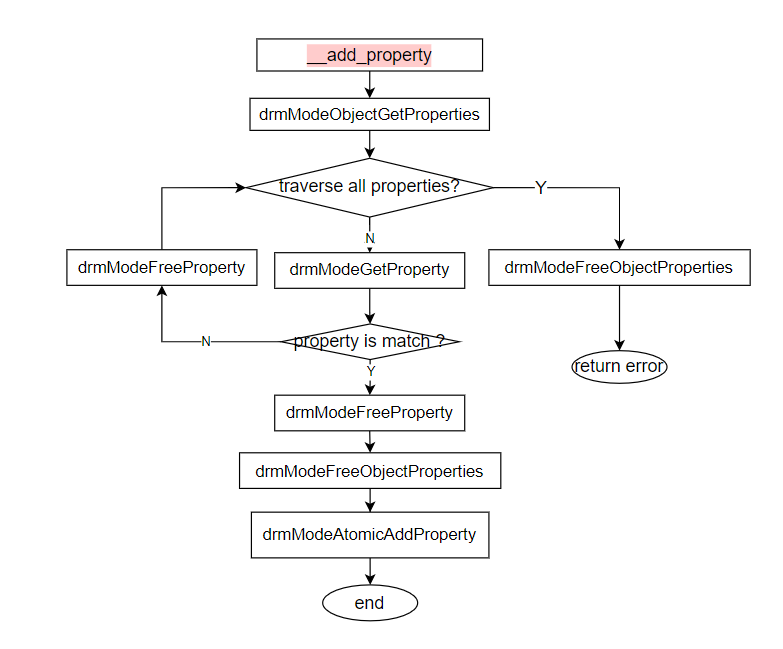
__create_and_mmap_drm_frame_buffer(yellow background): Call DRM interface to allocate memory from the DRM framework__wraper_dma_buffer_to_drm_frame_buffer(green background): Allocate memory externally and pass it to the DRM frameworkdisplay_setup: Call DRM interface to obtain an appropriateconnector, and set correspondingcrtcandconnectoras needed__add_property: Call DRM interface to set properties and complete layer display
Below are flowcharts for the four functions mentioned above:
__create_and_mmap_drm_frame_buffer
__wraper_dma_buffer_to_drm_frame_buffer
display_setup
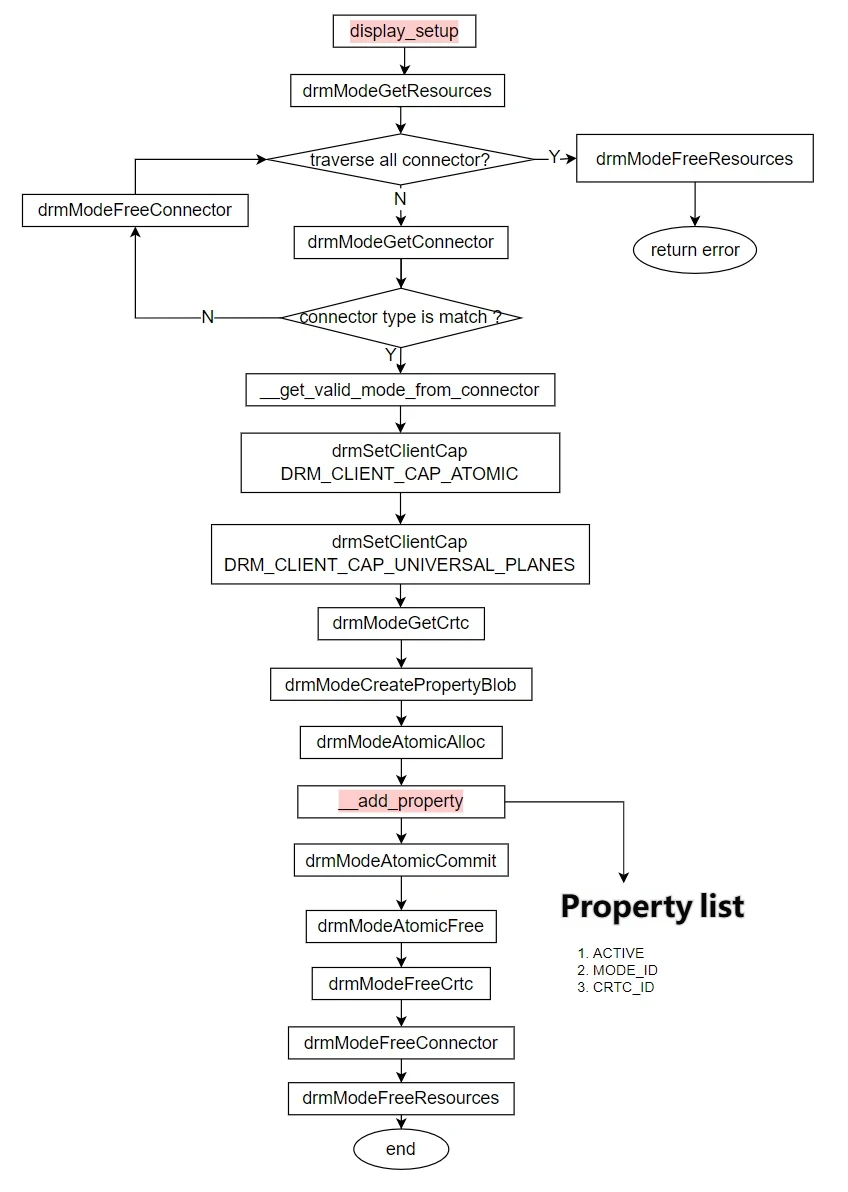
__add_property
3.8.1.2. Compilation and Deployment
Compilation
Enter the
sample_votdirectory and runmaketo compileThe output binary is
sample_votlocated in the source directoryFor detailed compilation methods, refer to the Compilation Methods section
Program Deployment
Upload the
sample_votandresourcedirectories to the/userdatadirectory on the development boardEnter the
sample_votdirectory and runchmod +x sample_votto grant execution permission
3.8.1.3. Execution
Execution Method
Run the program: ./sample_vot
Program Parameter Options
./sample_vot -lList the resolutions supported by the connected HDMI display./sample_vot -fRead../resource/nv12_1920x1080.yuvand display it on the screen./sample_votCreate a frame buffer, fill it with RGB data, and display it on the screen
Execution Results
List Resolutions Supported by Display
Command:
./sample_vot -l
Log Output:
Print param Config:
        Function : print connector support resolution.
Print [hdmi] connector support resolution:
  [0] 1920x1080 60.00fps
  [1] 1920x1080 59.94fps
  [2] 1920x1080i 60.00fps
  [3] 1920x1080i 59.94fps
  [4] 1920x1080 50.00fps
  [5] 1920x1080i 50.00fps
  [6] 1920x1080 24.00fps
  [7] 1920x1080 23.98fps
Display Cyclic RGB Background
Command:
./sample_vot
Runtime Log:
Print param Config:
        Function : display.
        Input    : default data (R, G, B).
        Output   :
                 Resolution: select connector's first config from EDID
                 Connector: hdmi
display select resolution :1920*1080 .
Effect Description: The display will cycle through red, green, and blue colors every 2 seconds.
Display Image from File
Command:
./sample_vot -f
Runtime Log:
Print param Config:
        Function : display.
        Input    : file(../resource/nv12_1920x1080.yuv).
        Output   :
                 Resolution: 1920*1080
                 Connector: hdmi
display select resolution :1920*1080 .
Effect Description:
The image ../resource/nv12_1920x1080.yuv will be displayed on the screen.
3.8.2. sample_rotation_square
3.8.2.1. Function Overview
Function Description: sample_rotation_square displays a square that rotates cyclically every 2 seconds at 0°, 90°, 180°, and 270°.
Software Architecture Description
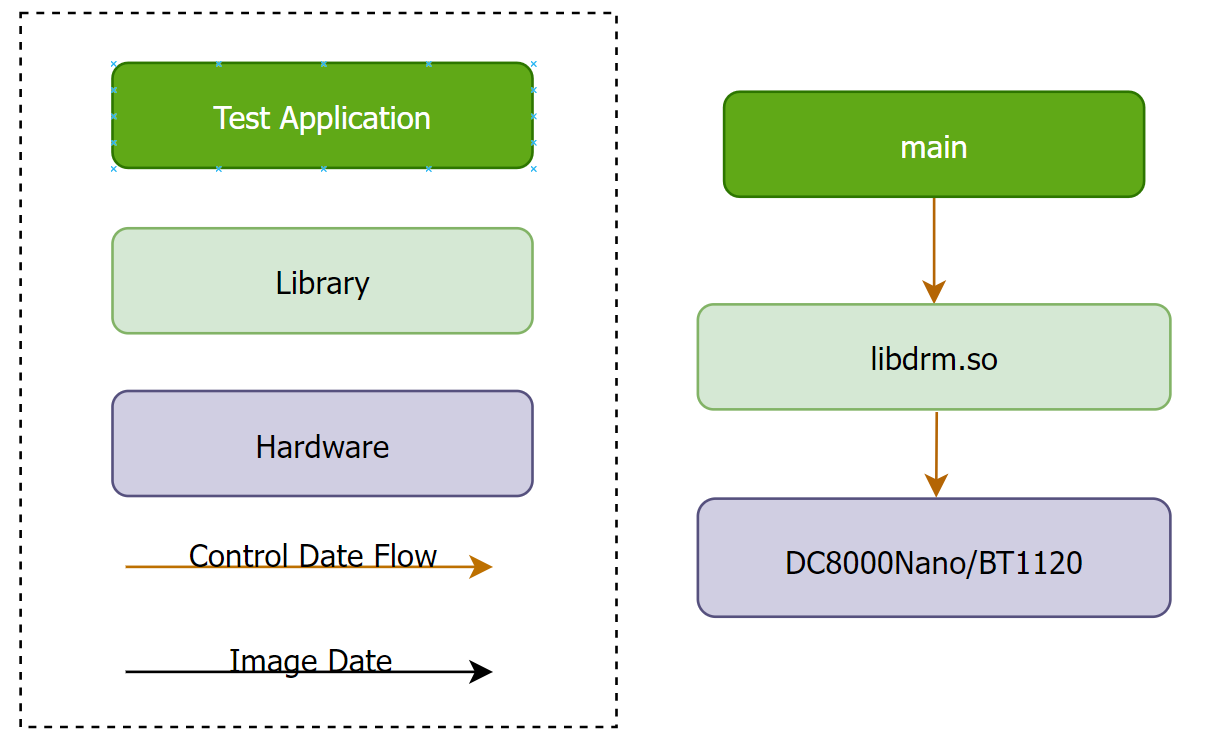
Code Location and Directory Structure
Code location:
app/samples/platform_samples/sample_rotation_squareDirectory structure
sample_rotation_square/
├── Makefile
├── sample_rotation_square
├── sample_rotation_square.c
└── sample_rotation_square.o
API Flow Description
sample
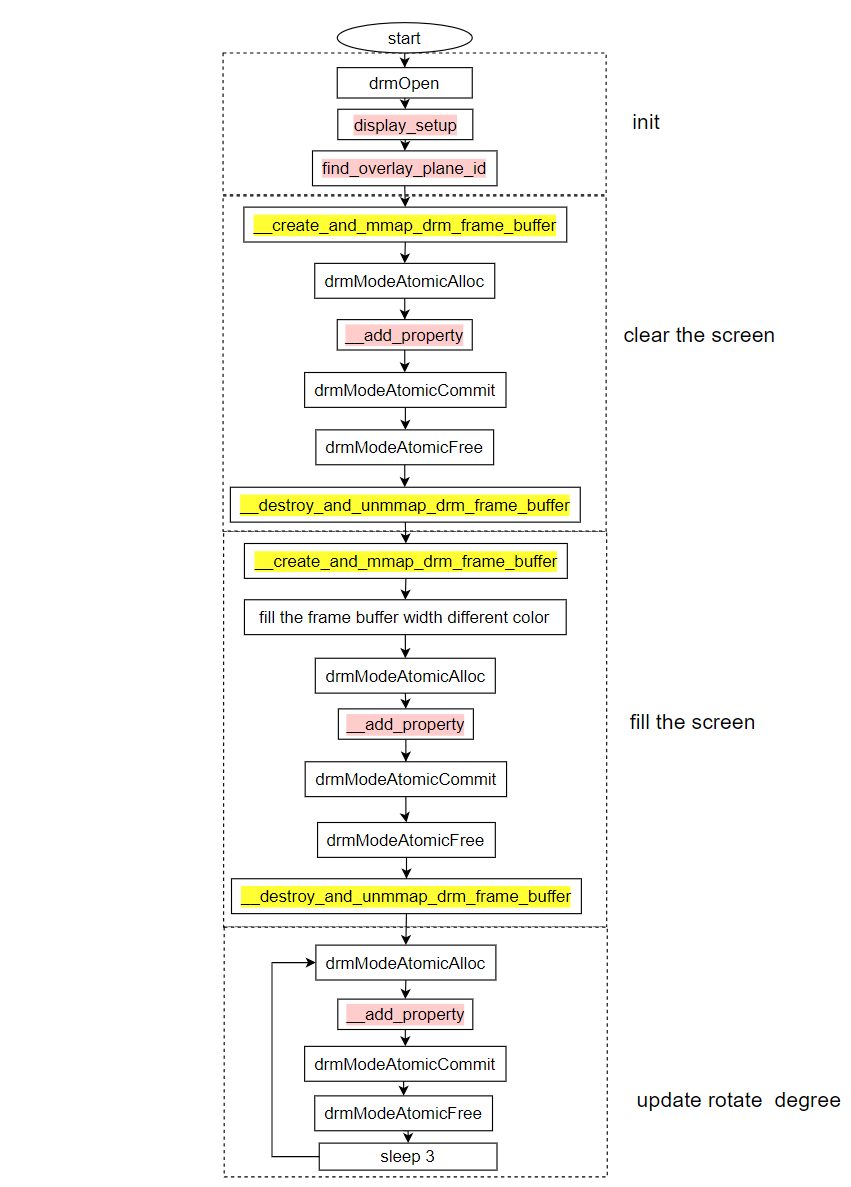
Functions with background colors in the diagram are wrappers for DRM interfaces. Below is a detailed explanation of each function’s functionality and flow:
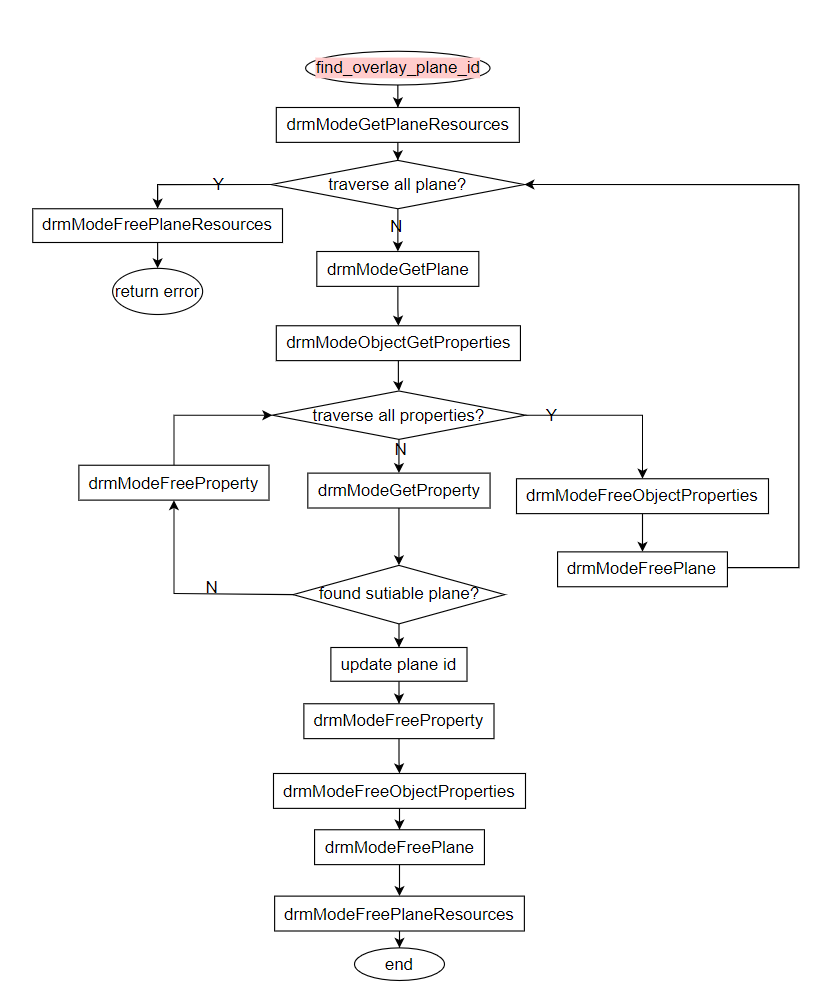
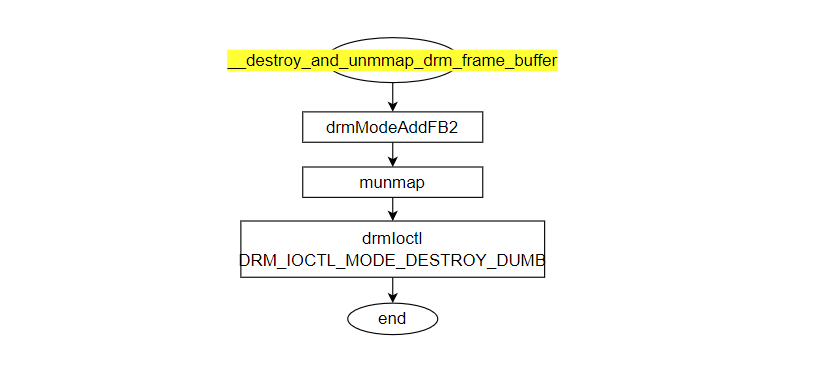
display_setup(red background): Call DRM interface to obtain an appropriateconnector, and set correspondingcrtcandconnectoras neededfind_overlay_plane_id(red background): Traverse all planes to find the one that supports rotation__create_and_mmap_drm_frame_buffer(yellow background): Call DRM interface to allocate memory from the DRM framework__destroy_and_unmmap_drm_frame_buffer(yellow background): Call DRM interface to release memory allocated from the DRM framework__add_property(red background): Call DRM interface to set properties, completing layer rotation and display
display_setup
find_overlay_plane_id
__add_property
__create_and_mmap_drm_frame_buffer
__destroy_and_unmmap_drm_frame_buffer
3.8.2.2. Compilation and Deployment
Compilation
Enter the
sample_rotation_squaredirectory and runmaketo compileThe output binary is
sample_rotation_squarelocated in the source directoryFor detailed compilation methods, refer to the Compilation Methods section
Program Deployment
Upload the
sample_rotation_squareandresourcedirectories to the/userdatadirectory on the development boardEnter the
sample_rotation_squaredirectory and runchmod +x sample_rotation_squareto grant execution permission
3.8.2.3. Execution
Execution Method
Run the program: ./sample_rotation_square
Program Parameter Options
None
Execution Results
Command:
./sample_rotation_square
Log Output:
Print param Config:
        Output   :
                 Resolution: select connector's first config from EDID
                 Connector: hdmi

display select resolution :1920*1080 .
Effect Description:
The display shows a white square with corners colored red, green, blue, and yellow respectively
The square rotates every 2 seconds in the following sequence: 0°, 90°, 180°, 270°
3.8.3. sample_blend
3.8.3.1. Function Overview
Function Description: sample_blend demonstrates alpha blending of 3 layers before display.
Software Architecture Description
Code Location and Directory Structure
Code location:
app/samples/platform_samples/sample_blendDirectory structure
sample_blend/
├── Makefile
├── sample_blend
├── sample_blend.c
└── sample_blend.o
API Flow Description
sample
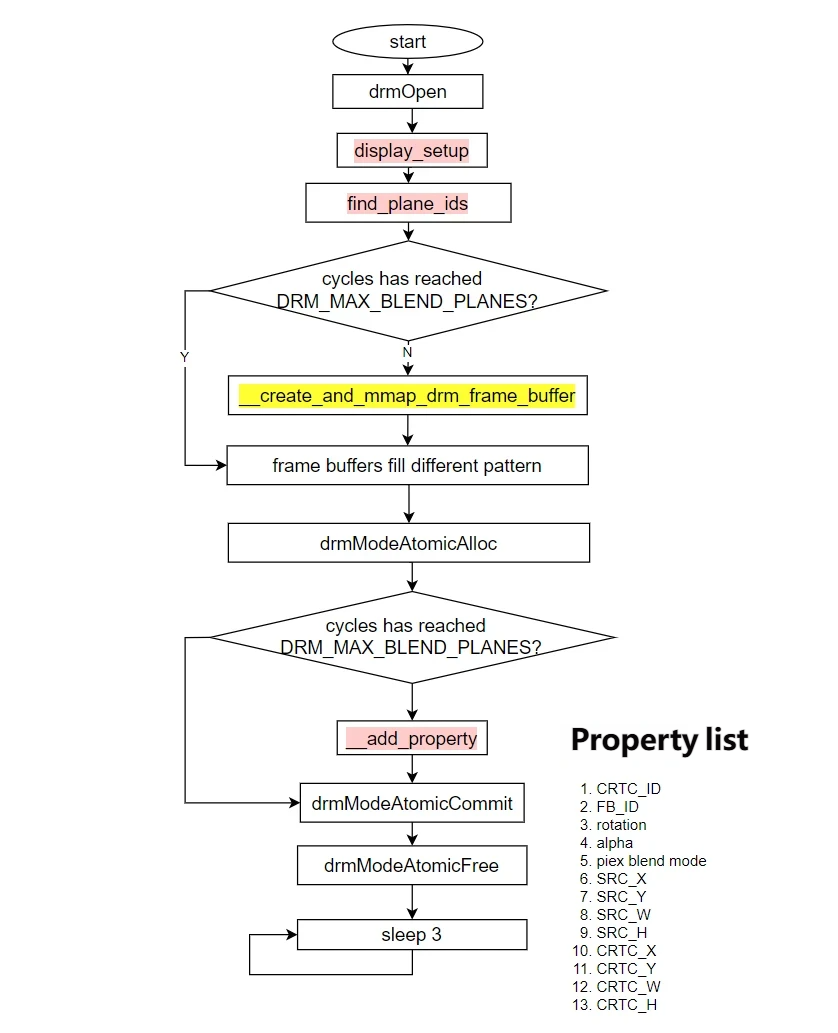
Functions with background colors in the diagram are wrappers for DRM interfaces. Below is a detailed explanation of each function’s functionality and flow:
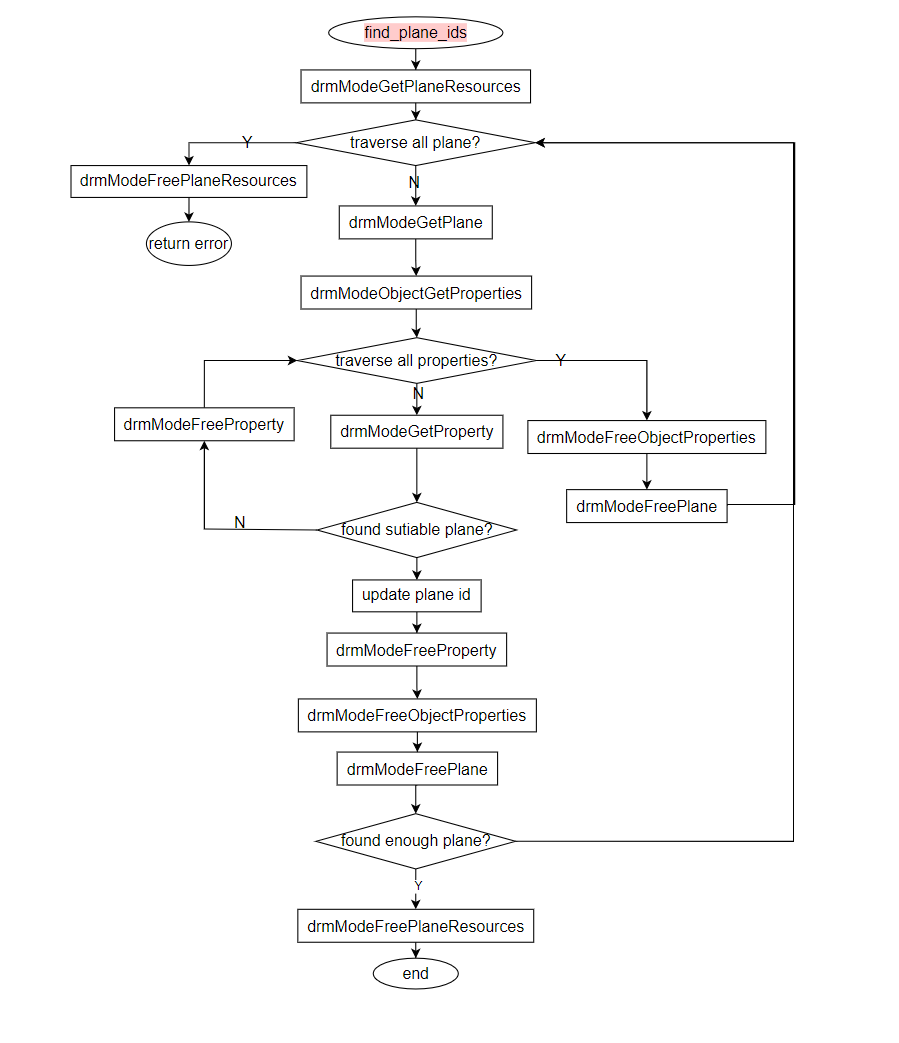
display_setup(red background): Call DRM interface to obtain an appropriateconnector, and set correspondingcrtcandconnectoras neededfind_plane_ids(red background): Traverse all planes to find those that support blending__create_and_mmap_drm_frame_buffer(yellow background): Call DRM interface to allocate memory from the DRM framework__destroy_and_unmmap_drm_frame_buffer(yellow background): Call DRM interface to release memory allocated from the DRM framework__add_property(red background): Call DRM interface to set properties, completing multi-layer blending and display
display_setup
find_plane_ids
__add_property
__create_and_mmap_drm_frame_buffer
3.8.3.2. Compilation and Deployment
Compilation
Enter the
sample_blenddirectory and runmaketo compileThe output binary is
sample_blendlocated in the source directoryFor detailed compilation methods, refer to the Compilation Methods section
Program Deployment
Upload the
sample_blenddirectory to the/userdatadirectory on the development boardEnter the
sample_blenddirectory and runchmod +x sample_blendto grant execution permission
3.8.3.3. Execution
Execution Method
Run the program: ./sample_blend
Program Parameter Options
./sample_blend -m 0 -v 30000mspecifies the blending mode,vspecifies the blending value. Detailed parameter descriptions:
Blending value: valid range is 0 - 65535, default is 32767
Blending mode: 0: Pre-multiplied, 1: Coverage, 2: None, default is None
Pre-multiplied mode:
out.rgb = plane_alpha * fg.rgb + (1 - (plane_alpha * fg.alpha)) * bg.rgbCoverage mode:
out.rgb = plane_alpha * fg.alpha * fg.rgb + (1 - (plane_alpha * fg.alpha)) * bg.rgbNone mode:
out.rgb = plane_alpha * fg.rgb + (1 - plane_alpha) * bg.rgb
Parameter explanations in formulas:
plane_alpha: Blending value (-vspecified value / 65535)fg.alpha: Foreground image alpha valuefg.rgb: Current pixel color valuebg.rgb: Background image color value
Execution Results
Command:
./sample_blend -m 0 -v 30000
Log Output:
Print param Config:
        AplhaBlend Param   :
                Mode    : Coverage
                Formula : out.rgb = plane_alpha * fg.alpha * fg.rgb + (1 - (plane_alpha * fg.alpha)) * bg.rgb
                Value   : 32767
display select resolution :1920*1080 .
Effect Description:
The display shows a white background with three overlapping rectangles in red, green, and blue
Non-overlapping areas blend with the background
Overlapping areas: first blended with the background, then the colors of the two rectangles are blended together
3.8.3.4. Common Issues
Issue 1:
Description: When the Linux DRM driver changes, layer IDs may change
Solution: Avoid hardcoding layer IDs in programs; instead, match by plane name (e.g., function
find_plane_ids)
Issue 2:
Description: When using the DRM framework, unsure about available layers and their functions
Solution: Use the command
modetest -M vs-drm -ato view details. See: Correspondence between DRM Debug Information and Hardware
Issue 3:
Description: After running a demo program, no effect is observed. Need to quickly determine if it’s a hardware issue
Solution: Use the command
modetest -M vs-drm -a -s 75@31:1920x1080 -P 33@31:1920x1080@NV12. See: DRM Quick Experience
3.8.4. sample_vot_drm_hotplug
3.8.4.1. Function Overview
Function Description: based on sample_vot, sample_vot_drm_hotplug adds HDMI hot-plug detection, a select event loop, and Page Flip-based asynchronous display. It supports automatic reconnection and display resumption after “starting the program first and then plugging in the HDMI cable” or “unplugging and replugging the HDMI cable”. demonstrates the following functions by accepting different input parameters:
List the resolutions supported by the HDMI display
Read an image and display it via HDMI
Create a frame buffer, fill it with color, and display it via HDMI
Software Architecture Description
Code Location and Directory Structure
Code location:
app/samples/platform_samples/sample_vot_drm_hotplugDirectory structure
sample_vot_drm_hotplug/
├── sample_vot_drm_hotplug
├── sample_vot_async.c
├── Makefile
├── drm_hotplug.h
└── drm_hotplug.c
API Flow Description
| Scenario | Background color of text in the figure |
|---|---|
| HDMI display hot-plug | Yellow |
| DRM Page Flip event | Green |
sample
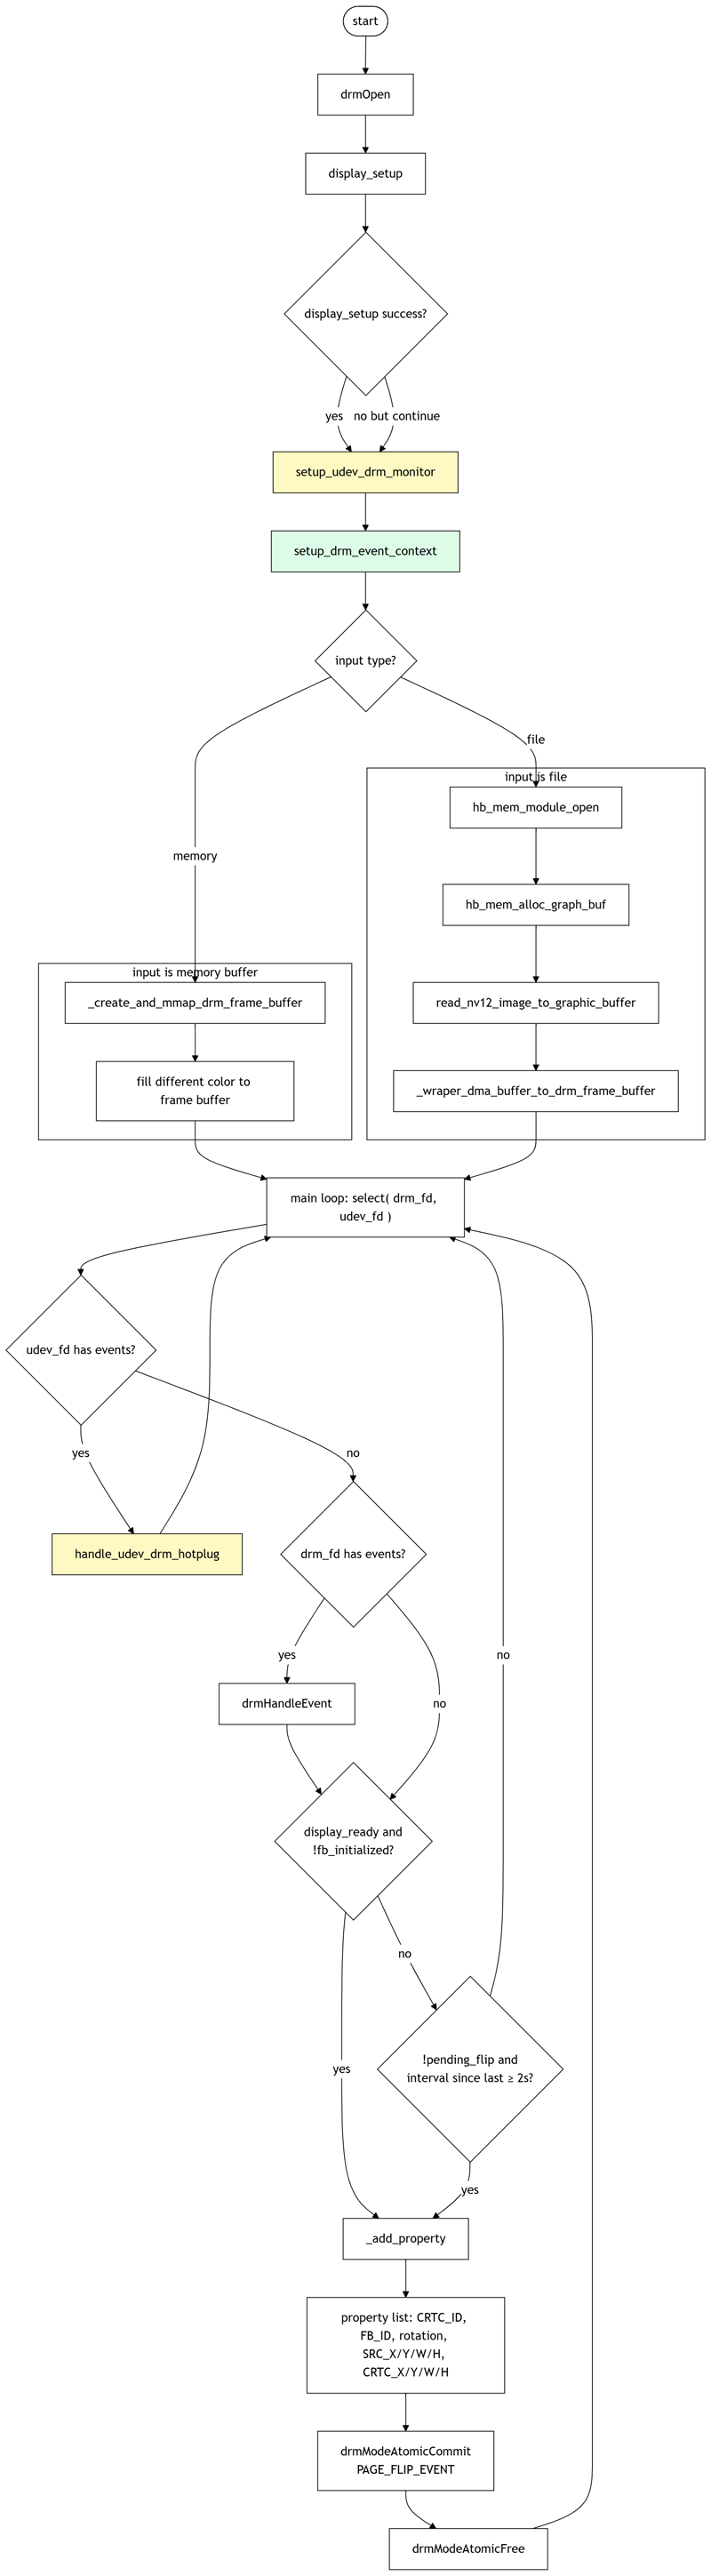
Function descriptions and flow in the figure with colored backgrounds:
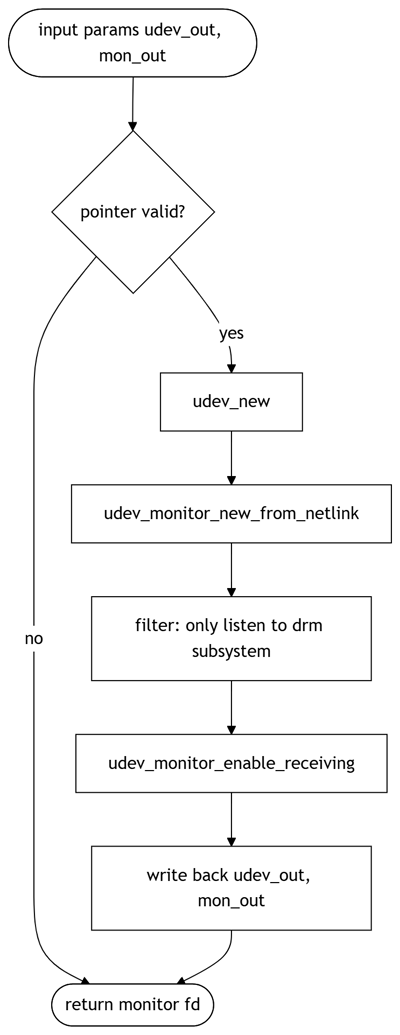
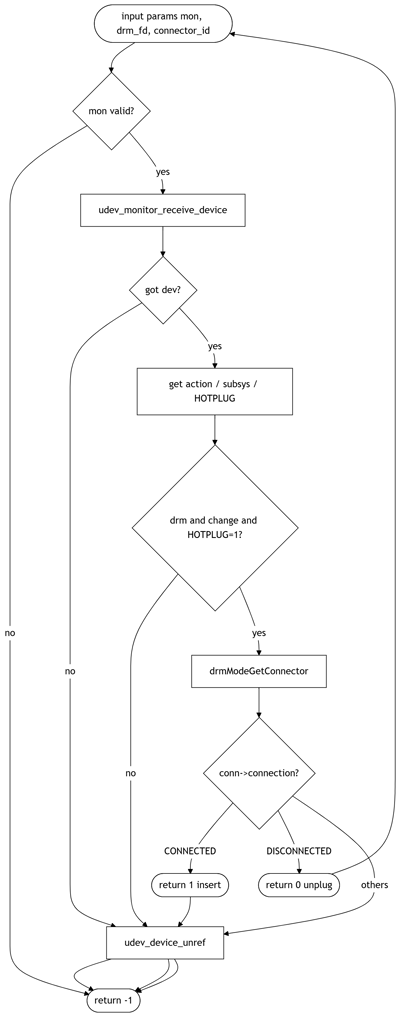
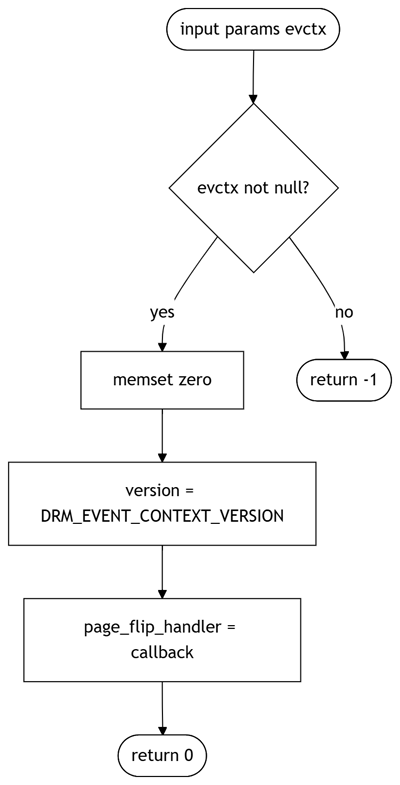
setup_udev_drm_monitor(yellow background): Create and initialize a udev listener that only receives device events from the DRM subsystem (such as HDMI hot-plug events).handle_udev_drm_hotplug(yellow background): Handle a single DRM hot-plug event read from the udev monitor, and determine whether it is an “insert” or “remove” based on the current connector status.setup_drm_event_context(green background): Initialize the DRM event contextdrmEventContext, which is used to receive and handle the Page Flip completion events reported by the DRM kernel.
Below are flowcharts for the three functions mentioned above:
setup_udev_drm_monitor
handle_udev_drm_hotplug
setup_drm_event_context
3.8.4.2. Compilation and Deployment
Compilation
Enter the
sample_vot_drm_hotplugdirectory and runmaketo compileThe output binary is
sample_vot_drm_hotpluglocated in the source directoryFor detailed compilation methods, refer to the Compilation Methods section
Program Deployment
Upload the
sample_vot_drm_hotplugandresourcedirectories to the/userdatadirectory on the development boardEnter the
sample_vot_drm_hotplugdirectory and runchmod +x sample_vot_drm_hotplugto grant execution permission
3.8.4.3. Execution
Execution Method
Run the program: ./sample_vot_drm_hotplug
Program Parameter Options
./sample_vot_drm_hotplug -lList the resolutions supported by the connected HDMI display./sample_vot_drm_hotplug -fRead../resource/nv12_1920x1080.yuvand display it on the screen./sample_vot_drm_hotplugCreate a frame buffer, fill it with RGB data, and display it on the screen
Execution Results
List Resolutions Supported by Display
Command:
./sample_vot_drm_hotplug -l
Log output:
Print param Config:
        Function : print connector support resolution.
Print [hdmi] connector support resolution:
  [0] 1920x1080 60.00fps
  [1] 1920x1080 59.94fps
  [2] 1920x1080i 60.00fps
  [3] 1920x1080i 59.94fps
  [4] 1920x1080 50.00fps
  [5] 1920x1080i 50.00fps
  [6] 1920x1080 24.00fps
  [7] 1920x1080 23.98fps
Display Cyclic RGB Background and HDMI hot-plug behavior on the monitor
Command:
./sample_vot_drm_hotplug
With HDMI not connected to the board, start the program, then plug in HDMI and unplug it again. Log output:
Print param Config:
        Function : display.
        Input    : default data (R, G, B).
        Output   :
                 Resolution: select connector's first config from EDID
                 Connector: hdmi
search hdmi connector: connector id is 75
display connector type 11 is not connected.
display_setup: no valid mode for connector type 11 (output=hdmi)
display_setup not ready, will wait for connector hotplug in main loop.
DRM hotplug event detected on /dev/dri/card0 (connector_type=11)
DRM connector is now CONNECTED (id=75)
hdmi index: 00 ch:3840 cv:2160 vrefresh:60
hdmi index: 01 ch:3840 cv:2160 vrefresh:60
hdmi index: 02 ch:3840 cv:2160 vrefresh:30
hdmi index: 03 ch:3840 cv:2160 vrefresh:30
hdmi index: 04 ch:3840 cv:2160 vrefresh:25
hdmi index: 05 ch:3840 cv:2160 vrefresh:24
hdmi index: 06 ch:3840 cv:2160 vrefresh:24
hdmi index: 07 ch:2560 cv:1440 vrefresh:60
hdmi index: 08 ch:1920 cv:1080 vrefresh:60
display connector connector found mode info.
display select resolution :1920*1080 .
Connector is now connected, start display.
page flip event: frame=2104 time=8937.489720
page flip event: frame=2225 time=8939.506395
page flip event: frame=2346 time=8941.523063
page flip event: frame=2467 time=8943.539721
page flip event: frame=2588 time=8945.556395
DRM hotplug event detected on /dev/dri/card0 (connector_type=11)
DRM connector is now DISCONNECTED (id=75)
Effect Description:
After the program starts, it reports that no HDMI connection is found. After the HDMI cable is plugged in, the program starts displaying frames.
During display, Page Flip events are triggered and print log messages.
The display will cycle through red, green, and blue colors every 2 seconds.
After HDMI is unplugged, the display is disconnected and frame display stops.
Display Image from File and HDMI hot-plug behavior on the monitor
Command:
./sample_vot_drm_hotplug -f
With HDMI connected to the board, start the program, then unplug HDMI and plug it back in. Log output:
Print param Config:
        Function : display.
        Input    : file(../resource/nv12_1920x1080.yuv).
        Output   :
                 Resolution: 1920*1080
                 Connector: hdmi
search hdmi connector: connector id is 75
hdmi index: 00 ch:3840 cv:2160 vrefresh:60
hdmi index: 01 ch:3840 cv:2160 vrefresh:60
hdmi index: 02 ch:3840 cv:2160 vrefresh:30
hdmi index: 03 ch:3840 cv:2160 vrefresh:30
hdmi index: 04 ch:3840 cv:2160 vrefresh:25
hdmi index: 05 ch:3840 cv:2160 vrefresh:24
hdmi index: 06 ch:3840 cv:2160 vrefresh:24
hdmi index: 07 ch:2560 cv:1440 vrefresh:60
hdmi index: 08 ch:1920 cv:1080 vrefresh:60
display connector connector found mode info.
display select resolution :1920*1080 .
page flip event: frame=4379 time=9518.206396
DRM hotplug event detected on /dev/dri/card0 (connector_type=11)
DRM connector is now DISCONNECTED (id=75)
DRM hotplug event detected on /dev/dri/card0 (connector_type=11)
DRM connector is now CONNECTED (id=75)
hdmi index: 00 ch:3840 cv:2160 vrefresh:60
hdmi index: 01 ch:3840 cv:2160 vrefresh:60
hdmi index: 02 ch:3840 cv:2160 vrefresh:60
hdmi index: 03 ch:3840 cv:2160 vrefresh:30
hdmi index: 04 ch:3840 cv:2160 vrefresh:30
hdmi index: 05 ch:3840 cv:2160 vrefresh:25
hdmi index: 06 ch:3840 cv:2160 vrefresh:24
hdmi index: 07 ch:3840 cv:2160 vrefresh:24
hdmi index: 08 ch:2560 cv:1440 vrefresh:60
hdmi index: 09 ch:1920 cv:1080 vrefresh:60
display connector connector found mode info.
display select resolution :1920*1080 .
Connector is now connected, start display.
page flip event: frame=4985 time=9533.806383
Effect Description:
After the program starts, it reports that a display connection is found and begins displaying frames. The monitor shows the image
../resource/nv12_1920x1080.yuvon the screen.After HDMI is unplugged, the display is disconnected and frame display stops.
After HDMI is plugged in again, it reports that a display connection is found and resumes displaying the image.