4.3.19. Audio 开发调试说明
4.3.19.1. 概述
Audio 主要
4.3.19.2. 特点
芯片
支持
主从 两种 模式 RX 支持 1/2/4/8/16 通道
的 音频 输入。 TX 支持 1/2 通道
的 音频 输出。 支持 8/16/32/44.1/48/64 KHz 采样率。
支持 16/24/32 bit 采样
深度。
TDM (Time-Division Multiplexing) 模式
4.3.19.3. 功能描述
典型应用
Audio 的
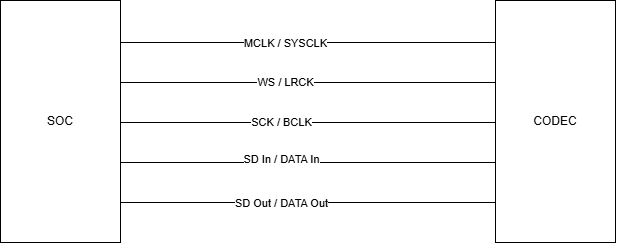
上
这种
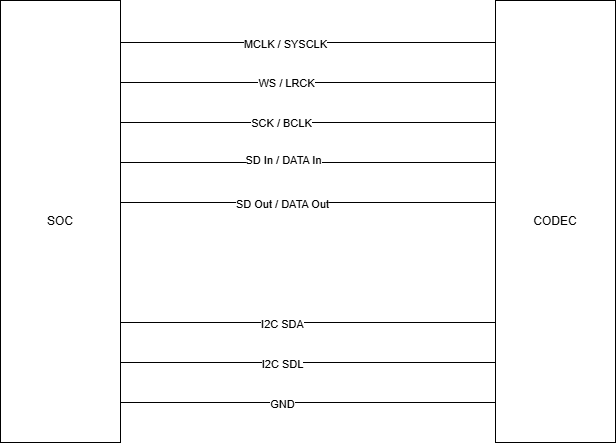
功能原理
I2S 的
MCLK / SYSCLK 代表
的 是 主 时钟( Master Clock),或者说 是 系统 时钟,用于 SOC 和 CODEC 之间 同步。 SCK / BCLK 代表
串行 时钟 信号( Serial Clock),或者说 是 位 时钟。 SCK 是 模块 内 的 同步 信号 , 从 模式 时 由 外部 提供 , 主模式 时 由 模块 内部 自己 产生。一个 脉冲 对应 一位 数字音频 数据。 WS / LRCK 代表
采样 时钟( Word Select),也 叫 左右 声道 选择 信号( Left Right Clock) SD / DATA 代表
串行 数据信号( Serial),也 叫 数据线,它 主要 用于 传输 数字音频 的 数据。如果 是 全双工,会 有 两根 这样 的 线,一根 用于 SOC 发送(常用 于 Playback),一根 用于 SOC 接收(常用 于 Capture)。

我们
采样率:每秒钟
取得 声音 样本 的 次数,可以 理解 为 ADC、 DAC 的 值 每秒 修改 多少 次,常见 的 采样率 是 8 / 16 / 32 / 44.1 / 48 / 64 KHz 等,它 的 频率 和 WS/LRCK 的 频率 是 基本一致 的,比如 我们 播放 采样率 位 16 KHz 的 音频, WS / LRCK 这个 引脚 也 应该 是 16 KHz 的 频率。 位
宽:可以 理解 为 一个 响度 的 量程,位 宽 越 大,数字 声音 的 精度 越高,声音 的 表现 会 更加 细腻,也 常有 深度 的 说法,位深 等等。体现 在 上 图 中 就是 SD / DATA 的 一个 声道 里面 的 的 数量, 0-15 就是 有 16bit。常见 的 深度 有 16 bit , 24 bit 等等。 通道
数:通常 理解 为 连接 的 麦克风、喇叭 的 数量。比如 左右 声道,就 形 如 两个 通道。
时钟
工作方式
Audio 的
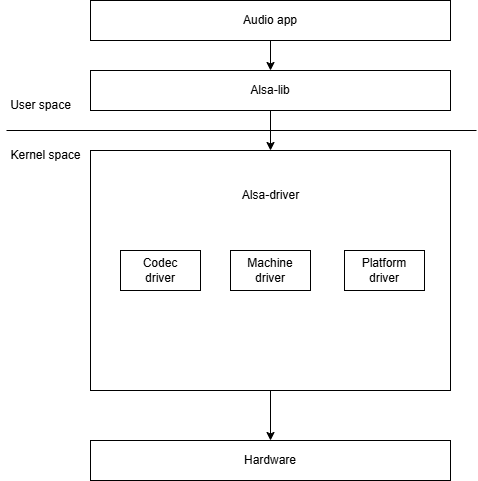
在
然后
4.3.19.4. 驱动代码
uboot 下
kernel 下驱动代码及配置、设备树
DTS 部分:
在
&i2c5 {
        wm8960:wm8960@1a{
                compatible = "wlf,wm8960";
                reg = <0x1a>;
                #sound-dai-cells = <0>;
                status = "okay";
        };
};

......

&dw_i2s1 {
        status = "okay";
        dwc-master = <1>; /*这里的 dwc-master 表示 soc 侧是 master*/
};

......

&hobot_sound_machine{

        status = "okay";
        #address-cells = <1>;
        #size-cells = <0>;
        simple-audio-card,name = "duplex-audio-i2s1";

        simple-audio-card,dai-link@0 {
                link-name = "dai-link0";
                reg = <0>;
                format = "i2s";
                bitclock-master = <&snd1_mm>;
                frame-master = <&snd1_mm>;
                snd1_mm: cpu {
                        sound-dai = <&dw_i2s1 1>;
                };
                codec {
                        sound-dai = <&wm8960>;
                };
        };

};
我们
codec 即 codec-dai 代码
platform 即 cpu-dai 代码
machine 代码
打开
CONFIG_SND_DESIGNWARE_I2S=y
CONFIG_SND_SOC_WM8960=m
CONFIG_SND_HOBOT_SOUND_MACHINE=m
我们
主线
修改 sound/soc/codecs/Kconfig 以及 Makefile,将 codec 加入
其中, Kconfig 可以
config SND_SOC_XXX
    tristate "XXX Audio Codec"
Makefile 可以
obj-$(CONFIG_SND_SOC_XXX) += XXX.o
完成
-> Device Drivers
    <*> Sound card support --->
        <*> Advanced Linux Sound Architecture --->
            <*> ALSA for SoC audio support --->
                    CODEC drivers --->
                        <M> XXX Audio Codec
4.3.19.5. 功能使用
kernel 阶段使用
我们
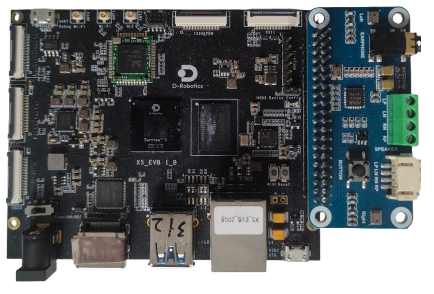
首先
如果
这里
按照
modprobe designware_i2s i2s_ms=1
modprobe snd-soc-wm8960
modprobe snd-soc-hobot-sound-machine
我们
# 探测设备地址

root@buildroot:~# i2cdetect -y -r 5
     0  1  2  3  4  5  6  7  8  9  a  b  c  d  e  f
00:                         -- -- -- -- -- -- -- --
10: -- -- -- -- -- -- -- -- -- -- UU -- -- -- -- --
20: -- -- -- -- -- -- -- -- -- -- -- -- -- -- -- --
30: -- -- -- -- -- -- -- -- -- -- -- -- -- -- -- --
40: -- -- -- -- -- -- -- -- -- -- -- -- -- -- -- --
50: -- -- -- -- -- -- -- -- -- -- -- -- -- -- -- --
60: -- -- -- -- -- -- -- -- -- -- -- -- -- -- -- --
70: -- -- -- -- -- -- -- --
root@buildroot:~#
# 找到可以打印寄存器的节点

cat /sys/kernel/debug/regmap/5-001aregisters > 0x1a_registers.txt
其次
snd_soc_register_codec
devm_snd_soc_register_component
正常
然后
确认 I2S 控制器
模式, SOC 侧 和 codec 侧 都 需要 确认。 确认
位 宽 是否 有 限制,常见 的 位 宽 是 16/24/32bit。 确认
传输 格式,左 对齐 右 对齐 等等。 确认
采样率 是否 有 限制,比如 有些 CODEC 的 mclk 固定 之后,只有 固定 的 采样率。
比如
最后
# 检查声卡, X5 EVB 上默认有一张 dummy 声卡

root@buildroot:/proc/asound# cat cards
 0 [guaaudio       ]: gua-audio - gua-audio
                      gua-audio
root@buildroot:/proc/asound#


# 正常注册之后,可以看到两张声卡
root@buildroot:~# cat /proc/asound/cards
 0 [guaaudio       ]: gua-audio - gua-audio
                      gua-audio
 1 [duplexaudioi2s1]: simple-card - duplex-audio-i2s1
                      duplex-audio-i2s1


## 检查 pcm 设备 , 可以看到 id 和 name 等等信息,都能和 codec 中的对上。

root@buildroot:~# cat /proc/asound/duplexaudioi2s1/pcm0c/info
card: 1
device: 0
subdevice: 0
stream: CAPTURE
id: i2s1-wm8960-hifi wm8960-hifi-0
name: i2s1-wm8960-hifi wm8960-hifi-0
subname: subdevice #0
class: 0
subclass: 0
subdevices_count: 1
subdevices_avail: 1
root@buildroot:~# cat /proc/asound/duplexaudioi2s1/pcm0p/info
card: 1
device: 0
subdevice: 0
stream: PLAYBACK
id: i2s1-wm8960-hifi wm8960-hifi-0
name: i2s1-wm8960-hifi wm8960-hifi-0
subname: subdevice #0
class: 0
subclass: 0
subdevices_count: 1
subdevices_avail: 1
root@buildroot:~#
我们
完成
用户态阶段使用
这里
tinymix 说明:
# tinymix -h
    usage: tinymix [options] <command>
    options:
        -h, --help               : prints this help message and exits
        -v, --version            : prints this version of tinymix and exits
        -D, --card NUMBER        : specifies the card number of the mixer

    commands:
        get NAME|ID              : prints the values of a control
        set NAME|ID VALUE(S) ... : sets the value of a control
        VALUE(S): integers, percents, and relative values
                Integers: 0, 100, -100 ...
                Percents: 0%, 100% ...
                Relative values: 1+, 1-, 1%+, 2%+ ...
        controls                 : lists controls of the mixer
        contents                 : lists controls of the mixer and their contents
示例
查看
#:/userdata# tinymix contents
通过 ctr 设置
#:/userdata# tinymix set 6 120
#:/userdata# tinymix get 6
120 (range 0->255)
通过 name 设置
#:~# tinymix set "ADC4 PGA gain" 1
#:~# tinymix get "ADC4 PGA gain"
1 (range 0->31)
tinycap 说明:
#:/userdata# tinycap
Usage: tinycap {file.wav | --} [-D card] [-d device] [-c channels] [-r
rate] [-b bits] [-p period_size] [-n n_periods] [-t time_in_seconds]
Use -- for filename to send raw PCM to stdout
示例
tinycap /userdata/test.wav -D 0 -d 0 -t 5
tinyplay 说明:
#:/userdata# tinyplay
usage: tinyplay file.wav [options]
options:
-D | --card <card number> The device to receive the audio
-d | --device <device number> The card to receive the audio
-p | --period-size <size> The size of the PCM's period
-n | --period-count <count> The number of PCM periods
-i | --file-type <file-type > The type of file to read (raw or wav)
-c | --channels <count> The amount of channels per frame
-r | --rate <rate> The amount of frames per second
-b | --bits <bit-count> The number of bits in one sample
-M | --mmap Use memory mapped IO to play audio
示例
tinyplay [file.wav] -D 0 -d 1
确定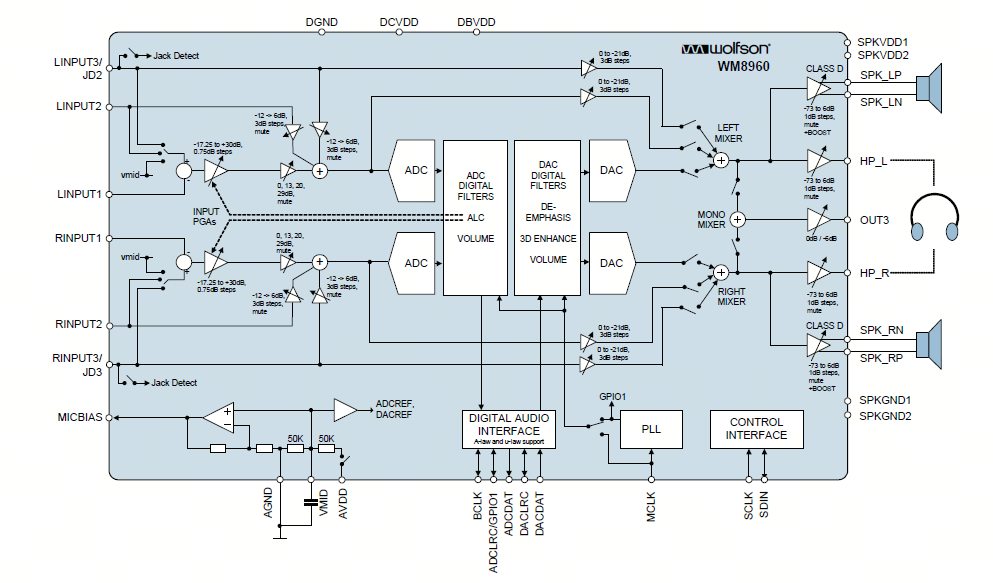
它
然后,我们
tinymix -D 1 contents
接着
录制:
tinymix -D 1 set 'Left Input Boost Mixer LINPUT1 Volume' 3
tinymix -D 1 set 'Right Input Boost Mixer RINPUT1 Volume' 3

tinymix -D 1 set 'Left Input Boost Mixer LINPUT1 Volume' 1
tinymix -D 1 set 'Right Input Boost Mixer RINPUT1 Volume' 1

tinymix -D 1 set 'Capture Volume' 40,40
tinymix -D 1 set 'ADC PCM Capture Volume' 200,200

tinymix -D 1 set 'Left Boost Mixer LINPUT1 Switch' 1
tinymix -D 1 set 'Right Boost Mixer RINPUT1 Switch' 1

tinymix -D 1 set 'Left Input Mixer Boost Switch' 1
tinymix -D 1 set 'Right Input Mixer Boost Switch' 1

tinymix -D 1 set 'Capture Switch' 1,1

tinycap /userdata/2chn_test.wav -D 1 -d 0 -c 2 -b 16 -r 48000 -p 512 -n 4 -t 5
播放:
tinymix -D  1 set 'Left Output Mixer PCM Playback Switch' 1
tinymix -D  1 set 'Right Output Mixer PCM Playback Switch' 1
tinymix -D  1 set 'Speaker DC Volume' 3
tinymix -D  1 set 'Speaker AC Volume' 3
tinymix -D  1 set 'Speaker Playback Volume' 127 , 127
tinymix -D  1 set 'Playback Volume' 255 , 255
tinymix -D  1 set 'Left Output Mixer PCM Playback Switch' 1
tinymix -D  1 set 'Right Output Mixer PCM Playback Switch' 1

tinyplay /userdata/2chn_test.wav -D 1 -d 0
4.3.19.6. 常见问题
Q1 :无声问题如何定位。
我们
黄色
蓝色
紫色
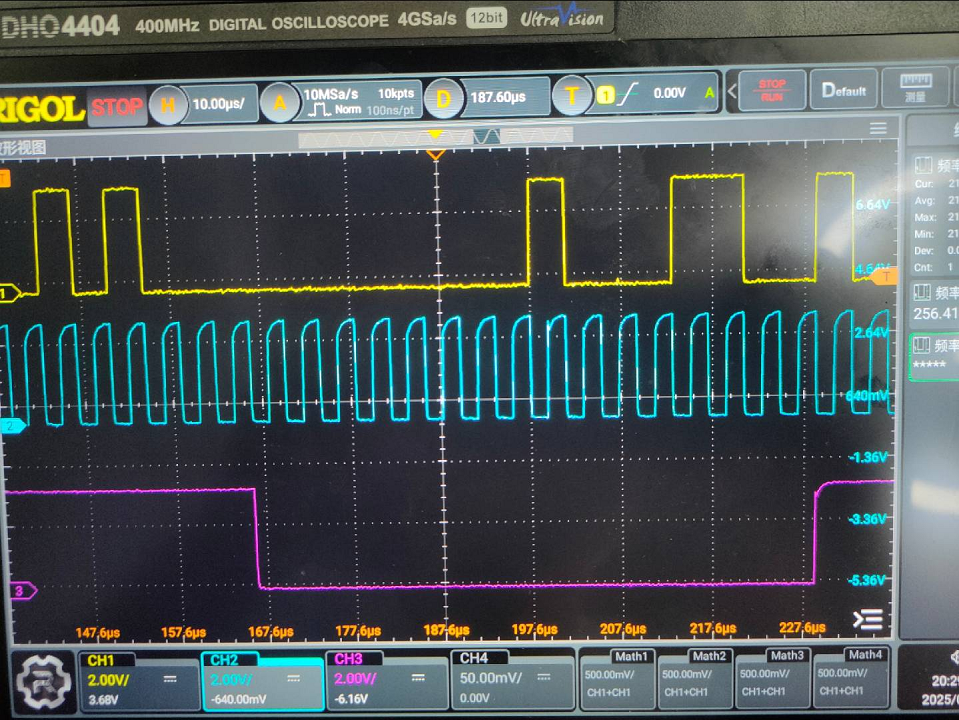
Q2: LOG 比较少,无法定位问题,怎么办?
调整 debug log 等级
echo "8 4 1 7" > /proc/sys/kernel/printk
echo -n "file dwc-i2s.c +p" > /sys/kernel/debug/dynamic_debug/control
Q3 :如何判断声卡注册成功和 pcm 设备对应关系?
Alsa 有 procfs,挂载
/proc/asound/cards : 已
/proc/asound/cardX/pcmY[c, p]/ : 系统
info pcm 流
的 一般 信息,比如 声 卡号、设备 号、流 类型、所 绑定 的 codec 类型 等 hw_params pcm 流
打开 状态 下,可以 查看 pcm 的 基础 参数 配置。比如 采样率、位 宽、通道 数、 period_size、 buffer_size 等。 配置 的 period_size、 buffer_size 可能 与 这里 打印 的 值 不同。实际 以 这里 查看 为准,对应 的 是 硬件 的 实际 参数 #:/proc/asound/card0/pcm0c/sub0# cat hw_params access: RW_INTERLEAVED format: S16_LE subformat: STD channels: 2 rate: 48000 (48000/1) period_size: 1024 buffer_size: 4096
sw_params pcm 流
打开 状态 下,查看 start_threshold、 stop_threshold、 silence_threshold 等。重点 关注 start_threshold、 stop_threshold 阈值 start_threshold: 该值 设置 太 大,从 开始 播放 到 声音 出来 延时 太 长,会 导致 太 短促 的 声音 播 不 出来 stop_threshold: 判断 是否 触发 xrun 的 条件。当 可用 空间 大小 超过 该值 时,会 触发 xrun。 #:/proc/asound/card0/pcm0c/sub0# cat sw_params tstamp_mode: ENABLE period_step: 1 avail_min: 1 start_threshold: 1 stop_threshold: 40960 silence_threshold: 0 silence_size: 0 boundary: 4611686018427387904
status 可
查看 当前 substream 的 状态 (running、 xrun 等 ), appl_ptr/hw_ptr 指针 的 值。其中, hw_ptr 和 appl_ptr 可以 识别 底层 硬件 无法 传输 或 接收 任何 数据 的 情况。 比如,启动 测试 但是 中断 未 正常 触发,数据传输 将会 停滞。此时, hw_ptr/appl_ptr 指针 将 持续 得不到 更新
Q4 : xrun 是什么问题,遇到了该怎么定位和解决?
音频
可能
播放
录音
触发 xrun 异常
音频
数据 来自 storage, IO 操作 耗时 访问 RAM disk 和
读写 pcm 设备 单线程 运行 语音
进程 优先级 较 低,其他 优先级 更 高 的 任务 抢占
定位 xrun
xrun 问题
检查 xrun 是否
音频文件
写入 ram disk 或者 特定 的 设备 文件,参考 命令
mkdir /data/audio_test
tinycap /data/audio_test/test.wav

tinycap /dev/null
注意,以上
优化
应用程序 测试
使用
以
依靠/proc 下
开启
CONFIG_SND_PCM_XRUN_DEBUG=y
CONFIG_SND_VERBOSE_PROCFS=y
CONFIG_SND_DEBUG=y
对应
# Enable basic debugging and dump stack
# Usefull to just see, if PCM stream is stopped for a reason (usually wrong audio process timing from scheduler)
echo 3 > /proc/asound/card0/pcm0p/xrun_debug
通过 ftrace 来
Ftrace 是
开启
编译 ftrace 的 config 配置 项。编译 并 重新 烧写 镜像。
CONFIG_FTRACE=y
CONFIG_FUNCTION_TRACER=y
CONFIG_FUNCTION_GRAPH_TRACER=y
CONFIG_STACK_TRACER=y
CONFIG_DYNAMIC_FTRACE=y
生成 trace 文件
echo > /sys/kernel/debug/tracing/trace
echo 1 > /sys/kernel/debug/tracing/events/signal/enable
app_test  # 执行你的应用
killed
echo 0 > /sys/kernel/debug/tracing/events/signal/enable
cat /sys/kernel/debug/tracing/trace > /userdata/trace.txt
或者
#!/bin/sh
date
rm /userdata/trace.dat
echo "" > /userdata/log/usr/message
trace-cmd record -e irq -e sched_switch -e sched_wakeup -o /userdata/trace.dat &
cnt=0
while true;do
    nr=$(grep -r "audio unexpected delay count" /userdata/log/usr/message | wc -l)
    echo "nr " $nr
    if [ $nr -gt 1 ];then
    echo "find the error message,send the SIGINT Term Interrupt to the trace-cmd !"
    kill -2 $(pidof trace-cmd)
    date
    exit 0
    else
    if [ $cnt -gt 100 ];then
        date
        cnt=0
        echo "rm the trace.dat file,and restart the trace-cmd"
        kill -9 $(pidof trace-cmd)
        rm -rf /userdata/trace.dat
        trace-cmd record -e irq -e sched_switch -e sched_wakeup -o /userdata/trace.dat &
    fi
    fi
    cnt=$((cnt+1))
    sleep 1
done
分析 trace 文件
分析 trace 文件
diff --git a/kernel/trace/Kconfig b/kernel/trace/Kconfig
index 29db703f6880..86de03221287 100644
--- a/kernel/trace/Kconfig
+++ b/kernel/trace/Kconfig
@@ -870,6 +870,10 @@ config HIST_TRIGGERS_DEBUG

       If unsure, say N.

+config OLD_TRACE
+   bool "old ftrace"
+   default y
+
 endif # FTRACE

 endif # TRACING_SUPPORT
diff --git a/kernel/trace/trace_output.c b/kernel/trace/trace_output.c
index bc24ae8e3613..e0df7a412c95 100644
--- a/kernel/trace/trace_output.c
+++ b/kernel/trace/trace_output.c
@@ -482,16 +482,23 @@ int trace_print_lat_fmt(struct trace_seq *s, struct trace_entry *entry)
    hardirq              ? 'h' :
    softirq              ? 's' :
                   '.' ;
-
+#ifndef CONFIG_OLD_TRACE
    trace_seq_printf(s, "%c%c%c%c",
         irqs_off, need_resched, need_resched_lazy,
         hardsoft_irq);
-
+#else
+   trace_seq_printf(s, "%c%c%c",
+            irqs_off, need_resched,
+            hardsoft_irq);
+#endif
    if (entry->preempt_count)
    trace_seq_printf(s, "%x", entry->preempt_count);
    else
    trace_seq_putc(s, '.');

+
+
+#ifndef CONFIG_OLD_TRACE
    if (entry->preempt_lazy_count)
    trace_seq_printf(s, "%x", entry->preempt_lazy_count);
    else
@@ -501,7 +508,7 @@ int trace_print_lat_fmt(struct trace_seq *s, struct trace_entry *entry)
    trace_seq_printf(s, "%x", entry->migrate_disable);
    else
    trace_seq_putc(s, '.');
-
+#endif
    return !trace_seq_has_overflowed(s);
 }
关于 ftrace 的
https://www.kernel.org/doc/html/latest/trace/ftrace.html
https://perfetto.dev/docs/data-sources/cpu-scheduling
https://git.kernel.org/pub/scm/linux/kernel/git/rostedt/trace-cmd.git/
https://kernelshark.org/Documentation.html#graph-info-line\
总的来讲,面对 xrun 问题
提高
线程 优先级 ( 设置 实时 线程 + 优先权 值 ) 调大 period_size,改变 DMA 传输数据
量 异步
实现 I/O 读写 和 ALSA 设备 读写
Q5 : 打开设备节点报错等相关问题:
出现
无法 打开 指定 PCM 设备 的 提示,没有 找到 这个 文件 或者 目录
Unable to open PCM device cannot open device (4) for card (1):
    No such file or directory
驱动
原因
原因
出现
无法 打开 PCM 设备 的 提示
Unable to open PCM device ()
检查
打开
设备 节点 卡住,应用 无 任何 log 日志 打印 ALSA 框架 允许 单个 设备 同一 时刻 只能 打开 一次。检查 应用 实现 上,是否 存在 上次 执行 还 未 退出 的 情况 下,又 启动 应用 pcm_read/pcm_write 返回
异常 值为 -5 调整 ALSA 框架 log 打印 等级,检查 是否 由于 中断 异常 或者 硬件 链接 异常 导致 pcm_read/pcm_write 返回
异常 值为 -32 一般 是 发生 了 xrun pcm_read 返回
异常 值为 -16 正常 录音 的 情况 (X5 做 slave) 下,时钟 突然 断掉 或者 硬件 链接 中断 会 发生 该 异常 录制
数据 均 为 0 或者 播放 没有 声音
1 ,示波器测量 I2S 的 时钟 线 频率 是否 正常, data 线 是否 有 数据 输出。
2 ,如果时钟 频率 不 符合 预期 或者 量 到 某个 时钟 信号 持续保持 低电平 的 情况,检查 I2S
寄存器的 配置 是否 符合 预期。比如 主从 模式、时钟 比值 状态
3 ,如果以上 没有 问题,就 需要 检查 codec 芯片 是否 正常 工作。播放 一个 正弦波,测量 codec 侧 模拟信号 的
输出,如果这里 没有 输出,确认 codec 的 时钟 比值 配置 和 X5 端 是否 匹配,以及 当前 X5 端的 时钟 比值 是否 在 codec 可 支持 范围。
4 ,如果 codec 的输出 也 能量 到 准确 的 信号,检查 功放 芯片 是否 正常 工作。确认 功放 芯片 各 管脚 幅值 是否 正常 录制 / 播放
噪声