4.1. 搭建开发环境及编译说明
4.1.1. 概述
本章
搭建
开发 :环境 了解
开发 所 需 的 软件 和 硬件 环境 要求,包括 操作系统 版本、必要 的 工具链、编译器 和 相关 依赖 库 的 安装。 配置
交叉 编译 环境。
源码
目录 :结构 详细
解析 X5 BSP 的 源码 目录,包括 每个 模块 的 功能 和 文件组织 方式。 明确
各个 模块 在 系统 开发 中 的 作用,以及 如何 定位 和 修改 相关 代码。
系统
镜像 :的 编译 从
源码 到 生成 完整 系统 镜像 的 编译 流程 解析。 包括
配置文件 的 准备、编译 脚本 的 使用 方法、镜像 生成 的 常见问题 及其 解决方案。 详细
说明 X5 BSP 编译 生成 的 主要 文件 的 作用 和 功能。
通过
4.1.2. 搭建开发环境
X5 BSP 采用 交叉
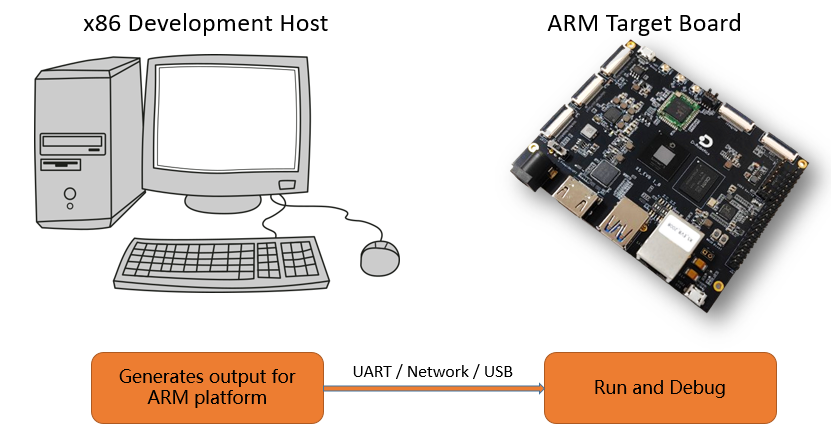
4.1.2.1. 开发主机规格要求
为了
| 硬件 / 操作系统 | 要求 |
|---|---|
| CPU | 8 核 |
| 内存 | 16GB 或 |
| 操作系统 | 推荐Ubuntu 20.04 操作系统,若 |
4.1.2.2. 配置开发主机编译环境
为
安装 Ubuntu 软件包(推荐方式)
通过
执行
sudo build/install_host_deps.sh
该
安装 Python 软件包(必须)
根据 Ubuntu 版本
Ubuntu 18.04
pip3 install cryptography -i https://pypi.tuna.tsinghua.edu.cn/simple
Ubuntu 20.04 和 Ubuntu 22.04
pip3 install cryptography==40.0.2 -i https://pypi.tuna.tsinghua.edu.cn/simple
手动安装 Ubuntu 软件包(可选方式)
如果
根据 Ubuntu 版本
Ubuntu 18.04
sudo apt update

sudo apt-get install -y \
        tzdata tree bc hashdeep kmod file wget curl cpio unzip rsync liblz4-tool jq \
        build-essential make cmake bison flex ccache zlib1g-dev libssl-dev \
        libncurses-dev u-boot-tools device-tree-compiler cryptsetup-bin \
        android-sdk-libsparse-utils e2fsprogs dosfstools mtools mtd-utils

sudo apt-get install -y python3 python3-pip
pip3 install cryptography -i https://pypi.tuna.tsinghua.edu.cn/simple
Ubuntu 20.04
sudo apt update

sudo apt-get install -y \
        tzdata tree bc hashdeep kmod file wget curl cpio unzip rsync liblz4-tool jq \
        build-essential make cmake bison flex ccache zlib1g-dev libssl-dev \
        libncurses-dev u-boot-tools device-tree-compiler cryptsetup-bin \
        android-sdk-libsparse-utils e2fsprogs dosfstools mtools mtd-utils

sudo  apt-get install -y python3 python3-pip
pip3 install cryptography==40.0.2 -i https://pypi.tuna.tsinghua.edu.cn/simple
Ubuntu 22.04
sudo apt update

sudo apt-get install -y \
        tzdata tree bc hashdeep kmod file wget curl cpio unzip rsync liblz4-tool jq \
        build-essential make cmake bison flex ccache zlib1g-dev libssl-dev \
        libncurses-dev u-boot-tools device-tree-compiler cryptsetup-bin \
        android-sdk-libsparse-utils dosfstools mtools mtd-utils

sudo apt-get install -y python3-pip
pip3 install cryptography==42.0.2 -i https://pypi.tuna.tsinghua.edu.cn/simple
注意事项
若
下载 Python 包时 网络 较慢,可 更换 国内 镜像 源,例如 以上 命令 中 指定 的 清华 源(https://pypi.tuna.tsinghua.edu.cn/simple)。
4.1.2.3. 安装交叉编译工具链( GCC)
X5 BSP 使用 arm-gnu-toolchain-11.3.rel1 版本toolchain 目录arm-gnu-toolchain-11.3.rel1-x86_64-aarch64-none-linux-gnu.tar.xz
在device/horizon/x5 目录board_x5_soc_debug_config.mk 配置
默认
以 device/horizon/x5/board_x5_soc_debug_config.mk 板级/opt/ 目录,例如:
export TOOLCHAIN_PATH=/opt/arm-gnu-toolchain-11.3.rel1-x86_64-aarch64-none-linux-gnu
工具链
根据
有
sudo权限的 如果用户 您 可以 访问 /opt/目录,执行以下 命令 解压 工具链: sudo tar -xvf toolchain/arm-gnu-toolchain-11.3.rel1-x86_64-aarch64-none-linux-gnu.tar.xz -C /opt/
无
sudo权限的 如果用户 您 无法访问 /opt/目录,可将 工具链 解压 到 用户 目录 下,例如 /home/hobot/:tar -xvf toolchain/arm-gnu-toolchain-11.3.rel1-x86_64-aarch64-none-linux-gnu.tar.xz -C /home/hobot/
然后
在 板级 配置文件 中 更新 TOOLCHAIN_PATH变量:export TOOLCHAIN_PATH=/home/hobot/arm-gnu-toolchain-11.3.rel1-x86_64-aarch64-none-linux-gnu
注意事项
目录
权限 如果解压 路径 需要 sudo权限,请确保 具备 相应 的 操作 权限。否则,选择 用户 拥有 写 权限 的 目录 进行 安装。 更新
配置文件 每次更改 工具链 安装 路径 后,请 及时 修改 板级 配置文件 中 的 TOOLCHAIN_PATH变量,确保编译 过程 中 工具链 路径 正确。
4.1.3. BSP 源码目录结构
4.1.3.1. 顶层目录结构
以下
.
├── bd.sh -> build/xbuild.sh      # 链接到编译主程序,用户可直接执行此文件启动编译
├── device                        # 板级配置目录,包含硬件配置文件,可设置编译选项和分区表
├── build                         # 编译系统代码目录,包含编译脚本及工具
├── miniboot                      # 最小启动固件原始资料目录,包含 BL2 、 DDR、 BL3x 等文件
├── uboot                         # U-Boot 源码
├── kernel                        # Linux Kernel 源码
├── system                        # 根文件系统,包括 initramfs 、 buildroot 和 Ubuntu 根文件系统
├── hbre                          # 多媒体库、板端运行工具等用户态程序的源码
├── app                           # 应用程序及测试程序源码
├── toolchain                     # 交叉编译工具链
├── prebuilts                     # 预编译模块,如闭源的 libbpu 和 bpu-hw_io 驱动等
├── README.md -> build/README.md  # 源码中自带的英文版 xbuild 使用说明,提供基础的环境搭建和命令使用说明
└── out                           # 系统编译的目标输出目录
system 目录
下 的 各种 根 文件系统 制作、修改 方法 请 查阅 根 文件系统 。适配 指南
4.1.3.2. bd.sh 文件
bd.sh 是 BSP 项目build/xbuild.sh,简化bd.sh 即可build/xbuild.sh 完全一致。
4.1.3.3. device 目录
device 目录
device/
└── horizon
    └── x5
        ├── board_cfg                                  # 本目录下包含硬件的基础配置
        │   └── soc
        │       ├── bl2_cfg
        │       │   ├── bl2_cfg.json                   # BL2 阶段配置文件,例如: DDR 参数、设置启动阶段是否开启看门狗等
        │       │   ├── bl2_rot_prikey.pem              # BL2 阶段使用的私钥
        │       │   └── user_root.key                   # 用户根密钥
        │       ├── boot_its
        │       │   ├── x5-common.its                   # 系统镜像的ITS配置文件
        │       │   ├── x5-enc-common.its               # 加密模式的ITS配置文件
        │       │   ├── x5-enc-recovery.its             # 恢复模式下的ITS配置文件
        │       │   └── x5-recovery.its                # 恢复模式的ITS配置文件
        │       ├── initramfs_configs
        │       │   └── recovery_ramfs_recipe_extern    # 初始化文件系统配置
        │       ├── key_files                           # 镜像加密等功能需要使用到的秘钥文件
        │       │   ├── fde-origin-128.key
        │       │   ├── fit_enc_iv.bin
        │       │   └── fit_enc_key.bin
        │       ├── sub_config                          # 分区表子集,可以把多个分区表合并在一个 json 中,然后在主分区表中引用
        │       │   ├── miniboot.json
        │       │   └── miniboot_nand.json
        │       ├── x5-soc-debug-ab-gpt.json            # Debug 模式下使用的 AB 分区表
        │       ├── x5-soc-debug-gpt.json               # Debug 模式的 GPT 分区表
        │       ├── x5-soc-debug-nand-ab-ota-gpt.json    # NAND 分区表和 OTA 配置
        │       ├── x5-soc-debug-nand-gpt.json          # NAND 分区表配置
        │       ├── x5-soc-recovery-ota.json            # 恢复模式的 OTA 分区表
        │       ├── x5-soc-release-gpt.json            # Release 模式下使用的分区表,使用单分区模式减小系统镜像大小
        │       ├── x5-soc-ubuntu-debug-gpt.json        # Ubuntu Debug 模式的 GPT 分区表
        │       └── x5-soc-ubuntu-release-gpt.json      # Ubuntu 发布模式的 GPT 分区表
        ├── board_x5_evb_debug_config.mk               # X5 EVB 的板级配置文件, Linux Kernel 配置会使能 Debug 选项等
        ├── board_x5_evb_jammy_debug_config.mk         # X5 EVB 使用 Jammy 作为主存储器的板级配置文件,Linux Kernel 配置使能 Debug 选项等
        ├── board_x5_evb_jammy_release_config.mk       # X5 EVB 使用 Jammy 作为主存储器的板级配置文件,Linux Kernel 配置关闭 Debug 选项等
        ├── board_x5_evb_nand_debug_config.mk          # X5 EVB 使用 Nand Flash 作为主存储器的板级配置文件,Linux Kernel 配置使能 Debug 选项等
        ├── board_x5_evb_nand_release_config.mk        # X5 EVB 使用 NAND Flash 作为主存储器的板级配置文件,Linux Kernel 配置关闭 Debug 选项等
        ├── board_x5_evb_release_config.mk             # X5 EVB Release 模式的板级配置文件,Linux Kernel 配置关闭 Debug 选项等
        ├── board_x5_soc_debug_config.mk               # X5 SoC Debug 模式的板级配置,Linux Kernel 配置使能 Debug 选项等
        ├── board_x5_soc_release_config.mk             # X5 SoC 发布模式的板级配置,Linux Kernel 配置关闭 Debug 选项等
        └── dr_release_version.mk                      # 系统镜像版本信息定义
4.1.3.4. build 目录
build 目录
build/
├── common                # 通用 Makefile 和配置项, mk_hbre.sh 在编译 hbre 目录下的源码时会用到当面目录下的源码
├── Dockerfile            # 用于生成 BSP 编译的 Docker 容器,配合 start_docker.sh 使用
├── hbre_config           # hbre 编译配置项,该配置文件中定义了是否编译对应的 hbre 模块
├── install_host_deps.sh  # 安装主机依赖的软件包
├── mk_app.sh             # 编译 app 目录并生成 app.img
├── mk_hbre.sh            # 编译 hbre 和 prebuilts/hbre ,生成 hbre.img
├── mk_boot.sh            # 编译 kernel 和 prebuilts/kernel,生成 boot.img
├── mk_miniboot.sh        # 打包 miniboot,生成 miniboot.img
├── mk_system.sh          # 打包 system 根文件系统,生成 system.img
├── mk_uboot.sh           # 编译 U-Boot,生成 uboot.img
├── mk_appsdk.sh          # 打包 APPSDK,生成 platform-appsdk-<ver>.deb + 总包 .tar.gz
├── mk_fde.sh             # 编译加密分区的示例脚本
├── pack_uart_usb.sh      # 打包用于 UART/USB 刷机的镜像
├── quickcmd.sh           # 提供常用快捷命令
├── README.md             # 源码中自带的英文版 xbuild 使用说明,提供基础的环境搭建和命令使用说明
├── start_docker.sh       # 如果需要在 docker 容器中编译 BSP,使用此脚本生成和启动容器
├── tools                 # 编译、打包、签名工具软件
├── utils_funcs.sh        # 通用函数封装
└── xbuild.sh             # 主编译入口
4.1.3.5. out 目录
out 目录
out/
├── build                             # U-Boot、 Kernel、 hbre、 app 等源码外编译的输出目录
│   ├── app
│   ├── hbre
│   ├── hbre_deps
│   ├── kernel                        # Kernel 的目标文件生成目录,通过板级配置中的 HR_KERNEL_OUTPUT_DIR 指定
│   └── uboot                         # U-Boot 的目标文件生成目录,通过板级配置中的 HR_UBOOT_OUTPUT_DIR 指定
├── build_log
│   └── build_20250110_101641.log     # 编译日志,通过 bd.sh 或者 xbuild.sh 启动的编译,所有输出日志会同步保存在此
├── deploy                            # 各分区镜像的内容,编译系统会把此目录下的数据打包成 product 目录下的 *.img 镜像
│   ├── app
│   ├── appsdk                        # APPSDK 打包产物(platform-appsdk-<ver>.deb + 总包 .tar.gz + 安装/验收脚本),由 ./bd.sh appsdk 生成
│   ├── boot
│   ├── hbre
│   ├── miniboot
│   ├── ota_packages
│   ├── system
│   ├── uboot
│   └── vbmeta
└── product                           # 编译后的最终产物,完整系统镜像和各分区镜像文件,刷机工具使用此目录下文件进行刷机
    ├── app.img                       # app 分区镜像
    ├── board_config.mk               # 方便查看板级配置信息,对升级过程无用
    ├── boot.img                      # Linux Kernel 分区镜像
    ├── emmc_disk.img                 # 完整系统镜像,包括 miniboot_all.img、 uboot.img、 ubootenv.img、 boot.img 和所有文件系统分区镜像
                                      # emmc_disk.img 可用于 fastboot、 DFU 或 TFTP 升级
    ├── emmc_disk.simg                # sparse 格式的完整镜像 , 比 emmc_disk.img 占用空间更小。 dfu 升级目前不支持解析该镜像
    ├── gpt_back.img                  # 没有被打包进 disk.img,暂时没有什么作用,编译的临时文件
    ├── gpt.img                       # 存放在 eMMC 0 地址处的分区表信息
    ├── hbre.img                      # hbre 分区镜像
    ├── mbr.img                       # ROMCODE 能解析的分区信息,记录 BL2 、 DDR 参数、 BL3x 等固件在镜像中的存放位置
    ├── miniboot.img                  # miniboot.img 包含 BL2 、 BL31 、 optee、 DDR 参数
    ├── miniboot_all.img              # miniboot_all.img  = gpt.img + mbr.img + miniboot.img + misc.img
                                      # miniboot_all.img 可以直接写到 eMMC 或者 Nand Flash 的 0 地址
    ├── misc.img                      # 无数据,在运行时该分区记录升级信息,并在 AB 分区模式下保存当前使用的分区编号
    ├── ota_packages                  # OTA 升级需要使用到的镜像,通过 bd.sh otapackage 命令生成
    ├── system.img                    # 根文件系统镜像
    ├── uart_usb                      # 此目录下固件,在刷机工具对空片升级时需要使用
    ├── ubootenv.img                  # 默认无数据,在 U-Boot 下执行 saveenv 后会保存 U-Boot 环境变量到该分区
    ├── uboot.img                     # U-Boot 分区镜像
    ├── vbmeta.img                    # 开启安全启动时,本镜像存放 Boot 和 system 分区镜像的校验信息
    └── x5-soc-release-gpt.json       # 分区表信息,在使用刷机工具刷机时,会读取该文件来获取分区表列表
product 目录
镜像 的 使用 请 查阅 快速 入门 - 系统 。镜像 烧写
4.1.4. 编译过程及命令
4.1.4.1. 编译过程
BSP 项目build 目录xbuild.sh 是bd.sh,指向 xbuild.sh,用户bd.sh 开始
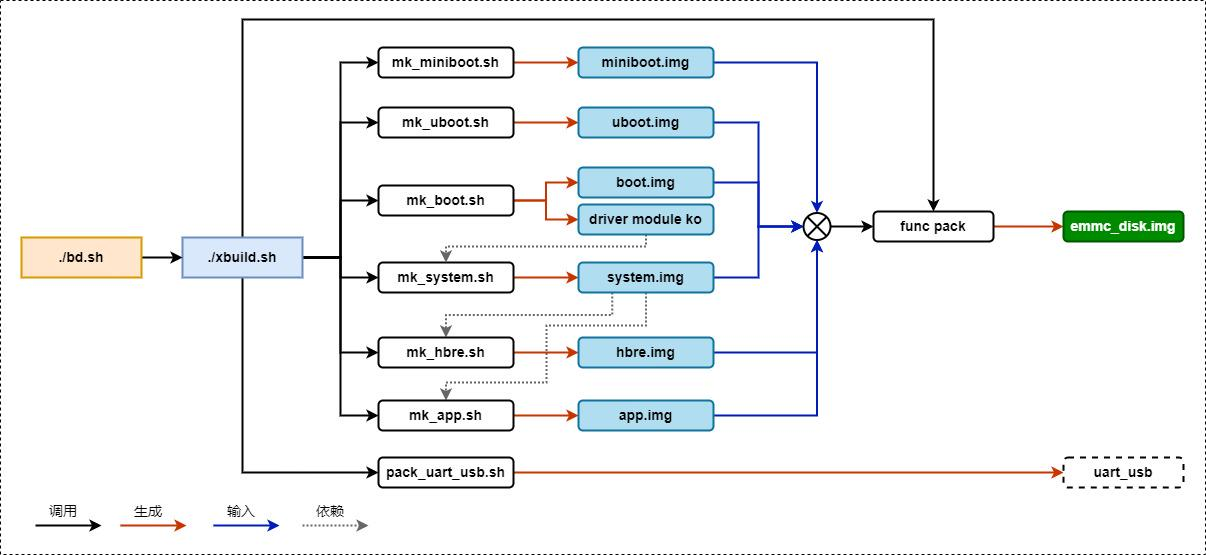
生成
miniboot.img:底层启动 引导 程序,负责 DDR 初始化、加载 和 引导 U-Boot。 uboot.img:引导加载 程序,用于 在 启动 Linux Kernel 之前 完成 必要 的 初始化。 boot.img:包含 Linux Kernel 镜像、设备树和 一个 基于 initramfs 格式 的 最小 根 文件系统。 system.img:根文件系统 镜像,包含 glibc 运行库、 Shell、工具软件 及 脚本。 hbre.img:多媒体库 镜像,包含 多媒体 相关 的 库 文件。 app.img:应用程序镜像,默认 存放 测试程序,用户 可 根据 需求 替换 为 实际 功能 程序。 emmc_disk.img:完整系统 固件,包含 上述 所有 镜像,适用 于 fastboot、 DFU、 TFTP 升级。 uart_usb:刷机工具 专用 固件。
4.1.4.2. lunch 命令选择板级配置
执行 ./bd.sh lunch 命令device 目录board_***_config.mk 命名
配置流程
执行 ./bd.sh lunch 命令device 目录board_config.mk (可以ls -lha device/ 命令distclean 清理
使用方法
首次
配置 如果用户 直接 运行 ./bd.sh,而未 选择 过板级 配置文件,系统 会 提示 选择 配置文件。 切换
板级 若需配置 更换 板级 配置文件,用户 可 主动 执行 以下 命令 重新 选择: ./bd.sh lunch
直接
指定 为配置文件 方便 脚本 调用, lunch命令支持 通过 数字 或 配置 文件名 直接 选择: ./bd.sh lunch 5 ./bd.sh lunch board_x5_evb_release_config.mk
示例
首次
运行 ./bd.sh lunch时,系统会 显示 配置 选项 $ ./bd.sh lunch You're building on #236-Ubuntu SMP Fri Apr 11 19:53:21 UTC 2025 Lunch menu... pick a combo: 0. horizon/x5/board_x5_evb_debug_config.mk 1. horizon/x5/board_x5_evb_jammy_debug_config.mk 2. horizon/x5/board_x5_evb_jammy_release_config.mk 3. horizon/x5/board_x5_evb_nand_debug_config.mk 4. horizon/x5/board_x5_evb_nand_release_config.mk 5. horizon/x5/board_x5_evb_release_config.mk 6. horizon/x5/board_x5_soc_debug_config.mk 7. horizon/x5/board_x5_soc_release_config.mk Which would you like? [0] : 5 You are selected board config: horizon/x5/board_x5_evb_release_config.mk输入
对应 的 数字 即可 完成 配置,例如 以上 示例 中 输入 5 后 选择 使用 horizon/x5/board_x5_evb_release_config.mk。成功
选择 后,系统 会 在 device目录下 创建 软 链接 board_config.mk,指向所 选 配置文件,无需 重复 选择 配置文件,除非 主动 切换 或 清理 编译 环境。 通过
指定 数字 和 板级 配置 文件名 直接 完成 配置 $ ./bd.sh lunch 5 You're building on #140~20.04.1-Ubuntu SMP Wed Dec 18 21:35:34 UTC 2024 You are selected board config: horizon/x5/board_x5_evb_release_config.mk $ ./bd.sh lunch board_x5_evb_release_config.mk You're building on #140~20.04.1-Ubuntu SMP Wed Dec 18 21:35:34 UTC 2024 You are selected board config: horizon/x5/board_x5_evb_release_config.mk
4.1.4.3. 编译命令
本
完整命令模式
支持
所有 编译 命令 和 选项。 无需
配置 环境变量,在 任何 终端 下均 可 运行。 在 BSP 根目录
下 执行:
./bd.sh [all | function] [module] [clean | distclean]
命令
==================================================================================
   \  //   Welcome to the D-Robotics xbuild system!
    \//    Working directory: /home/hobot/1-work/6-x5/02-dev-x5
    //\
   //  \
==================================================================================
Available commands for bd.sh:
./bd.sh [all | function] [module] [clean | distclean]
Support functions :
        help all lunch miniboot uboot factory boot hbre system app pack otapackage
Usage example:
        ./bd.sh all
        ./bd.sh miniboot [clean | distclean]
        ./bd.sh uboot [clean | distclean]
        ./bd.sh boot [clean | distclean]
        ./bd.sh boot module [clean]  -- eg: ./bd.sh boot spi
        ./bd.sh system [clean | distclean]
        ./bd.sh hbre [help | all ] [modules] [pack | clean | distclean]
        ./bd.sh hbre module [pack | clean | distclean] -- eg: ./bd.sh hbre liblog
        ./bd.sh app [help | all ] [modules] [pack | clean | distclean]
        ./bd.sh app module [pack | clean | distclean]
        ./bd.sh clean
        ./bd.sh distclean
        ./bd.sh uboot menuconfig
        ./bd.sh boot menuconfig
        ./bd.sh help
==================================================================================
快捷命令模式
提示: 如果source <BSP workspace>/build/quickcmd.sh 命令
通过source build/quickcmd.sh,可以
快捷
简化
命令,支持 Tab键补全。 支持
快捷 跳转 目录(如 cr跳转到 BSP 根目录)。 所有
快捷 。命令 支持 在 任意 目录 下 执行,例如 可以 在 $HOME 目录 下 执行 b 完成 对 BSP目录下 源码 的 编译 登录
的 一个 终端 只 支持 编译 source 过 的 那 份 源码。 仅
支持 以下 罗列 的 命令集。
快捷
==================================================================================
   \  //   Welcome to the D-Robotics xbuild system!
    \//    Working directory: /home/hobot/1-work/6-x5/02-dev-x5
    //\
   //  \
==================================================================================
Available commands for bd.sh:
        help all clean distclean lunch miniboot uboot factory boot system hbre app pack

Shortcut commands for build:
        b      : bd.sh             - default build all
        ball   : bd.sh all         - build all
        bm     : bd.sh miniboot    - only build miniboot
        bu     : bd.sh uboot       - only build uboot
        bf     : bd.sh factory     - build uart_usb image
        bb     : bd.sh boot        - only build kernel
        bs     : bd.sh system      - only build rootfs
        bh     : bd.sh hbre        - build hbre
        bhm    : bd.sh hbre module - build hbre module, user interactive mode
        ba     : bd.sh app         - build app
        bam    : bd.sh app module  - build app module, user interactive mode
        bp     : bd.sh pack        - pack all image into emmc_disk.img

Shortcut commands for changing directory:
        croot  - go to root directory
        cr     - go to root directory
        cout   - go to out directory
        co     - go to out directory
        cuboot - go to uboot directory
        cub    - go to uboot directory
        cboot  - go to kernel directory
        cb     - go to kernel directory
        cdev   - go to device directory
        cbuild - go to device directory
        capp   - go to app directory
        chbre  - go to hbre directory
        go <regex> -- go to directory matching the specified <regex>

Shortcut commands for configuring U-Boot and the kernel defconfig
        bumc   : bd.sh uboot menuconfig       - Edit and save uboot menuconfig
        bbmc   : bd.sh boot menuconfig        - Edit and save kernel menuconfig

Usage example for build kernel and hbre module
        bb spi      : bd.sh boot spi          - Compile driver under kernel
        bh liblog   : bd.sh hbre liblog       - Compile modules under hbre
==================================================================================
注意:进入
<xbuild>(base) sxq@DESKTOP-6VORLA0:~/projects/sdk_x5_1$
quickcmd.sh 脚本<xbuild> 字符串,以
4.1.4.4. 整体编译
不带./bd.sh 命令
./bd.sh
编译
4.1.4.5. 模块化编译
通过 bd.sh 脚本
./bd.sh [all | function] [module] [clean | distclean]
Support functions :
        help lunch miniboot uboot factory boot hbre system app pack appsdk
miniboot uboot boot hbre system app 这些clean 和 distclean 命令,例如:
# 单独编译 uboot
./bd.sh uboot
# 单独 clean uboot
./bd.sh uboot clean
# 单独 distclean uboot
./bd.sh uboot distclean
全部emmc_disk.img:
./bd.sh pack
hbre 和 app 编译hbre 目录liblog:
# 单独编译 liblog
./bd.sh hbre liblog

# 编译 liblog,并且重新打包 hbre.img
./bd.sh hbre liblog pack

# 如果不记得模块名,可以执行以下命令进入用户交互模式,通过输入数字选择模块
./bd.sh hbre module
factory 命令out/uart_usb 中miniboot 和 uboot 的
./bd.sh factory
appsdk 命令out/deploy/system 运行库 + hbre 产物 + 工具链 libc)、hbre 库
# 打包 APPSDK(需先 system unpack + hbre 构建完成)
./bd.sh appsdk
打包out/deploy/appsdk/images/ 目录:
out/deploy/appsdk/images$ ls platform-appsdk-*
platform-appsdk-v1.1.2.deb         # SDK 本体(deb 格式)
platform-appsdk-v1.1.2.tar.gz      # 总包(含 deb + install.sh + relocate-paths.sh + test-sdk.sh)
应用tar.gz 总包install.sh 安装、source environment-setup 激活
注:APPSDK 打包./bd.sh hbre && ./bd.sh appsdk 即可./bd.sh 完整./bd.sh all 不会
注:用户
cd build

./mk_boot.sh
./mk_boot.sh clean

./mk_uboot.sh
./mk_uboot.sh clean
./mk_uboot.sh distclean

./mk_hbre.sh
./mk_hbre.sh liblog
./mk_hbre.sh camsys/libvpf
4.1.4.6. Non-secure 固件
概述
根据
Secure 芯片: 已
烧录 地瓜 Hash key,不 支持 客户 自定义 Key Non-secure 芯片:不
包含 任何 Hash key,客户 可 烧录 自定义 Key,可以 参考客户 自定义Hash key
Secure 芯片
编译
Non-secure 固件HR_ENABLE_CUSTOMER_KEY,如下
export HR_ENABLE_CUSTOMER_KEY="yes"
启动 log 信息
Non-secure 固件
NOTICE:  Welcome to Horizon X5 ASIC BOOTROM - V4.1
NOTICE:                 OTP config:
NOTICE:                         otp exist: true
NOTICE:                         test region size: 304
NOTICE:                         secure region size: 120
NOTICE:                         none secure region size: 56
NOTICE:   Enable MMU
NOTICE:  Booting Trusted Firmware
NOTICE:  BL1: v2.8(release):
NOTICE:  BL1: Built : 17:42:12, Oct 19 2023
NOTICE:  Enter eMMC Mode......
NOTICE:  USER AREA.
NOTICE:   eMMC clk_rate = CLK_12M
NOTICE:   eMMC emmc_data_width == WIDTH_DATA_1
NOTICE:   eMMC emmc_cfg.emmc_clk_latch == CLK_RISING
NOTICE:  Enter media_source_select process(1).
NOTICE:  BL1: BL2 memory layout address = 0x1fe9f000
NOTICE:  BL1: Booting BL2
NOTICE:                 OTP config:
NOTICE:                         otp exist: true
NOTICE:                         test region size: 304
NOTICE:                         secure region size: 120
NOTICE:                         none secure region size: 56
NOTICE:  BL2: v2.8(release):v1.0.8-77-g72e4fe066
NOTICE:  BL2: Built : 20:14:26, Jun 11 2025
NOTICE:  Enter eMMC Mode......
NOTICE:  eMMC partition: User
NOTICE:  Enter media_source_select process(1).
NOTICE:  BL2 config file
NOTICE:  ab slot is : 0
NOTICE:  fip index:0
NOTICE:  start to load bl2 cfg image
NOTICE:  BL2 CFG ADDR:0x1ff00000, MAGIC:0x474643324c424248
NOTICE:  bypass update efuse
NOTICE:  calibration_offset 12
NOTICE:  trimming_value 9
NOTICE:  ADC read channel[2]: 295mv
NOTICE:  ddr info:[LPDDR4]-[DUAL_RANK]-[DIE: 1 GB]-[ECC OFF]-[DVFS ON]-[4266M]
NOTICE:  JTAG ENABLE
NOTICE:  disable wdt
NOTICE:  start to load ddr image
NOTICE:  run ddr Fw
NOTICE:  matching profile: profile_2 from aon config
NOTICE:  type: LP4, freq: 4266, ecc: 0(0x7f), rank: 2, dvfs: 1, die_dencity: 1 GB, version: 10.04
NOTICE:  ddr cost: 147151 us, ddr size: 4 GB, manuid: 0x13
NOTICE:  ddr ready
NOTICE:  start to load bl31 image
NOTICE:  start to load optee image
NOTICE:  start to load uboot image
NOTICE:  BL1: Booting BL31
NOTICE:  multicore_init: sec_entrypoint = 0x2000010c
NOTICE:  BL31: v2.8(release):v1.0.8-77-g72e4fe066
NOTICE:  BL31: Built : 20:12:37, Jun 11 2025
NOTICE:  plat_setup_psci_ops: sec_entrypoint = 0x2000010c
4.1.4.7. 清理功能
clean
删除
# 完整工程 clean
./bd.sh clean

# 单独模块 clean
./bd.sh uboot clean
./bd.sh boot clean
./bd.sh appsdk clean      # 清 out/deploy/appsdk/images/ 下的 SDK 产物(platform-appsdk-*.deb、*.tar.*、install.sh、relocate-paths.sh、test-sdk.sh)
distclean
删除
# 完整工程 distclean,力求把 BSP 还原到未编译前的状态
./bd.sh distclean
# 单独模块 distclean
./bd.sh uboot distclean
./bd.sh boot distclean
./bd.sh appsdk distclean  # 等同 appsdk clean,清 out/deploy/appsdk/images/ 下的 SDK 产物
帮助信息
$ ./bd.sh help
Available commands for bd.sh:
./bd.sh [all | function] [module] [clean | distclean]
Support functions :
        help lunch miniboot uboot factory boot hbre system app pack appsdk
... ( 和之前的章节内容重复,省略 ) ...
4.1.5. 使用 Docker 编译 BSP
为了
4.1.5.1. 安装 Docker
步骤 1: 安装 Docker
运行
以下 命令 来 安装 Docker:
sudo apt update
sudo apt install -y docker.io
启动 Docker 服务:
sudo systemctl start docker
将 Docker 服务
设置 为 在 系统启动 时 自动 启动:
sudo systemctl enable docker
步骤 2: 将用户添加到 Docker 用户组
确认
你 的 用户 帐户 属于 docker 组。运行 以下 命令:
sudo usermod -aG docker $USER
注意:这里$USER 是
步骤 3 :配置 Docker 的代理设置
Docker Hub 在
编辑 daemon.json 文件(通常daemon.json 配置文件
{
    "registry-mirrors": [
      "https://mirror.ccs.tencentyun.com",
      "https://hub-mirror.c.163.com",
      "https://registry.docker-cn.com",
      "https://docker.ustc.edu.cn",
      "https://nrbewqda.mirror.aliyuncs.com",
      "https://dmmxhzvq.mirror.aliyuncs.com",
      "https://docker.1panel.live",
      "https://docker.1ms.run",
      "https://docker.chenby.cn",
      "https://docker.m.daocloud.io"
    ]

}
Docker 会registry-mirrors 列表
保存 daemon.json 文件
sudo systemctl daemon-reload
sudo systemctl restart docker
步骤 4: 验证 Docker 安装
运行
以下 命令 检查 Docker 是否 正确 安装:
docker --version
使用
以下 命令 运行 一个 简单 的 容器 以 验证 Docker 是否 正常 工作:
docker run hello-world
4.1.5.2. 构建容器镜像
cd build
docker build -t dr_xbuild/ubuntu20.04:1.0 .
docker build: 用于构建 Docker 镜像 的 命令。 -t dr_xbuild/ubuntu20.04:1.0:-t表示标签,后面 的 参数 是 镜像 的 名称 和 版本号。在 这个 例子 中,镜像 名称 为 dr_xbuild/ubuntu20.04,版本号为 1.0。.: 这是构建 上下文 的 路径。 Docker 镜像 构建 时 需要 一个 上下文,这个 上下文 包含 了 构建 所 需 的 所有 文件 和 信息。在 这个 命令 中, .表示当前目录,即 当前 Dockerfile 所在 的 目录。 Docker 会 在 这个 路径 下 查找 Dockerfile 文件,并 使用 它 来 构建 镜像。
4.1.5.3. 启动容器
进入
hobot@ubuntu:~/1-work/6-x5/01-x5-gerrit$ ./build/start_docker.sh
c6a097021fd6d1adb2b8036204ecc510e37043ee5aff468dc90ebefb6e3da1c6
Starting Docker container dr_xbuild ...
Setting user and password ...
Installing cross-compilation toolchain ...
hobot@c6a097021fd6:~/1-work/6-x5/01-x5-gerrit$
4.1.5.4. 删除容器
# 停止容器
docker stop dr_xbuild
# 强制删除一个正在运行的 Docker 容器,即使容器正在运行
docker rm -f dr_xbuild
注意: dr_xbuild 是./build/start_docker.sh -n 修改dr_xbuild 替换
4.1.5.5. start_docker.sh 使用说明
本
使用方法
./build/start_docker.sh [-u 用户 ] [-p 密码 ] [-i 镜像 ] [-w 工作目录 ] [-n 容器名称 ] [-h]
选项
-u 用户:指定新 的 用户名。默认 为 当前 主机 用户名。 -p 密码:指定新 用户 的 密码。默认 为 预定 义 密码( 123456 )。 -i 镜像:指定 Docker 镜像版本。默认 为 预定 义 Docker 镜像( dr_xbuild/ubuntu20.04:1.0 )。 -w 工作目录:指定容器 的 工作 目录。默认 为 当前目录。 -n 容器名称:指定容器 名称,默认 为 dr_xbuild。-h:显示帮助 消息。
示例
如果
./build/start_docker.sh
4.1.6. 使用 Podman 编译 BSP
4.1.6.1. Podman 简介
Podman 是
4.1.6.2. Podman 安装
在 Ubuntu 上
更新
系统: sudo apt update && sudo apt upgrade -y
添加 Podman 仓库:
. /etc/os-release
echo "deb https://download.opensuse.org/repositories/devel:/kubic:/libcontainers:/stable/xUbuntu_${VERSION_ID}/ /" | sudo tee /etc/apt/sources.list.d/devel:kubic:libcontainers:stable.list
curl -L "https://download.opensuse.org/repositories/devel:/kubic:/libcontainers:/stable/xUbuntu_${VERSION_ID}/Release.key" | sudo apt-key add -
安装 Podman:
sudo apt install podman -y
验证
安装: podman --version
最终
hobot@hobot-ThinkPad-T14-Gen-1:~/project/sdk_x5_cs1.0/build$ podman --version
podman version 3.4.4
此时
hobot@hobot-ThinkPad-T14-Gen-1:~/project/sdk_x5_cs1.0/build$ podman run hello-world

Hello from Docker!
This message shows that your installation appears to be working correctly.

To generate this message, Docker took the following steps:
 1. The Docker client contacted the Docker daemon.
 2. The Docker daemon pulled the "hello-world" image from the Docker Hub.
    (amd64)
 3. The Docker daemon created a new container from that image which runs the
    executable that produces the output you are currently reading.
 4. The Docker daemon streamed that output to the Docker client, which sent it
    to your terminal.

To try something more ambitious, you can run an Ubuntu container with:
 $ docker run -it ubuntu bash

Share images, automate workflows, and more with a free Docker ID:
 https://hub.docker.com/

For more examples and ideas, visit:
 https://docs.docker.com/get-started/
可以
4.1.6.3. 配置 Podman 基础环境
需要sudo vi 依次
hobot@hobot-ThinkPad-T14-Gen-1:/etc/containers$ tree
.
├── policy.json
├── registries.conf
└── registries.conf.d
    └── 999-mirror.conf

1 directory, 3 files
policy.json
policy.json 是 Podman 的
{
    "default": [
        {
            "type": "insecureAcceptAnything"
        }
    ],
    "transports":
        {
            "docker-daemon":
                {
                    "": [{"type":"insecureAcceptAnything"}]
                }
        }
}
简要
default:
配置
了 默认 的 签名 策略 为 insecureAcceptAnything,这 意味着 Podman 会 接受 任何 镜像,不 进行 签名 验证。这 在 开发 环境 中 很 常见,但 在 生产 环境 中 不 推荐,因为 它 降低 了 安全性。
transports:
配置
了 docker-daemon 传输方式 的 签名 策略,同样 设置 为 insecureAcceptAnything。这 通常 用于 本地 Docker 守护 进程 拉取 的 镜像。
registries.conf
registries.conf 是 Podman 的
unqualified-search-registries = ["docker.io", "quay.io"]
简要
unqualified-search-registries:
定义
了 Podman 在 解析 未 完全 限定 的 镜像 名称 时,会 搜索 的 仓库 列表。这里 配置 了 两个 仓库:docker.io 和 quay.io。这 意味着 当 运行 podman pull ubuntu:20.04 时,Podman 会 首先 尝试 从 docker.io 拉取 镜像,如果 失败,再 尝试 从 quay.io 拉取。
registries.conf.d/999-mirror.conf
registries.conf.d 是registries.conf 文件999-mirror.conf 是
[[registry]]
prefix  = "docker.io"
location = "docker.m.daocloud.io"
简要
[[registry]]:
定义
了 一个 具体 的 镜像 仓库 配置。
prefix:
指定
了 镜像 名称 的 前缀 为 docker.io。
location:
指定
了 实际 的 镜像 仓库 地址 为 docker.m.daocloud.io,这是 DaoCloud 的公开 镜像 加速器 地址(也 可以 使用 其他 的 公开 镜像 加速器 地址 或者 私有 加速器 地址)。
4.1.6.4. 使用 Podman 构建容器镜像
进入build/ 目录Dockerfile 文件,在 BSP 源码
cd build
sudo podman build -t dr_xbuild/ubuntu20.04:1.0 .
podman build: 用于构建 Podman 镜像 的 命令。 -t dr_xbuild/ubuntu20.04:1.0:-t表示标签,后面 的 参数 是 镜像 的 名称 和 版本号。在 这个 例子 中,镜像 名称 为 dr_xbuild/ubuntu20.04,版本号为 1.0。 .: 这是构建 上下文 的 路径。 Podman 镜像 构建 时 需要 一个 上下文,这个 上下文 包含 了 构建 所 需 的 所有 文件 和 信息。在 这个 命令 中, .表示当前目录,即 当前 Dockerfile 所在 的 目录。 Podman 会 在 这个 路径 下 查找 Dockerfile 文件,并 使用 它 来 构建 镜像。
注意: 为
构建
hobot@hobot-ThinkPad-T14-Gen-1:~/project/sdk_x5_cs1.0/build$ sudo podman images
REPOSITORY                       TAG         IMAGE ID      CREATED         SIZE
localhost/dr_xbuild/ubuntu20.04  1.0         e61c819842c6  18 minutes ago  603 MB
4.1.6.5. 启动 Podman 容器
执行 start_podman.sh 脚本
hobot@hobot-ThinkPad-T14-Gen-1:~/project/sdk_x5_cs1.0$ sudo ./build/start_podman.sh
Using container image: dr_xbuild/ubuntu20.04:1.0
Using container name: dr_xbuild
Using project directory: /home/hobot/project/sdk_x5_cs1.0
Using container workdir: /project
Starting a new container dr_xbuild...
f023213d8cce778fef4df273a1497ee60a788d0f24b99e3221d797bc2148277c
Starting podman container dr_xbuild ...
Setting user and password ...
Installing cross-compilation toolchain ...
root@f023213d8cce:/project# ls
README.md  adsp  app  bd.sh  build  device  hbre  kernel  miniboot  out  prebuilts  system  toolchain  uboot
执行./bd.sh 进行 X5 镜像
4.1.6.6. 删除 Podman 容器
# 停止容器
sudo podman stop dr_xbuild
# 强制删除一个正在运行的 Podman 容器,即使容器正在运行
sudo podman rm -f dr_xbuild
注意: dr_xbuild 是./build/start_podman.sh -n 修改dr_xbuild 替换
4.1.6.7. start_podman.sh 使用说明
本
./build/start_podman.sh [-u 用户 ] [-p 密码 ] [-i 镜像 ] [-w 工作目录 ] [-n 容器名称 ] [-h]
选项:
-u 用户:指定
新 的 用户名。默认 为 当前 主机 用户名。 -p 密码:指定
新 用户 的 密码。默认 为 预定 义 密码( 123456 )。 -i 镜像:指定 Podman 镜像
版本。默认 为 预定 义 Podman 镜像( dr_xbuild/ubuntu20.04:1.0 )。 -w 工作
目录:指定 容器 的 工作 目录。默认 为 当前目录。 -n 容器
名称:指定 容器 名称,默认 为 dr_xbuild。 -h:显示
帮助 消息。
示例:
如果
./build/start_podman.sh
4.1.6.8. Podman 常见问题
构建容器报 alias 相关错误
报错
sudo podman build -t dr_xbuild/ubuntu20.04:1.0 .
STEP 1/6: FROM ubuntu:20.04
Error: error creating build container: short-name "ubuntu:20.04" did not resolve to an alias and no containers-registries.conf(5) was found
需要
缺少 cache 文件
报错
hobot@hobot-ThinkPad-T14-Gen-1:~/project/sdk_x5_cs1.0$ sudo ./build/start_podman.sh
Using container image: dr_xbuild/ubuntu20.04:1.0
Using container name: dr_xbuild
Using project directory: /home/hobot/project/sdk_x5_cs1.0
Using container workdir: /project
Starting a new container dr_xbuild...
Error: statfs /root/.ccache: no such file or directory
手动/root/.ccache 即可:
sudo mkdir /root/.ccache