2.5. 系统镜像烧写
2.5.1. 概述
系统
准备
镜像文件 :BSP 必须
编译 并 打包 成 镜像文件,包括 Bootloader、操作系统 和 应用程序 等 内容。有关 如何 生成 镜像文件 的 详细信息,请 查阅 BSP 开发 指南 - 搭建 。开发 环境 及 编译 说明 连接
开发板 :首先,需要
使用 USB 或 以太网 将 开发板 与 计算机 连接。 在
特定 情况 下,可能 需要 通过 串口 连接,以便 将 开发板 置于 特定 模式(例如,直接 从 存储介质 启动 或 将 部分 启动 镜像 通过 串口 下载 到 内存 中 运行),以 完成 USB 或 以太网 的 初始化。 选择
烧录 :工具 烧录
工具 用于 将 镜像文件 写入 开发板 的 存储设备,根据 用户 需求 和 操作系统 环境 的 不同,可 选择 以下 几种 工具: 图形化
工具: XBurnXBurn提供了 直观 的 图形界面,适合 希望 通过 简单 操作 完成 烧录 任务 的 用户。用户 只 需 点击 几步 即可 完成 镜像 烧录,非常 便捷。 特点:易于
操作,界面 友好。 使用
说明 :请参阅 图形化工具 。烧录 介绍
命令行
工具: xburn对于
更 高级 或 定制 化 的 烧录 需求,可以 选择 xburn工具。该工具 支持 通过 手动 编辑 JSON 配置文件 或 利用 图形化 工具 生成 配置文件 后 运行 命令 完成 烧录。 特点:灵活性
高,适合 需要 批量 处理 或 脚本 化 操作 的 用户。 使用
说明 :请参阅 命令行工具 。介绍
手动
烧录 方式 对于
某些 特殊 情况 或 更 高 自由度 的 需求,用户 可以 选择 手动 方式 完成 镜像 烧录。 特点:完全
自定义 操作 流程,适合 特定 开发 或 调试 场景。 使用
说明 :请参阅 手动烧录 。工具 介绍
设置
烧录 :参数 在
烧录 工具 的 图形界面 中,需要 设置 烧录 参数,包括 目标 设备 类型、镜像文件 路径 和 烧录 方式 等。这些 参数 将 直接 影响 烧录 的 结果 和 过程。 执行
烧录 :操作 烧录
参数设置 完成 后,开始 执行 烧录 操作。烧录 工具 将 逐字 节地 将 镜像文件 中 的 数据 写入 开发板 的 存储设备( eMMC 或 NAND Flash),确保 操作系统 和 应用程序 能够 正确 加载。 验证
烧录 :结果 系统
烧录 完成 后,烧录 结束 后,需 进行 验证 以 确保 烧录 成功。可以 通过 开发板 的 串口 输出 或 其他 调试 接口,检查 系统 是否 能够 正确 启动,以及 应用程序 是否 能够 正常 运行。
本XBurn 图形化
2.5.2. 固件烧录协议简介
在
| 协议 | |||
|---|---|---|---|
| DFU | DFU(Device Firmware Upgrade) 是 |
支持 |
设备 |
| Xmodem | Xmodem 是 |
适用 |
常用 |
| Fastboot | Fastboot 是 |
高速 |
设备 |
2.5.3. 图形化工具烧录介绍
XBurn-gui工具集
2.5.3.1. 烧录工具界面简介
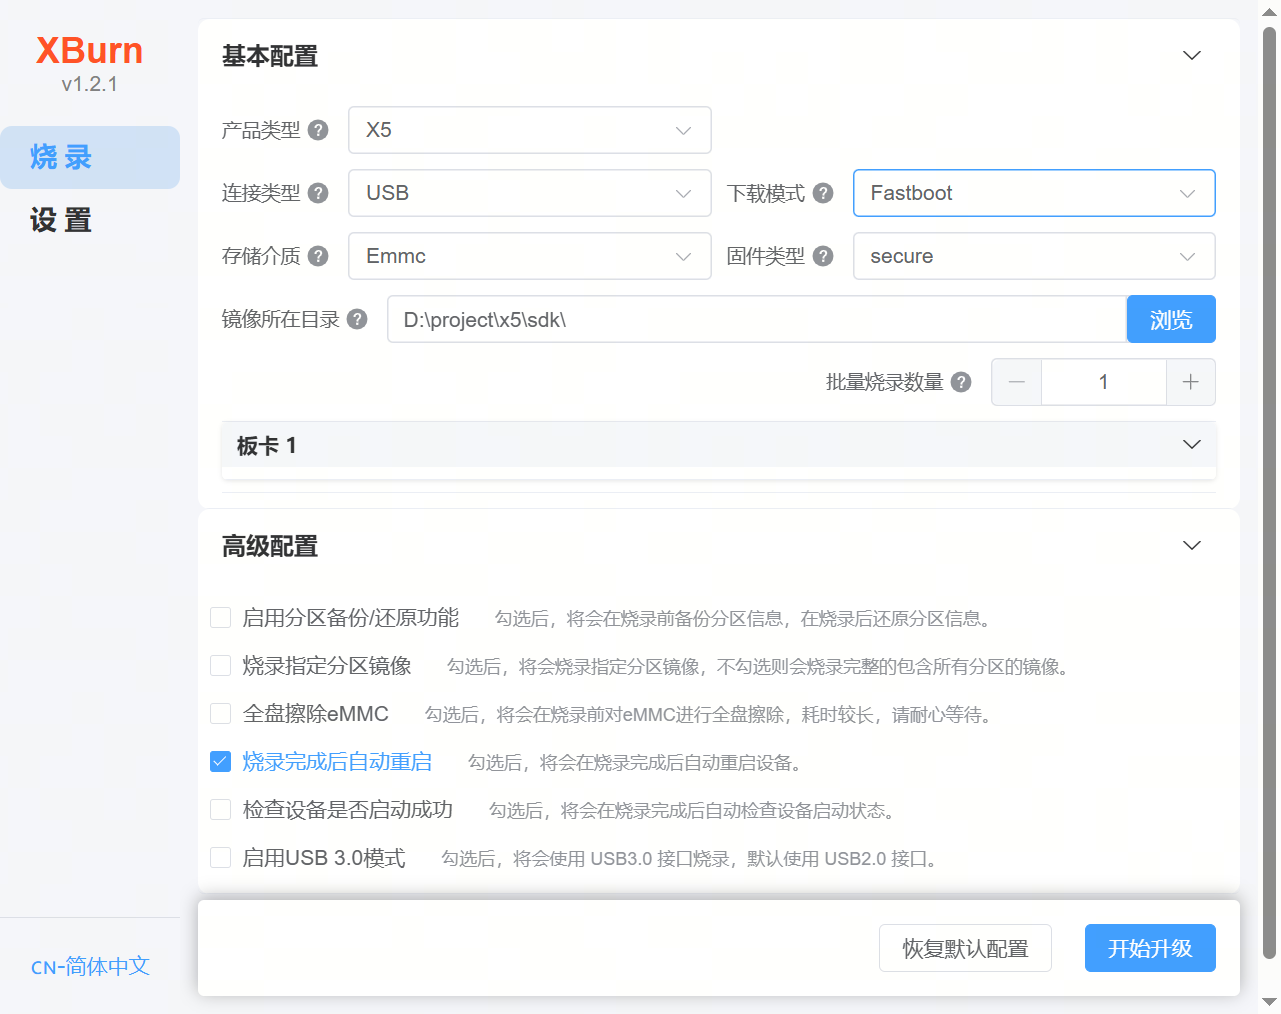
烧录界面
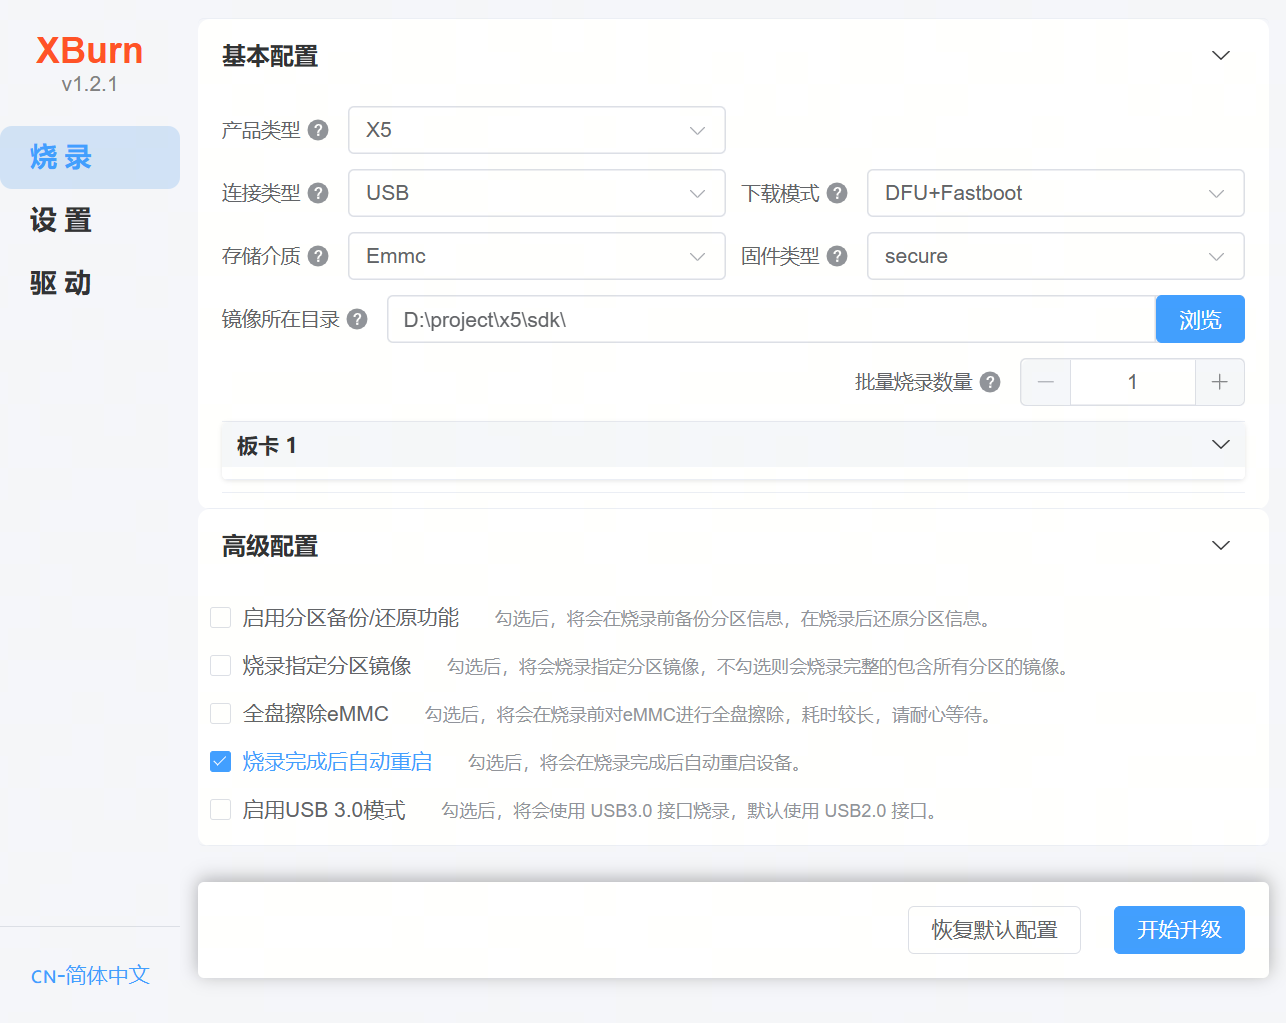
说明
基本
配置 :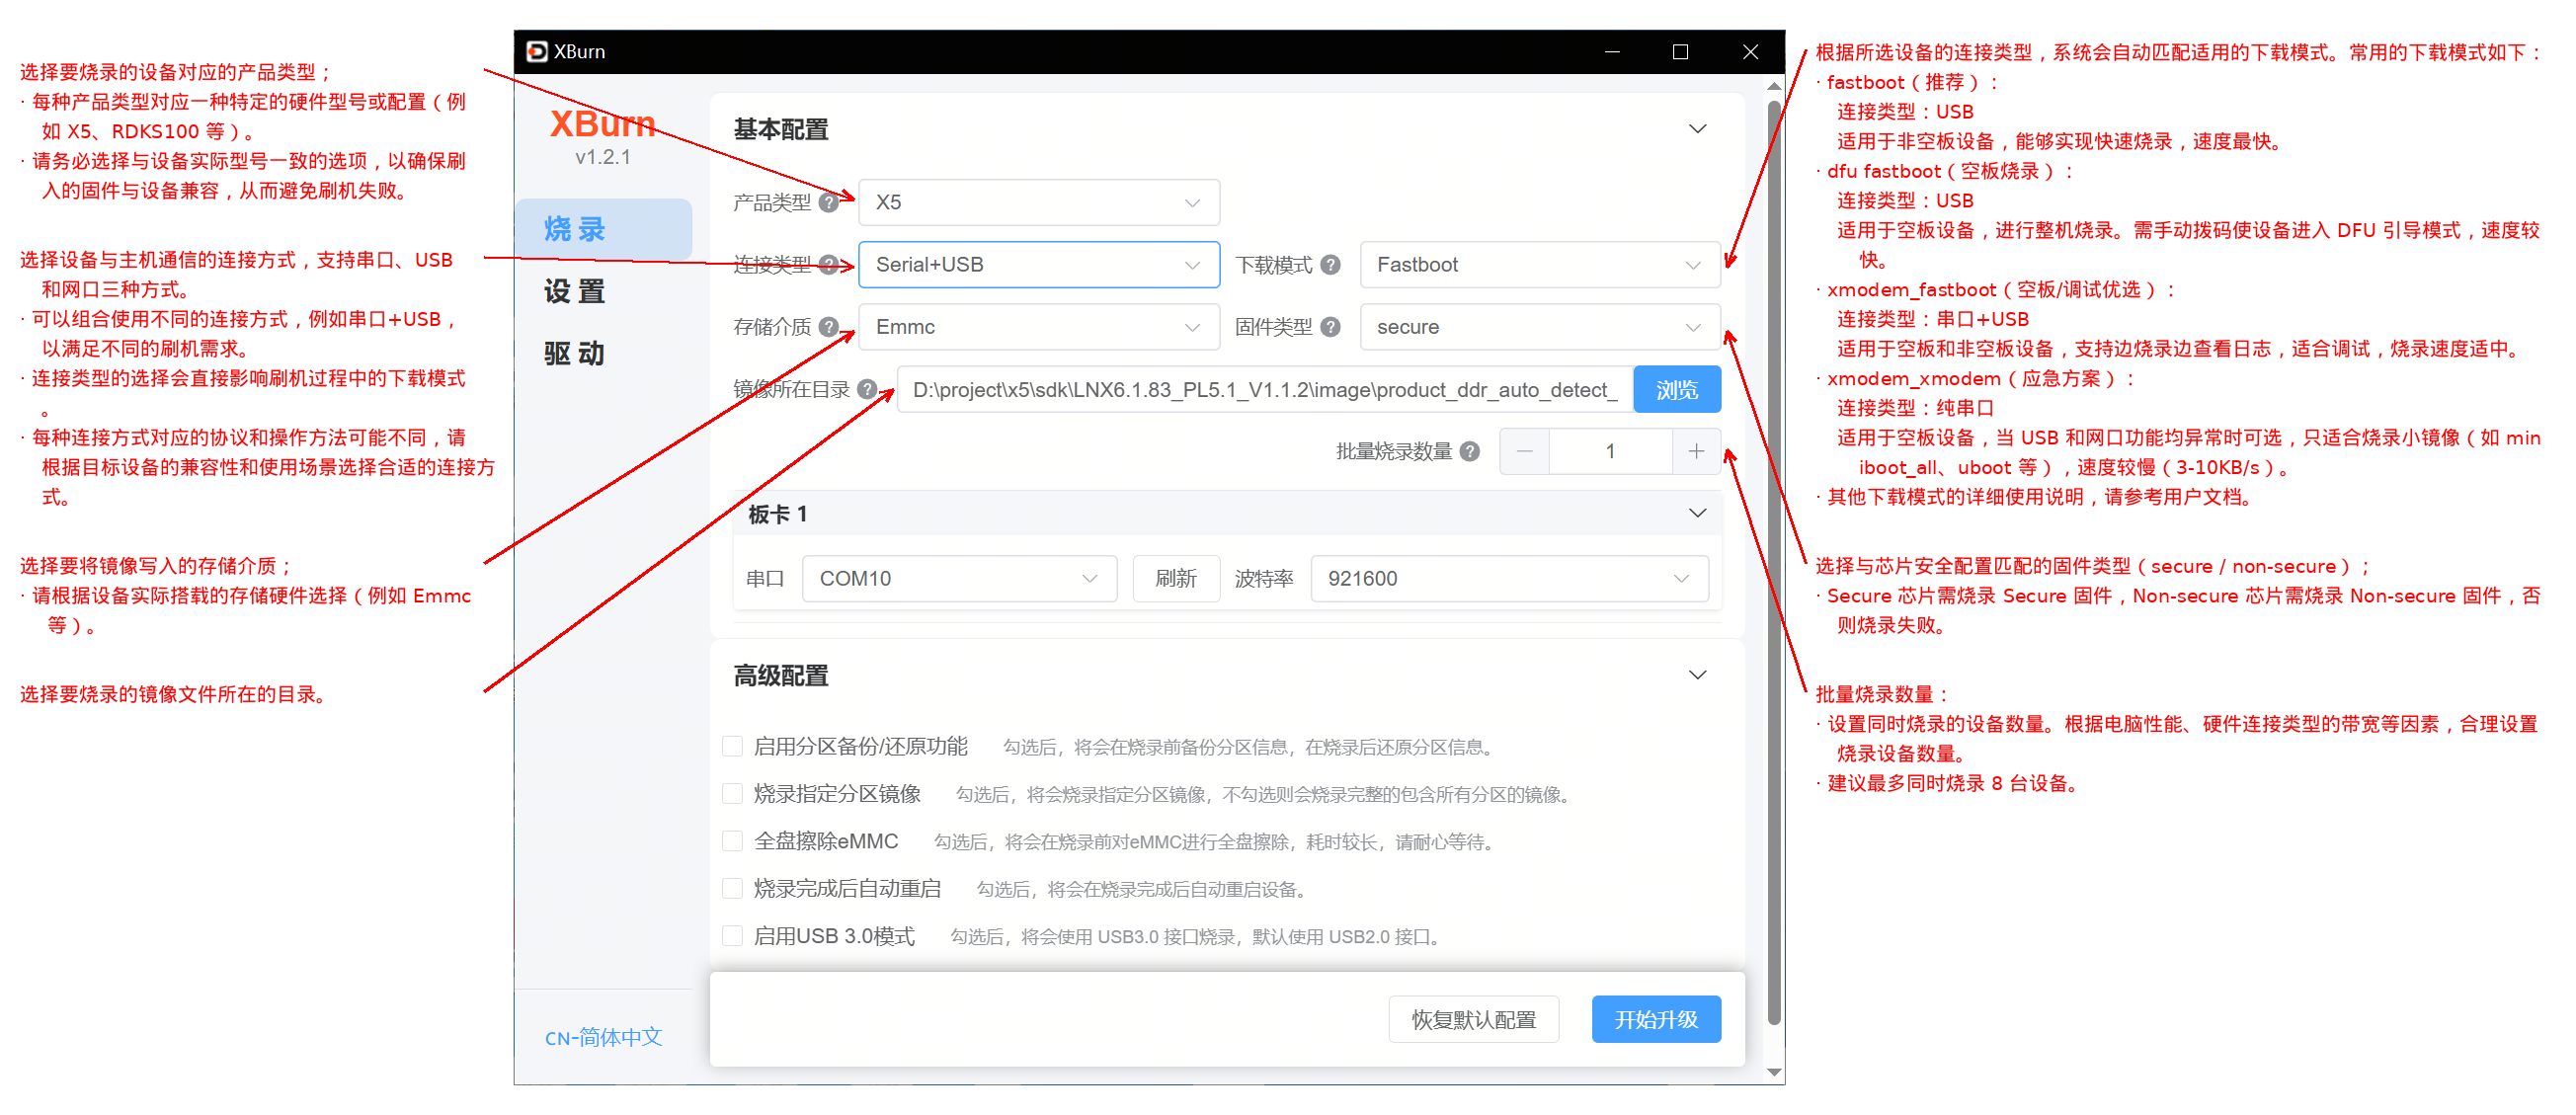
产品
类型: 请选择 您 要 烧录 设备 的 对应 产品 类型。 每种
产品 类型 对应 一种 特定 的 硬件 型号 或 配置(例如 X5 、 RDKS100 等)。 请
确保 选择 与 设备 实际 型号 一致 的 选项,以 确保 刷入 的 固件 与 设备 兼容,从而 避免 刷机 失败。
连接
类型: 请选择 设备 与 主机 通信 的 连接 方式,支持 串口、 USB 和 网口 三种 方式。 可以
组合 使用 不同 的 连接 方式,例如 串口 +USB,以 满足 不同 的 刷机 需求。 连接
类型 的 选择 会 直接 影响 刷机 过程 中 的 下载 模式。 每种
连接 方式 对应 的 协议 和 操作方法 可能 不同,请 根据 目标 设备 的 兼容性 和 使用 场景 选择 合适 的 连接 方式。
下载
模式: 根据所 选 设备 的 连接 类型,系统 会 自动 匹配 适用 的 下载 模式。常用 的 下载 模式 如下: fastboot(推荐):
连接
类型: USB 适用
于 非空板 设备,能够 实现 快速 烧录,速度 最快。
dfu_fastboot(空板
烧录): 连接
类型: USB 适用
于 空板 设备,进行 整机 烧录。需 手动 拨码 使 设备 进入 DFU 引导 模式,速度 较 快。
xmodem_fastboot(空板/调试
优选): 连接
类型:串口 +USB 适用
于 空板 和 非空板 设备,支持 边 烧录 边 查看 日志,适合 调试,烧录 速度 适中。
xmodem_xmodem(应急
方案): 连接
类型:纯 串口 适用
于 空板 设备,当 USB 和 网口 功能 均 异常 时可选,只 适合 烧录 小 镜像(如 miniboot_all, uboot 等),速度 较慢( 3-10KB/s)。
其他
下载 模式 的 详细 使用 说明,请 参考烧录 方式 章节简介 中 的 表格。
镜像文件
目录:
请选择 要 烧录 的 镜像文件 所在 的 目录。 批量
烧录 数量:
设置同时 烧录 的 设备 数量。根据 电脑 性能、硬件 连接 类型 的 带宽 等 因素,合理 设置 烧录 设备 数量。
建议最 多 同时 烧录 8 台 设备。
高级
配置 :启用
分区 :勾选后,会备份/还原 功能 在 烧录 前 备份 分区 信息,在 烧录 后 还原 分区 信息。 烧录
指定 :勾选后,会分区 镜像 烧录 指定 分区 镜像,不 勾 选则 会 烧录 完整 的 包含 所有 分区 的 镜像。 全盘
擦除 eMMC :勾选后,会在 烧录 前 对 eMMC 进行 全盘 擦除,耗时 较长,请 耐心 等待。 烧录
完成 :勾选后,会后 自动 重启 在 烧录 完成 后 自动 重启 设备。 启用 USB 3.0模式:勾选后,会
使用 USB3.0 接口 烧录,默认 使用 USB2.0 接口。 详细
使用 说明 请 参考高级 配置 章节
操作
按钮 :恢复
默认 :恢复配置 到 默认设置。 开始
升级 :开始烧录 操作。
设置界面
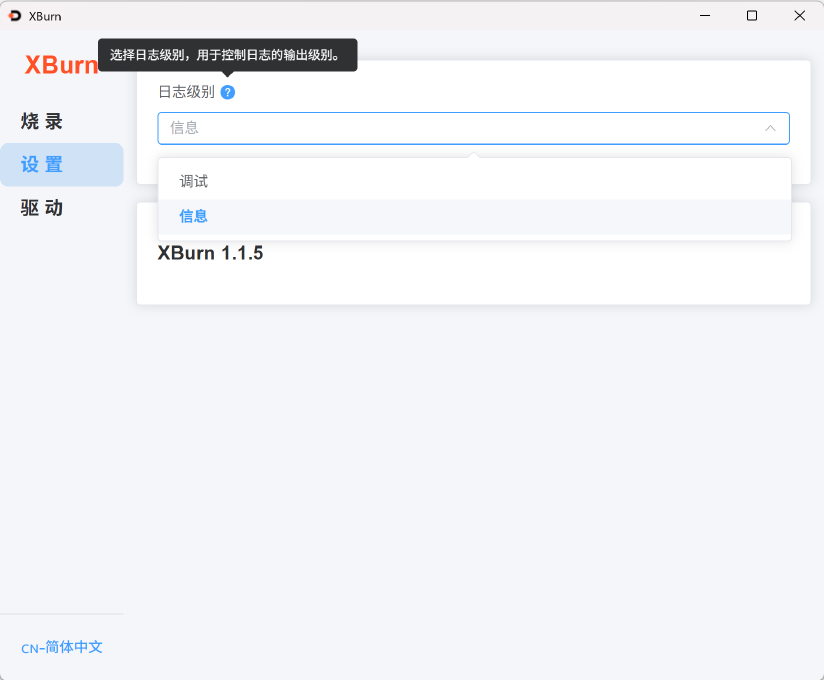
该
日志
级别 :选择日志 的 输出 级别(例如 信息、调试)。
驱动界面
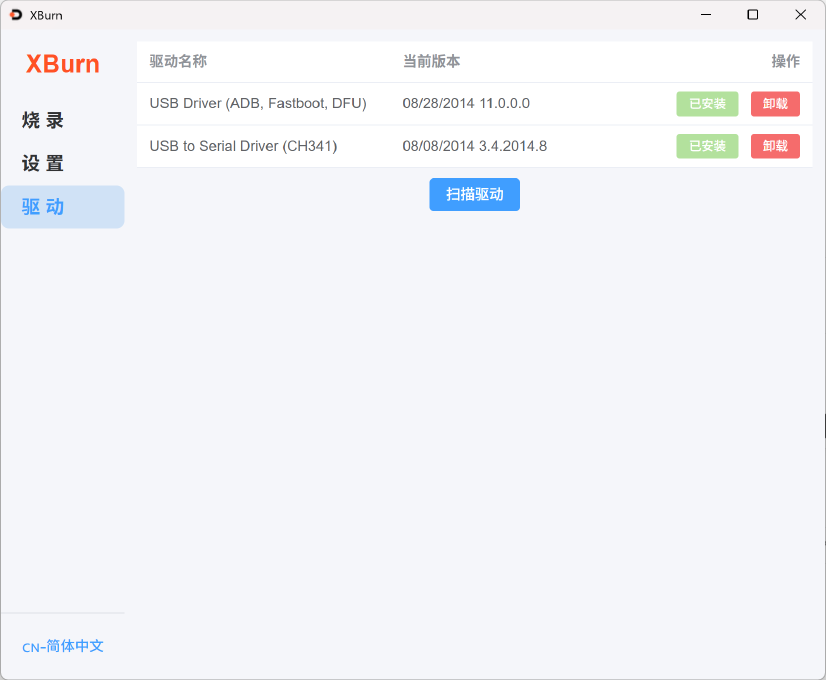
该
驱动
名称 :列出已 安装 的 驱动程序 名称(例如 USB Driver (ADB, Fastboot, DFU) 和 USB to Serial Driver (CH341))。 当前
版本 :显示驱动程序 的 当前 版本。 操作:提供
安装 和 卸载 驱动程序 的 按钮。 扫描
驱动 :提供扫描 驱动程序 的 按钮,用于 检测 和 安装 新 的 驱动程序。
2.5.3.2. 烧录方式简介
XBurn-gui工具
| 连接 |
下载 |
接线 |
||
|---|---|---|---|---|
| USB | DFU+Fastboot | 单 USB 线 |
1. 将BL2 和 BL3x 至2. 在 U-Boot 下 fastboot 0 进入 Fastboot 模式。3. 使用 Fastboot 通过 USB 烧写 4. 烧录 |
· 支持 · 需要 开始升级 按钮 |
| USB | Fastboot | 单 USB 线 |
1. 非空板fastboot 0 进入 Fastboot 模式:a. 若 b. 否则,若有 ADB 连接 (adb devices),如果 adb shell 进入reboot -m usb2 -f 使2. 使用 Fastboot 通过 USB 烧写 |
· 仅 |
| Serial+USB | Fastboot | 串口线 + USB 线 |
1. 非空板fastboot 0 并2. 使用 Fastboot 通过 USB 烧写 |
· 仅 |
| Serial+USB | Xmodem+fastboot | 串口线 + USB 线 |
1. 通过BL2 和 BL3x 至2. 在 U-Boot 下 fastboot 0 进入 Fastboot 模式。3. 使用 Fastboot 通过 USB 烧写 |
· 支持 · 推荐 |
| Serial+USB | Xmodem+DFU | 串口线 + USB 线 |
1. 通过BL2 和 BL3x 至2. 进入 U-Boot 命令 dfu 0 命令3. 使用 DFU 通过 USB 烧写 |
· 支持 · 推荐 |
| Serial+USB | DFU | 串口线 + USB 线 |
1. 非空板dfu 0 命令2. 使用 DFU 通过 USB 烧写 |
· 仅 |
| Serial+Ethernet | xmodem+fastboot | 串口线 + 网线 |
1. 通过BL2 和 BL3x 至2. 在 U-Boot 下 fastboot udp 0 命令Fastboot UDP 服务。3. 在 |
· 支持 · 推荐 |
| Serial+Ethernet | fastboot | 串口线 + 网线 |
1. 非空板fastboot udp 0 启动 Fastboot UDP 服务。2. 在 |
· 仅 |
| Serial | xmodem+xmodem | 单 |
1. 通过BL2 和 BL3x 至2. 继续 loady, loadx)下载 |
· 支持 · 仅 · 推荐 |
| Serial | xmodem | 单 |
1. 非空板loady, loadx)下载2. 下载 |
· 仅 · 仅 · 推荐 |
注意:在
2.5.3.3. 烧录工具安装与启动说明
windows 系统下安装与启动 XBurn
双击xburn-gui_1.1.5_x64-setup.exe 即可
点击
Next: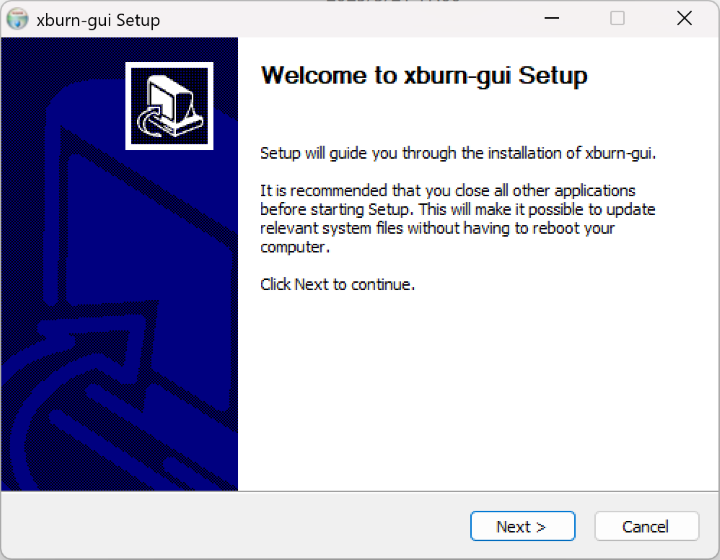
选择
Add/Reinstall components,然后点击 Next: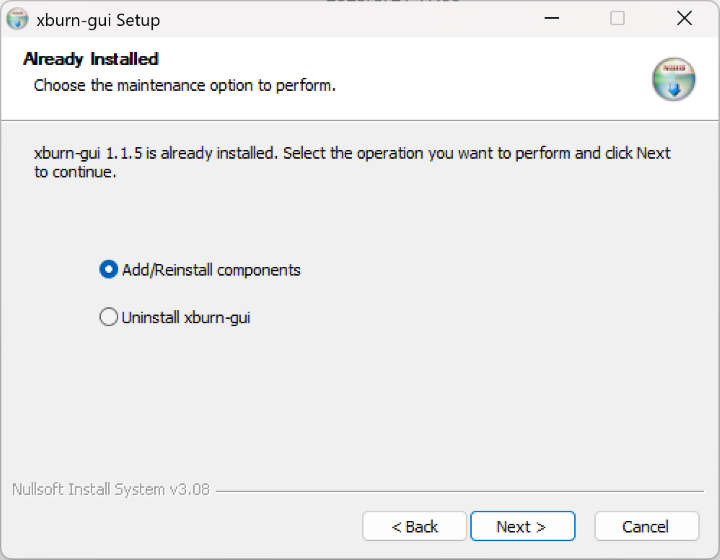
点击
Browse选择安装 路径: 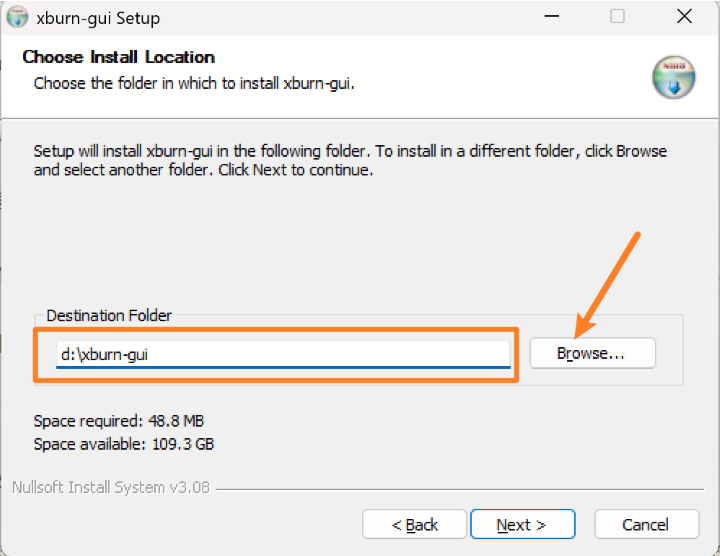
提示:建议
将 软件 安装 到 硬盘分区 根目录(如 D:\xburn-gui),以便 于 查找 日志 文件。 点击
Install进行安装: 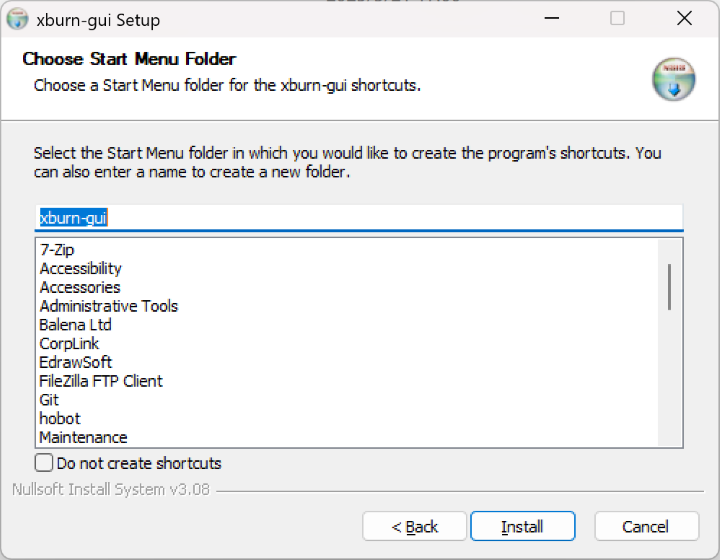
待
进度条 满,且 出现 Setup was completed successfully.即说明 安装 成功,此时 点击 Next: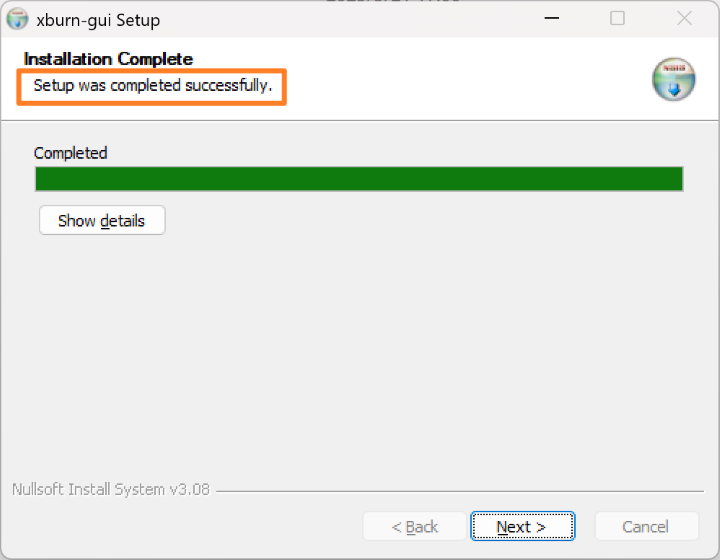
勾选
Run xburn-gui以及Create desktop shortcut,然后点击 Finish完成安装: 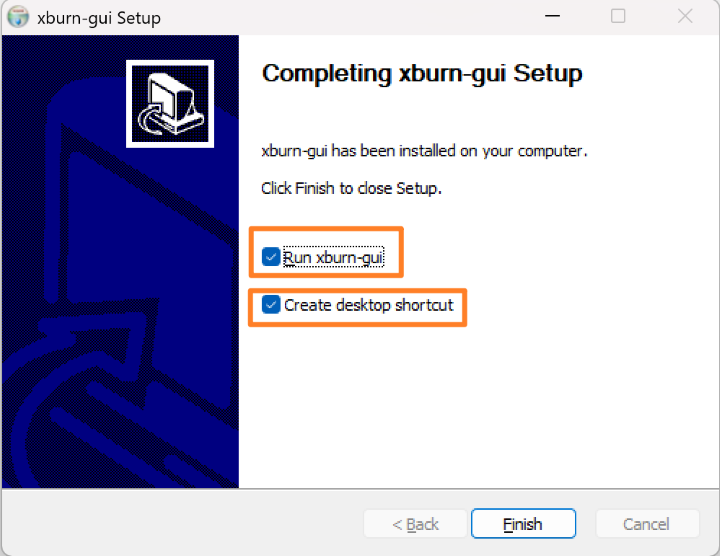
安装
完成 后,XBurn-gui界面 随后 会 自动 打开: 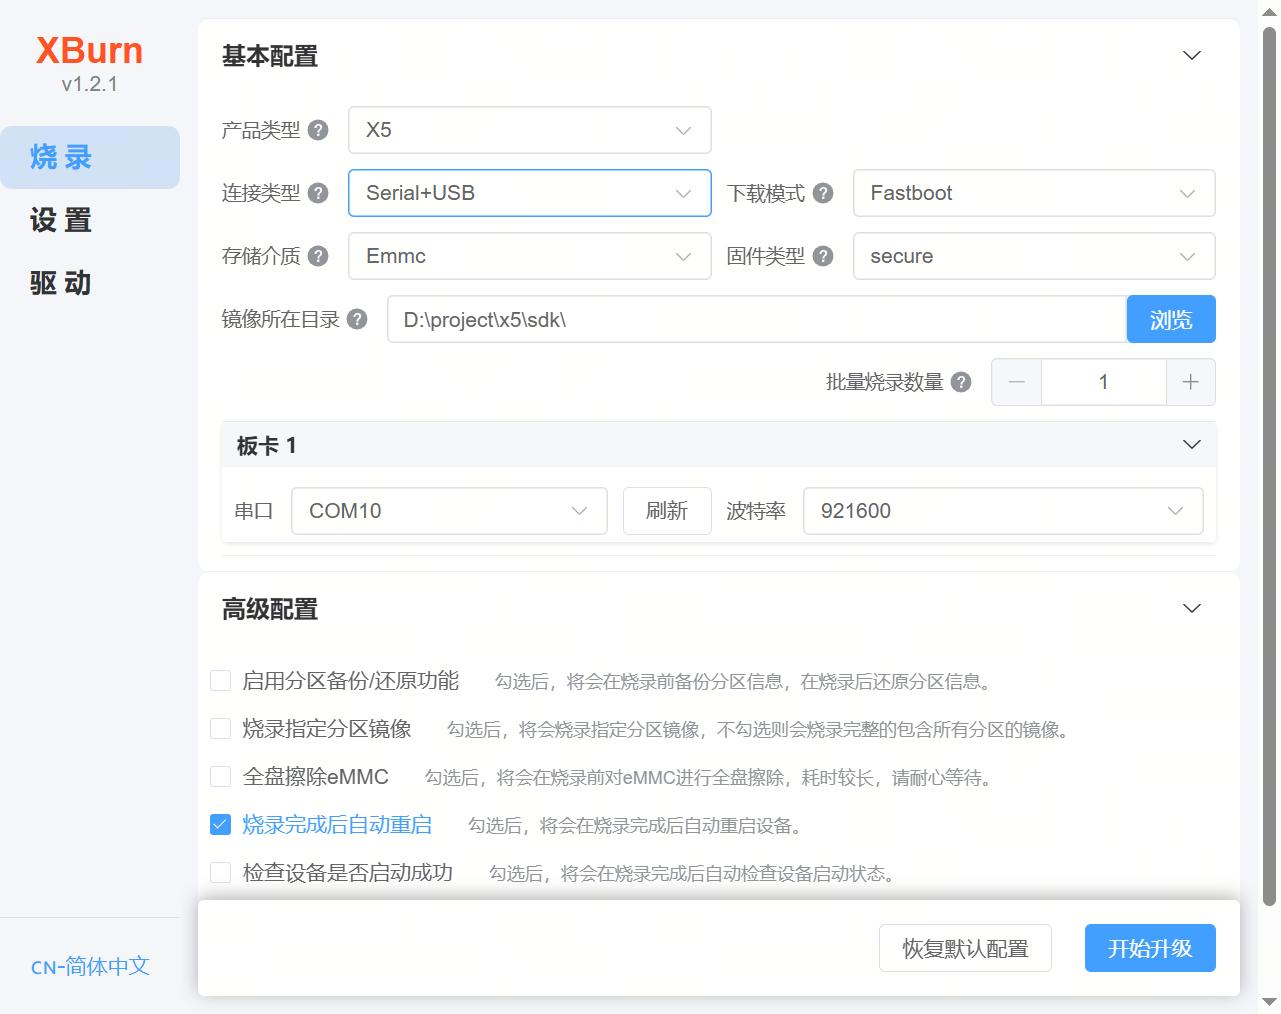
后续
可以 直接 双击 桌面上 的 XBurn.exe图标即可 启动 软件。
Ubuntu 系统下安装与启动 XBurn
在sudo dpkg -i xburn-gui_1.1.5_amd64.deb 命令
(base) hobot@hobot-ThinkPad-T14-Gen-1:~/tools$ sudo dpkg -i xburn-gui_1.1.5_amd64.deb
[sudo] hobot 的密码:
正在选中未选择的软件包 xburn-gui。
(正在读取数据库 ... 系统当前共安装有 494898 个文件和目录。)
准备解压 xburn-gui_1.1.5_amd64.deb  ...
正在解压 xburn-gui (1.1.5) ...
正在设置 xburn-gui (1.1.5) ...
Udev rules installed and activated
User nobody added to plugdev group
User hobot added to plugdev group
User snapd-range-524288-root added to plugdev group
User snap_daemon added to plugdev group
User xpj added to plugdev group
正在处理用于 mailcap (3.70+nmu1ubuntu1) 的触发器 ...
正在处理用于 gnome-menus (3.36.0-1ubuntu3) 的触发器 ...
正在处理用于 desktop-file-utils (0.26-1ubuntu3) 的触发器 ...
正在处理用于 hicolor-icon-theme (0.17-2) 的触发器 ...
然后sudo xburn-gui 命令xburn-gui 图标(会
MAC 系统下安装与启动 XBurn
双击xburn-gui_1.1.5_universal.dmg 即可
随即
会 出现 一个 弹窗,单击 并 按住 xburn-gui图标拖 到 Applications图标中: 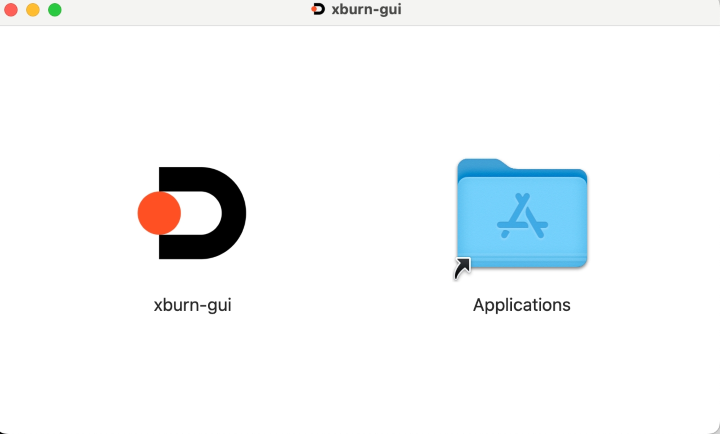
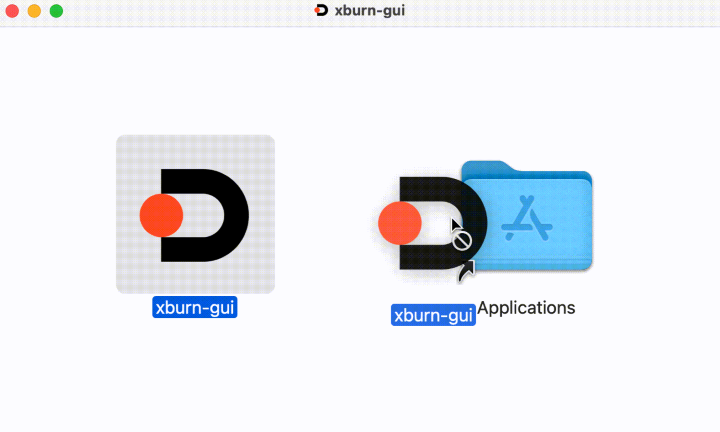
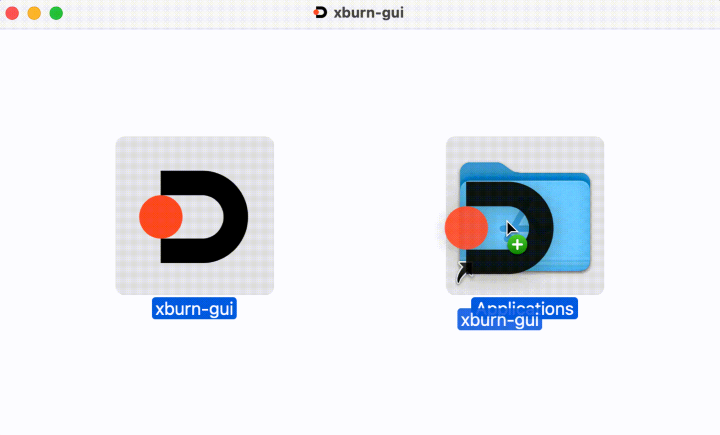
xburn-gui便装完成,此时 可以 双击 xburn-gui的图标 来 打开 该 程序: 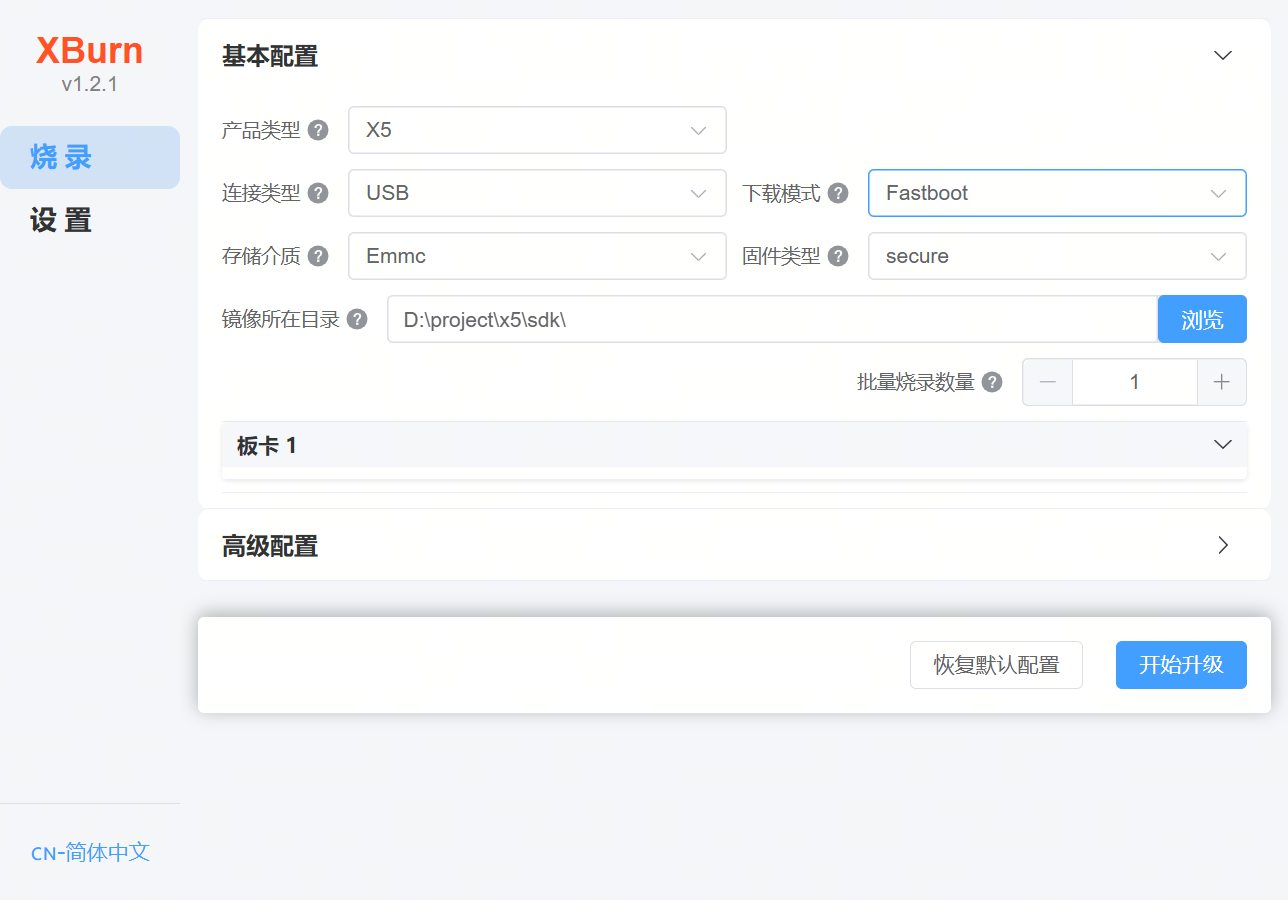
安装
过程 中若 遇到 提示 缺少 一些 依赖,需要 先 安装 相应 的 依赖。
启动时的常见问题
一些
2.5.3.4. 烧录方式选取说明
连接
存储介质
中 的 镜像 为空 或者 已经 损坏,设备 已变 砖(Bricked Device); 存储介质
中 的 镜像 正常,设备 可以 正常 启动。
这
镜像为空或已损坏时下载模式的选取
镜像
使用 DFU 下载
模式: 硬件
需 具备 启动 拨码 开关,且 该 拨码 开关 已 设置 为 USB 启动 模式; 硬件
中 BOOT CONFIG 中 DFU 位(一般 是 D5 位)需要 接地(DFU 置 零),如果 单板 上 有 拨码 开关 控制 DFU 则 将 拨码 开关 拨为 0;若 没有 拨码 开关 控制 DFU 位,则 需要 根据 实际 硬件 电路 拆/装 DFU 位 的 电阻; 当
存储介质 中 的 镜像 不 存在 或 已损坏 时,可以 采用 此 选项 进行 升级。
USB 启动模式 需要 将 拨码 开关 设置 为 如下 状态: 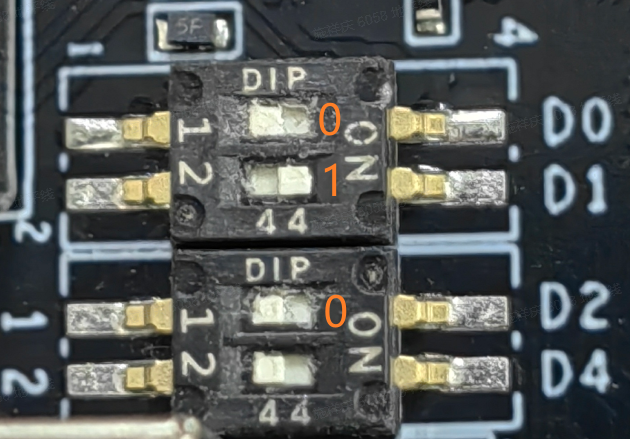
使用 Xmodem 下载
模式: 当
存储介质 中 的 镜像 不 存在 或 已损坏 时,可以 采用 此 选项 进行 升级; 建议
在 Xmodem 下载 模式 下,对于 X5 EVB 可以 将 拨码 开关 的 D4 置 1 (将 串口 波特率 改为 921600bps),这样 可以 极大 地 加快 烧录 速度。
Xmodem 启动模式 需要 将 拨码 开关 设置 为 如下 状态: 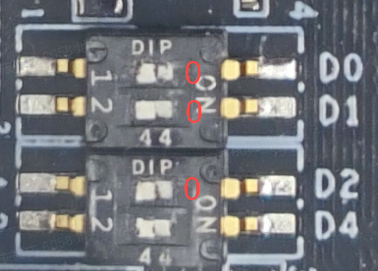
镜像正常时下载模式的选取
存储设备Fastboot 下载模式,该
若
硬件 不 具备 启动 拨码 开关,请 确保 存储介质 中 存在 可 正常 启动 的 软件,无需 其他 操作; 若
硬件 具备 启动 拨码 开关,请 确保 拨码 配置 设置 为 可以 正常 启动 的 状态。
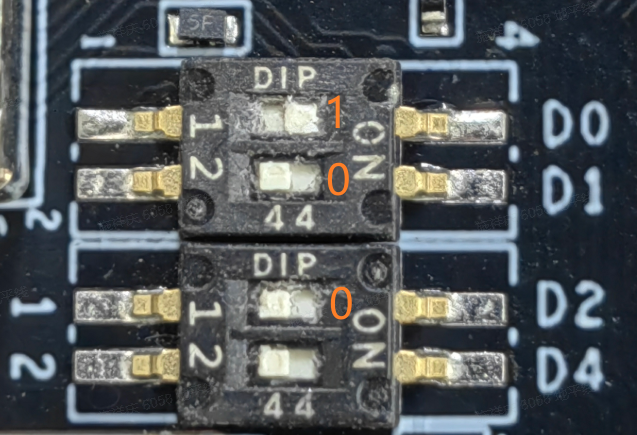
其他
注意:在
2.5.3.5. USB 连接方式升级过程说明
前提条件:
请
查阅 通过 USB 连接 完成 USB 驱动 的 安装。
适用范围:
USB 连接
DFU+Fastboot 下载
模式 DFU+Fastboot 烧录
模式 适用 于 开发板 上 的没有 可用 镜像 或 镜像 已损坏 场景,此时 需要 使用 out/product/uart_usb中的 镜像。 有
启动 并拨 码器 的 开发板 通过 启动 拨码 开关 配置 启动 的方式 为 USB 场景。 需要
注意 :本模式 需要 在 上 电 一分钟 内 点击 开始升级按钮进行 升级,否则 会 因为 DFU 超时 而 升级 失败。 烧录
步骤 如下: 将
单板 设置 为 DFU 启动 模式(将 拨码 )下载 BL2 和 BL3x 至开关 D5 置 零, 拨码 开关 D[2:0] 置 为 010 设备 并 引导 至 U-Boot 命令 模式。 在 U-Boot 下
执行 fastboot 0进入 Fastboot 模式。使用 Fastboot 通过 USB 烧写
完整 镜像。 烧录
完成 将 拨码 开关 改 回 正常 启动 模式,如 EMMC 启动 模式(将 D[5][2:0] 置 为1001)。
Fastboot 下载
模式 Fastboot 下载
模式 仅 适用 于 非空板 状态 烧录。 烧录
步骤 如下: 非空板
状态 下,确保 设备 可 进入 U-Boot 命令 模式,执行 fastboot 0 进入 Fastboot 模式: I. 若
设备 已 在 Fastboot 模式,直接 烧录。 II. 否则,若有 ADB 连接 (adb devices),如果
存在 adb devices,通过 adb shell进入单板 终端,然后 执行 reboot -m usb2 -f使设备 进入 到 fastboot 模式: # Windows PowerShell terminal PS C:\Users\xiangqing.shi> adb devices List of devices attached 0x30811a620a494c0f035cefd80000 device PS C:\Users\xiangqing.shi> adb shell sh-5.1# reboot -m usb2 -f
III. 操作前,如果
板端 有 接入 串口,此时 可以 看到 串口 日志: # board serial terminal U-Boot 2022.10-g64e3056741 (Jun 18 2025 - 21:44:29 +0800) Model: Horizon X5 DRAM: 3.9 GiB console out start addr:0x0000000087ffc000, end addr:0x0000000087ffe000 horizon_lsio_pinctrl lsio_iomuxc@34180000: Initialized D-Robotics pinctrl driver optee optee: OP-TEE: revision 3.20 (a3b65462) ADC calibration: -22 ADC trimming: 9 horizon_hsio_pinctrl hsio_iomuxc@35050000: Initialized D-Robotics pinctrl driver horizon_dsp_pinctrl dsp_iomuxc@31040014: Initialized D-Robotics pinctrl driver Core: 149 devices, 29 uclasses, devicetree: separate WDT: Started watchdog@34250000 with servicing (10s timeout) stop watchdog MMC: sdio-host@35040000: 0, sdio-host@35020000: 1 Loading Environment from MMC... (Tuning Ok!) *** Warning - bad CRC, using default environment In: serial@32120000 Out: serial@32120000 Err: serial@32120000 Net: Warning: gmac-tsn@35010000 (eth0) using random MAC address - 92:d9:1f:90:d1:8d eth0: gmac-tsn@35010000 boot action: FASTBOOT USB2.0 select emmc(0) as flash medium do fastboot usb
使用 Fastboot 通过 USB 烧写
完整 镜像。
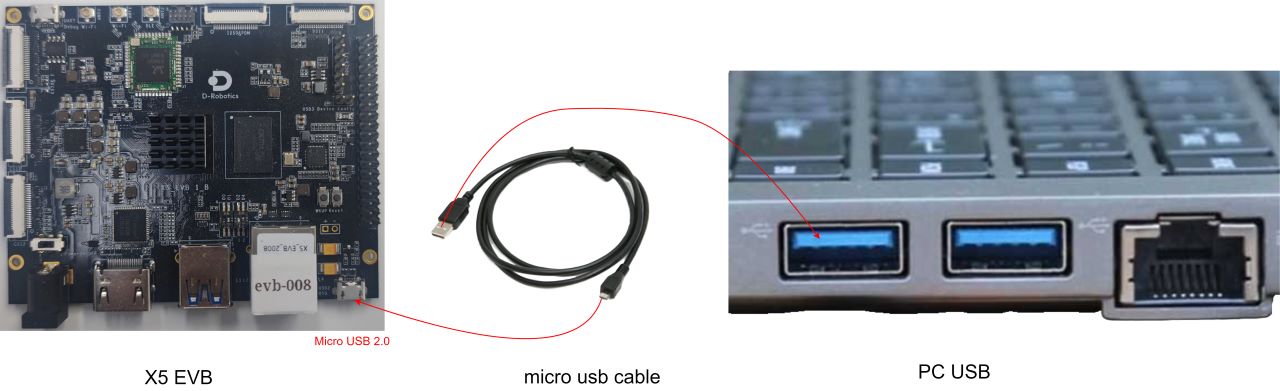
USB 连接
以 DFU+Fastboot 下载
烧录
SNOTICE:  Welcome to Horizon X5 ASIC BOOTROM - V4.1
NOTICE:                 OTP config:
NOTICE:                         otp exist: true
NOTICE:                         test region size: 304
NOTICE:                         secure region size: 120
NOTICE:                         none secure region size: 56
NOTICE:   Enable MMU
NOTICE:  Booting Trusted Firmware
NOTICE:  BL1: v2.8(release):
NOTICE:  BL1: Built : 17:42:12, Oct 19 2023
NOTICE:  Enter USB2 Mode......
NOTICE:  Currtenly use dfu-util to download file
NOTICE:  Download file via USB
NOTICE:  DFU Start...
XBurn-gui烧录
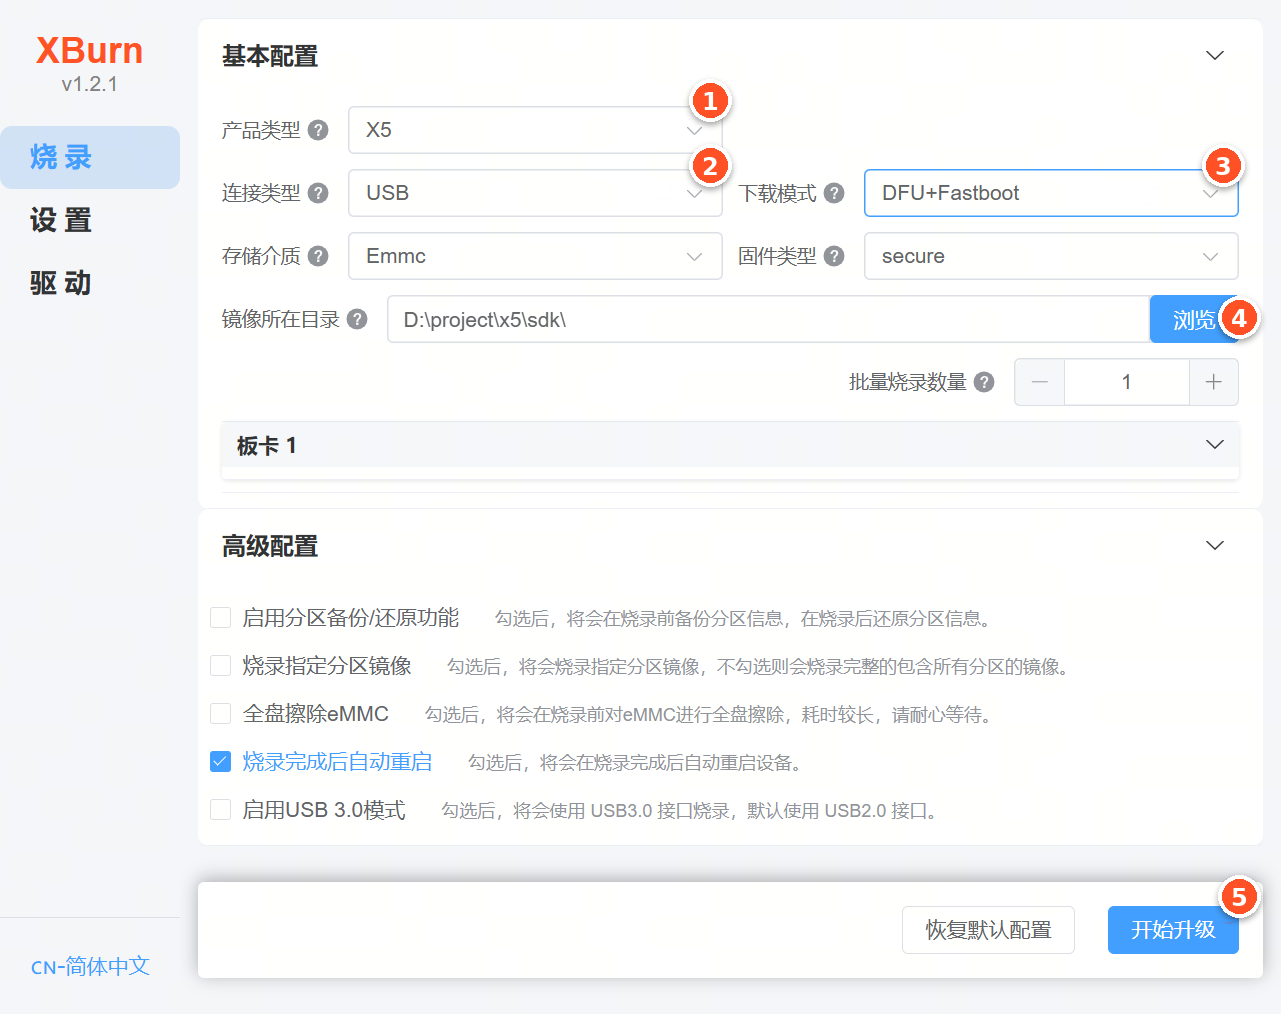
步骤1:
选择产品类型选项X5。
步骤2:
选择选择连接类型选项USB。
步骤3:
选择下载模式选项DFU+Fastboot 模式。
步骤4:
选择浏览,选择S:\home\sxq\projects\sdk_x5_CS1.0\out\product。
步骤5:
开始开始升级,工具
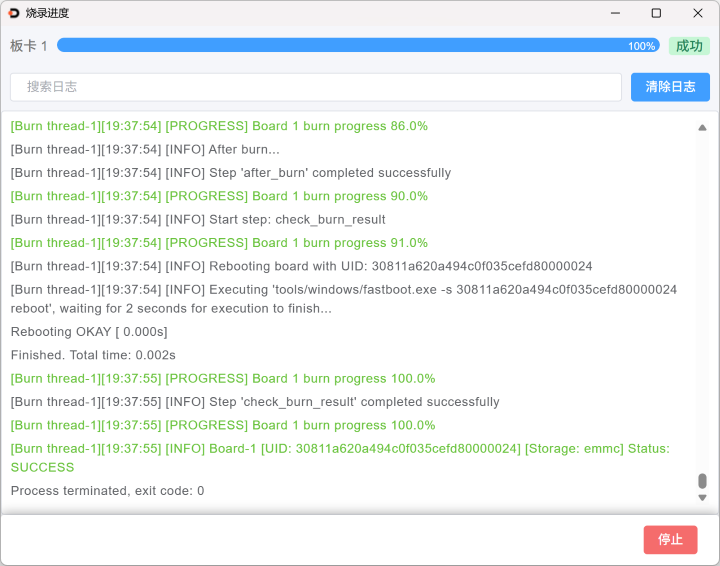
步骤6:
烧录
注意:点击开始升级 按钮
[Burn thread-1][20:09:55] [WARNING] Minimum dfu device detect timeout is 30s!
[Burn thread-1][20:09:55] [INFO] Executing 'tools/windows/dfu-util.exe -l', waiting for 60 seconds for execution to finish...
dfu-util 0.11
......
Determining device status...
error get_status: LIBUSB_ERROR_PIPE
[Burn thread-1][20:09:58] [ERROR] DFU download 'S:\home\sxq\projects\sdk_x5_CS1.0\out\product\uart_usb/bl2_usb2_ddr.bin' failed
......
[Burn thread-1][20:09:58] [ERROR] Step 'dfu_boot' failed
[Burn thread-1][20:09:58] [ERROR] Board-1, burn failed
[Burn thread-1][20:09:58] [ERROR] Board-1 [UID: 1-2.2] [Storage: emmc] Status: FAILED
Process terminated, exit code: 0
如果
NOTICE:  Welcome to Horizon X5 ASIC BOOTROM - V4.1
NOTICE:                 OTP config:
NOTICE:                         otp exist: true
NOTICE:                         test region size: 304
NOTICE:                         secure region size: 120
NOTICE:                         none secure region size: 56
NOTICE:   Enable MMU
NOTICE:  Booting Trusted Firmware
NOTICE:  BL1: v2.8(release):
NOTICE:  BL1: Built : 17:42:12, Oct 19 2023
NOTICE:  Enter USB2 Mode......
NOTICE:  Currtenly use dfu-util to download file
NOTICE:  Download file via USB
NOTICE:  DFU Start...
NOTICE:  USB DFU function timeout and need switch to xmodem download
NOTICE:   dfu-util timeout, forcily switch xmodem download......
## Ready for (xmodem) download to 0x1ff00000
CCCCCCCCCCCCCCCCCCCCCCCCCCCCCCCCCCCCCCCCCCCCCCCCCCCCCCCCCCCC
如果
2.5.3.6. Serial+USB 连接方式升级过程说明
前提条件:
适用范围:
Serial+USB 连接
需要
本
连接 类型 适用 于 能够 同时 连接 串口 和 USB 接口 的 情景; 本
连接 类型 中 可以 选择 Xmodem+fastboot 以及 Xmodem+DFU 下载 模式,通过 Xmodem 协议 用于开发板 上 场景没有 可用 镜像 或 镜像 已损坏 的 烧录,此时 需要 使用 out/product/uart_usb中的 镜像 BL2 以及 BL3X,此时 推荐 将 串口 波特率 设置 为 921600 (拨码 开关 D4 置 1)。
下面
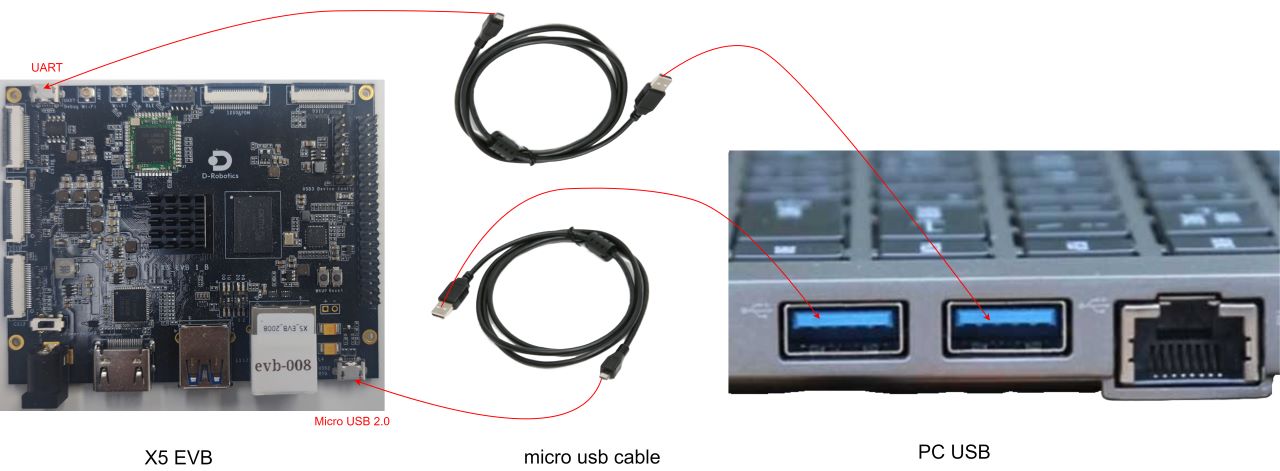
XBurn-gui烧录
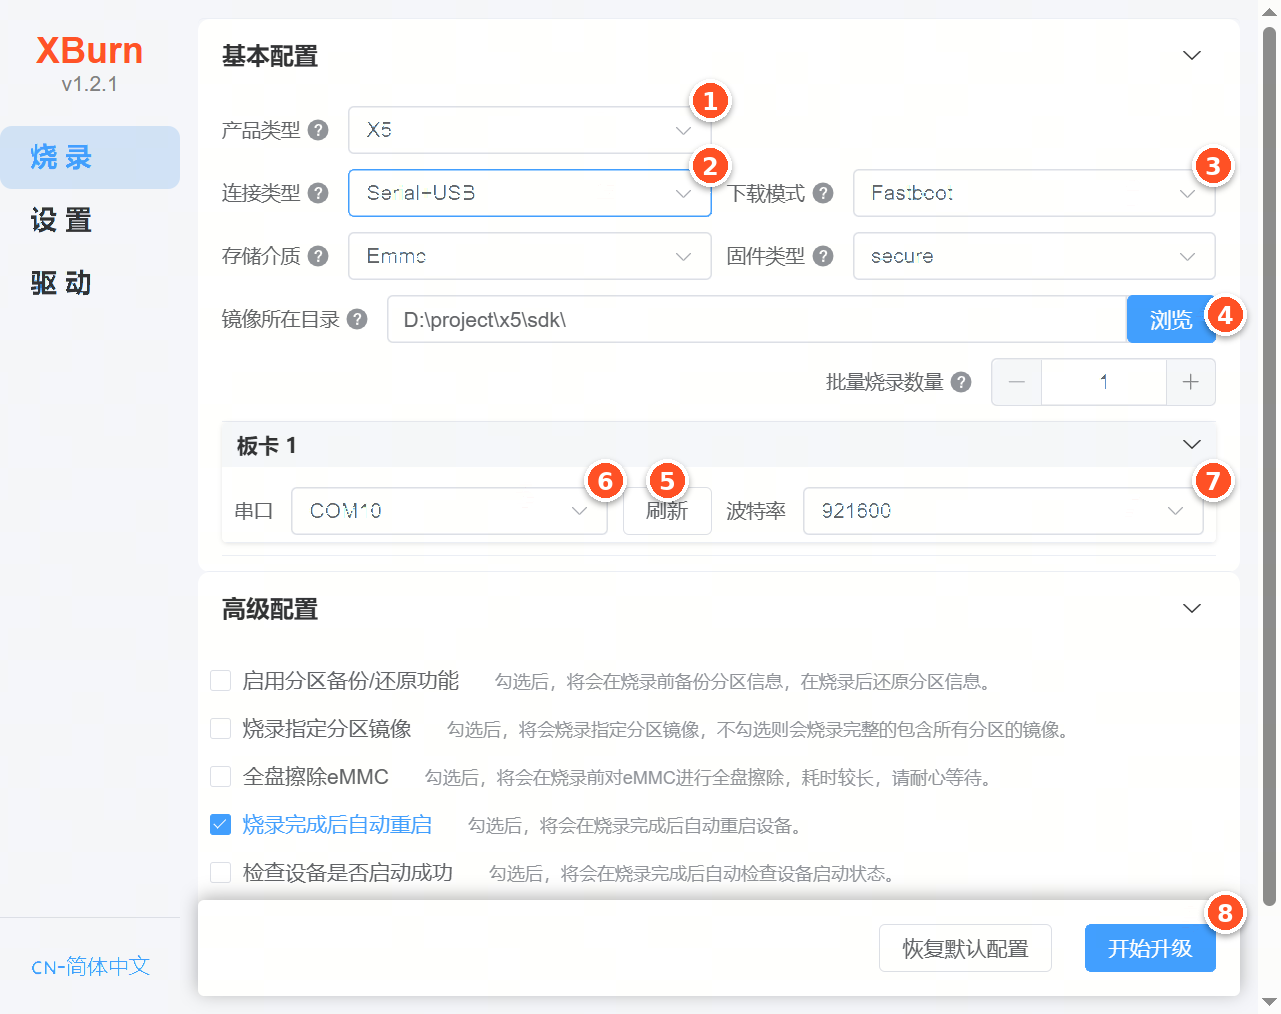
以下
步骤1:
选择产品类型选项X5。
步骤2:
选择连接类型选项Serial+USB。
步骤3:
选择下载模式选项Fastboot模式。
步骤4:
选择浏览,选择out/product目录,如S:\home\sxq\projects\sdk_x5_CS1.0\out\product。
步骤5:
点击刷新按钮,确保
步骤6:
选择串口选项COM6。
步骤7:
设置波特率选项921600(推荐)。
步骤8:
开始开始升级,工具
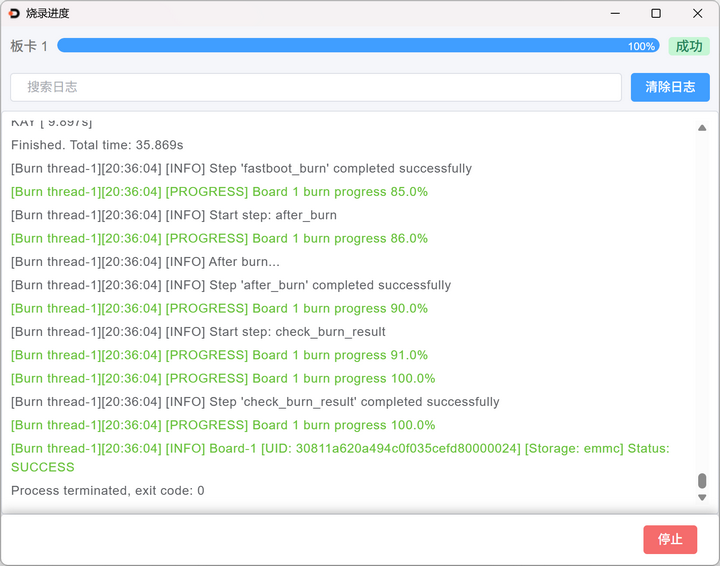
2.5.3.7. Serial+Ethernet 连接方式升级过程说明
前提条件:
适用范围:
Serial+Ethernet 连接
本
连接 方式 适用 于 能够 同时 连接 串口 和 以太网 口 的 场景。 本
连接 方式 中 可以 选择 Xmodem+fastboot 下载 模式,通过 Xmodem 协议 用于开发板 上 场景没有 可用 镜像 或 镜像 已损坏 的 烧录,此时 需要 使用 out/product/uart_usb中的 镜像 BL2 以及 BL3X,此时 推荐 将 串口 波特率 设置 为 921600 (拨码 开关 D4 置 1)。
下面
接线
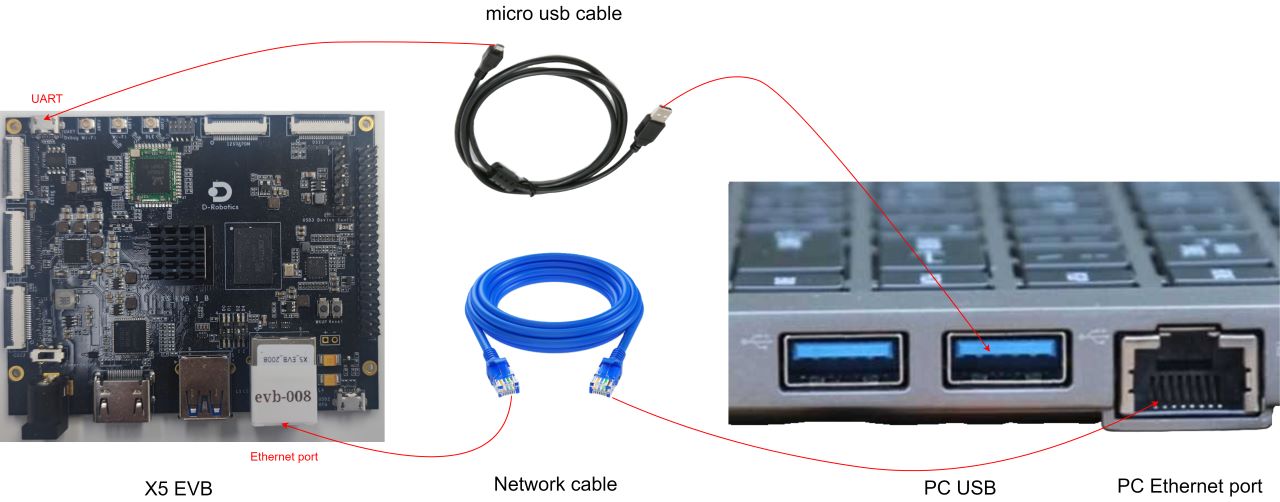
XBurn-gui烧录
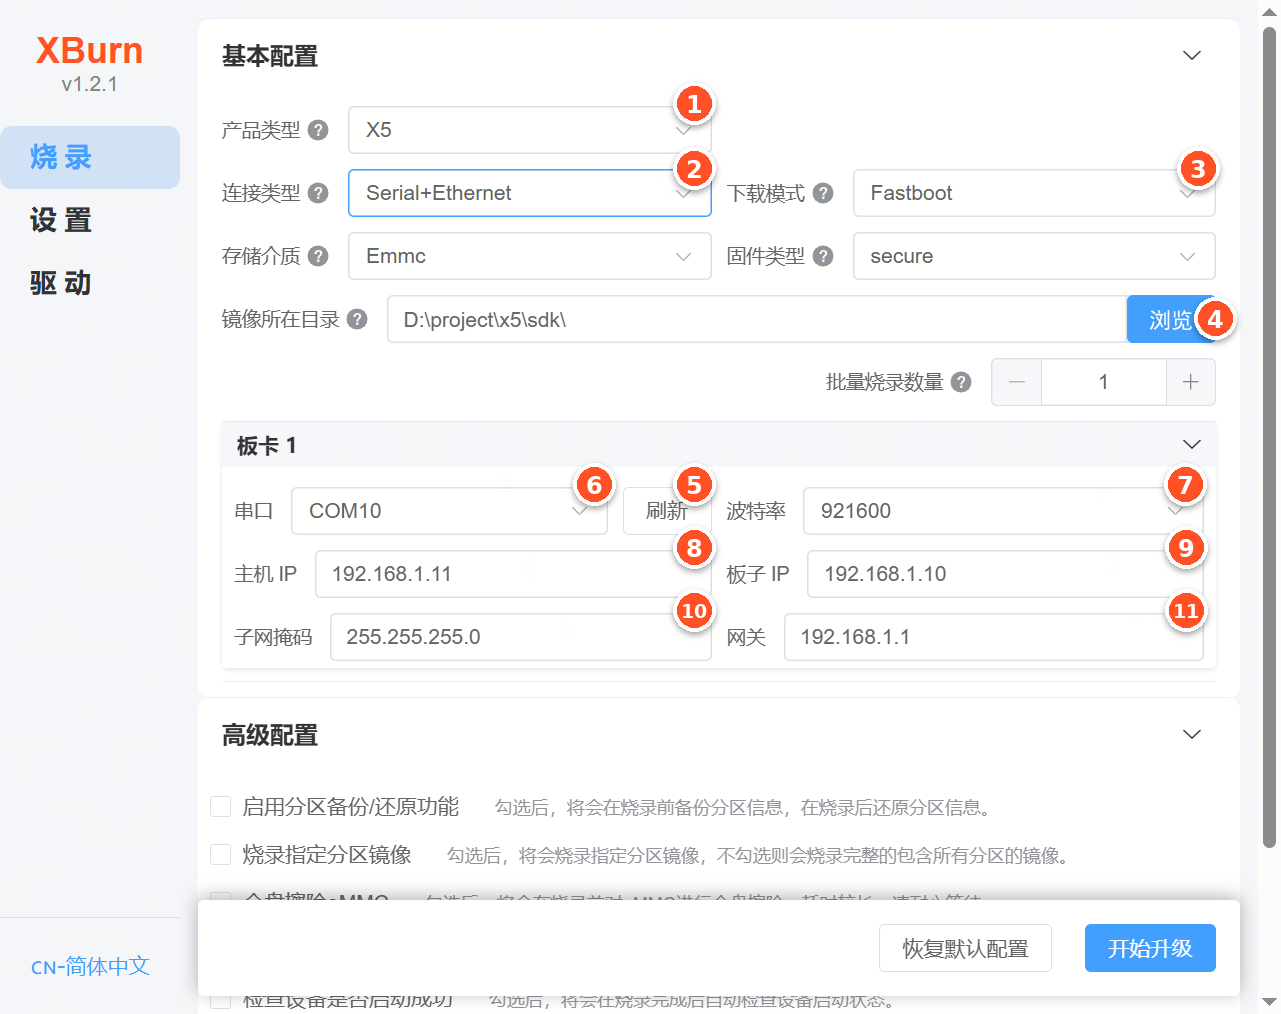
以下
步骤1:
选择产品类型下X5。
步骤2:
选择连接类型下Serial+Ethernet。
步骤3:
选择下载模式下Fastboot。
步骤4:
选择浏览按钮,选择S:\home\sxq\projects\sdk_x5_CS1.0\out\product。
步骤5:
点击刷新按钮,确保
步骤6:
选择串口下COM6。
步骤7:
设置波特率下921600。
步骤8:
设置主机IP输入框192.168.1.101。
步骤9:
设置板子IP输入框192.168.1.10(默认 IP)。
步骤10:
设置子网掩码输入框255.255.255.0。
步骤11:
设置网关输入框192.168.1.1。
步骤12:
开始开始升级按钮,开始
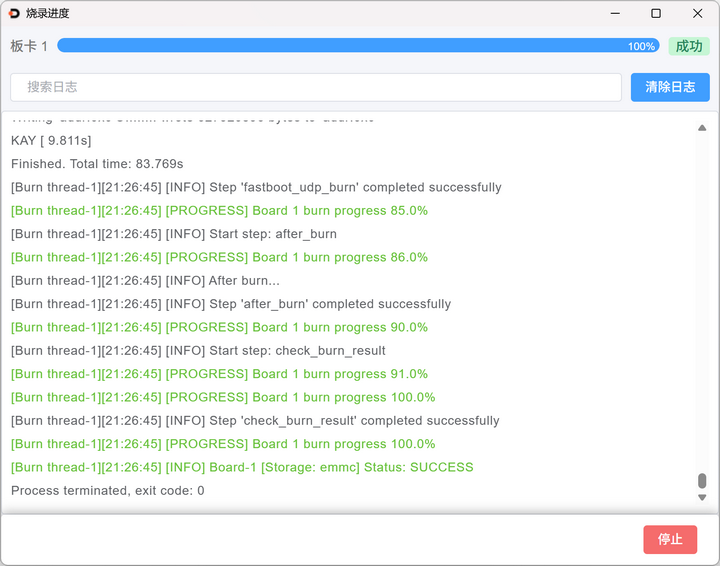
2.5.3.8. Serial 连接方式升级过程说明
前提条件:
请
查阅 通过 串口 完成连接 串口 驱动 的 安装。
适用范围:
Serial 连接
本
连接 方式 适用 于 只能 连接 串口 的 场景。 本
连接 方式 中 支持 的 下载 模式 均 通过 Xmodem 协议 用于开发板 上 场景没有 可用 镜像 或 镜像 已损坏 的 烧录,此时 需要 使用 out/product/uart_usb中的 镜像 BL2 以及 BL3X,此时 推荐 将 串口 波特率 设置 为 921600 (拨码 开关 D4 置 1)。 本
连接 方式 仅 推荐 用于 小 尺寸 镜像 的 烧录,Xmodem 传输 的 速度 很 慢。
下面
接线
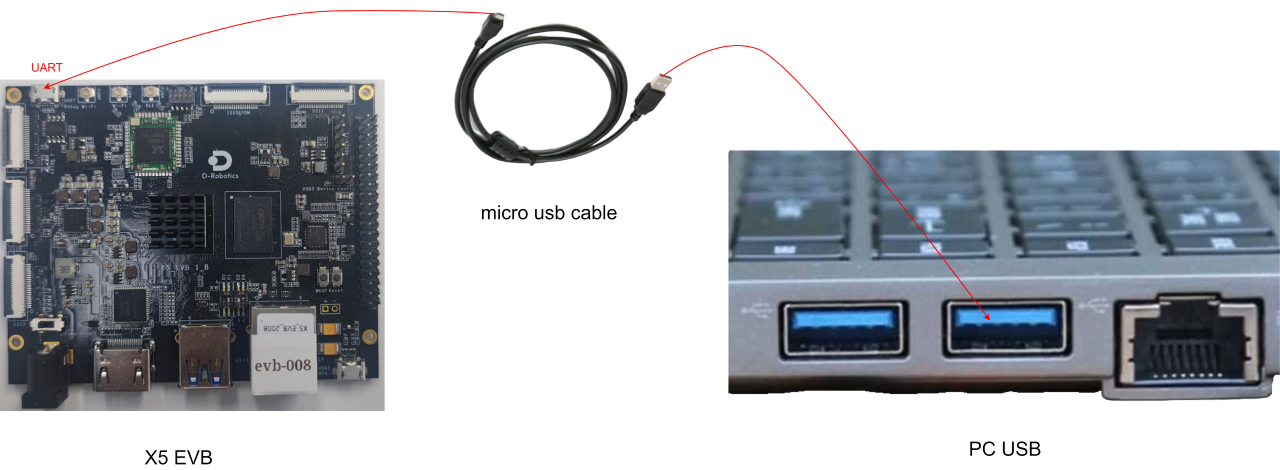
XBurn-gui烧录
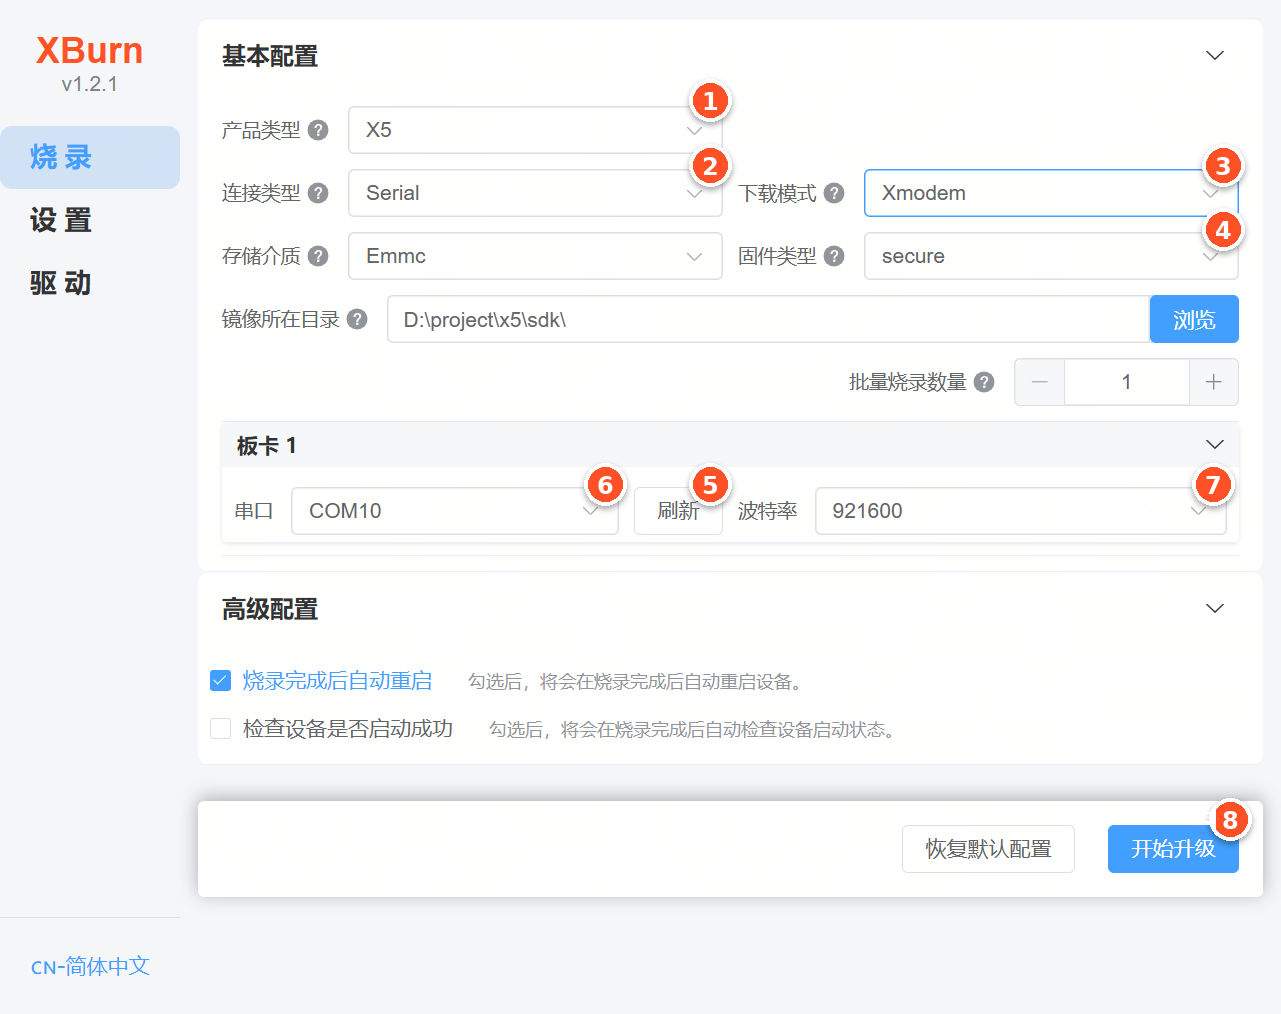
以下
步骤1:
选择产品类型下X5。
步骤2:
选择连接类型下Serial。
步骤3:
选择下载模式下Xmodem。
步骤4:
选择浏览按钮,选择S:\home\sxq\projects\sdk_x5_CS1.0\out\product。
步骤5:
选择串口下COM6。
步骤6:
点击刷新按钮,刷新
步骤7:
设置波特率输入框921600。
步骤8:
开始开始升级按钮,开始
2.5.3.9. 高级配置
烧录完成后自动重启
勾选烧录完成后自动重启选项
默认
勾选,烧录 结束 后,开发板 会 停留 在 最后 的 烧录 结束 时 的 状态,比如 通过fastboot烧录,那么 烧录 结束 后,开发板 依然 会 处在fastboot模式。
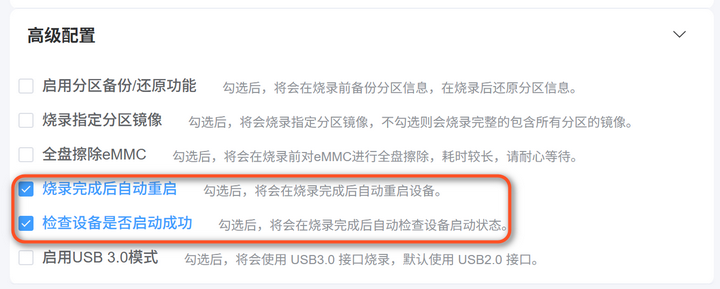
勾选后检查设备是否重启成功 选项
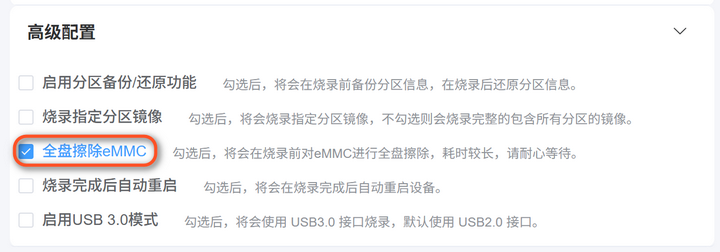
全盘擦除 eMMC
勾选全盘擦除 eMMC后,如果
全盘
擦除 eMMC 耗时 较长,请 耐心 等待,16GB 的 eMMC 的 全盘 擦除 需要 3-5 分钟。 当选
则 了 烧录指定分区镜像模式是,即使 勾选 全盘擦除 eMMC也不会 生效。
启用分区备份/还原功能
简介
XBurn-gui 烧录
适用范围
开发板
的 存储介质 中 必须 已经 存在 分区。
使用
默认
烧录 时 不会 进行 分区 备份。 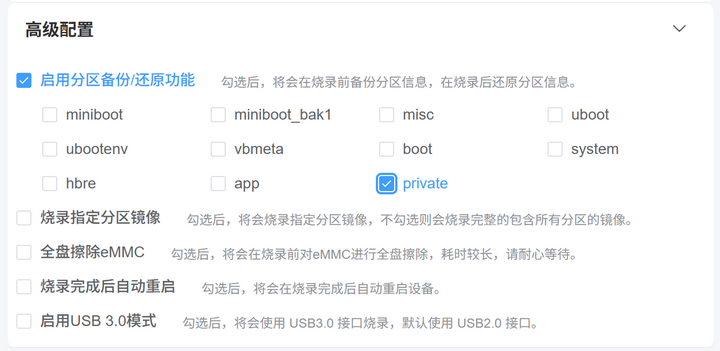
勾选
启用分区备份/还原功能选项,并选择 需要 备份 的 分区,则 烧录 时会 对 选择 的 分区 进行 分区 备份。
烧录启用分区备份/还原功能 选项
额外
指定烧录分区镜像
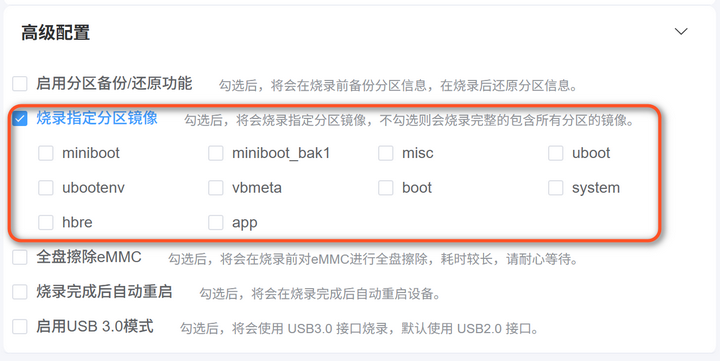
指定
烧录 本分区 镜像: 选项 支持 只 烧录 镜像 中 的 某 一个 或 多个 分区,不 影响 其他 分区 内容。适用 于 以下 场景: 只
需 更新 系统 中 的 某个 组件(如 miniboot、uboot、system、app 分区 等) 需要
在 不 影响 用户 数据 分区 的 前提 下 进行 系统升级 选择
此 模式 后,您 需 手动 选择 要 烧录 的 目标 分区。
2.5.4. 命令行工具介绍(工厂版本)
2.5.4.1. 简介
命令行
镜像
2.5.4.2. 命令行环境配置说明
Windows 系统
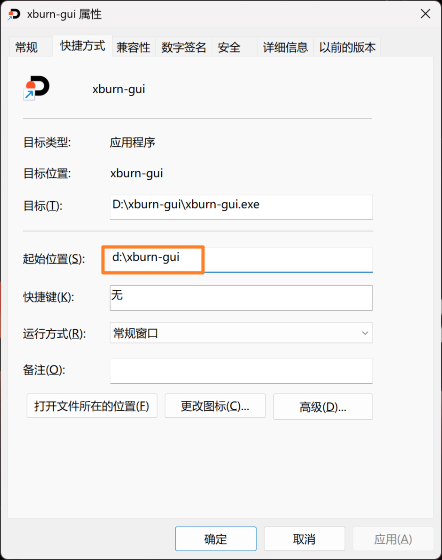
将D:\xburn-gui 添加
按下 Win + R 键,打开
运行 对话框。 输入
sysdm.cpl,按下回车。 在
系统属性窗口中 菜单栏 选择 高级,然后点击 右下角 的 环境变量。在
环境变量窗口中 选中 Path变量,然后点击 编辑按钮。在
编辑环境变量窗口中 点击 新建,将 xburn-gui 烧录工具 的 安装 目录 地址 粘贴 进去 即可。 点击
确定。
在 Ubuntu 系统xburn 命令/usr/bin/ 中,可以
2.5.4.3. 命令行使用方式
在 PC 端,打开sudo xburn (Ubuntu 以及 macOS 终端xburn (Windows Powershell 中),即可xburn --help 看到
$ xburn --help
usage: xburn [-h] [-s {product,serial,dfu,adb}] [-c CONFIG] [-v, --version] [-V {debug,info,warning,error,critical}] [-p PRODUCT_TYPE] [-l {usb,ethernet,serial,serial_usb,serial_ethernet}] [-d {fastboot,dfu,dfu_fastboot,xmodem,xmodem_fastboot,xmodem_dfu,xmodem_xmodem}] [-i IMG_FILES] [--erase_scrub]
             [--security {secure,secure_ohp,nosecure}] [--boot_check] [--batch_num BATCH_NUM] [--host_ip HOST_IP] [--board_ip BOARD_IP] [--netmask NETMASK] [--gateway GATEWAY] [--ipv6] [--usb_port {usb2.0,usb3.0}] [--serial SERIAL] [--baudrate BAUDRATE] [--mcu_serial MCU_SERIAL]
             [--hsm_serial HSM_SERIAL] [--erase_part ERASE_PART] [--select_part SELECT_PART] [--backup_part BACKUP_PART] [--reboot]

Command-line interface for the application.

optional arguments:
  -h, --help            show this help message and exit

Status query and other configurations::
  -s {product,serial,dfu,adb}, --scan {product,serial,dfu,adb}
                        Scan serial, dfu, adb and supported product lists.
  -c CONFIG, --config CONFIG
                        Path to the xburn config file.
  -v, --version         Display compiler version information.
  -V {debug,info,warning,error,critical}, --log_level {debug,info,warning,error,critical}
                        Set the logging level (default: info).

Burn configuration Arguments::
  -p PRODUCT_TYPE, --product_type PRODUCT_TYPE
                        Specify the product type.
  -l {usb,ethernet,serial,serial_usb,serial_ethernet}, --link_type {usb,ethernet,serial,serial_usb,serial_ethernet}
                        Specify the hardware link type.
  -d {fastboot,dfu,dfu_fastboot,xmodem,xmodem_fastboot,xmodem_dfu,xmodem_xmodem}, --dl_mode {fastboot,dfu,dfu_fastboot,xmodem,xmodem_fastboot,xmodem_dfu,xmodem_xmodem}
                        Specify the download mode.
  -i IMG_FILES, --img_files IMG_FILES
                        Specify img_files (comma separated).
  --erase_scrub         Enable or disable storage erase scrub.
  --security {secure,secure_ohp,nosecure}, --security_type {secure,secure_ohp,nosecure}
                        Specify the security type.
  --boot_check          Enable or disable boot check.
  --batch_num BATCH_NUM
                        Specify the number of boards to burn in batch.
  --host_ip HOST_IP     Specify the network host IP (comma separated).
  --board_ip BOARD_IP   Specify the network board IP (comma separated).
  --netmask NETMASK     Specify the network netmask (comma separated).
  --gateway GATEWAY     Specify the network gateway (comma separated).
  --ipv6                Enable or disable IPv6 network configuration.
  --usb_port {usb2.0,usb3.0}
                        Specify the usb port.
  --serial SERIAL       Specify the serial port.
  --baudrate BAUDRATE   Specify the serial port baud rate.
  --mcu_serial MCU_SERIAL
                        Specify the MCU serial port.
  --hsm_serial HSM_SERIAL
                        Specify the Hardware Security Module serial port.
  --erase_part ERASE_PART
                        Specify partitions to erase (comma separated).
  --select_part SELECT_PART
                        Specify partitions to select (comma separated).
  --backup_part BACKUP_PART
                        Specify partitions to backup (comma separated).
  --reboot              Enable or disable board reboot after burn.
下面
状态查询与基础配置
| 参数 | 缩写 | 可选值 | 作用 |
示例 | 格式 |
|---|---|---|---|---|---|
--scan |
-s |
product, serial, dfu, adb |
扫描 |
-s serial |
单选 |
--config |
-c |
文件 |
指定 |
-c XXX |
|
--version |
-v |
无 | 显示 |
-v |
- |
--log_level |
-V |
debug, info, warning, error, critical |
设置info) |
-V debug |
- |
核心烧录配置
| 参数 | 缩写 | 可选值 | 作用 |
示例 | 格式 |
|---|---|---|---|---|---|
--product_type |
-p |
产品型号(当前X5, RDKS100) |
必填,指定 |
-p X5 |
需 |
--link_type |
-l |
usb, ethernet, serial, serial_usb, serial_ethernet |
物理 |
-l serial_usb |
- |
--dl_mode |
-d |
fastboot,dfu,dfu_fastboot,xmodem,xmodem_fastboot,xmodem_dfu,xmodem_xmodem |
烧录 |
-d xmodem_fastboot |
- |
--img_files |
-i |
镜像 |
指定 |
-i boot.img,system.img |
多块 |
--batch_num |
- | 整数(建议≤8 ) | 并行 |
--batch_num 4 |
- |
--reboot |
- | - | 烧录 |
--reboot |
- |
协议
空板
状态 → 优先dfu或xmodem_xmodem(串口应急) 非空板 → 首选
fastboot( USB 高速)调试
需求 →xmodem_fastboot(串口日志 +USB 烧录)
分区操作与安全控制
| 参数 | 缩写 | 可选值 | 作用 |
示例 | 格式 |
|---|---|---|---|---|---|
--erase_part |
- | 分区 |
擦除 |
--erase_part cache,userdata |
逗号 |
--select_part |
- | 分区 |
仅 |
--select_part boot |
逗号 |
--backup_part |
- | 分区 |
烧录 |
--backup_part recovery |
逗号 |
--erase_scrub |
- | 布尔值 | 启用 |
--erase_scrub |
- |
--security_type |
- | secure, secure_ohp, nosecure |
设备 |
--security secure |
- |
--boot_check |
- | 布尔值 | 烧录 |
--boot_check |
- |
网络配置
| 参数 | 缩写 | 可选值 | 作用 |
示例 | 格式 |
|---|---|---|---|---|---|
--host_ip |
- | IPv4/IPv6 地址 | 主机 IP 地址 | --host_ip 192.168.1.100 |
逗号 |
--board_ip |
- | IPv4/IPv6 地址 | 设备 IP 地址 | --board_ip 192.168.1.101,192.168.1.102 |
逗号 |
--netmask |
- | 子网掩码 | 网络 |
--netmask 255.255.255.0 |
- |
--gateway |
- | IPv4/IPv6 地址 | 网关 |
--gateway 192.168.1.1 |
- |
--ipv6 |
- | 布尔值 | 启用 IPv6 网络 |
--ipv6 |
- |
接口配置
| 参数 | 缩写 | 可选值 | 作用 |
示例 | 格式 |
|---|---|---|---|---|---|
--usb_port |
- | usb2.0, usb3.0 |
USB 接口 |
--usb_port usb3.0 |
- |
--serial |
- | 串口 |
指定 |
--serial /dev/ttyUSB0、--serial COM10 |
- |
--baudrate |
- | 当前115200 和 921600 |
设置 |
--baudrate 115200 |
- |
--mcu_serial |
- | 串口 |
MCU 调试 |
--mcu_serial /dev/ttyACM1 |
- |
--hsm_serial |
- | 串口 |
HSM 安全 |
--hsm_serial /dev/ttyHS0 |
- |
使用示例
单
设备 烧录(串口 + USB Fastboot) xburn -V info -p X5 -l serial_usb -d fastboot -i S:\home\sxq\projects\sdk_x5_CS1.0\out\product --batch_num 1 --baudrate 921600 --serial COM6 --reboot
空板
调试(串口 + USB xmodem_fastboot) xburn -V info -p X5 -l serial_usb -d xmodem_fastboot -i S:\home\sxq\projects\sdk_x5_CS1.0\out\product --batch_num 1 --baudrate 921600 --serial COM6 --reboot
执行
成功 日志 如下: Finished. Total time: 31.990s [Burn thread-1][18:44:37] [INFO] Step 'fastboot_burn' completed successfully [Burn thread-1][18:44:37] [PROGRESS] Board 1 burn progress 85.0% [Burn thread-1][18:44:37] [INFO] Start step: after_burn [Burn thread-1][18:44:37] [PROGRESS] Board 1 burn progress 86.0% [Burn thread-1][18:44:37] [INFO] After burn... [Burn thread-1][18:44:37] [INFO] Step 'after_burn' completed successfully [Burn thread-1][18:44:37] [PROGRESS] Board 1 burn progress 90.0% [Burn thread-1][18:44:37] [INFO] Start step: check_burn_result [Burn thread-1][18:44:37] [PROGRESS] Board 1 burn progress 91.0% [Burn thread-1][18:44:37] [ERROR] Write failed: Write timeout [Burn thread-1][18:44:37] [INFO] Reconnected successfully [Burn thread-1][18:44:37] [PROGRESS] Board 1 burn progress 100.0% [Burn thread-1][18:44:37] [INFO] Step 'check_burn_result' completed successfully [Burn thread-1][18:44:37] [PROGRESS] Board 1 burn progress 100.0% [Burn thread-1][18:44:37] [INFO] Board-1 [UID: 308064960e30c82402062d570000024] [Storage: emmc] Status: SUCCESS
扫描
可用 串口 xburn -s serial
命令
执行 日志 如下: PS C:\Users\xiangqing.shi> xburn -s serial Scanning for serial information... Detected serial devices: Device: COM6, Description: USB-SERIAL CH340 (COM6), HWID: USB VID:PID=1A86:7523 SER= LOCATION=1-2.3
2.5.5. 手动烧录工具介绍
2.5.5.1. 使用 fastboot 命令烧录镜像
前提条件:
请
查阅 通过 串口 以连接 完成 串口 驱动 的 安装。在 Windows 电脑 的 设备 管理器 中,您 可以 看到 对应 的 COM 端口;在 Ubuntu 系统 的 /dev 目录 中,可以 找到 相应 的 tty 串口 设备。 请
查阅 通过 USB 连接 来 完成 USB 驱动 的 安装。在 Windows 电脑 上,通常 会 在 设备 管理器 中 显示 为 Android Bootloader Interface设备。
适用范围:
该
提示:
图形化
的 xburn-gui软件包中 已 集成 Fastboot 工具。 Windows 版本 位于 安装 目录 下 的 xburn-gui\tools\windows目录中。 在 Windows 系统
中,可以 将 fastboot工具的 路径 加入 到 环境变量 中。
当fastboot 0 命令
U-Boot 2022.10-gca2c6582a0 (Mar 13 2024 - 19:04:15 +0800)

Model: Horizon X5
... (省略) ...
Hobot>fastboot 0
接下来,您emmc_disk.simg 镜像
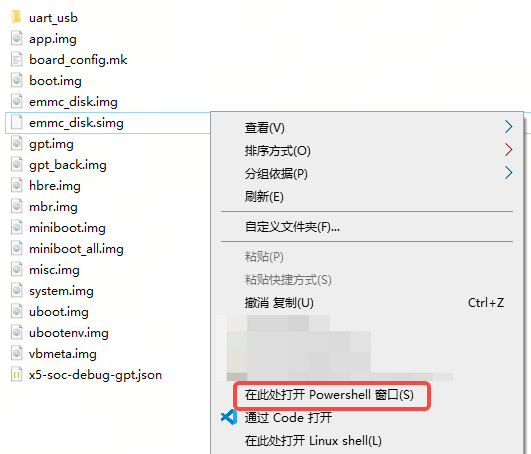
然后
fastboot flash addr:0x0 emmc_disk.simg
烧写fastboot reboot 命令
整体
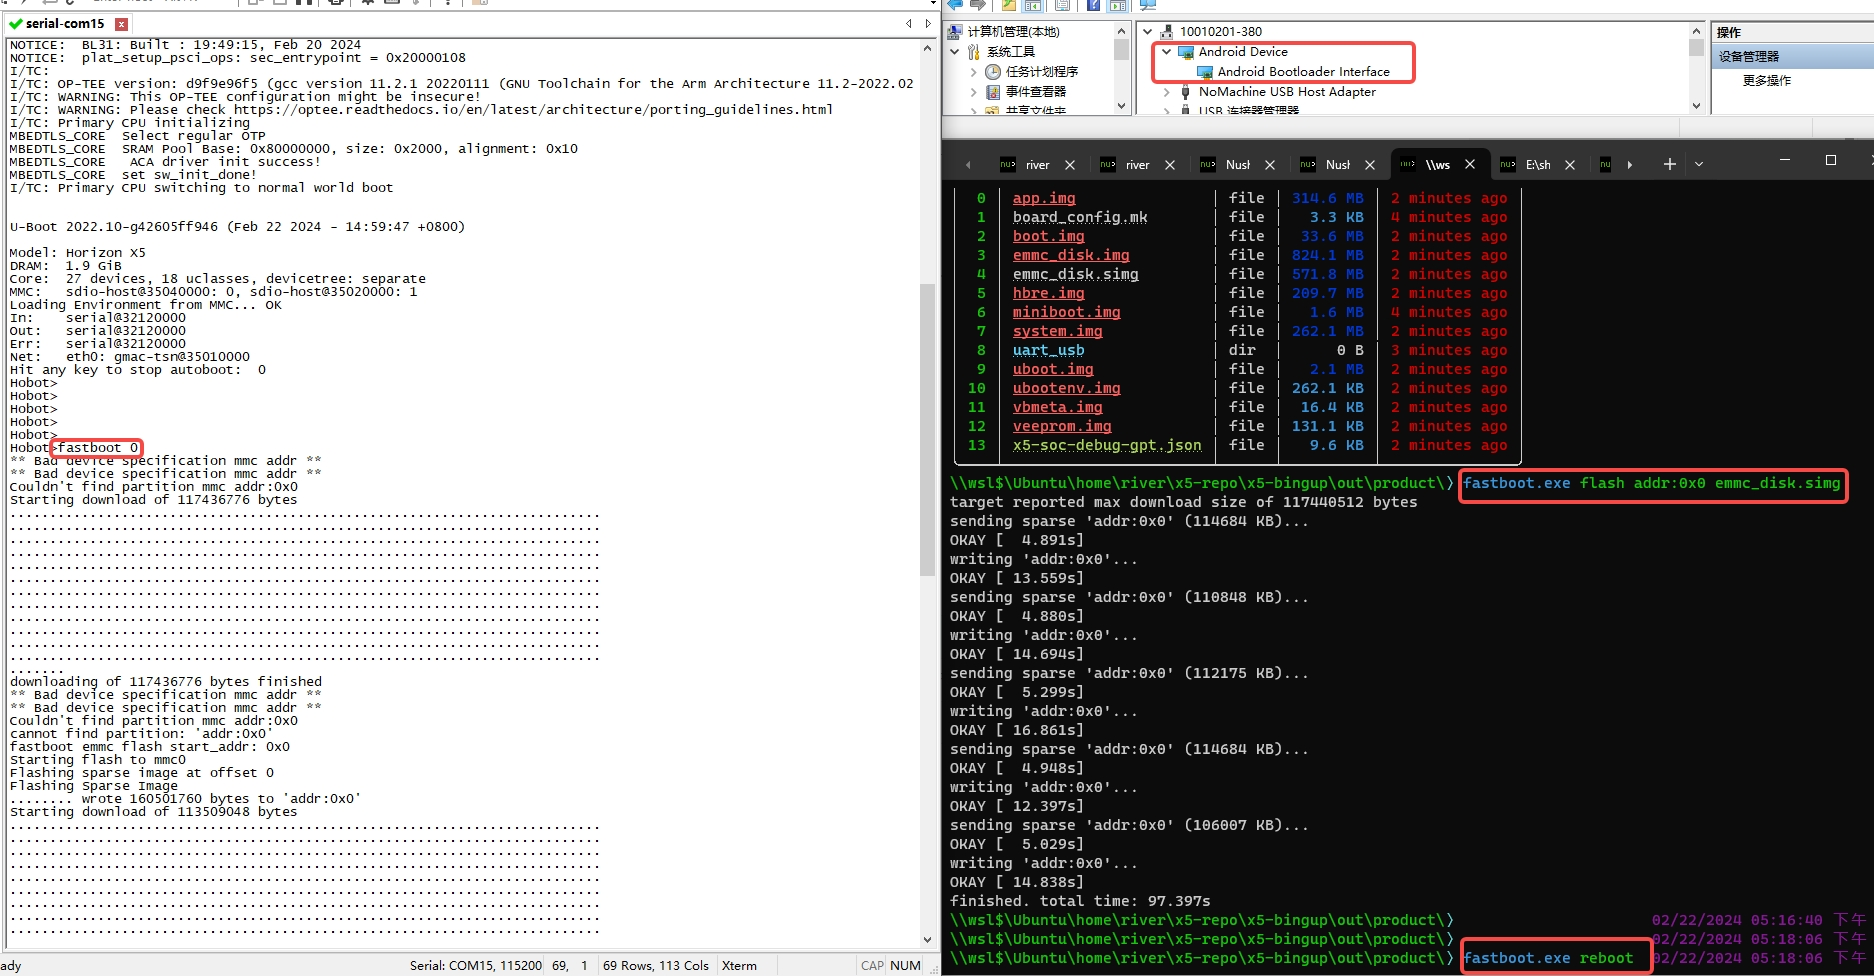
此外,您
烧录 uboot 分区
fastboot flash uboot uboot.img
烧录 boot 分区
fastboot flash boot boot.img
烧录 system 分区
fastboot flash system system.img
烧录 miniboot 分区
fastboot flash miniboot miniboot.img
注意:
烧录 miniboot 分区flash addr:0x0, 使用
fastboot flash addr:0x0 miniboot_all.img
miniboot_all.img 是
2.5.5.2. 使用 dfu 命令烧录镜像
前提条件:
请
查阅 通过 USB 连接 来 完成 USB 驱动 的 安装。在 Windows 电脑 上,通常 会 在 设备 管理器 中 显示 为 Android Bootloader Interface设备。请
按照 图形化 工具 USB 下载 模式 的接线 方式 进行接线。
适用范围:
该
烧录 方式 主要 适用 于 没有 镜像 或 镜像 损坏 的 开发板。 该
烧录 方式 也 可 用于 已经 存在 镜像 且 能够 正常 启动 的 开发板。
Windows 下 dfu 命令烧录说明
Windows 下 dfu 命令
Ubuntu 下 dfu 命令烧录说明
前置条件 (udev 规则, plugdev 组)
配置 udev 规则:将 51-drobotics-usb.rules(点击
自动 下载)文件 拷贝到 /etc/udev/rules.d/目录中。 激活
新 规则: udevadm control --reload-rules udevadm trigger
若
上述 命令 激活 失败,可以 尝试 重启 电脑。 将
当前 用户 添加 到 plugdev 组: sudo usermod -aG plugdev $(whoami)
重新
登录 账户 并 使用 groups命令确认 用户 已 成功 加入 plugdev 组。
常见
命令 常用命令 与 Windows 平台 类似,使用 dfu-util工具进行 烧录。
2.5.5.3. 使用串口手动烧录镜像
前提条件:
请
查阅 通过 串口 以连接 完成 串口 驱动 的 安装。在 Windows 电脑 的 设备 管理器 中,您 可以 看到 对应 的 COM 端口;在 Ubuntu 系统 的 /dev 目录 中,可以 找到 相应 的 tty 串口 设备。 请
按照 图形化 工具 UART 下载 模式 的接线 方式 进行接线。 有
拨码 开关 的 单板,保持 拨码 开关 处于 默认 启动 方式 如 EMMC 启动 状态 。使用
串口 烧录 镜像 时,建议 将 串口 波特率 调整 为 921600bps (对于 X5 EVB 可以 将 拨码 开关 的 D4 置 1)以 提高 烧录 速度。
适用范围:
该
烧录 方式 主要 适用 于 没有 镜像 或 镜像 损坏 的 开发板。 该
烧录 方式 也 可 用于 已经 存在 镜像 且 能够 正常 启动 的 开发板。 如果
通过 图形化 烧录 工具 进行 固件 升级 失败,并且 由于 缺少 日志 信息 难以 准确 定位问题,可以 参考 本 章节 提供 的 手动 烧录 方法。通过 将 系统启动 至 U-Boot 阶段,可以 获取 更 详细 的 启动 信息,帮助 判断 问题 原因。
以下
步骤1:
准备
对于 Windows 系统WindTerm_X.X.X_Windows_Portable_x86_64.zip,解压WindTerm.exe 即可。
对于 Linux 系统WindTerm_X.X.X_Linux_Portable_x86_64.zip,解压
chmod +x ./WindTerm && ./WindTerm
步骤2:
将
步骤3:
使用 WindTerm 连接
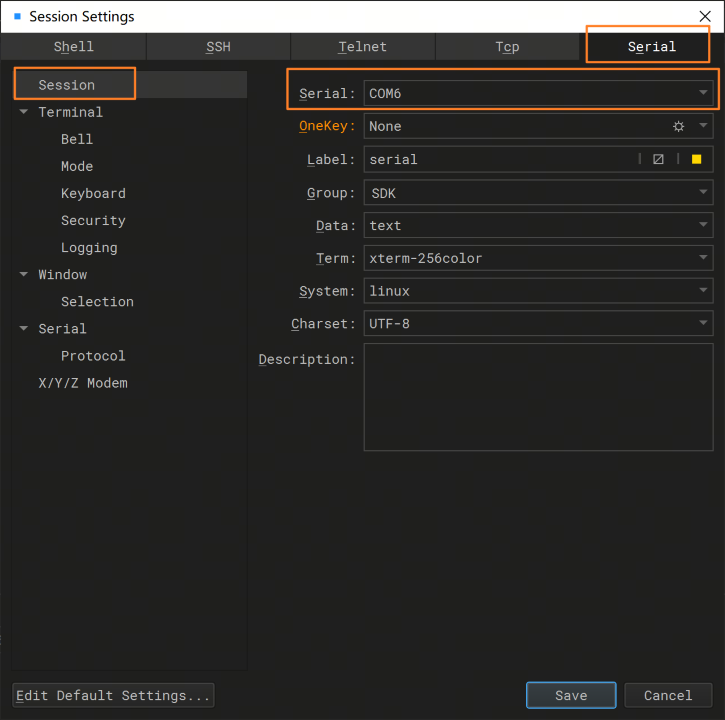
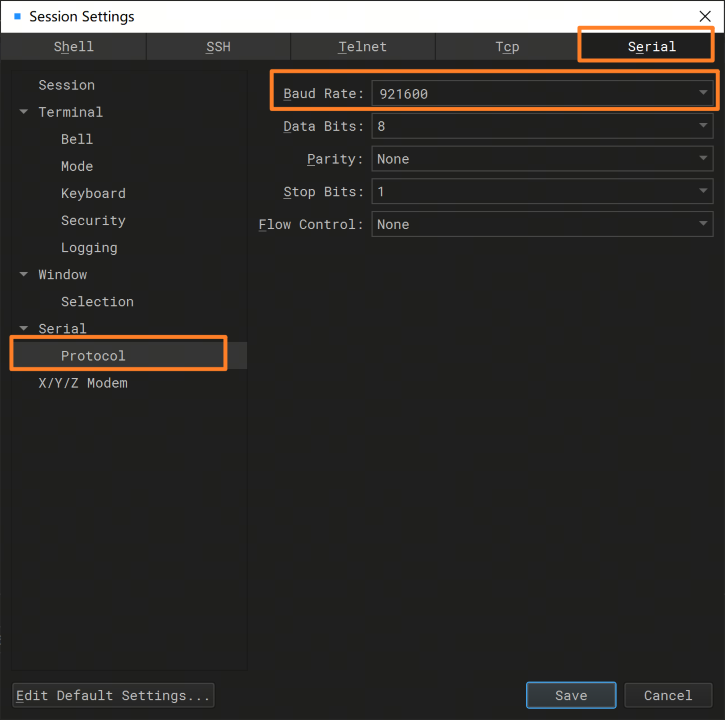
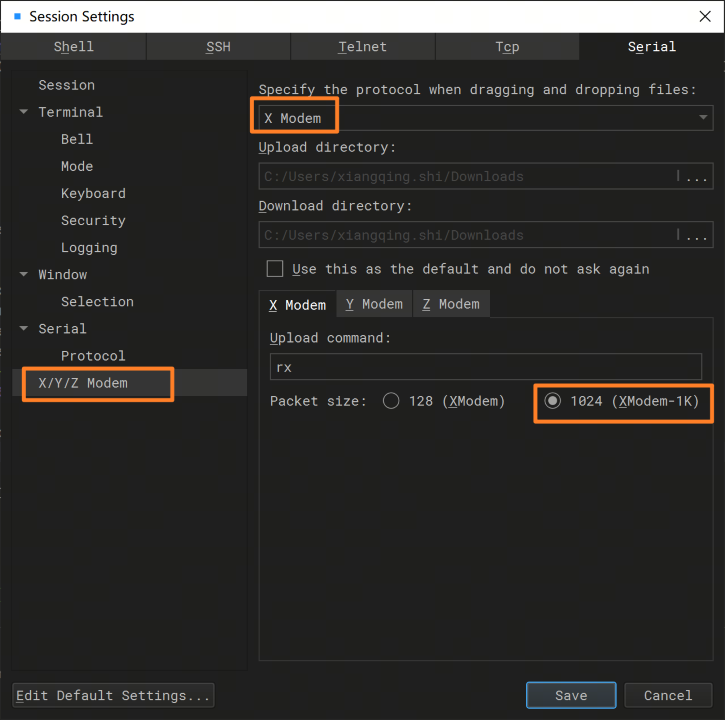
配置
步骤4:
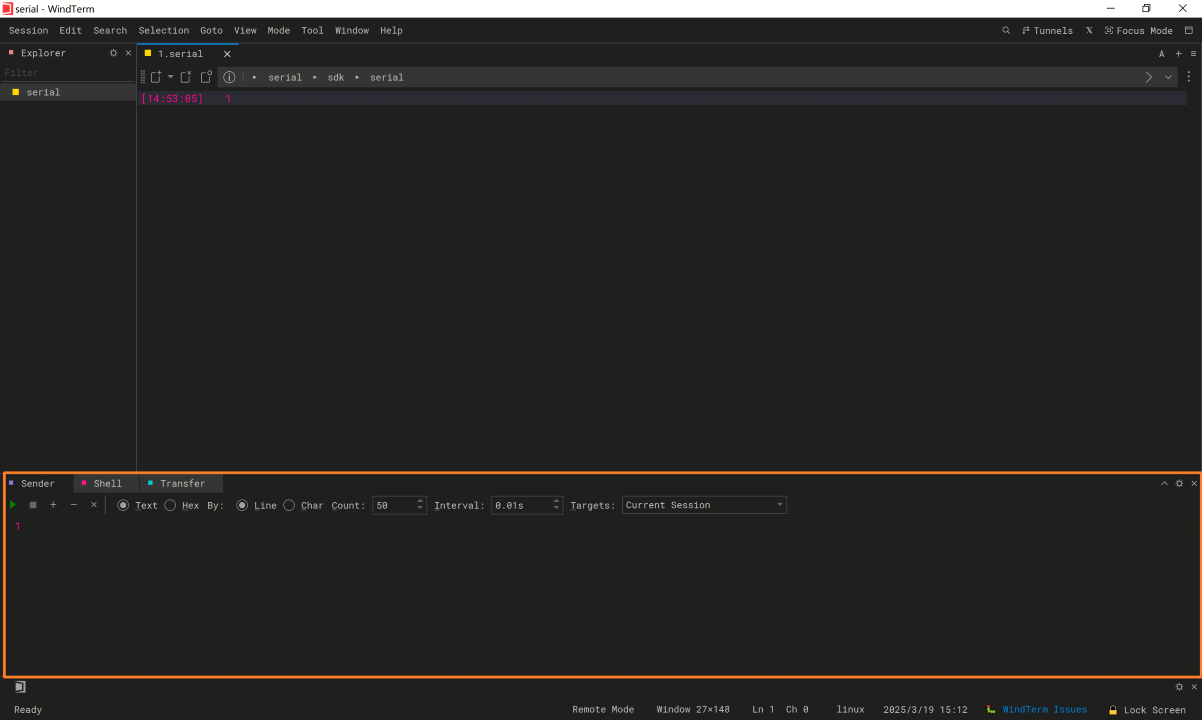
在 WindTerm 界面,依次
步骤5:
在 Sender 窗口x2dbg 命令,并
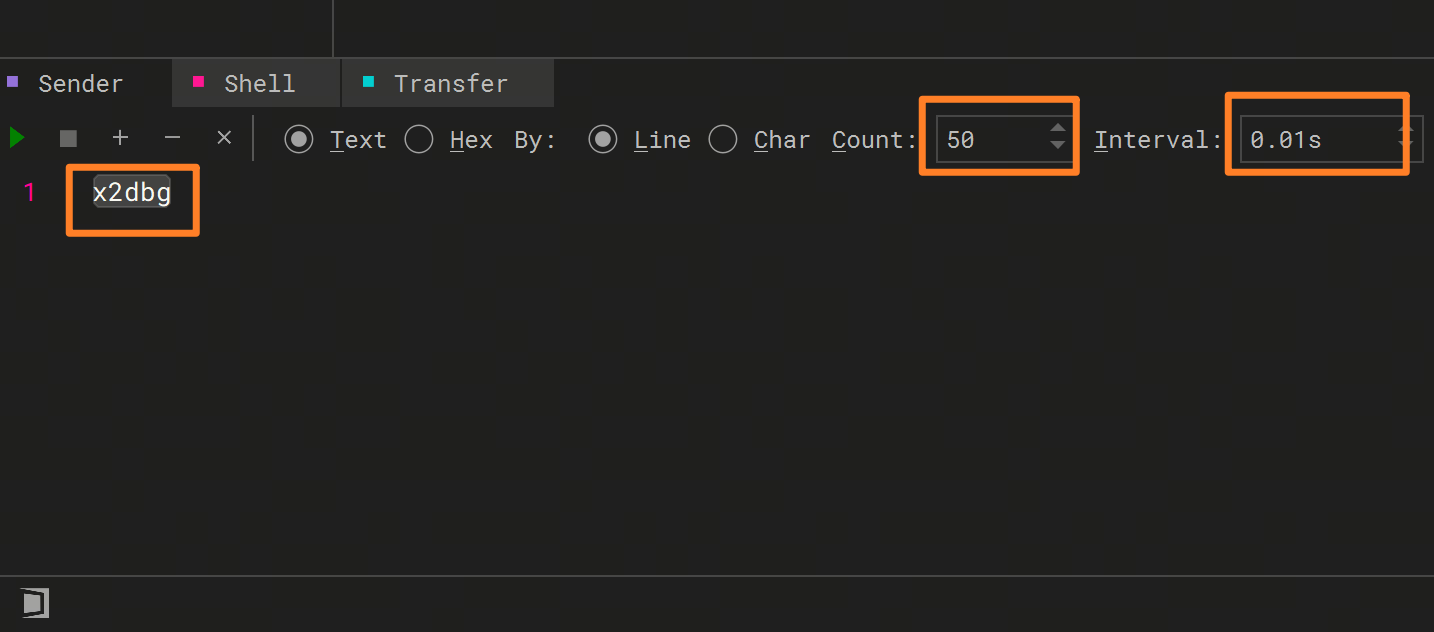
步骤6:
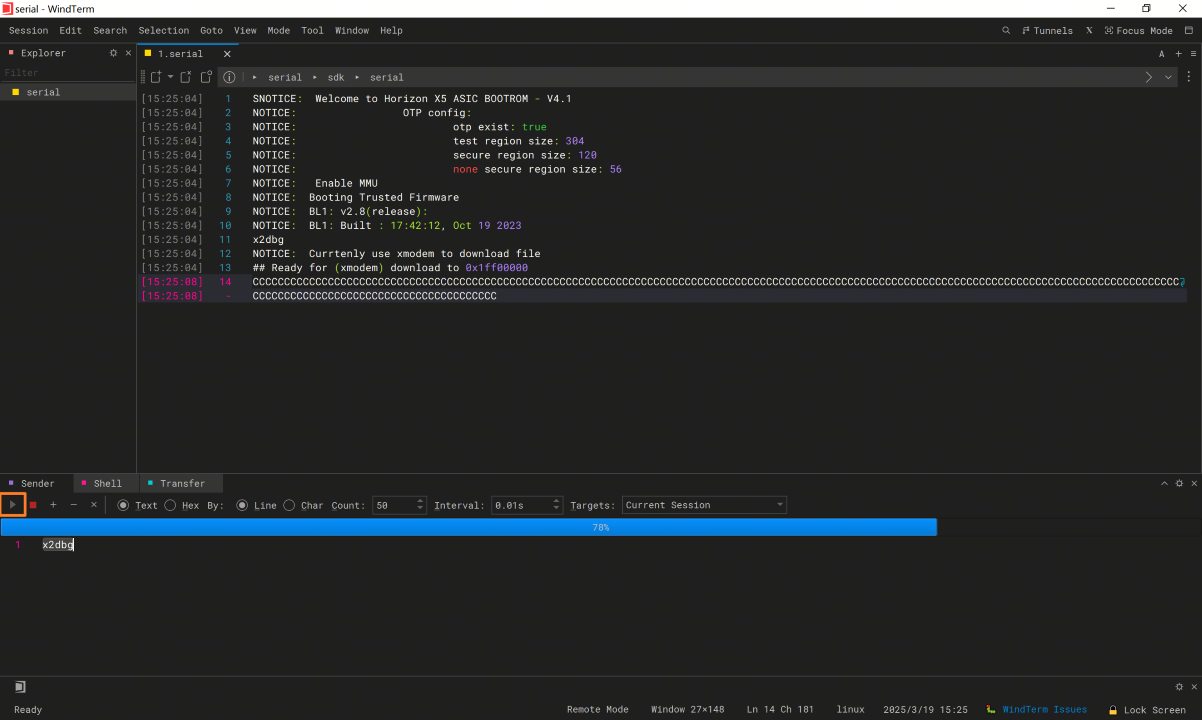
点击 run(绿色
步骤7:
运行C,并Currently use xmodem to download file。
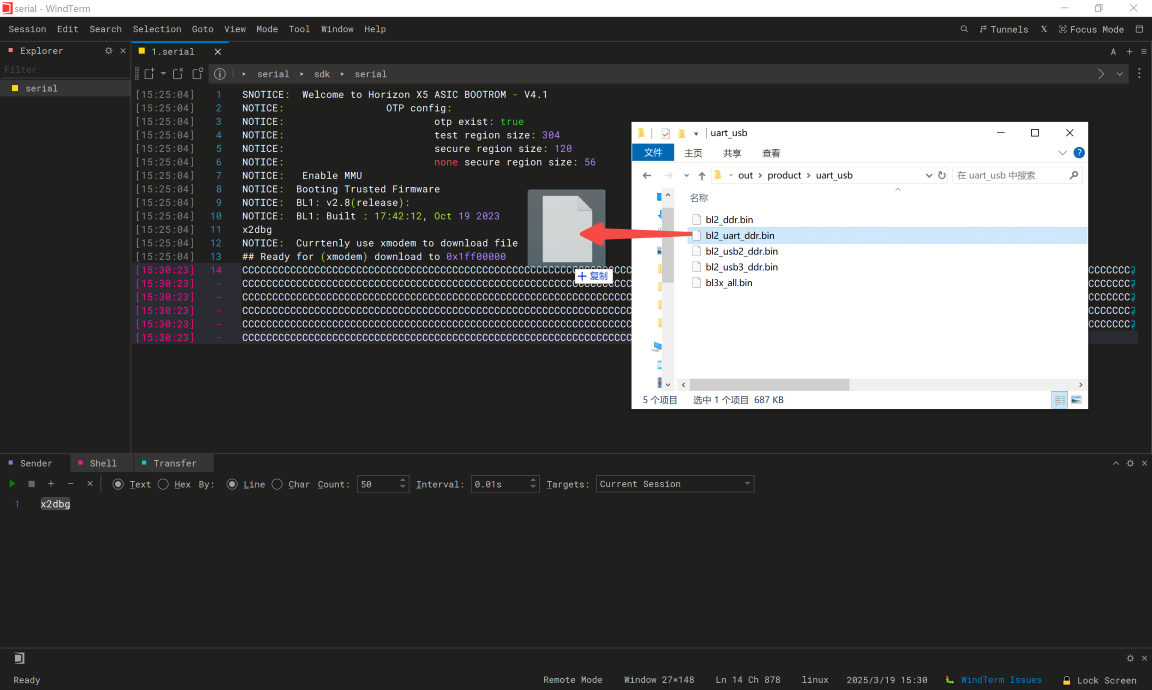
将out\product\uart_usb 目录bl2_uart_ddr.bin 固件
步骤9:
当 bl2_uart_ddr.bin 载Download bl3x fip(bl3x_all.bin),此时xmodem 传输C,等待
 100% [====================] 00:00:10 704360 bytes
00 = 704512 Bytes
NOTICE:  Get S1PK
NOTICE:  [verify_signature] pass.
NOTICE:  [verify_hash] pass.
NOTICE:  [verify_hash] pass.
NOTICE:  [auth_decrypt] pass.
NOTICE:  BL1: BL2 memory layout address = 0x1fe9f000
NOTICE:  BL1: Booting BL2
NOTICE:                 OTP config:
NOTICE:                         otp exist: true
NOTICE:                         test region size: 304
NOTICE:                         secure region size: 120
NOTICE:                         none secure region size: 56
NOTICE:  BL2: v2.8(release):v1.0.8-72-g68feecd07
NOTICE:  BL2: Built : 15:17:38, Jan 16 2025
NOTICE:  Enter UART Mode.....
NOTICE:  Enter media_source_select process(0).
NOTICE:  BL2 config file
NOTICE:  start to load bl2 cfg image
NOTICE:  BL2 CFG ADDR:0x1ff00000, MAGIC:0x474643324c424248
NOTICE:  bypass update efuse
NOTICE:  calibration_offset -22
NOTICE:  trimming_value 9
NOTICE:  ADC read channel[2]: 313mv
NOTICE:  ddr info:[LPDDR4]-[DUAL_RANK]-[ECC OFF]-[DVFS ON]-[4266M]
NOTICE:  JTAG ENABLE
NOTICE:  disable wdt
NOTICE:  Get S1PK
NOTICE:  [verify_signature] pass.
NOTICE:  [verify_hash] pass.
NOTICE:  [verify_signature] pass.
NOTICE:  start to load ddr image
NOTICE:  [verify_hash] pass.
NOTICE:  run ddr Fw
NOTICE:  matching profile: profile_2 from aon config
NOTICE:  type: LP4, freq: 4266, ecc: 0(0x7f), rank: 2, dvfs: 1, version: 9.03
NOTICE:  ddr cost: 146803 us, ddr size: 4 GB, manuid: 0x13
NOTICE:  ddr ready
NOTICE:  Download bl3x fip(bl3x_all.bin) to ddr: 0x84000000
NOTICE:  Currtenly use xmodem to download file
## Ready for (xmodem) download to 0x84000000
CCCCCCCCCCCCCCCCCCCC
步骤10:
和步骤 8 一样,将out\product\uart_usb 目录bl3x_all.bin 固件
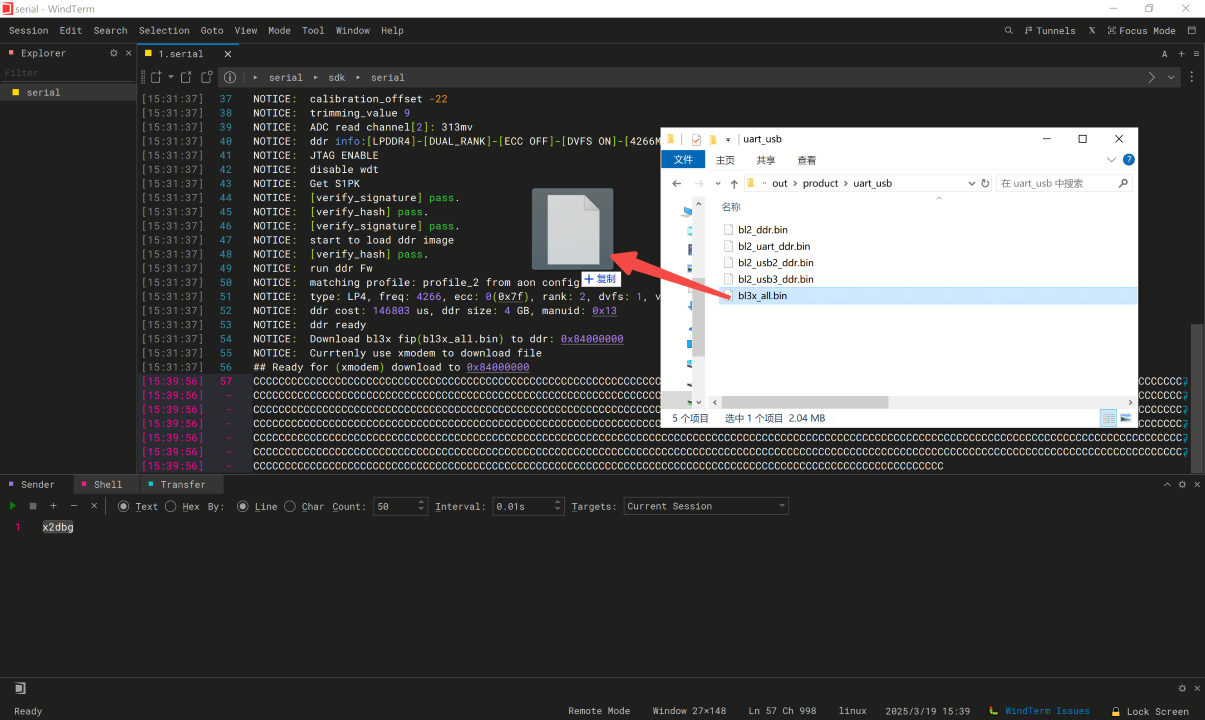
步骤11:
当 bl3x_all.bin 传输U-Boot 命令行fastboot 命令tftp 下载
串口
100% [====================] 00:00:32 2144940 bytes
00 = 2145280 Bytes
NOTICE:  Get S1PK
NOTICE:  [verify_signature] pass.
NOTICE:  [verify_hash] pass.
NOTICE:  [verify_signature] pass.
NOTICE:  start to load bl31 image
NOTICE:  [verify_hash] pass.
NOTICE:  Get S1PK
NOTICE:  [verify_signature] pass.
NOTICE:  [verify_hash] pass.
NOTICE:  [verify_signature] pass.
NOTICE:  start to load optee image
NOTICE:  [verify_hash] pass.
NOTICE:  [verify_hash] pass.
NOTICE:  start to load uboot image
NOTICE:  BL1: Booting BL31
NOTICE:  multicore_init: sec_entrypoint = 0x2000010c
NOTICE:  BL31: v2.8(release):v1.0.8-67-g40e41bd29
NOTICE:  BL31: Built : 10:40:46, Dec 31 2024
NOTICE:  plat_setup_psci_ops: sec_entrypoint = 0x2000010c
I/TC:
I/TC: OP-TEE version: 6b9fbbe87 (gcc version 11.3.1 20220712 (Arm GNU Toolchain 11.3.Rel1)) #1 Thu Jan 16 06:59:55 UTC 2025 aarch64
I/TC: WARNING: This OP-TEE configuration might be insecure!
I/TC: WARNING: Please check https://optee.readthedocs.io/en/latest/architecture/porting_guidelines.html
I/TC: Primary CPU initializing
MBEDTLS_CORE  Select regular OTP
MBEDTLS_CORE  SRAM Pool Base: 0x80000000, size: 0x2000, alignment: 0x10
MBEDTLS_CORE   ACA driver init success!
MBEDTLS_CORE  set sw_init_done!
I/TC: Primary CPU switching to normal world boot


U-Boot 2022.10-gd5c668dae2 (Mar 14 2025 - 17:56:43 +0800)

Model: Horizon X5
DRAM:  3.9 GiB
console out start addr:0x0000000087ffc000, end addr:0x0000000087ffe000
horizon_lsio_pinctrl lsio_iomuxc@34180000: Initialized D-Robotics pinctrl driver
optee optee: OP-TEE: revision 3.20 (6b9fbbe8)
ADC calibration: -22
ADC trimming: 9
horizon_hsio_pinctrl hsio_iomuxc@35050000: Initialized D-Robotics pinctrl driver
horizon_dsp_pinctrl dsp_iomuxc@31040014: Initialized D-Robotics pinctrl driver
Core:  149 devices, 29 uclasses, devicetree: separate
WDT:   Started watchdog@34250000 with servicing (10s timeout)
stop watchdog
MMC:   sdio-host@35040000: 0, sdio-host@35020000: 1
Loading Environment from MMC... (Tuning Ok!) *** Warning - bad CRC, using default environment

In:    serial@32120000
Out:   serial@32120000
Err:   serial@32120000
Net:
Warning: gmac-tsn@35010000 (eth0) using random MAC address - 36:64:fc:52:5e:1e
eth0: gmac-tsn@35010000
boot action: UART
Hobot>
请
2.5.6. FAQ:常见错误对照表
2.5.6.1. 环境准备问题
问题: 检测烧录状态错误
报错
[Burn thread-1][11:46:37] [INFO] burn_flow.py:271 Please try enter UART download mode
[Burn thread-1][11:46:37] [INFO] serial_transport.py:746 Try entry UART download mode...
[Burn thread-1][11:46:37] [WARNING] serial_transport.py:748 [IMPORTANT] Please power on or reboot the Board! Wait 30 seconds...
[Burn thread-1][11:47:07] [WARNING] serial_transport.py:763 Entry UART download mode timed out after 30 seconds.
[Burn thread-1][11:47:07] [ERROR] burn_flow.py:273 Failed to enter UART download mode, Board state: UNKNOWN
[Burn thread-1][11:47:07] [ERROR] burn_executor.py:57 Step 'prepare_boot' failed
[Burn thread-1][11:47:07] [ERROR] xburn.py:91 Board-1, burn failed
[Burn thread-1][11:47:07] [ERROR] xburn.py:75 Board-1 [Storage: nand] Status: FAILED
Process terminated, exit code: 0
措施
工具
提示 Please power on or reboot the Board! Wait 30 seconds… 时请 重启 开发板 建议
操作 顺序:先 点击 工具 开始 升级,然后 开发板 上电
问题: 串口未连接
报错
[MainThread][10:54:37] [ERROR] cli_utils.py:573 Serial port COM8 is NOT available
[MainThread][10:54:37] [ERROR] cli_utils.py:575 Reason:
Port COM8 not found.
Please check:
1. Is the device properly connected?
2. Is the correct port name used?
3. Available ports: python -m serial.tools.list_ports
[MainThread][10:54:37] [ERROR] xburn.py:368 Invalid configuration.
Process terminated, exit code: 1
措施
检查
串口 USB 线 是否 连接 检查 USB 驱动
是否 已 安装 串口
是否 被 其他 终端 占用 返回
主 界面 刷新 串口,并 选择 正确 的 串 口号
问题: 镜像路径异常或镜像不存在
报错
[MainThread][10:58:00] [ERROR] cli_utils.py:427 Set storage type failed.
[MainThread][10:58:00] [ERROR] cli_utils.py:584 The img_files parameter validation failed. Exiting...
[MainThread][10:58:00] [ERROR] xburn.py:368 Invalid configuration.
措施
检查
镜像 路径 是否 正确,SDK默认 可 烧录 的 镜像 路径 为 out/product检查
指定 镜像 路径 下 是否 有所 需 镜像文件
问题: 找不到 dfu 设备
报错
dfu-util 0.11
Copyright 2005-2009 Weston Schmidt, Harald Welte and OpenMoko Inc.
Copyright 2010-2021 Tormod Volden and Stefan Schmidt
This program is Free Software and has ABSOLUTELY NO WARRANTY
Please report bugs to http://sourceforge.net/p/dfu-util/tickets/
dfu-util: Warning: Invalid DFU suffix signature
dfu-util: A valid DFU suffix will be required in a future dfu-util release
dfu-util: No DFU capable USB device available
措施
检查
是否 usb2.0 dfu 启动 模式 检查 USB 线
连接 状态 检查 USB 驱动
是否 安装
2.5.6.2. 固件类型错误
问题: Secure 芯片烧录 Non-Secure 固件
报错
[Burn thread-1][18:05:09] [INFO] uart_boot.py:66 load success
NOTICE: Get S1PK
NOTICE: [verify_signature] pass.
ERROR: Hash value not match.
ERROR: Failed to load extension FW ID 1
ERROR: horizon_dfu_dnl_fip failed
ERROR: Uart Preemption Download fip failed, ReDownLoad!!
措施
Secure 芯片
问题: Non-Secure 芯片烧录 Secure 固件
报错
[Burn thread-1][17:54:58] [PROGRESS] burn_progress.py:21 Board 1 burn progress 15.5%
[Burn thread-1][17:54:58] [INFO] uart_boot.py:66 load success
00 = 708608 Bytes
NOTICE: BL1: BL2 memory layout address = 0x1fe9f000
NOTICE: BL1: Booting BL2
E[Burn thread-1][17:56:38] [ERROR] uart_boot.py:81 Uart xmodem download uart_usb/bl3x_all.bin failed
[Burn thread-1][17:56:38] [ERROR] burn_executor.py:57 Step 'xmodem_boot' failed
[Burn thread-1][17:56:38] [ERROR] xburn.py:91 Board-1, burn failed
[Burn thread-1][17:56:38] [ERROR] xburn.py:75 Board-1 [Storage: emmc] Status: FAILED
Process terminated, exit code: 0
措施
Non-Secure 芯片Booting BL2 阶段
2.5.6.3. 烧录过程问题
问题: Xmodem 报错 “send error: expected ACK; got b’C’ for block 1”
报错
[Burn thread-1][2026-07-02 11:42:04,689] [PROGRESS] burn_progress.py:21 Board 1 burn progress 18.2%
[Burn thread-1][2026-07-02 11:42:04,689] [INFO] serial_transport.py:83 Transfer: 59.4% | Blocks: 940/1582
[Burn thread-1][2026-07-02 11:42:06,094] [ERROR] __init__.py:338 send error: expected ACK; got b'\x15' for block 1
[Burn thread-1][2026-07-02 11:42:06,107] [ERROR] __init__.py:338 send error: expected ACK; got b'\x15' for block 1
[Burn thread-1][2026-07-02 11:42:06,117] [ERROR] __init__.py:338 send error: expected ACK; got b'\x15' for block 1
措施
检查
串口 连接 稳定性 调低
串口 波特率 重试,对于 X5 EVB 开发板,可 将 拨码 开关 D4 置 0,将 波特率 调 到115200 如果
是 客制化 主板,并且 使用 外部 串口 模块,检查 线束 连接 状态,地 线 是否 连接 等
问题: 找不到 fastboot 设备
报错
[DeviceScannerThread][14:33:53] [INFO] usb_device_manager.py:246 Scan fastboot [21]round: timeout 3s
[DeviceScannerThread][14:33:53] [INFO] run_host_cmd.py:240 Executing 'tools/windows/fastboot.exe devices', waiting for 3 seconds for execution to finish...
[DeviceScannerThread][14:33:54] [INFO] usb_device_manager.py:246 Scan fastboot [22]round: timeout 3s
[DeviceScannerThread][14:33:54] [INFO] run_host_cmd.py:240 Executing 'tools/windows/fastboot.exe devices', waiting for 3 seconds for execution to finish...
[Burn thread-1][14:33:56] [WARNING] usb_transport.py:196 Wait for state Fastboot Mode timed out
[Burn thread-1][14:33:56] [ERROR] fastboot_burn.py:159 Not found usb2.0
措施
检查 USB 驱动
是否 安装 检查 USB 线
连接 状态 Fastboot 设备
启动 需要 依赖 开发板 uboot,检查 uboot 是否 正常 启动
问题: Fastboot 报错 “Too many links”
报错
FAILED (Status read failed (Too many links))
fastboot: error: Command failed
分析
这是 fastboot 的Status read failed (Too many links) 或者 data transfer failure (Too many links),意味着
措施
检查 USB 线
连接 状态,检查 USB 数据线 或 USB 接口 质量 兼容
电脑 兼容性问题,部分 电脑 的 USB 3.0 接口 可能 存在 兼容问题,导致 传输 失败