3.15. sample_pipeline 使用说明
3.15.1. 概述
3.15.1.1. 功能简介
sample_pipeline 用于sample_pipeline 子目录
注意:本
3.15.1.2. sample_pipeline架构说明
sample_pipeline 包含app/samples/platform_samples/sample_pipeline 下,每个
| 目录 | 描述 |
|---|---|
| common | 公共 |
| single_pipe_vin_isp_vse | 1路 sensor 简单 pipeline 串联 |
| single_pipe_vin_isp_vse_vpu | 1路 sensor 简单 pipeline 串联 |
| single_pipe_vin_isp_gdc | 1路 sensor 实现 GDC 处理 |
| single_pipe_vin_isp_vse_gdc | 1路 sensor 经 VSE 后 bind GDC 动态 |
| multi_pipe_vin_isp_vse | 多路 sensor pipeline 串联 |
| multi_pipe_crop_and_stitch | 多路 sensor 裁剪 |
| multi_pipe_gdc_stitching | 2路 sensor 拼接 |
| multi_pipe_vin_isp_vse_gpu2d | 2路 sensor pipeline 实现 GPU 旋转 |
| sample_custom_capbuf | 测试 VSE / GDC 不同 |
| uvc_gadget_camera | 虚拟 uvc 测试用例 |
| uvc_capture_sample | uvc 摄像头 |
| mp4_decode_and_display | Mp4 文件 |
| single_pipe_vin_isp_vse_vo | 用于 |
| single_pipe_vin_isp_vse_gpu2d | 测试 |
| single_format_convert_gpu2d | 验证 |
| single_pipe_vin_isp_vse_multi_process | 多 |
| single_pipe_vin_isp_vse_bpu | Sensor 图像 |
3.15.2. single_pipe_vin_isp_vse
3.15.2.1. 功能概述
single_pipe_vin_isp_vse 示例MIPI CSI,VIN,ISP,VSE模块,是
Camera Sensor 图像
0 通道
输出ISP处理 后 的 原 尺寸 图像 1 通道
输出16像素 对齐 的 常用 算法 图像 使用 的 分辨率:512 x 512。 2 通道
输出 非16像素 对齐 的 常用 算法 图像 使用 的 分辨率:224 x 224 3 通道
输出 以 原图 中心点 不变,宽、高 各 裁剪 一半,输出 图像 宽、高等 于ROI区域 宽高,输出 缩小 到 支持 的 最小 分辨率:64 x 64。 4 通道
输出 常用 算法 图像 使用 的 分辨率:672 x 672。 5 通道
输出 放大 到 支持 的 最大 分辨率(注意:图像 只能 最大 放到4倍,仅本 通道 支持 放大):4096 x 3076。
软件架构说明
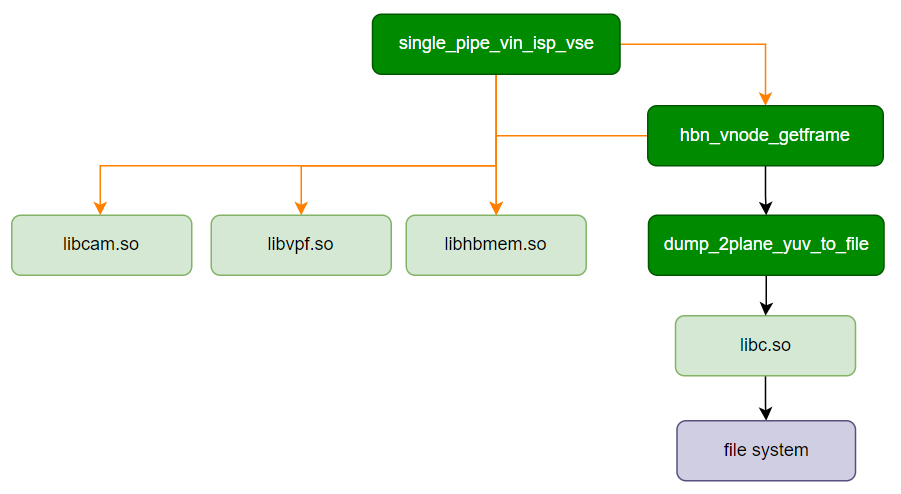
数据流说明
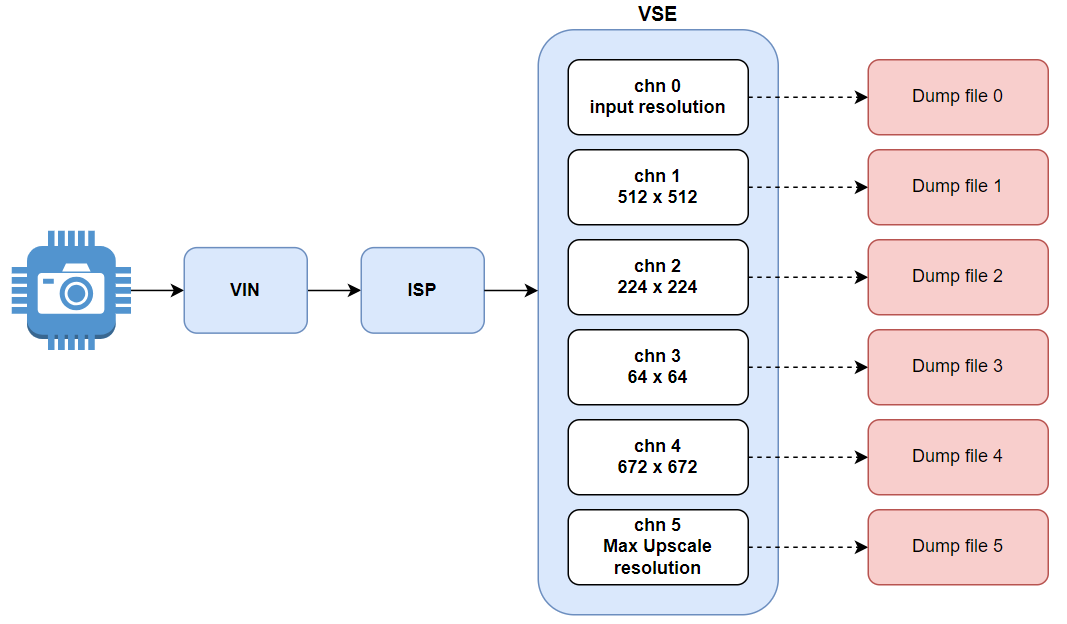
代码位置及目录结构
代码
位置 app/samples/platform_samples/sample_pipeline/single_pipe_vin_isp_vse目录
结构
single_pipe_vin_isp_vse
├── Makefile
├── single_pipe_vin_isp_vse
└── single_pipe_vin_isp_vse.c
API 流程说明
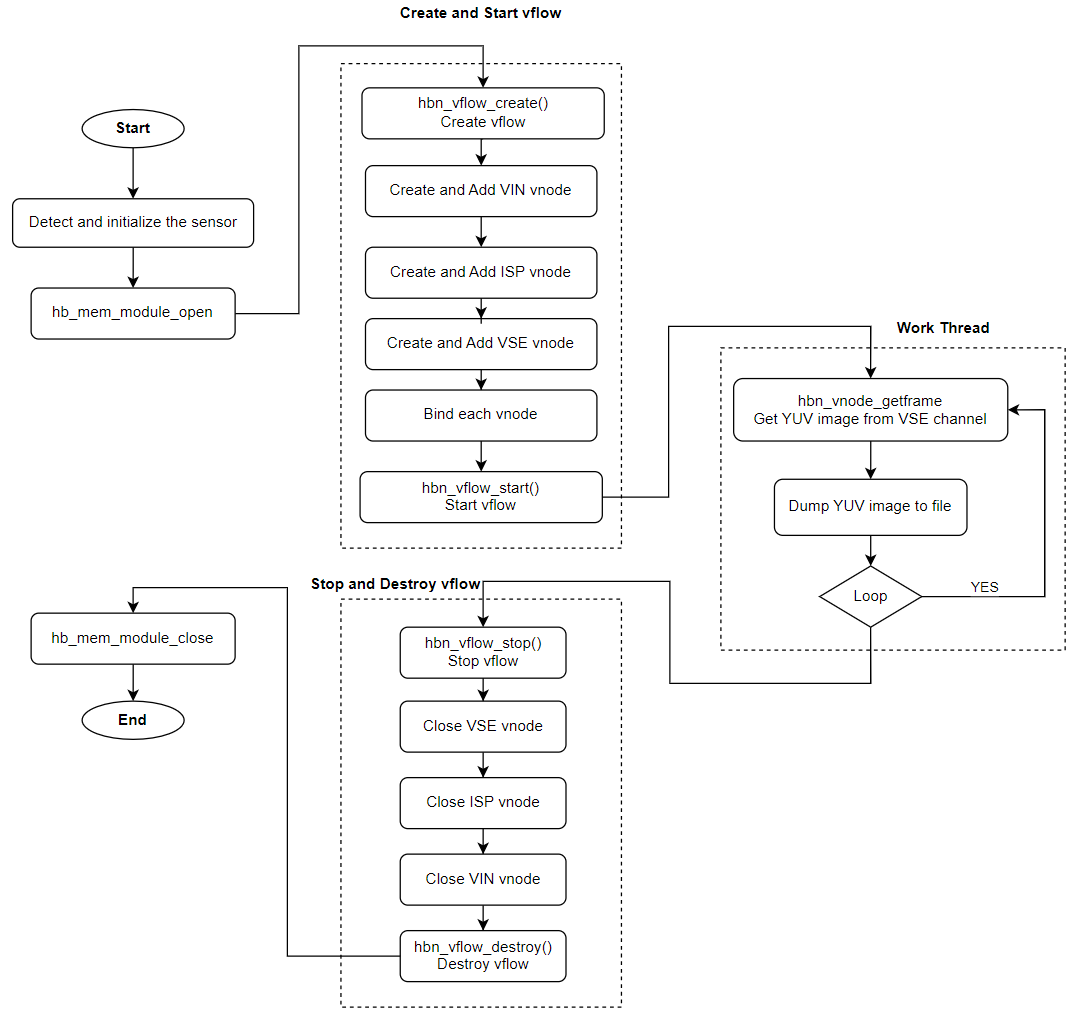
3.15.2.2. 编译部署
编译
进入 single_pipe_vin_isp_vse 目录,执行
make编译输出
成果 物是 single_pipe_vin_isp_vse 源码 目录 下 的 single_pipe_vin_isp_vse详细
程序 编译 方式 请 查阅 编译 方法 章节
程序部署
把 single_pipe_vin_isp_vse 上chmod +x single_pipe_vin_isp_vse命令
3.15.2.3. 运行
程序运行方法
直接./single_pipe_vin_isp_vse 可以
程序参数选项说明
Usage: ./single_pipe_vin_isp_vse [OPTIONS]
Options:
  -s <sensor_index>             Specify sensor index
  -c <channel_type>             Specify channel type: vo and vf and io and if, default: vf:if
                Support both individual configuration and combined configuration.
                The individual configuration supports four types:
                                1. vo: vin online isp
                                2. vf: vin offline isp
                                3. io: isp online vse
                                4. if: isp offline vse
                The combination configuration supports four types:
                                1. vo:io  vin online isp + isp online vse
                                2. vo:if  vin online isp + isp offline vse
                                3. vf:io  vin offline isp + isp online vse
                                4. vf:if  vin offline isp + isp offline vse
  -h    Show help message
参数
-s: 指定 Camera Sensor 型号和 配置 -c: 指定 VIN 和 ISP 之间,以及 ISP 和 VSE 之间的 连接 方式,分别 支持 Offline 和 Online 的 连接 方式
运行效果
single_pipe_vin_isp_vse 每隔60帧
示例: 以 sc230ai 作为 sensor 输入,执行 ./single_pipe_vin_isp_vse -s 3 ,实际
Using index:3  sensor_name:sc230ai-30fps  config_file:linear_1920x1080_raw10_30fps_1lane.c
mipi mclk is configed.
Searching camera sensor on device: /proc/device-tree/soc/cam/vcon@0 i2c bus: 4 mipi rx phy: 0
INFO: Found sensor_name:sc230ai-30fps on mipi rx csi 0, i2c addr 0x30, config_file:linear_1920x1080_raw10_30fps_1lane.c

Connection method from VIN to ISP: vin offline isp
Connection method from VIN to ISP: isp offline vse.

hbn_vnode_set_ochn_attr: 0, 1920x1080
hbn_vnode_set_ochn_attr: 1, 512x480
hbn_vnode_set_ochn_attr: 2, 224x224
hbn_vnode_set_ochn_attr: 3, 64x64
hbn_vnode_set_ochn_attr: 4, 480x480
hbn_vnode_set_ochn_attr: 5, 3840x2160
####################### vse chn 0 #######################
=== Frame Info ===
Frame ID: 0
Timestamps: 353357434335
Systimestamps: 353357434418
tv: 0.000000
trig_tv: 0.000000
Frame Done: 8
Buffer Index: 0

=== Graphic Buffer ===
File Descriptors: 23 -1 -1
Plane Count: 2
Format: 8
Width: 1920
Height: 1080
Stride: 1920
Vertical Stride: 1080
Is Contiguous: 1
Share IDs: 44 0 0
Flags: 67108881
Sizes: 2073600 1036800 0
Virtual Addresses: 0xffffbd120000 0xffffbd31a400 (nil)
Physical Addresses: 2795712512 2797786112 0
Offsets: 0 0 0
####################### vse chn 1 #######################
=== Frame Info ===
Frame ID: 0
Timestamps: 353357434335
Systimestamps: 353357434418
tv: 0.000000
trig_tv: 0.000000
Frame Done: 8
Buffer Index: 0

=== Graphic Buffer ===
File Descriptors: 29 -1 -1
Plane Count: 2
Format: 8
Width: 512
Height: 512
Stride: 512
Vertical Stride: 512
Is Contiguous: 1
Share IDs: 50 0 0
Flags: 67108881
Sizes: 262144 131072 0
Virtual Addresses: 0xffffbcad0000 0xffffbcb10000 (nil)
Physical Addresses: 2805063680 2805325824 0
Offsets: 0 0 0
####################### vse chn 2 #######################
=== Frame Info ===
Frame ID: 0
Timestamps: 353357434335
Systimestamps: 353357434418
tv: 0.000000
trig_tv: 0.000000
Frame Done: 8
Buffer Index: 0

=== Graphic Buffer ===
File Descriptors: 35 -1 -1
Plane Count: 2
Format: 8
Width: 224
Height: 224
Stride: 224
Vertical Stride: 224
Is Contiguous: 1
Share IDs: 56 0 0
Flags: 67108881
Sizes: 50176 25088 0
Virtual Addresses: 0xffffbc9fd000 0xffffbca09400 (nil)
Physical Addresses: 2806255616 2806305792 0
Offsets: 0 0 0
####################### vse chn 3 #######################
=== Frame Info ===
Frame ID: 0
Timestamps: 353357434335
Systimestamps: 353357434418
tv: 0.000000
trig_tv: 0.000000
Frame Done: 8
Buffer Index: 0

=== Graphic Buffer ===
File Descriptors: 41 -1 -1
Plane Count: 2
Format: 8
Width: 64
Height: 64
Stride: 64
Vertical Stride: 64
Is Contiguous: 1
Share IDs: 62 0 0
Flags: 67108881
Sizes: 4096 2048 0
Virtual Addresses: 0xffffbdfa9000 0xffffbdfaa000 (nil)
Physical Addresses: 2806501376 2806505472 0
Offsets: 0 0 0
####################### vse chn 4 #######################
=== Frame Info ===
Frame ID: 0
Timestamps: 353357434335
Systimestamps: 353357434418
tv: 0.000000
trig_tv: 0.000000
Frame Done: 8
Buffer Index: 0

=== Graphic Buffer ===
File Descriptors: 47 -1 -1
Plane Count: 2
Format: 8
Width: 672
Height: 672
Stride: 672
Vertical Stride: 672
Is Contiguous: 1
Share IDs: 68 0 0
Flags: 67108881
Sizes: 451584 225792 0
Virtual Addresses: 0xffffbc931000 0xffffbc99f400 (nil)
Physical Addresses: 2806538240 2806989824 0
Offsets: 0 0 0
####################### vse chn 5 #######################
=== Frame Info ===
Frame ID: 0
Timestamps: 353357434335
Systimestamps: 353357434418
tv: 0.000000
trig_tv: 0.000000
Frame Done: 8
Buffer Index: 0

=== Graphic Buffer ===
File Descriptors: 53 -1 -1
Plane Count: 2
Format: 8
Width: 3840
Height: 2160
Stride: 3840
Vertical Stride: 2160
Is Contiguous: 1
Share IDs: 74 0 0
Flags: 67108881
Sizes: 8294400 4147200 0
Virtual Addresses: 0xffffbbc07000 0xffffbc3f0000 (nil)
Physical Addresses: 2808590336 2816884736 0
Offsets: 0 0 0
运行
vse_ch0_0.yuv
vse_ch1_0.yuv
vse_ch2_0.yuv
vse_ch3_0.yuv
vse_ch4_0.yuv
vse_ch5_0.yuv
vse_ch0_60.yuv
vse_ch1_60.yuv
vse_ch2_60.yuv
vse_ch3_60.yuv
vse_ch4_60.yuv
vse_ch5_60.yuv
... ...
3.15.3. single_pipe_vin_isp_vse_vpu
3.15.3.1. 功能概述
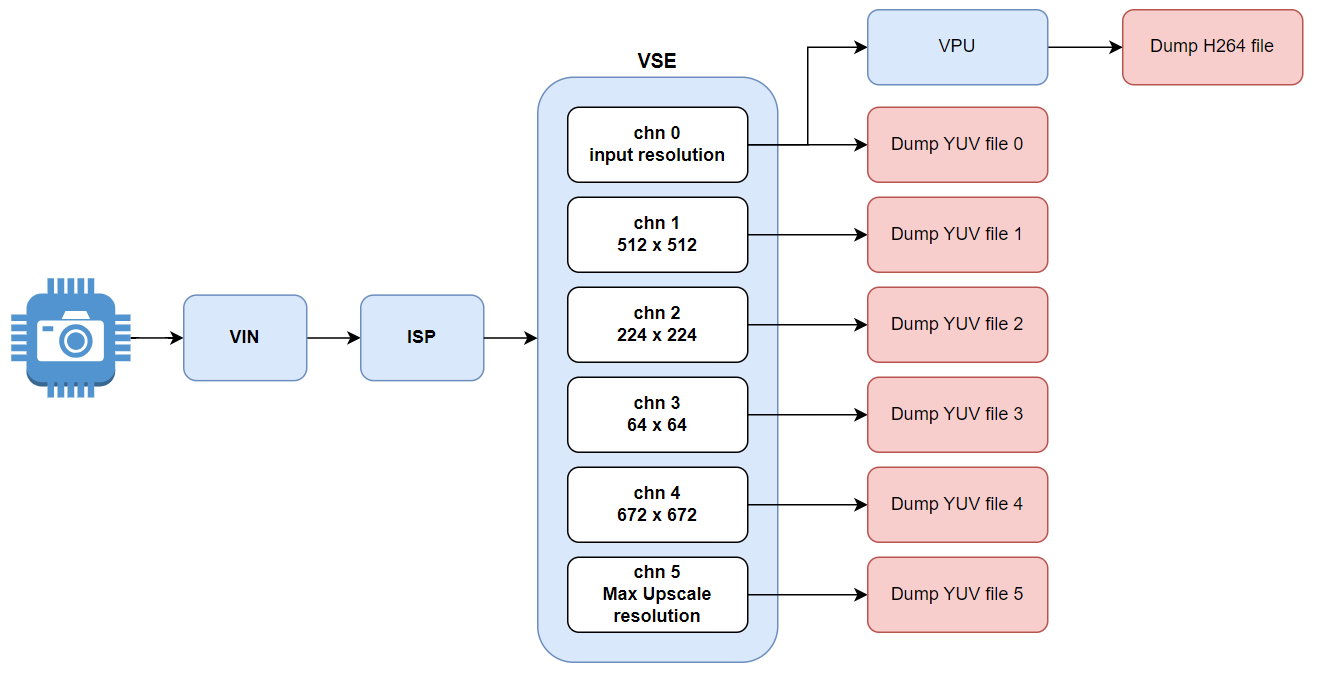
single_pipe_vin_isp_vse_vpu 示例MIPI CSI,VIN,ISP,VSE,CODEC 模块,是
0 通道
输出ISP处理 后 的 原 尺寸 图像,本 通道 的 输出 数据 会 再 送给 编码器 编码 后 保存 为H264视频 码流。 1 通道
输出16像素 对齐 的 常用 算法 图像 使用 的 分辨率:512 x 512。 2 通道
输出 非16像素 对齐 的 常用 算法 图像 使用 的 分辨率:224 x 224 3 通道
输出 以 原图 中心点 不变,宽、高 各 裁剪 一半,输出 图像 宽、高等 于ROI区域 宽高,输出 缩小 到 支持 的 最小 分辨率:64 x 64。 4 通道
输出 常用 算法 图像 使用 的 分辨率:672 x 672。 5 通道
输出 放大 到 支持 的 最大 分辨率(注意:图像 只能 最大 放到4倍):4096 x 3076。
软件架构说明
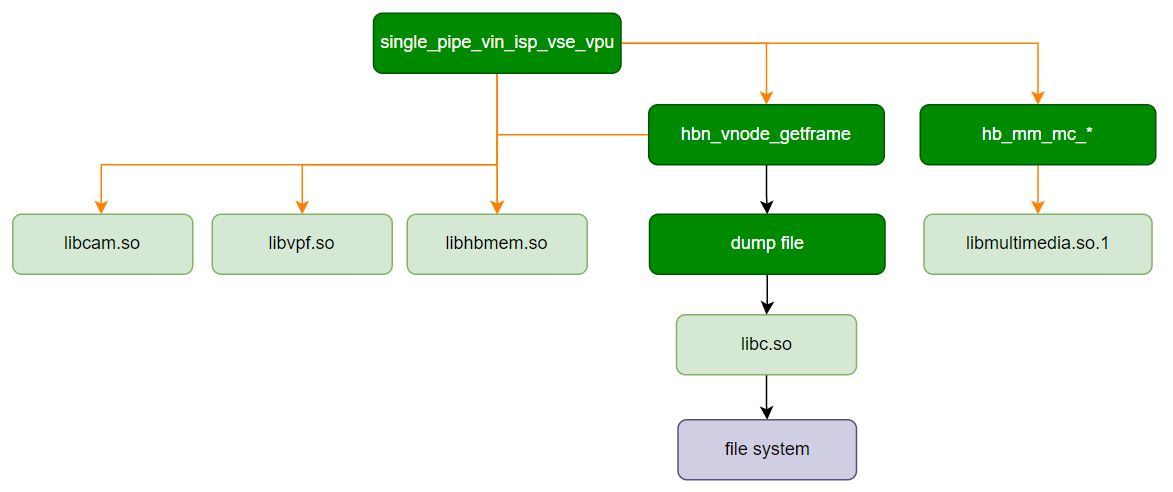
数据流说明
代码位置及目录结构
代码
位置 app/samples/platform_samples/sample_pipeline/single_pipe_vin_isp_vse_vpu目录
结构
single_pipe_vin_isp_vse_vpu
├── Makefile
├── single_pipe_vin_isp_vse_vpu
└── single_pipe_vin_isp_vse_vpu.c
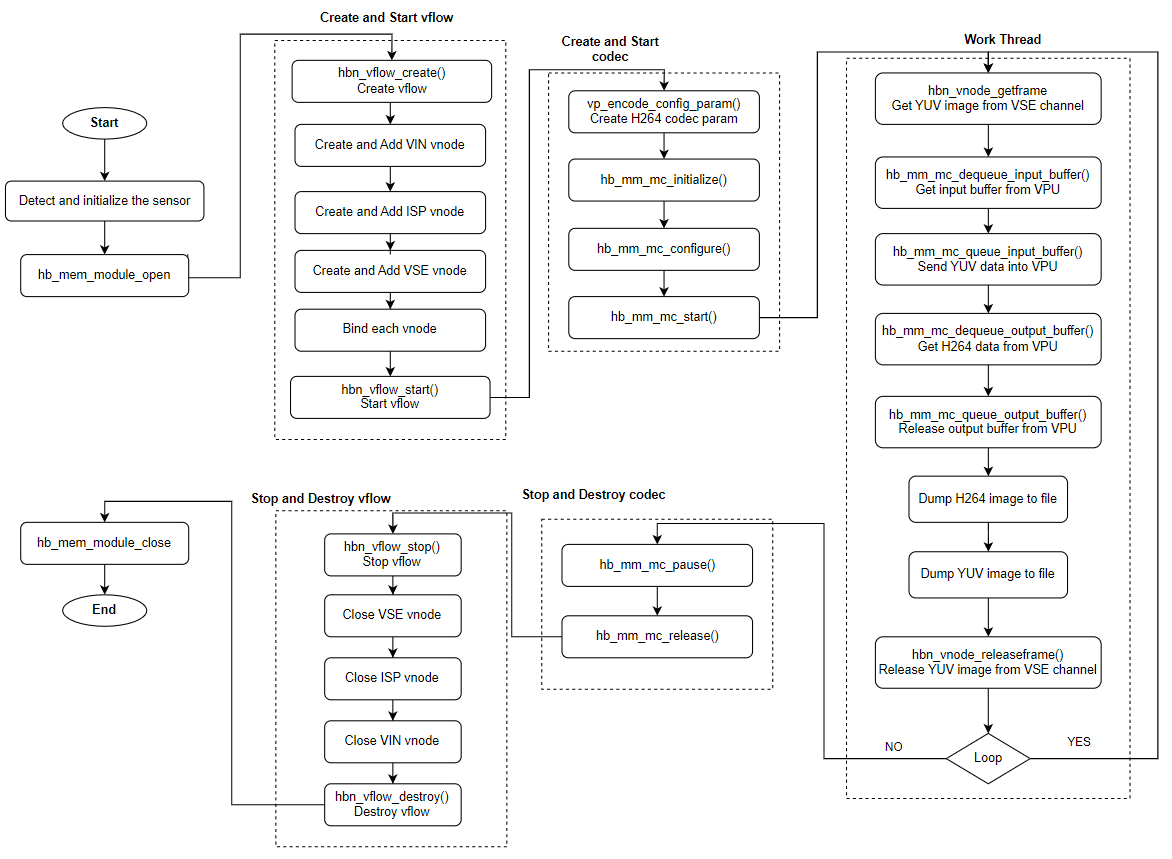
API 流程说明
3.15.3.2. 编译部署
编译
进入 single_pipe_vin_isp_vse_vpu 目录,执行
make编译输出
成果 物是 single_pipe_vin_isp_vse_vpu 源码 目录 下 的 single_pipe_vin_isp_vse_vpu详细
程序 编译 方式 请 查阅 编译 方法 章节
程序部署
把 single_pipe_vin_isp_vse_vpu 上chmod +x single_pipe_vin_isp_vse_vpu命令
3.15.3.3. 运行
程序运行方法
直接./single_pipe_vin_isp_vse_vpu 可以
程序参数选项说明
Usage: ./single_pipe_vin_isp_vse_vpu [OPTIONS]
Options:
  -s <sensor_index>             Specify sensor index
  -c <channel_type>             Specify channel type: vo and vf and io and if, default: vf:if
                Support both individual configuration and combined configuration.
                The individual configuration supports four types:
                                1. vo: vin online isp
                                2. vf: vin offline isp
                                3. io: isp online vse
                                4. if: isp offline vse
                The combination configuration supports four types:
                                1. vo:io  vin online isp + isp online vse
                                2. vo:if  vin online isp + isp offline vse
                                3. vf:io  vin offline isp + isp online vse
                                4. vf:if  vin offline isp + isp offline vse
参数
-s: 指定 Camera Sensor 型号和 配置 -c: 指定 VIN 和 ISP 之间,以及 ISP 和 VSE 之间的 连接 方式,分别 支持 Offline 和 Online 的 连接 方式
运行效果
single_pipe_vin_isp_vse_vpu 每隔60帧
示例: 以 sc230ai 作为 sensor 输入,执行 ./single_pipe_vin_isp_vse_vpu -s 3 ,实际
日志
# ./single_pipe_vin_isp_vse_vpu -s 3
Using index:3  sensor_name:sc230ai-30fps  config_file:linear_1920x1080_raw10_30fps_1lane.c
mipi mclk is configed.
Searching camera sensor on device: /proc/device-tree/soc/cam/vcon@0 i2c bus: 4 mipi rx phy: 0
INFO: Found sensor_name:sc230ai-30fps on mipi rx csi 0, i2c addr 0x30, config_file:linear_1920x1080_raw10_30fps_1lane.c

Connection method from VIN to ISP: vin offline isp
Connection method from VIN to ISP: isp offline vse.

hbn_vnode_set_ochn_attr: 0, 1920x1080
hbn_vnode_set_ochn_attr: 1, 512x480
hbn_vnode_set_ochn_attr: 2, 224x224
hbn_vnode_set_ochn_attr: 3, 64x64
hbn_vnode_set_ochn_attr: 4, 480x480
hbn_vnode_set_ochn_attr: 5, 3840x2160
Encode idx: 0, init successful
lunch read_vse_data thread
ping pang file saver failed
Error writing y to file
####################### vse chn 0 #######################
####################### vse chn 0 #######################
=== Frame Info ===
Frame ID: 0
Timestamps: 34646123641
Systimestamps: 34646123724
tv: 0.000000
trig_tv: 0.000000
Frame Done: 8
Buffer Index: 0

=== Graphic Buffer ===
File Descriptors: 23 -1 -1
Plane Count: 2
Format: 8
Width: 1920
Height: 1080
Stride: 1920
Vertical Stride: 1080
Is Contiguous: 1
Share IDs: 44 0 0
Flags: 67108881
Sizes: 2073600 1036800 0
Virtual Addresses: 0xffff90d80000 0xffff90f7a400 (nil)
Physical Addresses: 2795712512 2797786112 0
Offsets: 0 0 0
####################### vse chn 1 #######################
=== Frame Info ===
Frame ID: 0
Timestamps: 34646123641
Systimestamps: 34646123724
tv: 0.000000
trig_tv: 0.000000
Frame Done: 8
Buffer Index: 0

=== Graphic Buffer ===
File Descriptors: 39 -1 -1
Plane Count: 2
Format: 8
Width: 512
Height: 512
Stride: 512
Vertical Stride: 512
Is Contiguous: 1
Share IDs: 60 0 0
Flags: 67108881
Sizes: 262144 131072 0
Virtual Addresses: 0xffff8f858000 0xffff8f898000 (nil)
Physical Addresses: 2820648960 2820911104 0
Offsets: 0 0 0
####################### vse chn 2 #######################
=== Frame Info ===
Frame ID: 0
Timestamps: 34646123641
Systimestamps: 34646123724
tv: 0.000000
trig_tv: 0.000000
Frame Done: 8
Buffer Index: 0

=== Graphic Buffer ===
File Descriptors: 55 -1 -1
Plane Count: 2
Format: 8
Width: 224
Height: 224
Stride: 224
Vertical Stride: 224
Is Contiguous: 1
Share IDs: 76 0 0
Flags: 67108881
Sizes: 50176 25088 0
Virtual Addresses: 0xffff8f5a5000 0xffff8f5b1400 (nil)
Physical Addresses: 2823827456 2823877632 0
Offsets: 0 0 0
####################### vse chn 3 #######################
=== Frame Info ===
Frame ID: 0
Timestamps: 34646123641
Systimestamps: 34646123724
tv: 0.000000
trig_tv: 0.000000
Frame Done: 8
Buffer Index: 0

=== Graphic Buffer ===
File Descriptors: 71 -1 -1
Plane Count: 2
Format: 8
Width: 64
Height: 64
Stride: 64
Vertical Stride: 64
Is Contiguous: 1
Share IDs: 92 0 0
Flags: 67108881
Sizes: 4096 2048 0
Virtual Addresses: 0xffff91d95000 0xffff91d96000 (nil)
Physical Addresses: 2824482816 2824486912 0
Offsets: 0 0 0
####################### vse chn 4 #######################
=== Frame Info ===
Frame ID: 0
Timestamps: 34646123641
Systimestamps: 34646123724
tv: 0.000000
trig_tv: 0.000000
Frame Done: 8
Buffer Index: 0

=== Graphic Buffer ===
File Descriptors: 87 -1 -1
Plane Count: 2
Format: 8
Width: 672
Height: 672
Stride: 672
Vertical Stride: 672
Is Contiguous: 1
Share IDs: 108 0 0
Flags: 67108881
Sizes: 451584 225792 0
Virtual Addresses: 0xffff8f47a000 0xffff8f4e8400 (nil)
Physical Addresses: 2824581120 2825032704 0
Offsets: 0 0 0
####################### vse chn 5 #######################
=== Frame Info ===
Frame ID: 0
Timestamps: 34646123641
Systimestamps: 34646123724
tv: 0.000000
trig_tv: 0.000000
Frame Done: 8
Buffer Index: 0

=== Graphic Buffer ===
File Descriptors: 103 -1 -1
Plane Count: 2
Format: 8
Width: 3840
Height: 2160
Stride: 3840
Vertical Stride: 2160
Is Contiguous: 1
Share IDs: 124 0 0
Flags: 67108881
Sizes: 8294400 4147200 0
Virtual Addresses: 0xffff8e412000 0xffff8ebfb000 (nil)
Physical Addresses: 2830053376 2838347776 0
Offsets: 0 0 0
...
运行
single_pipe_vin_isp_vse_vpu.h264
vse_ch0_0.yuv
vse_ch1_0.yuv
vse_ch2_0.yuv
vse_ch3_0.yuv
vse_ch4_0.yuv
vse_ch5_0.yuv
vse_ch0_60.yuv
vse_ch1_60.yuv
vse_ch2_60.yuv
vse_ch3_60.yuv
vse_ch4_60.yuv
vse_ch5_60.yuv
... ...
3.15.4. single_pipe_vin_isp_gdc
3.15.4.1. 功能概述
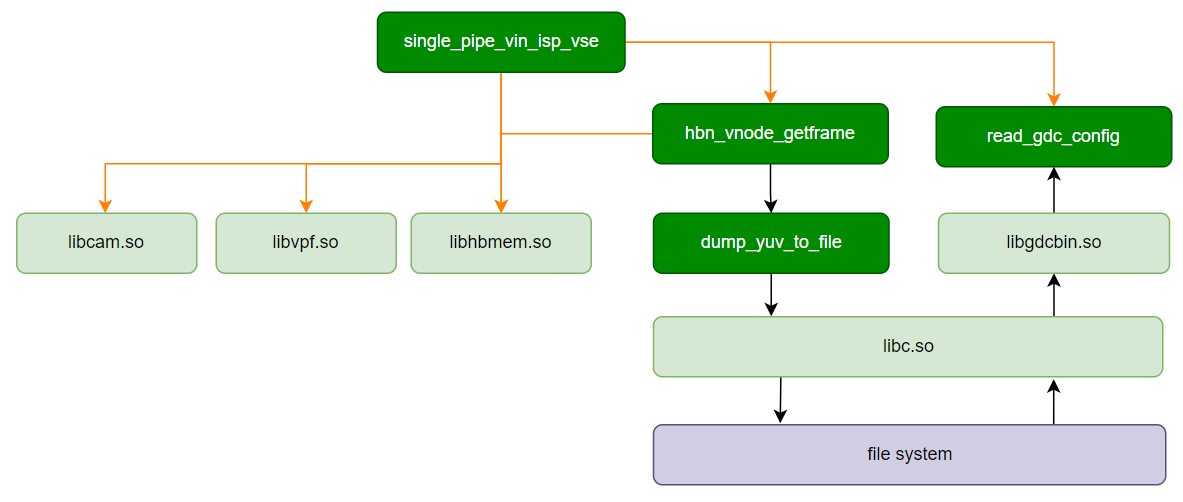
single_pipe_vin_isp_gdc 用于
本Camera Sensor,并且
软件架构说明
数据流说明

代码位置及目录结构
代码
位置 app/samples/platform_samples/sample_pipeline/single_pipe_vin_isp_gdc目录
结构
single_pipe_vin_isp_gdc
├── Makefile
├── single_pipe_vin_isp_gdc
└── single_pipe_vin_isp_gdc.c
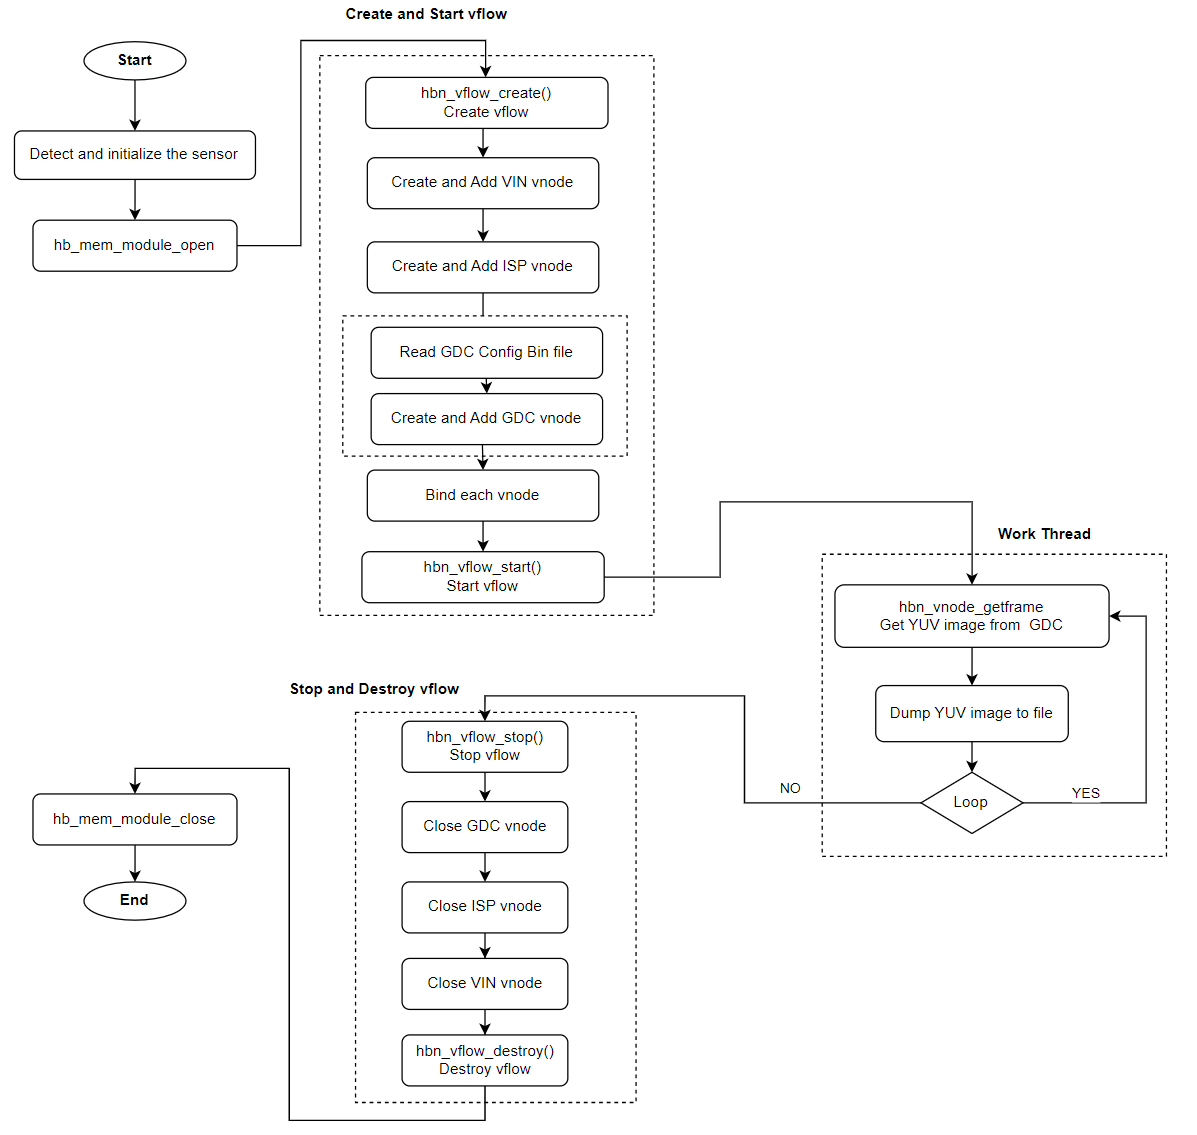
API 流程说明
3.15.4.2. 编译部署
编译
进入 single_pipe_vin_isp_gdc 目录,执行
make编译输出
成果 物是 single_pipe_vin_isp_gdc 源码 目录 下 的 single_pipe_vin_isp_gdc详细
程序 编译 方式 请 查阅 编译 方法 章节
程序部署
把 single_pipe_vin_isp_gdc 和 需要chmod +x single_pipe_vin_isp_gdc命令
3.15.4.3. 运行
程序运行方法
直接./single_pipe_vin_isp_gdc 可以
程序参数选项说明
Usage: single_pipe_vin_isp_gdc [OPTIONS]
Options:
  -s <sensor_index>             Specify sensor index
  -c <channel_type>             Specify channel type: vo and vf
                                        1. vo: vin online isp
                                        2. vf: vin offline isp
                                        3. default is vf
  -f <gdc_bin_file>      Specify sensor gdc_bin_file path
  -h                     Show this help message
-s <sensor_index>指定
Camera Sensor索引。示例:
-s 0表示使用 索引 为 0 的 传感器。
-c:指定 VIN 和 ISP 之间
的 连接 方式,支持 Offline 和 Online 两种 连接 方式 示例:
-c vo表示 VIN online ISP
-f <gdc_bin_file>指定 GDC 配置
的 bin 文件 的 路径。 示例:
-f /path/to/gdc.bin表示使用 指定 路径 的 GDC 二进制 文件。
-h-显示帮助 信息。运行 此 命令 时,将 输出 以上 选项 的 详细 说明。
运行效果
本single_pipe_vin_isp_gdc 的
运行
./single_pipe_vin_isp_gdc -s 3 -f sc230ai_gdc.bin
注意事项
gdc bin文件
需要 根据 每个 Camera Sensor专门调节,本 示例 代码 一般 使用 vp_sensors/gdc_bin目录下 预制 好 的 文件。如果 需要 新增 或者 修改 gdc bin 文件,请 参考 sample_gdc 示例 了解 gdc 的 使用。
日志
 ./single_pipe_vin_isp_gdc -s 3 -f sc230ai_gdc.bin
Using index:3  sensor_name:sc230ai-30fps  config_file:linear_1920x1080_raw10_30fps_1lane.c
[INFO] board_id is 202, so skip sci1.
Searching camera sensor on device: /proc/device-tree/soc/cam/vcon@0 i2c bus: 4 mipi rx phy: 0
Searching camera sensor on device: /proc/device-tree/soc/cam/vcon@2 i2c bus: 2 mipi rx phy: 2
WARN: Sensor Name: sc230ai-30fps, Expected Chip ID: 0xCB34, Actual Chip ID Read: 0x01
Searching camera sensor on device: /proc/device-tree/soc/cam/vcon@3 i2c bus: 7 mipi rx phy: 3
INFO: Found sensor_name:sc230ai-30fps on mipi rx csi 3, i2c addr 0x30, config_file:linear_1920x1080_raw10_30fps_1lane.c

***************  Command Lists  ***************
 g      -- get single frame
 l      -- get a set frames
 q      -- quit
 h      -- print help message

Command:
命令
g: 分别
从 两个gdc的 输出 通道 获取 图像,支持 输入 多个 g 来 连续 获取 图像,例如 输入 gggg
Command: g
gdc(165733) dump yuv 1920x1080(stride:1920), buffer size: 2073600 + 1036800 frame id: 4612, timestamp: 45479310356561
isp dump yuv 1920x1080(stride:1920), buffer size: 2073600 + 1036800 frame id: 5490, timestamp: 45508577025491
gdc(231269) dump yuv 1920x1080(stride:1920), buffer size: 2073600 + 1036800 frame id: 5490, timestamp: 45508577025491
l: 连续
获取12次 图像,每次 分别 从 两个gdc的 输出 通道 获取 图像,相当于 输入12个 g
Command: l
gdc(165733) dump yuv 1920x1080(stride:1920), buffer size: 2073600 + 1036800 frame id: 4613, timestamp: 45479343689602
isp dump yuv 1920x1080(stride:1920), buffer size: 2073600 + 1036800 frame id: 5522, timestamp: 45509643692158
gdc(231269) dump yuv 1920x1080(stride:1920), buffer size: 2073600 + 1036800 frame id: 5522, timestamp: 45509643692158
... (省略,总共Dump 12 帧) ...
gdc(165733) dump yuv 1920x1080(stride:1920), buffer size: 2073600 + 1036800 frame id: 5532, timestamp: 45509977023200
isp dump yuv 1920x1080(stride:1920), buffer size: 2073600 + 1036800 frame id: 5533, timestamp: 45510010356909
gdc(231269) dump yuv 1920x1080(stride:1920), buffer size: 2073600 + 1036800 frame id: 5533, timestamp: 45510010356909
q: 退出
程序
Command: q
quit
3.15.5. single_pipe_vin_isp_vse_gdc
3.15.5.1. 功能概述
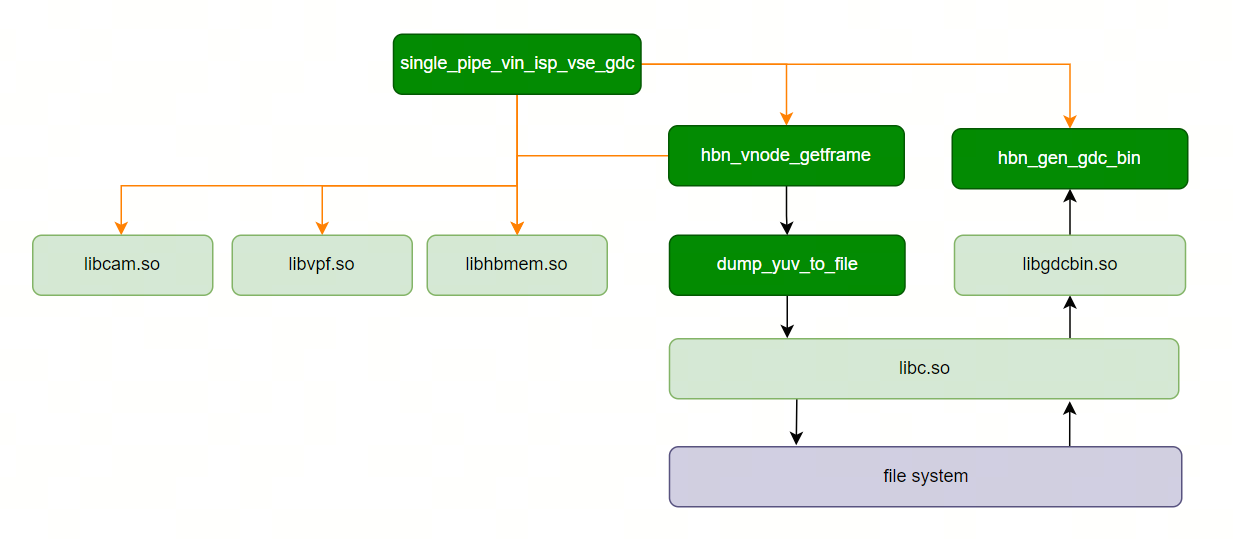
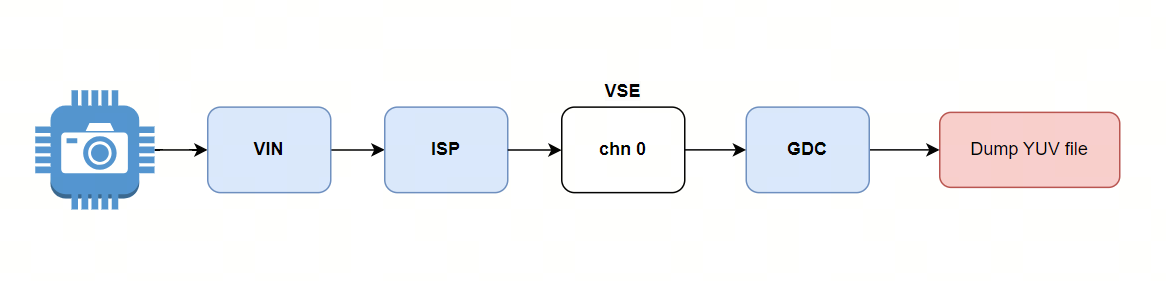
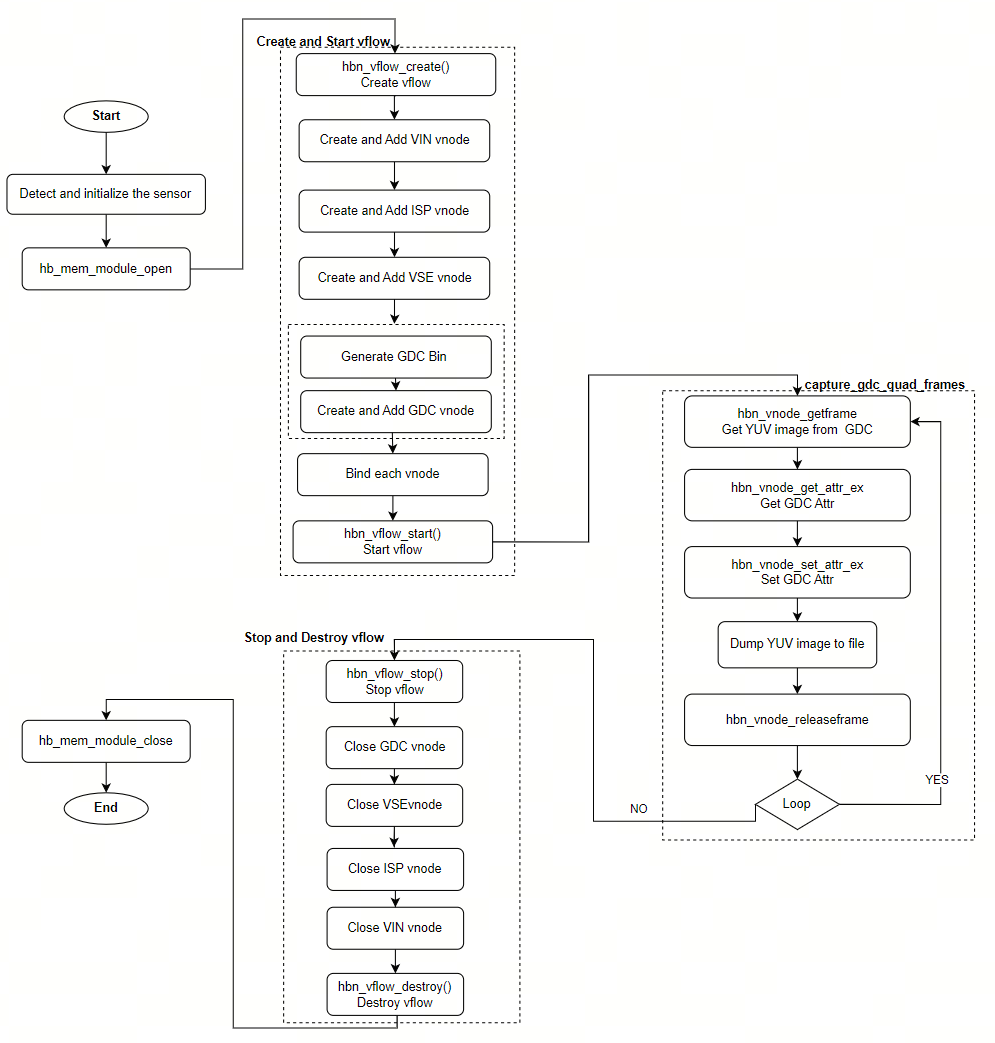
single_pipe_vin_isp_vse_gdc 用于VIN、ISP、VSE、GDC 的GDC binbuf的
本
VIN -> ISP:支持 online / offlineISP -> VSE:支持 online / offlineVSE -> GDC:仅支持 offline(VSE 输出 DDR)
在 GDC 侧,示例binbuf(左binbuf,并
软件架构说明
数据流说明
代码位置及目录结构
代码
位置 app/samples/platform_samples/sample_pipeline/single_pipe_vin_isp_vse_gdc目录
结构
single_pipe_vin_isp_vse_gdc
├── Makefile
├── single_pipe_vin_isp_vse_gdc
└── single_pipe_vin_isp_vse_gdc.c
API 流程说明
3.15.5.2. 编译部署
编译
进入
single_pipe_vin_isp_vse_gdc目录,执行make编译输出
成果 物是 single_pipe_vin_isp_vse_gdc源码目录 下 的 single_pipe_vin_isp_vse_gdc详细
程序 编译 方式 请 查阅 编译 方法 章节
程序部署
把 single_pipe_vin_isp_vse_gdc 上chmod +x single_pipe_vin_isp_vse_gdc 命令
3.15.5.3. 运行
程序运行方法
直接./single_pipe_vin_isp_vse_gdc 可以
程序参数选项说明
Usage: ./single_pipe_vin_isp_vse_gdc [OPTIONS]
Options:
  -s <sensor_index>             Specify sensor index
  -c <channel_type>             Specify channel type: vo and vf and io and if, default: vf:if
                Support both individual configuration and combined configuration.
                The individual configuration supports four types:
                                1. vo: vin online isp
                                2. vf: vin offline isp
                                3. io: isp online vse
                                4. if: isp offline vse
                The combination configuration supports four types:
                                1. vo:io  vin online isp + isp online vse
                                2. vo:if  vin online isp + isp offline vse
                                3. vf:io  vin offline isp + isp online vse
                                4. vf:if  vin offline isp + isp offline vse
  -h    Show help message
参数
-s:指定 Camera Sensor 型号和 配置 -c:指定VIN->ISP与ISP->VSE的连接 方式(online/offline) -h:打印帮助 信息
运行效果
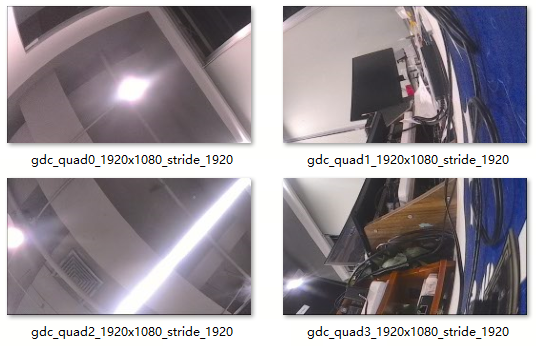
本binbuf 配置,并
gdc_quad0_1920x1080_stride_1920.yuv
gdc_quad1_1920x1080_stride_1920.yuv
gdc_quad2_1920x1080_stride_1920.yuv
gdc_quad3_1920x1080_stride_1920.yuv
本single_pipe_vin_isp_vse_gdc 的
运行
./single_pipe_vin_isp_vse_gdc -s 3 -c vf:if
图像
注意事项
多个
不同 的 binbuf 就 会 占用 多块 ION内存,相同 的 binbuf 只会 复用 同 一块ion内存。
3.15.6. multi_pipe_vin_isp_vse
3.15.6.1. 功能概述
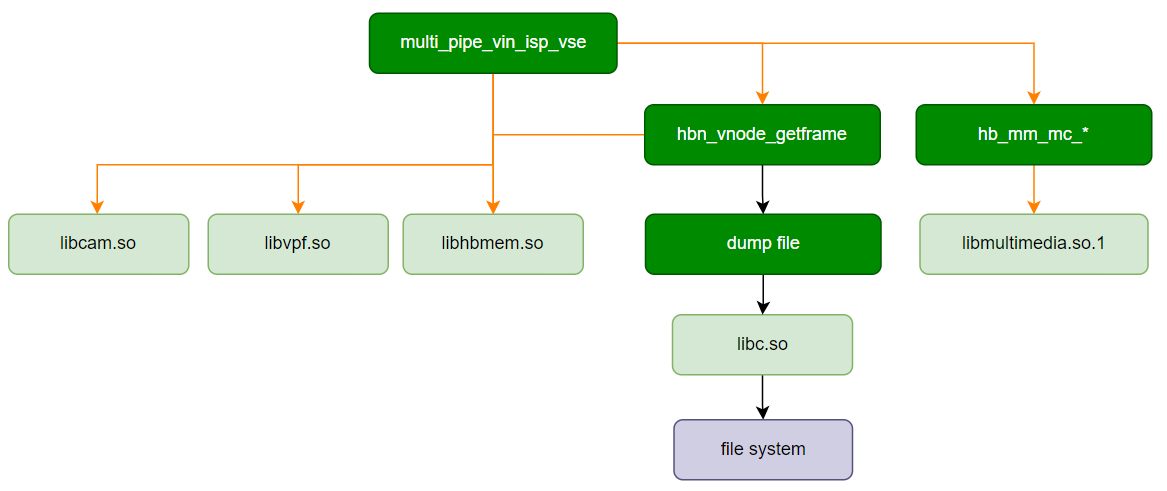
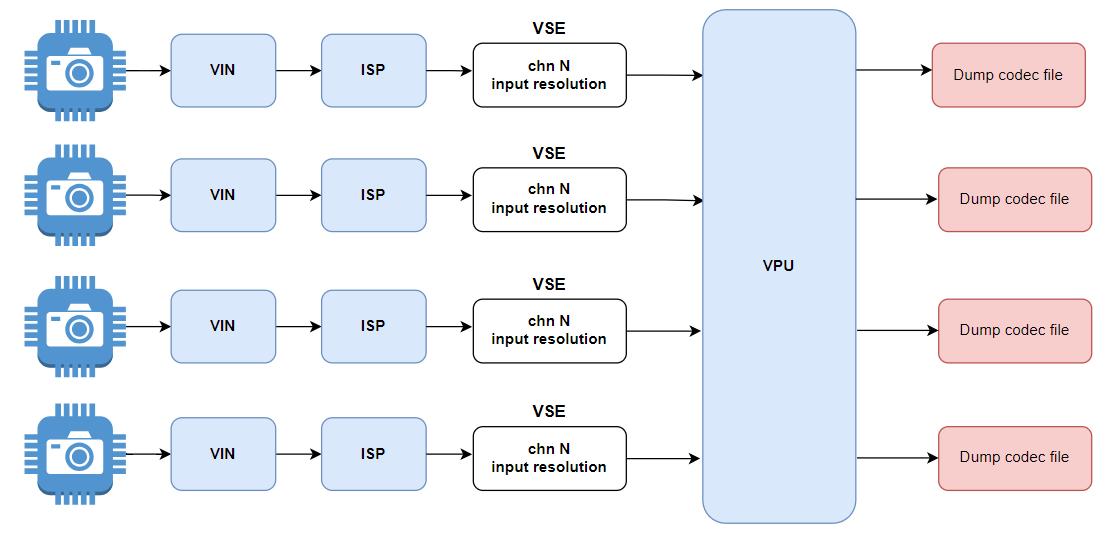
multi_pipe_vin_isp_vse 是MIPI CSI,VIN,ISP,VSE,CODEC 相关CODEC获取h264编码数据HBN API创建
软件架构说明
数据流说明
代码位置及目录结构
代码
位置 app/samples/platform_samples/sample_pipeline/multi_pipe_vin_isp_vse目录
结构
multi_pipe_vin_isp_vse
├── Makefile
├── multi_pipe_vin_isp_vse
└── multi_pipe_vin_isp_vse.c
API 流程说明
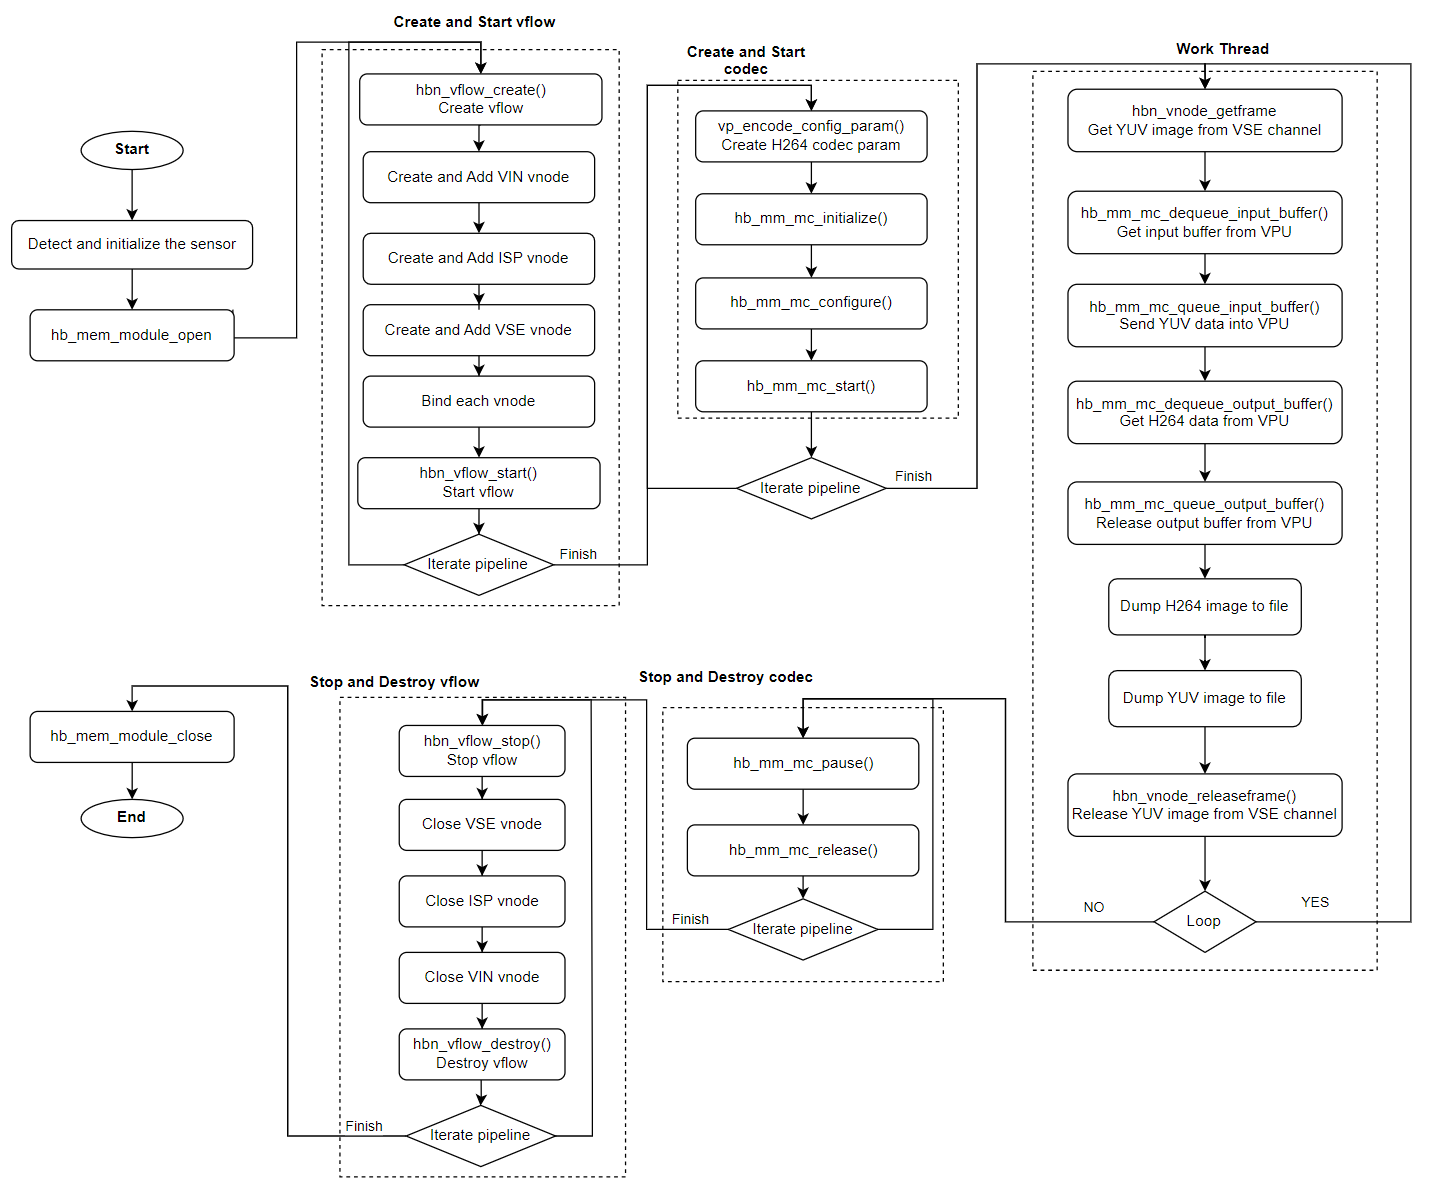
3.15.6.2. 编译部署
编译
进入 multi_pipe_vin_isp_vse 目录,执行
make编译输出
成果 物是 multi_pipe_vin_isp_vse 源码 目录 下 的 multi_pipe_vin_isp_vse详细
程序 编译 方式 请 查阅 编译 方法 章节
程序部署
把 multi_pipe_vin_isp_vse 上chmod +x multi_pipe_vin_isp_vse命令
3.15.6.3. 运行
程序运行方法
直接./multi_pipe_vin_isp_vse -h 可以
程序参数选项说明
Options:
-c, --config="sensor=id channel=vse_chn type=TYPE output=FILE"
                Configure parameters for each video pipeline, can be repeated up to 4 times.
                sensor   --  Sensor index,can have multiple parameters, reference sensor list.
                mode     --  Sensor mode of camera_config_t
                channel  --  Vse channel index bind to encode, default 0, can be set to [0-5].
                type     --  Encode type, default is h264, can be set to [h264, h265].
                output   --  Save codec stream data to file, defaule is 'pipeline[xx]_[width]x[height]_[xxx]fps.[type]'.
-v, --verbose   Enable verbose mode
-h, --help      Show help message
-c, --config="sensor=id channel=vse_chn type=TYPE output=FILE"配置
每 一路 视频 通路 的 参数。此 选项 最 多 可以 重复4次以 配置 最 多4路 视频 通路。 sensor 是
必须 的 参数,channel、type、output是 可 选 参数,用户 不 配置 时,程序 会 使用 默认值。 sensor:传感器索引,必须 参数,可以 有 多个 参数,参考 传感器 列表。 channel:VSE 通道索引,可 选 参数,默认 为 0,可以 设置 为 [0-5]。 type:编码类型,可 选 参数,默认 为 h264,可以 设置 为 [h264, h265]。 output:保存编码 流 数据 到 文件,可 选 参数,默认 为 pipeline[xx]_[width]x[height]_[xxx]fps.[type]。
-v, --verbose启用
详细 模式。
-h, --help显示
帮助 信息。
注意: 如果-c 参数
运行效果
本multi_pipe_vin_isp_vse 的
运行
./multi_pipe_vin_isp_vse -c "sensor=2 channel=0 type=h264 output=output0.h264" -c "sensor=11 channel=1 type=h265 output=output1.h265" -v
每
视频
通路0: 配置 参数 sensor=2 channel=0 type=h264 output=output0.h264sensor 名称:
sc230ai-10fpsVSE 通道: 0
编码
类型: h264 输出
文件: output0.h264
视频
通路1: 配置 参数 sensor=11 channel=1 type=h265 output=output1.h265sensor 名称:
imx415-30fps-2laneVSE 通道: 1
编码
类型: h265 输出
文件: output1.h265
日志
# ./multi_pipe_vin_isp_vse -c "sensor=2 channel=0 type=h264 output=output0.h264" -c "sensor=11 channel=1 type=h265 output=output1.h265" -v
Using index:2  sensor_name:sc230ai-10fps  config_file:linear_1920x1080_raw10_10fps_1lane.c
[INFO] board_id is 0x0202, not need skip sci1.
mipi mclk is configed.
Searching camera sensor on device: /proc/device-tree/soc/cam/vcon@0 i2c bus: 4 mipi rx phy: 0
INFO: Found sensor_name:sc230ai-10fps on mipi rx csi 0, i2c addr 0x30, config_file:linear_1920x1080_raw10_10fps_1lane.c
Using index:11  sensor_name:imx415-30fps-2lane  config_file:linear_3840x2160_raw10_30fps_2lane.c
[INFO] board_id is 0x0202, not need skip sci1.
mipi mclk is not configed.
Searching camera sensor on device: /proc/device-tree/soc/cam/vcon@1 i2c bus: 1 mipi rx phy: 1
WARN: Sensor Name: imx415-30fps-2lane, Expected Chip ID: 0x03, Actual Chip ID Read: 0x00
mipi mclk is configed.
Searching camera sensor on device: /proc/device-tree/soc/cam/vcon@2 i2c bus: 2 mipi rx phy: 2
WARN: Sensor Name: imx415-30fps-2lane, Expected Chip ID: 0x03, Actual Chip ID Read: 0x00
mipi mclk is configed.
Searching camera sensor on device: /proc/device-tree/soc/cam/vcon@3 i2c bus: 7 mipi rx phy: 3
INFO: Found sensor_name:imx415-30fps-2lane on mipi rx csi 3, i2c addr 0x1a, config_file:linear_3840x2160_raw10_30fps_2lane.c
Pipeline index 0:
        Sensor index: 2
        Sensor name: sc230ai-10fps
        Active mipi host: 0
        Vse Channel: 0
        Encode type: h264
        Output file: output0.h264
Pipeline index 1:
        Sensor index: 11
        Sensor name: imx415-30fps-2lane
        Active mipi host: 3
        Vse Channel: 1
        Encode type: h265
        Output file: output1.h265
MIPI host: 0x9
  Host 0: Used
  Host 3: Used
Verbose: 1
hbn_vnode_set_ochn_attr: 1920x1080
Create Encode idx: 0, init successful
Input width 3840 exceeds maximum width 1920 for channel 1. Adjusting to maximum width.
Input height 2160 exceeds maximum height 1080 for channel 1. Adjusting to maximum height.
hbn_vnode_set_ochn_attr: 1920x1080
Create Encode idx: 1, init successful
Encodec idx: 0 type:0 get stream size:306122
Encodec idx: 0 type:0 get stream size:150586
Encodec idx: 1 type:1 get stream size:8447
Encodec idx: 1 type:1 get stream size:10329
Encodec idx: 0 type:0 get stream size:154342
Encodec idx: 1 type:1 get stream size:10957
Encodec idx: 1 type:1 get stream size:10894
Encodec idx: 1 type:1 get stream size:7949
Encodec idx: 0 type:0 get stream size:111222
Encodec idx: 1 type:1 get stream size:7741
Encodec idx: 1 type:1 get stream size:9076
Encodec idx: 1 type:1 get stream size:8035
Encodec idx: 0 type:0 get stream size:132560
运行
output0.h264 output1.h265
3.15.7. multi_pipe_gdc_stitching
3.15.7.1. 功能概述
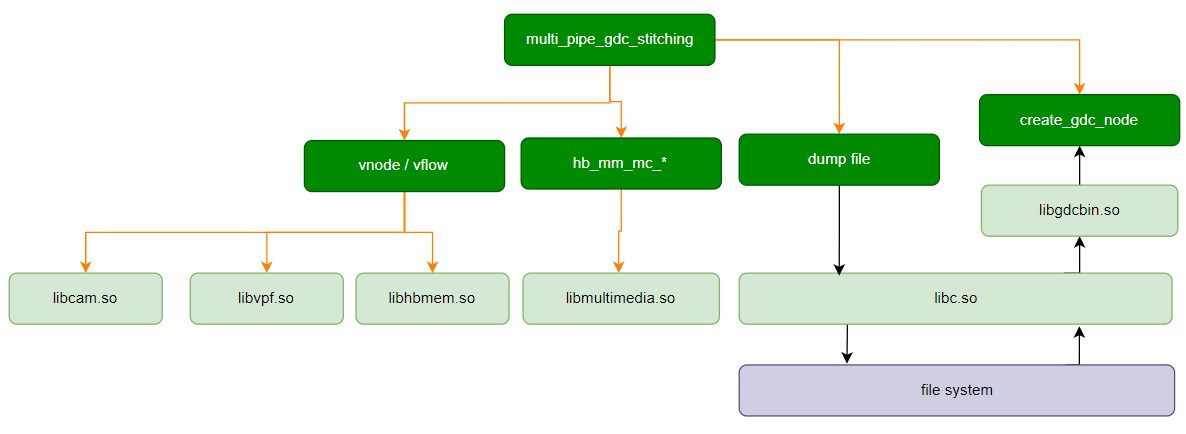
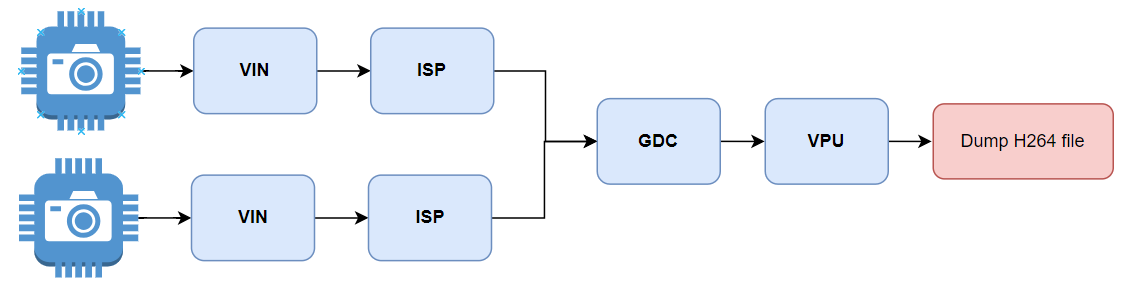
multi_pipe_gdc_stitching 程序
软件架构说明
数据流说明
代码位置及目录结构
代码
位置 app/samples/platform_samples/sample_pipeline/multi_pipe_gdc_stitching目录
结构
multi_pipe_gdc_stitching
├── Makefile
├── multi_pipe_gdc_stitching
└── multi_pipe_gdc_stitching.c
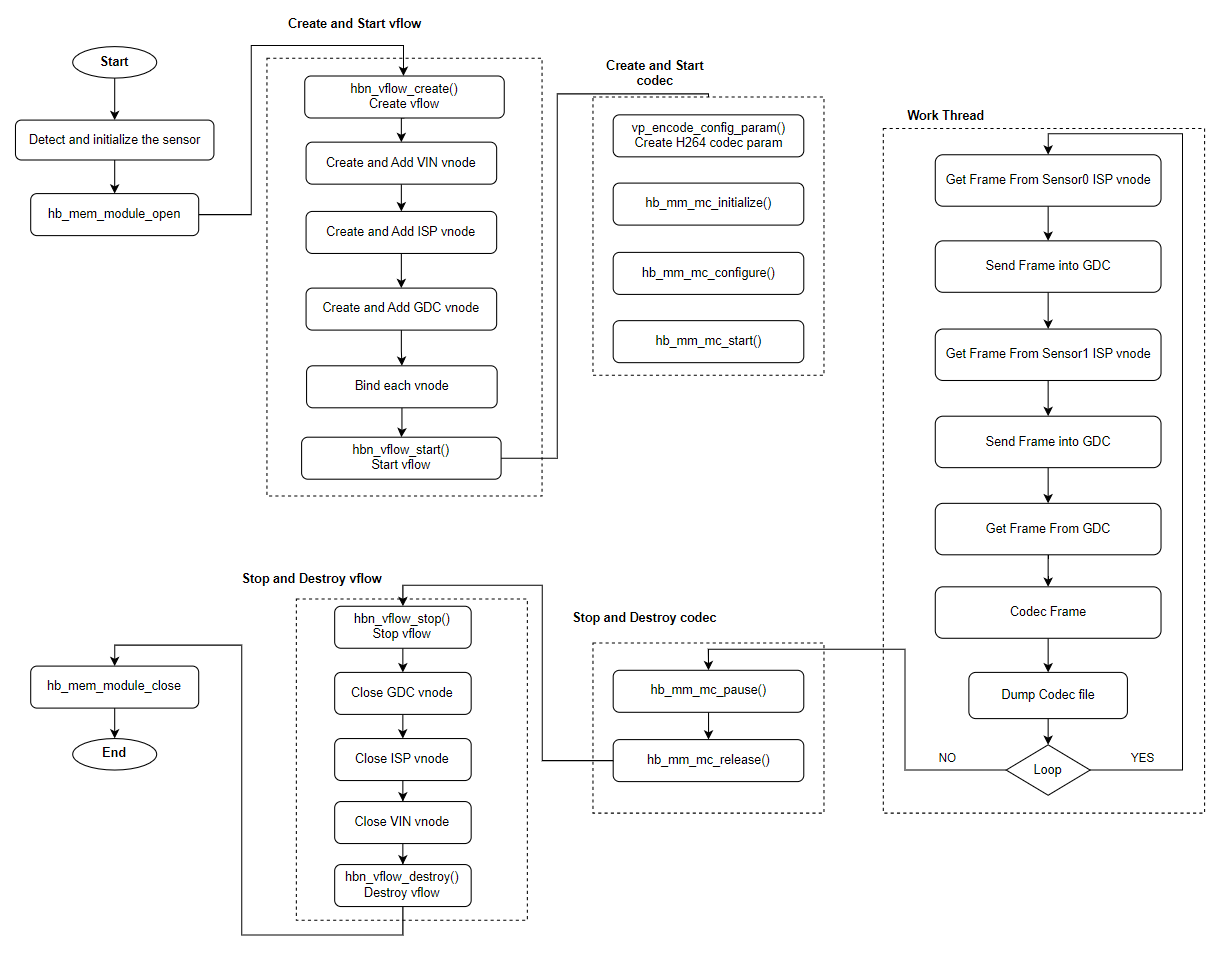
API 流程说明
3.15.7.2. 编译部署
编译
进入 multi_pipe_gdc_stitching 目录,执行
make编译输出
成果 物是 multi_pipe_gdc_stitching 源码 目录 下 的 multi_pipe_gdc_stitching详细
程序 编译 方式 请 查阅 编译 方法 章节
程序部署
把 multi_pipe_gdc_stitching 上chmod +x multi_pipe_gdc_stitching命令
3.15.7.3. 运行
程序运行方法
直接./multi_pipe_gdc_stitching 可以
程序参数选项说明
Usage: multi_pipe_gdc_stitching [Options]
Options:
-c, --config="sensor=id"
                Configure parameters for each video pipeline, can be repeated up to 2 times.
                sensor   --  Sensor index,can have multiple parameters, reference sensor list.
-v, --verbose   Enable verbose mode
-h, --help      Show help message
-c, --config="sensor=id"配置
每 一路 视频 通路 的 参数,目前 只 支持 配置2路 摄像头。
-v, --verbose启用
详细 模式。
-h, --help显示
帮助 信息。
注意: 需
运行效果
日志
# ./multi_pipe_gdc_stitching -c "sensor=3" -c "sensor=3"
Using index:3  sensor_name:sc230ai-30fps  config_file:linear_1920x1080_raw10_30fps_1lane.c
[INFO] board_id is 0x0202, not need skip sci1.
mipi mclk is configed.
Searching camera sensor on device: /proc/device-tree/soc/cam/vcon@0 i2c bus: 4 mipi rx phy: 0
INFO: Found sensor_name:sc230ai-30fps on mipi rx csi 0, i2c addr 0x30, config_file:linear_1920x1080_raw10_30fps_1lane.c
Using index:3  sensor_name:sc230ai-30fps  config_file:linear_1920x1080_raw10_30fps_1lane.c
[INFO] board_id is 0x0202, not need skip sci1.
mipi mclk is not configed.
Searching camera sensor on device: /proc/device-tree/soc/cam/vcon@1 i2c bus: 1 mipi rx phy: 1
WARN: Sensor Name: sc230ai-30fps, Expected Chip ID: 0xCB34, Actual Chip ID Read: 0x00
mipi mclk is configed.
Searching camera sensor on device: /proc/device-tree/soc/cam/vcon@2 i2c bus: 2 mipi rx phy: 2
WARN: Sensor Name: sc230ai-30fps, Expected Chip ID: 0xCB34, Actual Chip ID Read: 0x00
mipi mclk is configed.
Searching camera sensor on device: /proc/device-tree/soc/cam/vcon@3 i2c bus: 7 mipi rx phy: 3
INFO: Found sensor_name:sc230ai-30fps on mipi rx csi 3, i2c addr 0x30, config_file:linear_1920x1080_raw10_30fps_1lane.c
total_pipeline_num:2
Pipeline index 0:
        Sensor index: 3
        Sensor name: sc230ai-30fps
        Active mipi host: 0
Pipeline index 1:
        Sensor index: 3
        Sensor name: sc230ai-30fps
        Active mipi host: 3
Encode type: h264
Output file: pipeline1_1920x1080_30fps.h264
MIPI host: 0x9
  Host 0: Used
Verbose: 0
Create Encode idx: 0, init successful
q
^C[  145.555162] [VPF ops]:[L153][S2][gdc0] vpf_safety_close: sudden close
[  145.561818] vin sensor1: sensor_frame_end_stop_wait 488 fe 0ms abort
[  145.569080] [VPF ops]:[L153][S1][vin3] vpf_safety_close: sudden close
[  145.577640] [VPF ops]:[L153][S1][isp0] vpf_safety_close: sudden close
[  145.589144] vin sensor0: sensor_frame_end_stop_wait 509 fe 0ms abort
[  145.596381] [VPF ops]:[L153][S0][vin0] vpf_safety_close: sudden close
[  145.604412] [VPF ops]:[L153][S0][isp0] vpf_safety_close: sudden close
...
运行
pipeline1_1920x1080_30fps.h264
3.15.8. multi_pipe_vin_isp_vse_gpu2d
3.15.8.1. 功能概述
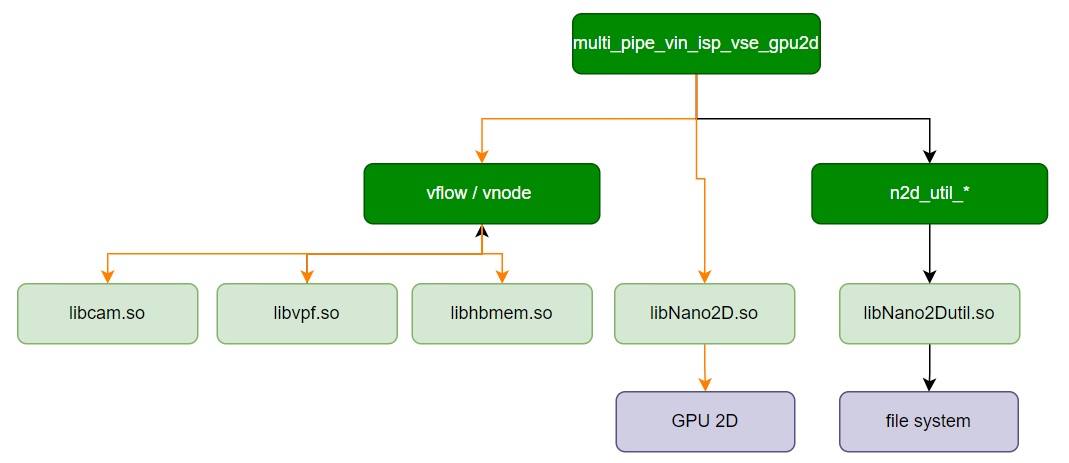
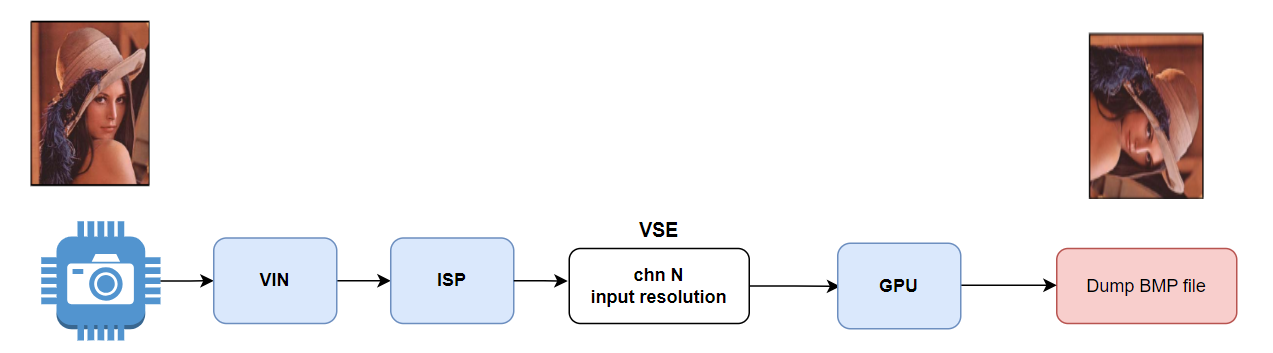
multi_pipe_vin_isp_vse_gpu2d 是MIPI CSI,VIN,ISP,VSE,GPU2D 相关SIF->ISP->VSE 通路
软件架构说明
数据流说明
代码位置及目录结构
代码
位置 app/samples/platform_samples/sample_pipeline/multi_pipe_vin_isp_vse_gpu2d目录
结构
multi_pipe_vin_isp_vse_gpu2d
├── Makefile
├── create_n2d_buffer_wraper.c
├── create_n2d_buffer_wraper.h
├── multi_pipe_vin_isp_vse_gpu2d
└── multi_pipe_vin_isp_vse_gpu2d.c
API 流程说明
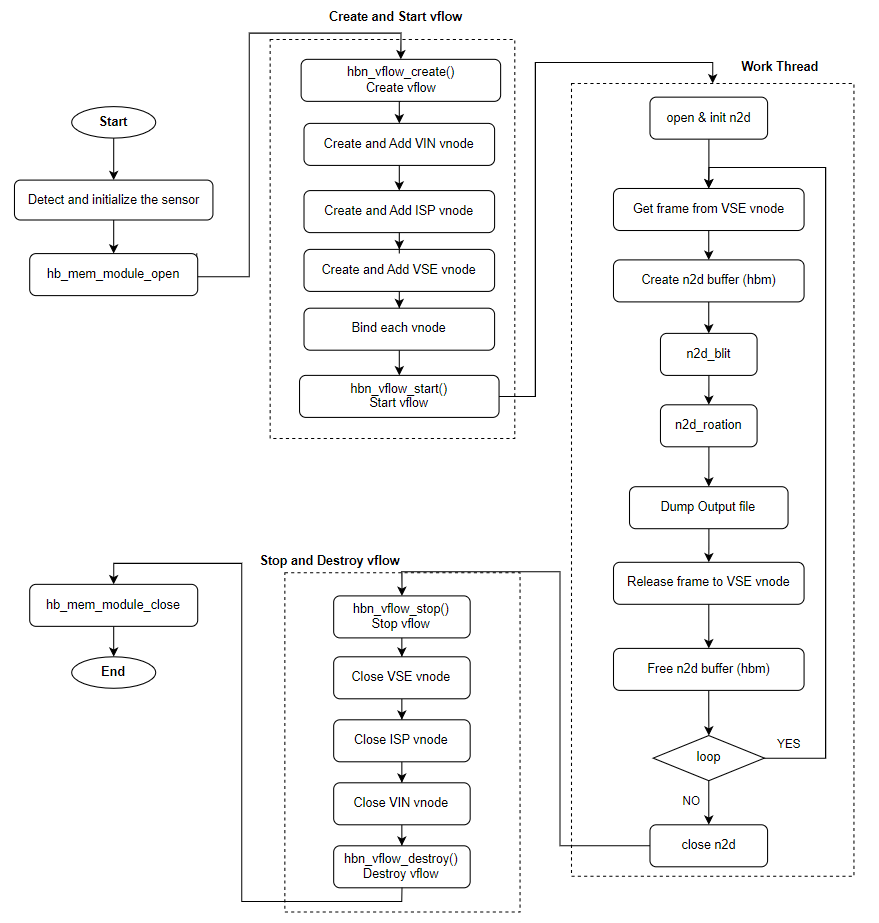
3.15.8.2. 编译部署
编译
进入 multi_pipe_vin_isp_vse_gpu2d 目录,执行
make编译输出
成果 物是 multi_pipe_vin_isp_vse_gpu2d 源码 目录 下 的 multi_pipe_vin_isp_vse_gpu2d详细
程序 编译 方式 请 查阅 编译 方法 章节
程序部署
把 multi_pipe_vin_isp_vse_gpu2d 上chmod +x multi_pipe_vin_isp_vse_gpu2d命令
3.15.8.3. 运行
程序运行方法
直接./multi_pipe_vin_isp_vse_gpu2d 可以
程序参数选项说明
Usage: multi_pipe_vin_isp_vse_gpu2d [Options]
Options:
-c, --config="sensor=id output=FILE"
                Configure parameters for each video pipeline, can be repeated up to 4 times.
                sensor   --  Sensor index,can have multiple parameters, reference sensor list.
                output   --  Save bmp data to file.
-v, --verbose   Enable verbose mode
-y, --enable yuv-debug
-h, --help      Show help message
-c, --config="sensor=id channel=vse_chn output=FILE"配置
每 一路 视频 通路 的 参数。此 选项 最 多 可以 重复4次以 配置 最 多4路 视频 通路。 sensor 是
必须 的 参数,channel、type、output是 可 选 参数,用户 不 配置 时,程序 会 使用 默认值。 sensor (必选):传感器索引,可以 有 多个 参数,参考 传感器 列表。 output (可选):保存编码 流 数据 到 文件,默认 命名 格式 为’output_sensor’id_[width]x[height]_rotated_count.[bmp]’。
-v, --verbose启用
详细 模式。
-h, --help显示
帮助 信息。
运行效果
本multi_pipe_vin_isp_vse_gpu2d
运行
./multi_pipe_vin_isp_vse_gpu2d -c "sensor=3" -c "sensor=3"
日志
root@buildroot:/app/platform_samples/sample_pipeline/multi_pipe_vin_isp_vse_gpu2d# ./multi_pipe_vin_isp_vse_gpu2d -c "sensor=3" -c "sensor=3"
Using index:3  sensor_name:sc230ai-30fps  config_file:linear_1920x1080_raw10_30fps_1lane.c
[INFO] board_id is 0x0202, not need skip sci1.
mipi mclk is configed.
Searching camera sensor on device: /proc/device-tree/soc/cam/vcon@0 i2c bus: 4 mipi rx phy: 0
INFO: Found sensor_name:sc230ai-30fps on mipi rx csi 0, i2c addr 0x30, config_file:linear_1920x1080_raw10_30fps_1lane.c
Using index:3  sensor_name:sc230ai-30fps  config_file:linear_1920x1080_raw10_30fps_1lane.c
[INFO] board_id is 0x0202, not need skip sci1.
mipi mclk is not configed.
Searching camera sensor on device: /proc/device-tree/soc/cam/vcon@1 i2c bus: 1 mipi rx phy: 1
WARN: Sensor Name: sc230ai-30fps, Expected Chip ID: 0xCB34, Actual Chip ID Read: 0x00
WARN: Sensor Name: sc230ai-30fps, Expected Chip ID: 0xCB34, Actual Chip ID Read: 0x00
WARN: Sensor Name: sc230ai-30fps, Expected Chip ID: 0xCB34, Actual Chip ID Read: 0x00
WARN: Sensor Name: sc230ai-30fps, Expected Chip ID: 0xCB34, Actual Chip ID Read: 0x00
mipi mclk is configed.
Searching camera sensor on device: /proc/device-tree/soc/cam/vcon@2 i2c bus: 2 mipi rx phy: 2
INFO: Found sensor_name:sc230ai-30fps on mipi rx csi 2, i2c addr 0x30, config_file:linear_1920x1080_raw10_30fps_1lane.c
total_pipeline_num:2
Pipeline index 0:
        Sensor index: 3
        Sensor name: sc230ai-30fps
        Active mipi host: 0
        Vse Channel: 0
        Encode type: bmp
        Output file:
Pipeline index 1:
        Sensor index: 3
        Sensor name: sc230ai-30fps
        Active mipi host: 2
        Vse Channel: 0
        Encode type: bmp
        Output file:
MIPI host: 0x5
  Host 0: Used
  Host 2: Used
Verbose: 0
mipi rx = 0,active_mipi_host = 0
isp_width:1920 , isp_height:1080hbn_vnode_set_ochn_attr: 1920x1080
mipi rx = 2,active_mipi_host = 2
isp_width:1920 , isp_height:1080hbn_vnode_set_ochn_attr: 1920x1080
************ n2d read start*********
Saved file to [./_width:1920_height:1080_stride1920_frameid20.bmp].
Saved file to [./_width:1920_height:1080_stride1920_frameid5.bmp].
Saved file to [./_width:1920_height:1080_stride1920_frameid32.bmp].
Saved file to [./_width:1920_height:1080_stride1920_frameid16.bmp].
Saved file to [./_width:1920_height:1080_stride1920_frameid43.bmp].
Saved file to [./_width:1920_height:1080_stride1920_frameid27.bmp].
Saved file to [./_width:1920_height:1080_stride1920_frameid55.bmp].
Saved file to [./_width:1920_height:1080_stride1920_frameid39.bmp].
Saved file to [./_width:1920_height:1080_stride1920_frameid70.bmp].
Saved file to [./_width:1920_height:1080_stride1920_frameid53.bmp].
Saved file to [./_width:1920_height:1080_stride1920_frameid78.bmp].
Saved file to [./_width:1920_height:1080_stride1920_frameid59.bmp].
Saved file to [./_width:1920_height:1080_stride1920_frameid85.bmp].
Saved file to [./_width:1920_height:1080_stride1920_frameid66.bmp].
Saved file to [./_width:1920_height:1080_stride1920_frameid92.bmp].
Saved file to [./_width:1920_height:1080_stride1920_frameid93.bmp].
Saved file to [./_width:1920_height:1080_stride1920_frameid118.bmp].
Saved file to [./_width:1920_height:1080_stride1920_frameid99.bmp].
Saved file to [./_width:1920_height:1080_stride1920_frameid125.bmp].
Saved file to [./_width:1920_height:1080_stride1920_frameid106.bmp].
Saved file to [./_width:1920_height:1080_stride1920_frameid132.bmp].
Saved file to [./_width:1920_height:1080_stride1920_frameid113.bmp].
Saved file to [./_width:1920_height:1080_stride1920_frameid139.bmp].
Saved file to [./_width:1920_height:1080_stride1920_frameid120.bmp].
Saved file to [./_width:1920_height:1080_stride1920_frameid146.bmp].
Saved file to [./_width:1920_height:1080_stride1920_frameid127.bmp].
Saved file to [./_width:1920_height:1080_stride1920_frameid153.bmp].
Saved file to [./_width:1920_height:1080_stride1920_frameid134.bmp].
Saved file to [./_width:1920_height:1080_stride1920_frameid160.bmp].
Saved file to [./_width:1920_height:1080_stride1920_frameid141.bmp].
Saved file to [./_width:1920_height:1080_stride1920_frameid167.bmp].
Saved file to [./_width:1920_height:1080_stride1920_frameid148.bmp].
encode thread end
运行
_width:1920_height:1080_stride1920_frameid160.bmp
_width:1920_height:1080_stride1920_frameid167.bmp
3.15.9. multi_pipe_crop_and_stitch
3.15.9.1. 功能概述
multi_pipe_crop_and_stitch 是MIPI CSI,VIN,ISP,VSE,2D GPU,CODEC 相关HBN API创建2D GPU完成
详细
2路
视频流 同时 采集 通过 VSE 放大 到4K 分别
从2路 视频 的 左 上、右 上、左 下、右 下4个角,扣出640*480大小 的 图, 共8张 对
步骤2得到 的8张小图 进行 放大 把2路原
视频 图像 和8张小图 拼接 到 一张4K的 图像 中 对
拼接 后 的 图像 进行H265编码 后,保存 到 文件 output.h265
注意: 目前1920*1080 和 3840*2160 的
软件架构说明
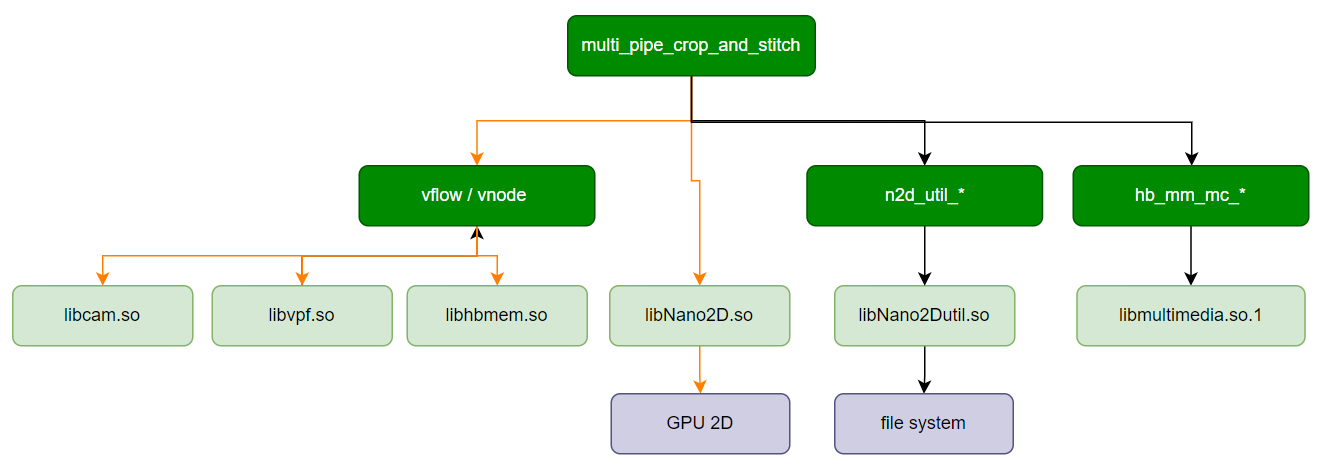
数据流说明
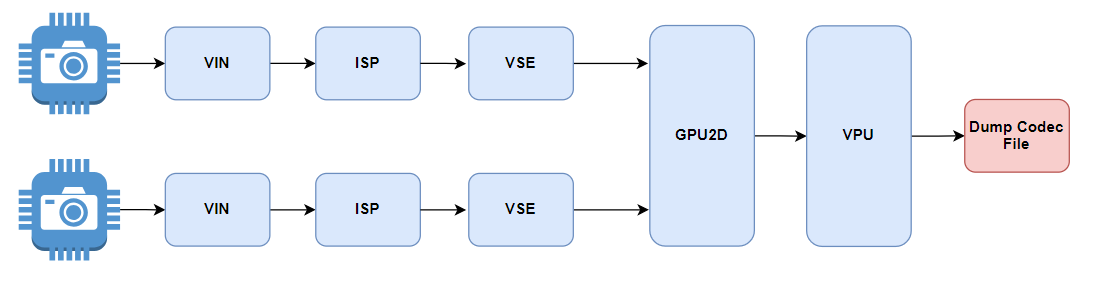
代码位置及目录结构
代码
位置 app/samples/platform_samples/sample_pipeline/multi_pipe_crop_and_stitch目录
结构
multi_pipe_crop_and_stitch
├── Makefile
├── bpu_limit.sh
├── multi_pipe_crop_and_stitch
├── multi_pipe_crop_and_stitch.c
├── param_parser.c
├── param_parser.h
├── qos.sh
├── qos_read.sh
├── run_gdc_yolo_h264_mjpeg.sh
├── run_gdc_yolo_h265.sh
├── run_gdc_yolo_hdmi.sh
└── run_noqos.sh
API 流程说明
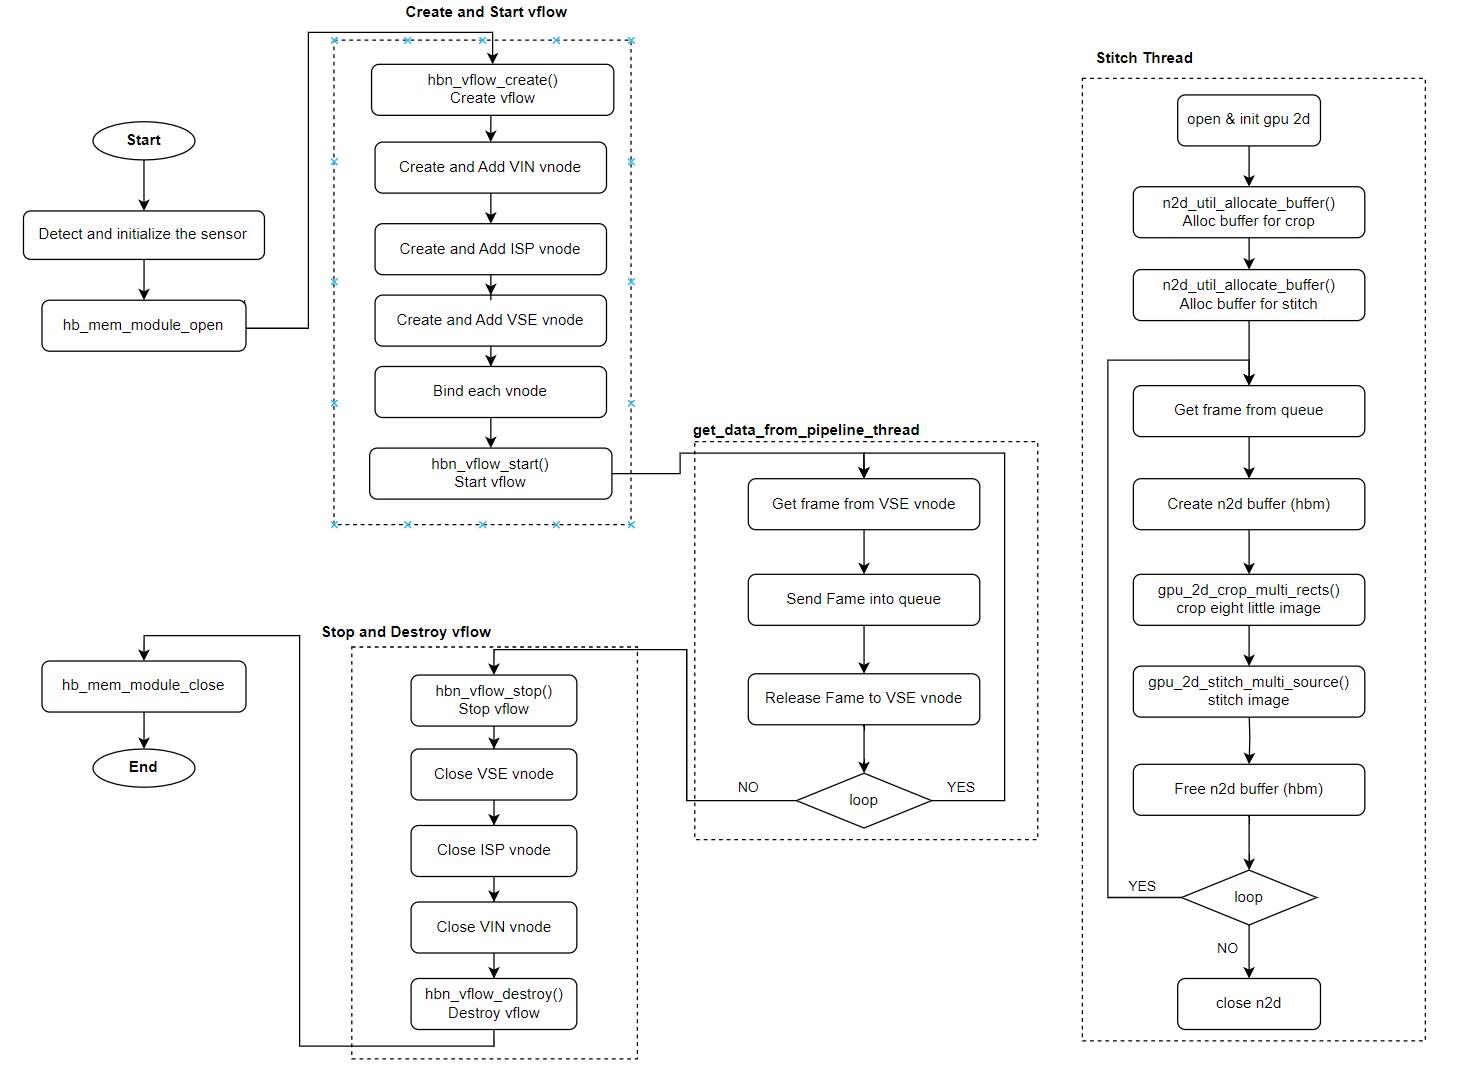
3.15.9.2. 编译部署
编译
进入 multi_pipe_crop_and_stitch 目录,执行
make编译输出
成果 物是 multi_pipe_crop_and_stitch 源码 目录 下 的 multi_pipe_crop_and_stitch详细
程序 编译 方式 请 查阅 编译 方法 章节
程序部署
把 multi_pipe_crop_and_stitch 上chmod +x multi_pipe_crop_and_stitch命令
3.15.9.3. 运行
程序运行方法
直接./multi_pipe_crop_and_stitch 可以
程序参数选项说明
Usage: multi_pipe_crop_and_stitch [Options]
Options:
-c, --config="sensor=id "
                Configure parameters for each video pipeline, can be repeated up to 4 times.
                sensor   --  Sensor index,can have multiple parameters, reference sensor list.
                gdc      --  Enable gdc, default is disable.
                out264   --  Enable codec h264 stream, default is disable.
                outmjpeg --  Enable codec mjpeg stream, default is disable.
                file     --  Enable codec stream save as file, default is disable.
-o, --output="file or hdmi, default is nothing output
-r, --ratio="camera image width ratio, used to blend, default is 0.0
-b, --bpu_enable        Enable bpu, default is disable
-p, --bpu_postprocess_enable    Enable bpu postprocess, default is disable
-v, --verbose   Enable verbose mode
-h, --help      Show help message
-c, --config="sensor=id"配置
每 一路 视频 通路 的 参数,目前 只 支持 配置2路 摄像头,每路 sensor 可 单独 配置 参数 如下 sensor:传感器索引,参考 传感器 列表。 gdc:是否开启GDC,默认 为 0,可以 设置 为 [0-1]。 out264:是否开启 H264 编码,默认 为 0,可以 设置 为 [0-1]。 outmjpeg:是否开启 MJPEG 编码,默认 为 0,可以 设置 为 [0-1]。 file:以上编码 流 是否 保存 为 文件,文件名 Chn[通道号].[编码类型]。
-o, --output图像
拼接 后 的 输出 方式,支持 输出 方式。 -o file:输出 H265 编码文件,文件名 output.h265。-o hdmi:输出 hdmi 显示,目前仅 支持 4K 分辨率 显示器。
-b, --bpu_enable是否
开启 算法 线程,使用 yolov5 进行 人形 检测。
-p, --bpu_postprocess_enable是否
开启 算法 后处理。
-v, --verbose是否
开启 详细 打印信息。
-h, --help显示
帮助 信息。
运行效果
本multi_pipe_crop_and_stitch 测试用例
输入
./multi_pipe_crop_and_stitch -c "sensor=3" -c "sensor=3" -o file
日志
Using index:3  sensor_name:sc230ai-30fps  config_file:linear_1920x1080_raw10_30fps_1lane.c
[INFO] board_id is 202, not need skip sci1.
mipi mclk is configed.
Searching camera sensor on device: /proc/device-tree/soc/cam/vcon@0 i2c bus: 4 mipi rx phy: 0
mipi mclk is not configed.
Searching camera sensor on device: /proc/device-tree/soc/cam/vcon@1 i2c bus: 1 mipi rx phy: 1
mipi mclk is configed.
Searching camera sensor on device: /proc/device-tree/soc/cam/vcon@2 i2c bus: 2 mipi rx phy: 2
INFO: Found sensor_name:sc230ai-30fps on mipi rx csi 2, i2c addr 0x30, config_file:linear_1920x1080_raw10_30fps_1lane.c
mipi host 2
MIPI host: 0x4
  Host 2: Used


Using index:3  sensor_name:sc230ai-30fps  config_file:linear_1920x1080_raw10_30fps_1lane.c
[INFO] board_id is 202, not need skip sci1.
mipi mclk is configed.
Searching camera sensor on device: /proc/device-tree/soc/cam/vcon@0 i2c bus: 4 mipi rx phy: 0
mipi mclk is not configed.
Searching camera sensor on device: /proc/device-tree/soc/cam/vcon@1 i2c bus: 1 mipi rx phy: 1
mipi mclk is configed.
Searching camera sensor on device: /proc/device-tree/soc/cam/vcon@3 i2c bus: 7 mipi rx phy: 3
INFO: Found sensor_name:sc230ai-30fps on mipi rx csi 3, i2c addr 0x30, config_file:linear_1920x1080_raw10_30fps_1lane.c
mipi host 3
MIPI host: 0xc
  Host 2: Used
  Host 3: Used


 Show sensor info:
  Pipeline index 0:
        Sensor index: 3
        Sensor name: sc230ai-30fps
        Active mipi host: 2
        Vse Channel: 5
  Pipeline index 1:
        Sensor index: 3
        Sensor name: sc230ai-30fps
        Active mipi host: 3
        Vse Channel: 5
hbn_vnode_set_ochn_attr: 3840x2160 fps:30
hbn_vnode_set_ochn_attr: 3840x2160 fps:30


Codec param:
        codec type :H265
        codec fps :30
        codec width :3840
        codec height :2160
Create Encode idx: 0, init successful


input q to stop :
运行
output.h265
3.15.10. uvc_gadget_camera
3.15.10.1. 功能概述
uvc_gadget_camera 实现
采集 MIPI 摄像头
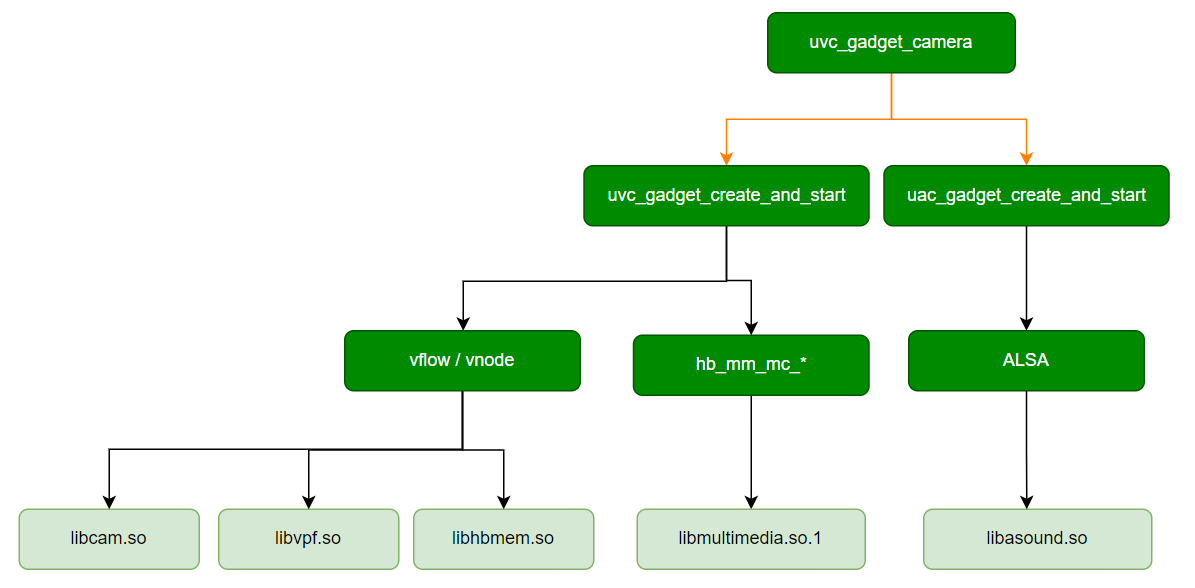
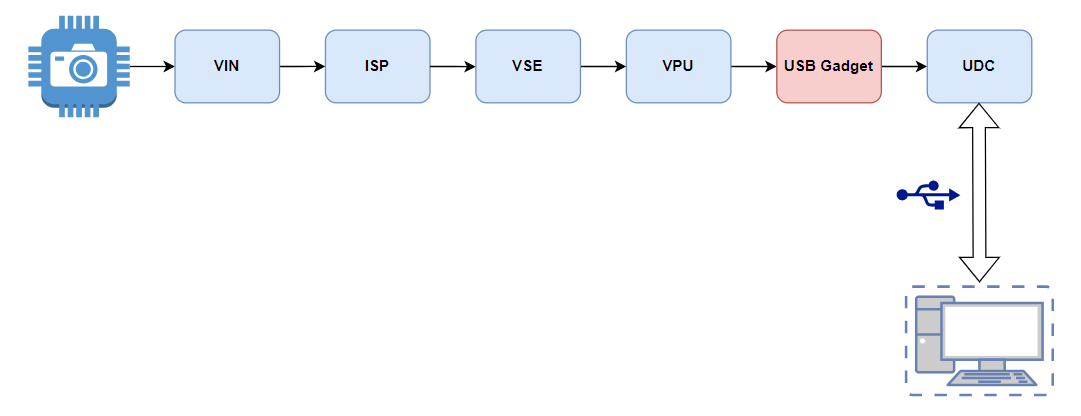
的 数据,经过 如下 流程 CSI,VIN,ISP,VSE,CODEC后,通过 USB Gadget 发送给 PC 端 显示,目前 只 支持H264的 格式 UAC1 循环
播放 PCM 文件,默认 使用48K采样率,双通道,16bit UAC1 录制 PCM 文件,默认
使用48K采样率,双通道,16bit
软件架构说明
数据流说明
代码位置及目录结构
代码
位置 app/samples/platform_samples/sample_pipeline/uvc_gadget_camera目录
结构
.
├── Makefile
├── alsa_device.c
├── audio
│   └── count10_48K_chn2_s16le.pcm
├── include
│   ├── alsa_device.h
│   ├── uac_common.h
│   ├── uac_gadget.h
│   ├── uac_micphone.h
│   ├── uac_speaker.h
│   ├── utils.h
│   ├── uvc.h
│   ├── uvc_gadget.h
│   └── uvc_gadget_api.h
├── lib
│   └── libguvc.a
├── mqueue.c
├── mqueue.h
├── uac_gadget.c
├── uac_micphone.c
├── uac_speaker.c
├── uvc_gadget_camera
├── uvc_gadget_camera.c
├── uvc_gadget_wraper.c
├── uvc_gadget_wraper.h
├── vp_codec.c
├── vp_codec.h
├── vp_pipeline.h
└── vp_pipeline.c
API 流程说明
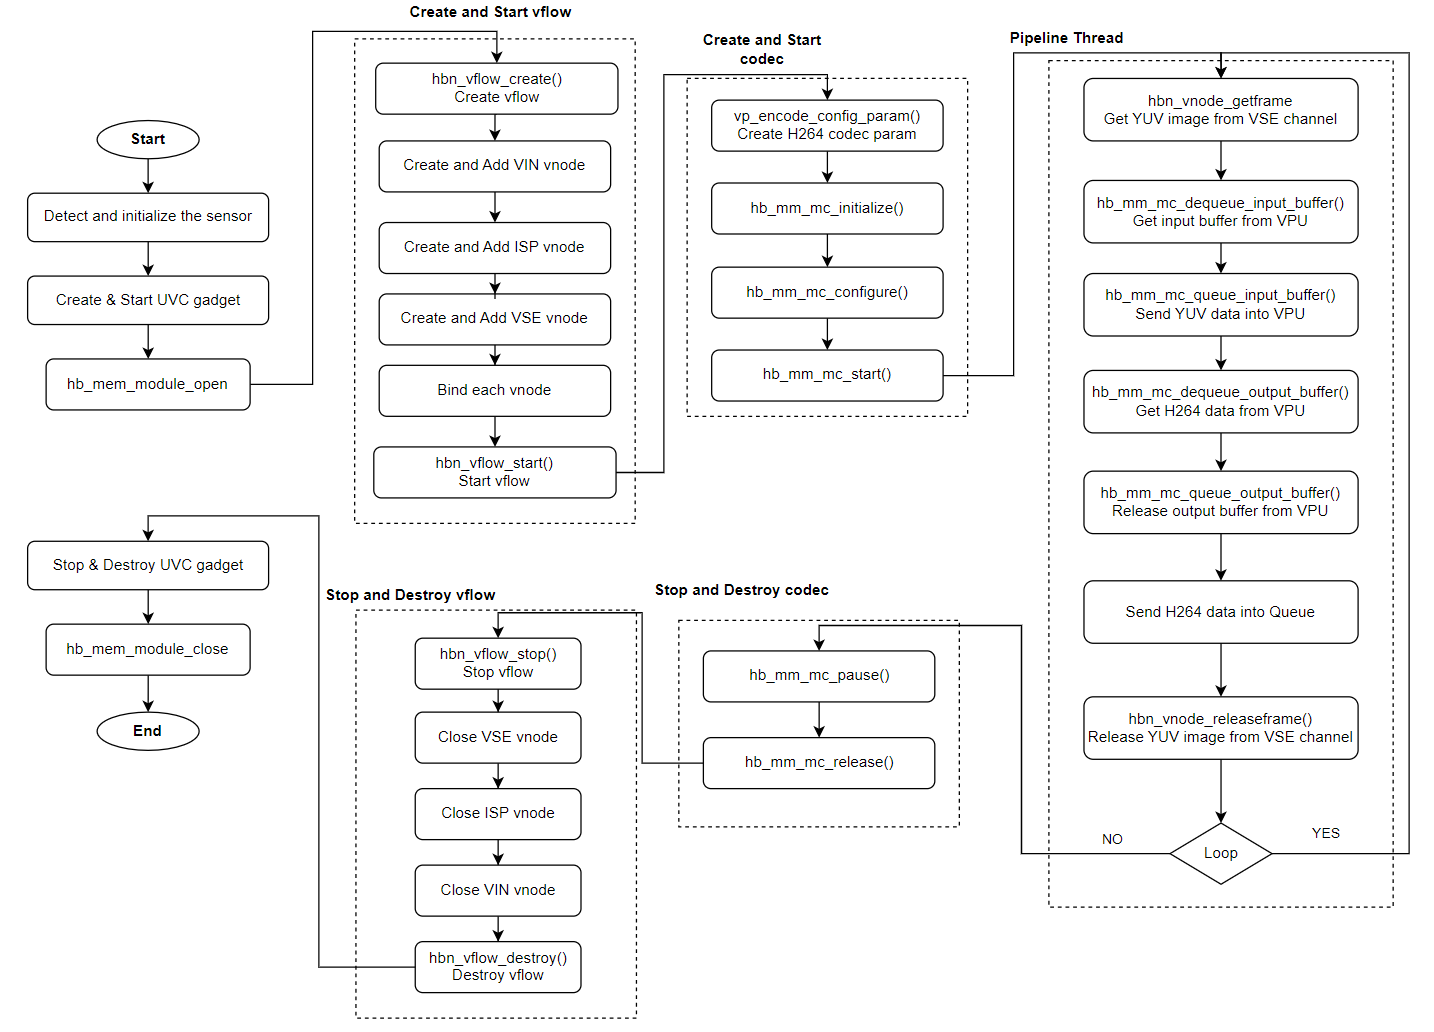
3.15.10.2. 编译部署
编译
进入 uvc_gadget_camera 目录,执行
make编译输出
成果 物是 single_pipe_vin_isp_vse_vpu 源码 目录 下 的 uvc_gadget_camera详细
程序 编译 方式 请 查阅 编译 方法 章节
程序部署
把 uvc_gadget_camera 上chmod +x uvc_gadget_camera命令
3.15.10.3. 运行
程序运行方法
直接./uvc_gadget_camera 可以
程序参数选项说明
Usage: ./uvc_gadget_camera [OPTIONS]
Options:
  -s <sensor_index>      Specify sensor index
  -c <channel_type>             Specify channel type: vo and vf and io and if, default: vf:if
                Support both individual configuration and combined configuration.
                The individual configuration supports four types:
                                1. vo: vin online isp
                                2. vf: vin offline isp
                                3. io: isp online vse
                                4. if: isp offline vse
                The combination configuration supports four types:
                                1. vo:io  vin online isp + isp online vse
                                2. vo:if  vin online isp + isp offline vse
                                3. vf:io  vin offline isp + isp online vse
                                4. vf:if  vin offline isp + isp offline vse
  -p <play PCM file>     Specifies the audio playback file path
  -r <record PCM file>   Specify the audio recording file path
  -h                     Show this help message
-s <sensor_index>指定
Camera Sensor索引。示例:
-s 0表示使用 索引 为 0 的 传感器。
-c <channel_type>:指定 VIN 和 ISP 之间,以及 ISP 和 VSE 之间
的 连接 方式,分别 支持 Offline 和 Online 的 连接 方式 示例:
-c vo:io表示 VIN Online ISP, ISP Online VSE
-p <play PCM file>指定
要 播放 的PCM文件 路径。 示例:
-p /userdata/play.pcm,默认使用48K采样率,双通道,16bit
-r <record PCM file>指定
录制 的PCM文件 路径, 示例:
-r /userdata/rec.pcm,默认使用48K采样率,双通道,16bit
-h显示
帮助 信息。运行 此 命令 时,将 输出 以上 选项 的 详细 说明。
运行效果
示例1:测试 UVC:
使用USB数据线
连接 开发板 和 电脑,参考USB 2.0 接口 USB接口
开机 默认 用作 adb 的 功能,需要 执行 如下 命令 切换 为 uvc 设备 的 功能
/etc/init.d/usb-gadget.sh stop
/etc/init.d/usb-gadget.sh start uvc isoc
出现
设备 节点 /dev/video0证明切换 成功
root@buildroot:~# ls /dev/video0
/dev/video0
启动uvc_gadget_camera
以 sc230ai 为例,使用
./uvc_gadget_camera -s 3
PC 端
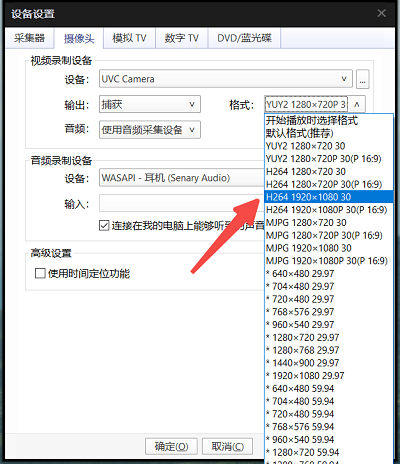
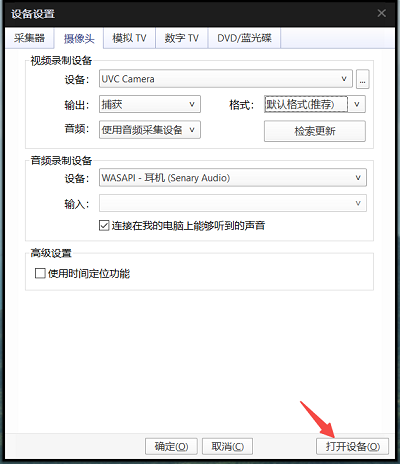
打开 USB Camera 播放器,比如 PotPlayer, 快捷键 Alt+D打开摄像头 配置 界面, 选择 UVC Camera, 点击 检索更新
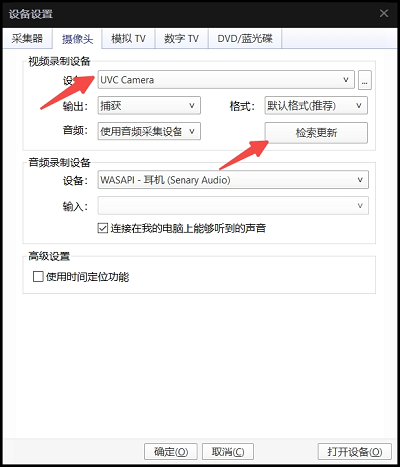
PC机端
根据 摄像头 的 分辨率 和 帧 率 信息 选择 对应 的 配置, 并 打开 摄像头
注意事项
usb-gadget.sh 脚本
启动 UVC 后,并 不会 在 PC 端 直接 生成 UVC 外设,需要 执行 uvc_gadget_camera程序后 才 生成 UVC 外设。 PC 端
通过 PotPlayer 程序 打开 摄像头 时,如果 格式 信息 无法 选择 时,点击 检索更新PC 端
通过 PotPlayer 程序 打开 摄像头 时,要 根据 实际 接入 的 摄像头 的 参数 下发 格式 信息,如果 分辨率 和 格式 错误 uvc_gadget_camera程序会 直接 退出
示例2:测试UVC + UAC1
/etc/init.d/usb-gadget.sh stop
/etc/init.d/usb-gadget.sh start uvc-uac1 isoc
启动uvc_gadget_camera
以 sc230ai 为例,同时
cd /app/platform_samples/sample_pipeline/uvc_gadget_camera/
./uvc_gadget_camera -s 3 -p count10_48K_chn2_s16le.pcm -r /userdata/rec.pcm
PC 端
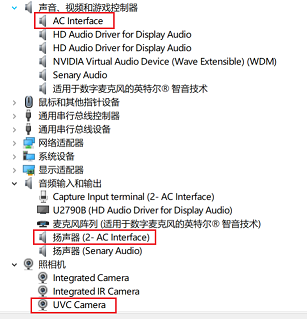
设备 管理器 将 新增 UVC 和 UAC 设备
运行
执行命令
./uvc_gadget_camera -s 3, 打印如下 日志( uvc_gadget_camera等待PC上的 客户端 发起 连接)
 ./uvc_gadget_camera -s 3
Using index:3  sensor_name:sc230ai-30fps  config_file:linear_1920x1080_raw10_30fps_1lane.c
mipi mclk is configed.
Searching camera sensor on device: /proc/device-tree/soc/cam/vcon@0 i2c bus: 4 mipi rx phy: 0
INFO: Found sensor_name:sc230ai-30fps on mipi rx csi 0, i2c addr 0x30, config_file:linear_1920x1080_raw10_30fps_1lane.c

Connection method from VIN to ISP: vin offline isp
Connection method from VIN to ISP: isp offline vse.
##function uvc_gadget_init in
using uvc device: /dev/video0
###uvc_gadget_init###
using uvc device: /dev/video0
width: 1920
height: 1080
format: 1
io_method: 0
bulk_mode: 0
nbufs: 2
mult: 2
burst: 0
speed: 3
mult_alts: 0
h264_quirk: 0
maxpkt_quirk: 3072
uvc device is dwc3-gadget on bus gadget.0
uvc open succeeded, file descriptor = 4
uvc_size=3, maxpkt_size=3072
##function uvc_gadget_init succeed
##function uvc_gadget_start in
##function uvc_gadget_start succeed
'q' for exit
##function uvc_loop in
PC端
发起 连接,在 摄像头 格式 信息 下发 正确 的 情况 下,打印 如下 日志:
STREAM ON! show video info:
==============================================
fcc: h264(0x34363248)
run_standalone: 1
uvc_devname: /dev/video0
mem: 0xffff9003b2a0
dummy_buf: (nil)
nbufs: 2
width: 1920
height: 1080
bulk: 0
imgsize: 0
imgdata: (nil)
maxpkt: 1024
speed: 3
mult_alts: 0
h264_quirk: 0
maxpkt_quirk: 3072
==============================================
3.15.11. sample_custom_capbuf
3.15.11.1. 功能概述
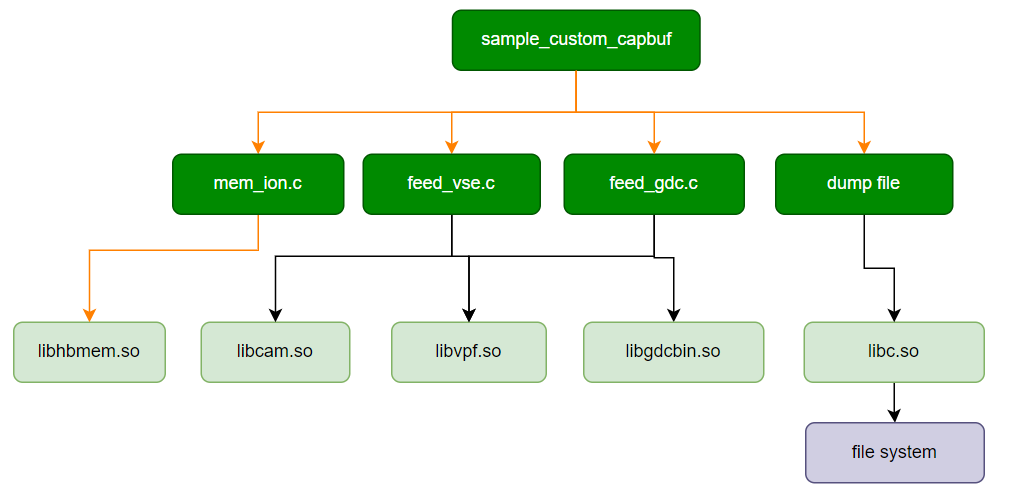
sample_custom_capbuf 可
软件架构说明
数据流说明
代码位置及目录结构
代码
位置 app/samples/platform_samples/sample_pipeline/sample_custom_capbuf目录
结构
sample_custom_capbuf
├── Makefile
├── feedback_gdc.c
├── feedback_gdc.h
├── feedback_vse.c
├── feedback_vse.h
├── mem_ion.c
├── mem_ion.h
├── run_test.sh
├── sample_custom_capbuf
├── sample_custom_capbuf.c
├── test_res
│   ├── gdc.bin
│   └── test_image_1920x1080.yuv
├── vflow_connection.h
└── vflow_connection.c
API 流程说明
3.15.11.2. 编译部署
编译
进入 sample_custom_capbuf 目录,执行
make编译输出
成果 物是 sample_custom_capbuf 源码 目录 下 的 sample_custom_capbuf详细
程序 编译 方式 请 查阅 编译 方法 章节
程序部署
把 sample_custom_capbuf run_test.sh 和 test_res 目录chmod +x sample_custom_capbuf run_test.sh命令
3.15.11.3. 运行
程序运行方法
sample_custom_capbuf 预置run_test.sh,用于run_test.sh。
直接./run_test.sh 可以
程序参数选项说明
Usage: program -e <engine> [OPTIONS]
Options for vse:
-i, --input_file FILE   Specify the input file
-w, --input_width WIDTH Specify the input width
-h, --input_height HEIGHT       Specify the input height
-V, --verbose           Enable verbose mode
Options for gdc:
-c, --config_file FILE  Specify the config file
-i, --input_file FILE   Specify the input file
-o, --output_file FILE  Specify the output file
-w, --input_width WIDTH Specify the input width
-h, --input_height HEIGHT       Specify the input height
-x, --output_width WIDTH        Specify the output width
-y, --output_height HEIGHT      Specify the output height
Options for gdc-0-vse:
-i, --input_file FILE   Specify the input file
-w, --input_width WIDTH Specify the input width
-h, --input_height HEIGHT       Specify the input height
-V, --verbose           Enable verbose mode
-c, --config_file FILE  Specify the config file for gdc
-o, --output_file FILE  Specify the output file for gdc
-x, --output_width WIDTH        Specify the output width for gdc
-y, --output_height HEIGHT      Specify the output height for gdc
本用例-e 选项
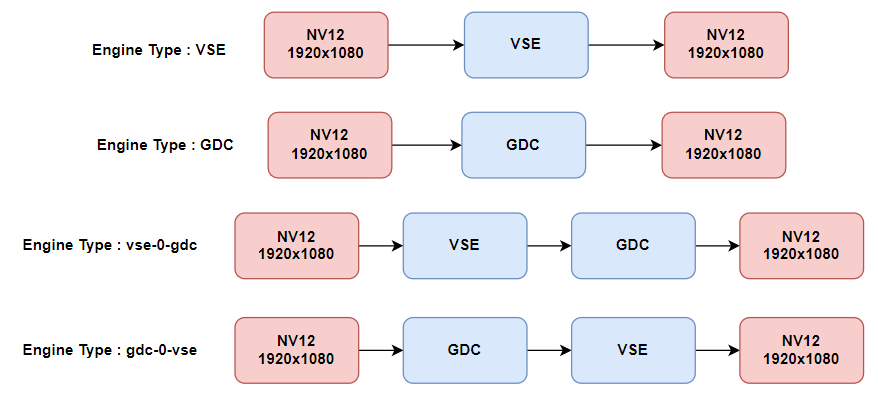
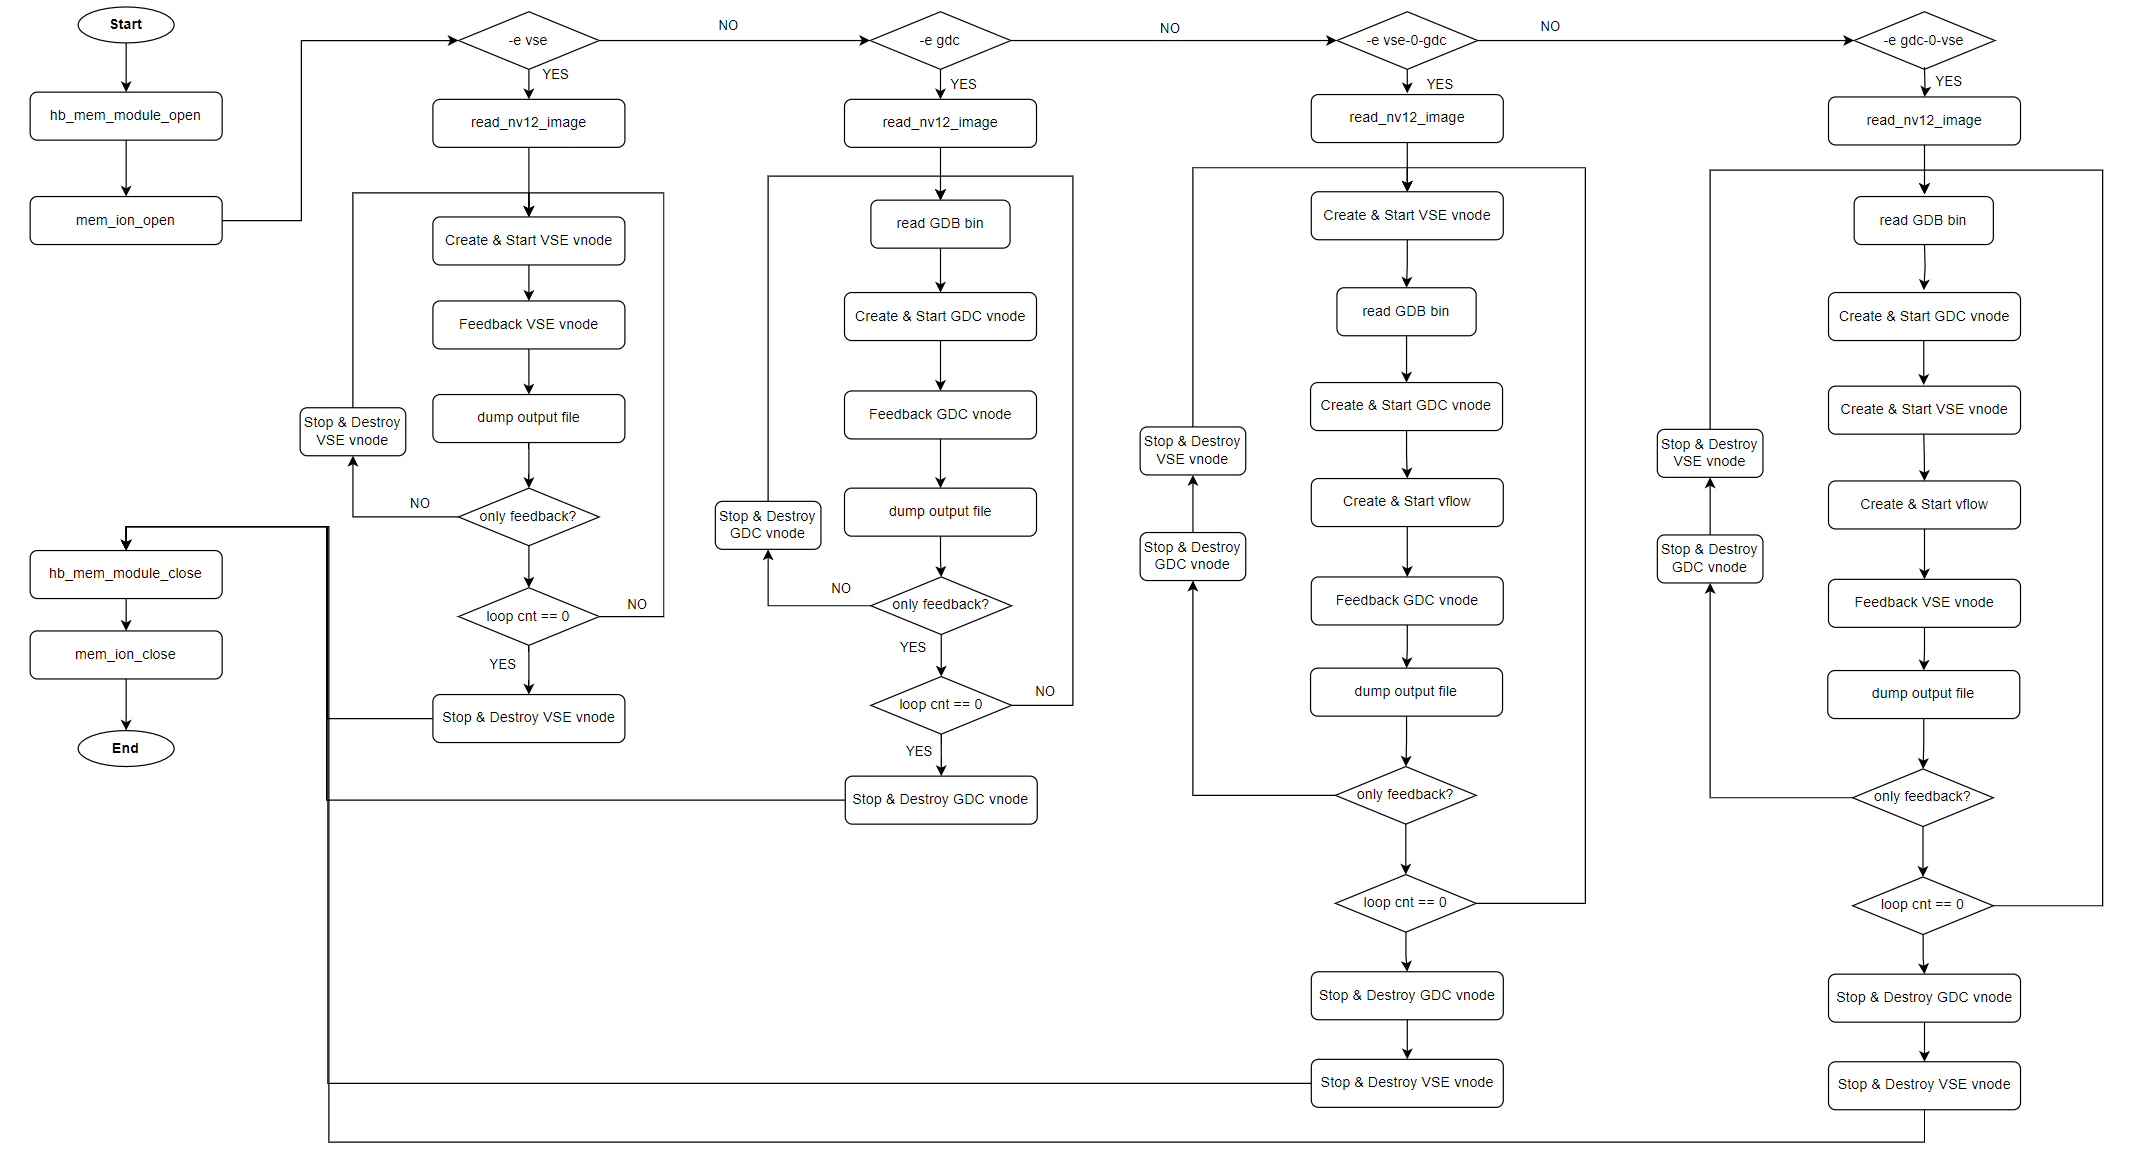
vse: 表示通过 VSE 缩放 一张 NV12 图片 gdc: 表示通过 GDC 对 一张 NV12 图片 做 畸变 矫正 vse-0-gdc: 表示先 通过 VSE 通道0缩放,再 通过 GDC 做 畸变 矫正,最后 输出 NV12 gdc-0-vse: 表示先 通过 GDC 做 畸变 矫正,再 通过 VSE 通道0缩放,最后 输出 NV12
本 sample 通过run_test.sh 中
CAP_LOOP_CNT表示
测试 循环 的 次数, CAP_LOOP_CNT为空则 表示 仅 测试 一次
CAP_LOOP_FLAG表示 vnode 操作
类型,其 支持 的 值 如下 CAP_LOOP_ONLY_FEEDBACK: 其值为0,表示 每次 循环 vnode 不 销毁 直接 进行 回灌 CAP_LOOP_FEEDBACK_AND_CREATE: 其值为1,表示 每次 循环 vnode 需 重新 创建 初始化
CAP_BUF_FLAG表示
回灌 VSE / GDC 的 输出 buffer 类型 CAP_BUF_CUSTOM: 其值为0,表示 通过 hbm 接口 申请 buffer 内存
CAP_BUF_CUSTOM_EXT: 其值为1,表示 通过 ION 接口 申请 buffer 内存 CAP_BUF_INTERNAL: 其值为2,表示 通过 模块 内部 获得 buffer 内存
CAP_DUMP_FLAG表示
是否 保存 输出 yuv 图像 对于 VSE 模块,其
默认 输出 目录 /userdata/vse对于 GDC 模块,其
默认 输出 目录 /userdata/gdc
CAP_THREAD_NUM表示
创建 的 线程 数量,用于 对 模块 并发 操作, CAP_THREAD_NUM为空则 表示 仅 创建 一个 测试 线程
注意事项
只
支持 VSE,GDC 和 GDC 绑定 VSE 的 回灌 模式。 用户
自定义 的 输出 buffer,需Y和UV地址 空间 要 连续,需 使用 ION 空间,需 填充 必要 bufferindex 和 share_id。
运行效果
执行./run_test.sh
...
==== feedback_thread_vse buf flag CAP_BUF_CUSTOM loop 100 time cost 1263.837 ms
==== feedback_thread_gdc buf flag CAP_BUF_CUSTOM loop 100 time cost 895.005 ms
==== feedback_thread_vse buf flag CAP_BUF_INTERNAL loop 100 time cost 1640.084 ms
==== feedback_thread_gdc buf flag CAP_BUF_INTERNAL loop 100 time cost 966.076 ms
...
3.15.12. uvc_capture_sample
3.15.12.1. 功能概述
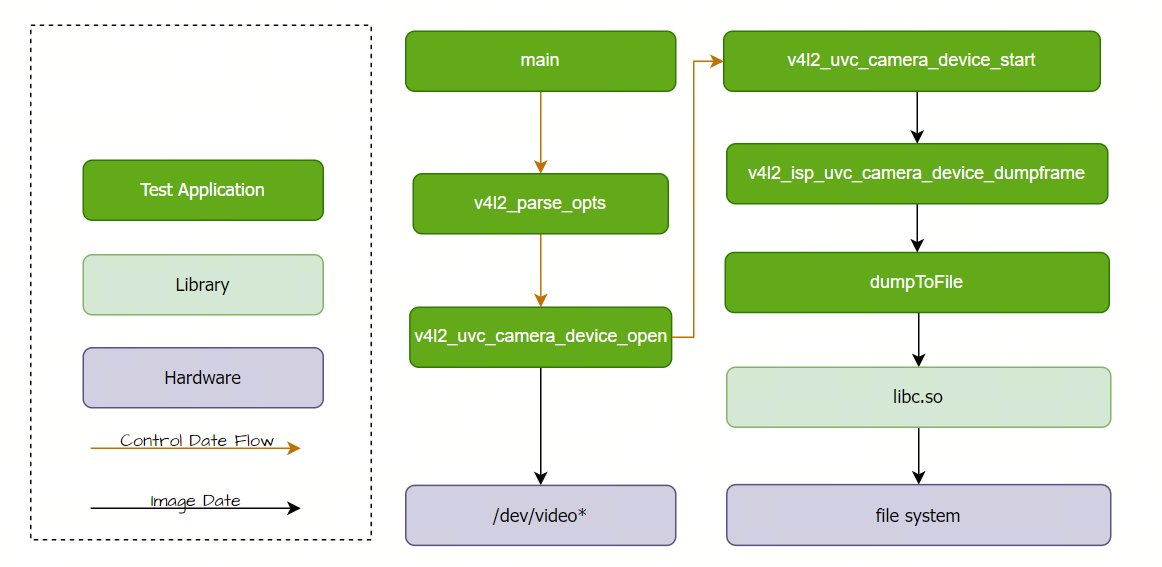
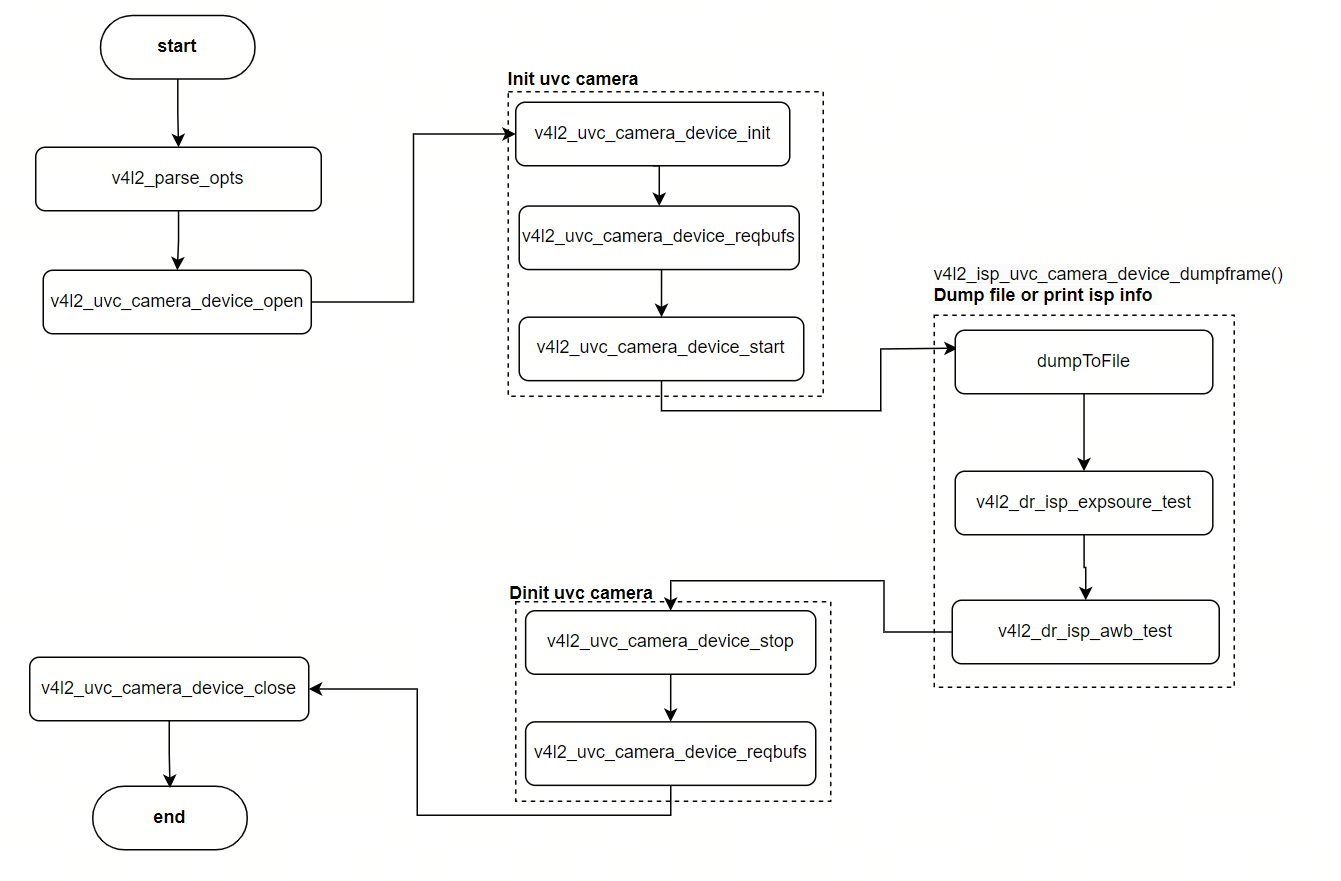
uvc_capture_sample 是
软件架构说明
代码位置及目录结构
代码
位置 app/samples/platform_samples/sample_pipeline/uvc_capture_sample目录
结构
uvc_capture_sample
├── Makefile
├── common_utils.c
├── common_utils.h
├── uvc_capture_sample.c
├── uvc_capture_sample.h
├── v4l2_common_utils.c
└── v4l2_common_utils.h
API 流程说明
3.15.12.2. 编译部署
编译
进入 uvc_capture_sample 目录,执行
make编译输出
成果 物是 uvc_capture_sample 源码 目录 下 的 uvc_capture_sample详细
程序 编译 方式 请 查阅 编译 方法 章节
程序部署
把 uvc_capture_sample 目录chmod +x uvc_capture_sample命令
3.15.12.3. 运行
程序运行方法
运行./uvc_capture_sample -h 可以
程序参数选项说明
选项:
-i, --video_id <id>指定
对应 的 video 的 节点,比如 video0、video1等。 系统
中 的 /dev/videoX 节点 用途 可能 不同,可 通过 以下 命令 查看 支持 格式 和 功能:
v4l2-ctl --device=/dev/videoX --list-formats-ext
-d, --dump_file是否
保存 图像文件。启用 此 选项 会 将 捕获 的 图像 保存 为 文件。
-F, --format设置
图像格式,如 YUYV、NV12 等,需 与 实际 UVC Camera 所 支持 格式 一致。
-l, --loop_cnt <num>设置
采集 循环 的 次数(即 捕获 多少 帧 图像)。
-H, --height <px>设置
图像 的 高度(单位 为 像素)。
-W, --width <px>设置
图像 的 宽度(单位 为 像素)。
-E, --isp_info显示 ISP exposure 和 white balance 信息。
-H, --help显示
帮助 信息。
示例:
配置
一条 uvc camera 视频 通路,使用video0,指定 格式 YUYV,保存 5 帧 采集 到 的 图像。
./uvc_capture_sample -i 0 -l 5 -W 1920 -H 1080 -F YUYV -d
配置
一条 uvc camera 视频 通路,使用video0,指定 格式 YUYV,保存 5 帧 采集 到 的 图像,并打印 当前 的 exposure 和 white balance 信息。
./uvc_capture_sample -i 0 -l 5 -W 1920 -H 1080 -F YUYV -d -E
运行效果
运行
./uvc_capture_sample -i 0 -l 5 -W 1920 -H 1080 -F YUYV -d
日志
ptc[0].video_id = 0
ptc[0].loop_cnt = 5
ptc[0].pic_width = 1920
ptc[0].pic_height = 1080
ptc[0].pic_format = 6
ptc[0].dump_mask = 1
DEBUG: index = 0, max_num = 24
pipe_num:0
TestContext[0] create pthread success
loop_cnt: 5
open device: /dev/video0 (fd=3)
     driver: uvcvideo
       card: FHD Camera Microphone: FHD Came
    version: 6.1.83
   all caps: 84a00001
device caps: 04200001
 0: Motion-JPEG 0x47504a4d 0x1
...
filedump(/userdata/yuv_dump/isp_5_s0_c0_b1_f0_005838.yuv, size(4147200) is successed
loop cnt use up
pipe(0)Test thread 281473524101408---join done.
------ Test case uvc_capture_sample done  ------
3.15.13. mp4_decode_and_display
3.15.13.1. 功能概述
mp4_decode_and_display 示例
并且
注意:
必须
接入 HDMI 显示器,并且 HDMI 显示器 要 支持 MP4 中 视频文件 的 分辨率 由于
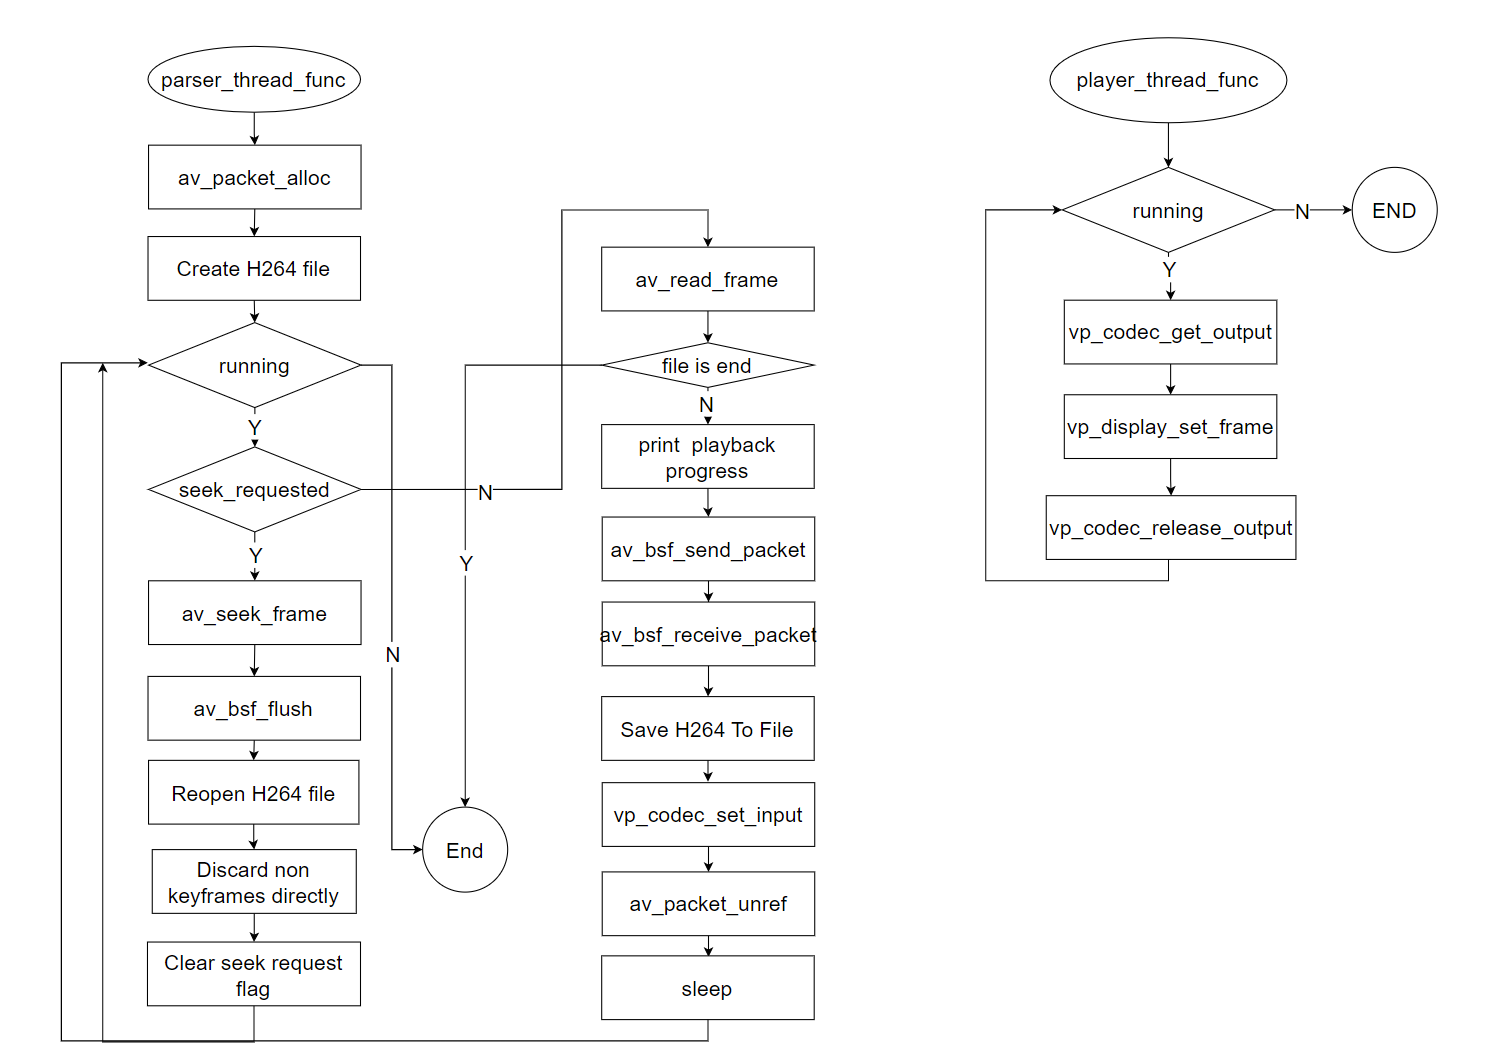
解码器 只能 从 关键帧 开始 解码,所以 当 指定 的 位置 不是 关键帧 时,会 从 指定 位置 附近 选择 合适 的 位置 开始 播放
软件架构说明
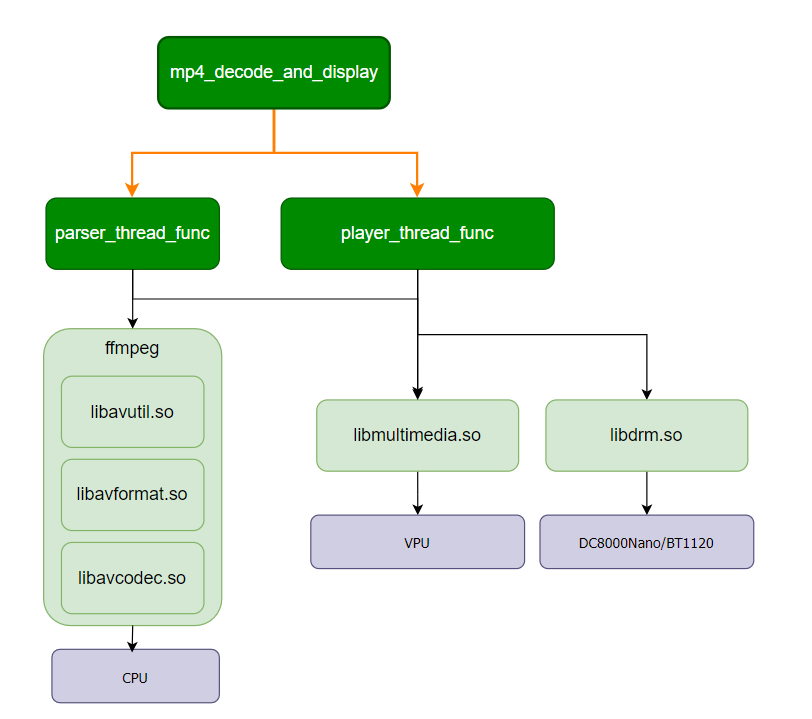
数据流说明

代码位置及目录结构
代码
位置 app/samples/platform_samples/sample_pipeline/mp4_decode_and_display目录
结构
mp4_decode_and_display
.
├── Makefile
├── codec_helper.c
├── codec_helper.h
├── mp4_decode_and_display.c
├── uthash.h
├── vp_codec.c
├── vp_codec.h
├── vp_display.c
└── vp_display.h
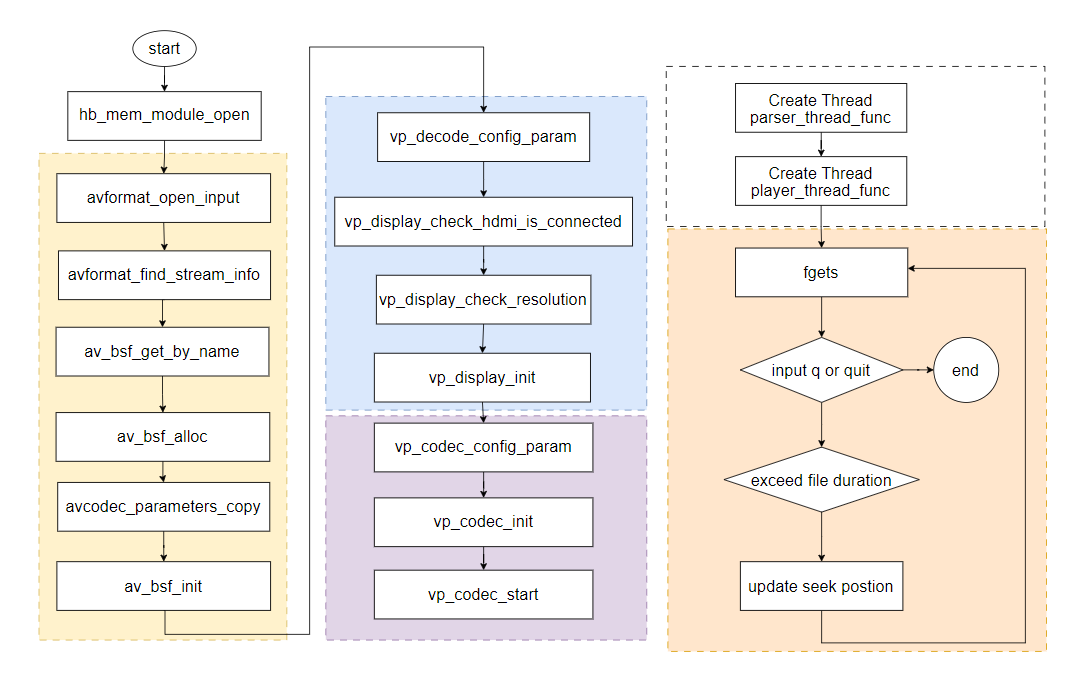
API 流程说明
3.15.13.2. 编译部署
编译
进入 mp4_decode_and_display 目录,执行
make编译输出
成果 物是 mp4_decode_and_display 源码 目录 下 的 mp4_decode_and_display详细
程序 编译 方式 请 查阅 编译 方法 章节
程序部署
把 mp4_decode_and_display 上chmod +x mp4_decode_and_display命令
3.15.13.3. 运行
运行
MP4 格式
的 视频文件 HDMI 显示
屏幕,并且 显示 屏幕 要 支持 MP4 视频文件 中 视频 的 分辨率
程序运行方法
直接./mp4_decode_and_display 可以
程序参数选项说明
./mp4_decode_and_display
Usage: ./mp4_decode_and_display <input_mp4_file>
Example: ./mp4_decode_and_display input.mp4
参数
input_mp4_file: 指定 MP4 文件
运行效果
mp4_decode_and_display 执行
HDMI 显示屏
中 会 显示 MP4 视频文件 中 的 视频 从
最近 指定 的 播放 位置,开始 保存 H264 或 H265 的 裸码 流 到 文件 output.h264 或 output.h265 命令行
输入 数字 可以 指定 播放 的 位置 输入 q 或 quit 退出
程序 或者 文件 播放 完毕 后 输入 回车 也 会 退出 程序
./mp4_decode_and_display ./20250829-172933.mp4
[MP4_PLAYER]Printf video info:
[MP4_PLAYER] Input file: ./20250829-172933.mp4
[MP4_PLAYER] Output file:
[MP4_PLAYER] Codec: h264
[MP4_PLAYER] Duration: 136 seconds
[MP4_PLAYER] Total frames: 3146
[MP4_PLAYER] Video FPS: 23.00 or TotalFrames/Duration: 23.13
[MP4_PLAYER] Codec: H264
[MP4_PLAYER] Resolution: 1920x1080


[MP4_PLAYER] hdmi is connected.
[Decoder] Decode idx: 0, init successful
[MP4_PLAYER] Init video decode instance 0 successful
[Decoder] Decode idx: 0, start successful
[MP4_PLAYER] Parser thread start.


[MP4_PLAYER] MP4 decoder started. Enter seek position in seconds (or 'q' to quit):
[MP4_PLAYER] Example: 30 (seek to 30 seconds)[MP4_PLAYER] Seek to (seconds):

[MP4_PLAYER] Player thread start.
[MP4_PLAYER] playback progress: 0/136 s
[MP4_PLAYER] playback progress: 1/136 s
[MP4_PLAYER] playback progress: 2/136 s
[MP4_PLAYER] playback progress: 3/136 s
[MP4_PLAYER] playback progress: 4/136 s
[MP4_PLAYER] playback progress: 5/136 s
q
[MP4_PLAYER] Quitting...
[MP4_PLAYER] Parse thread finished
[MP4_PLAYER] Player thread finished

DRM resources cleaned up.
[MP4_PLAYER] MP4 decoder stopped
3.15.14. single_pipe_vin_isp_vse_gpu2d
3.15.14.1. 功能概述
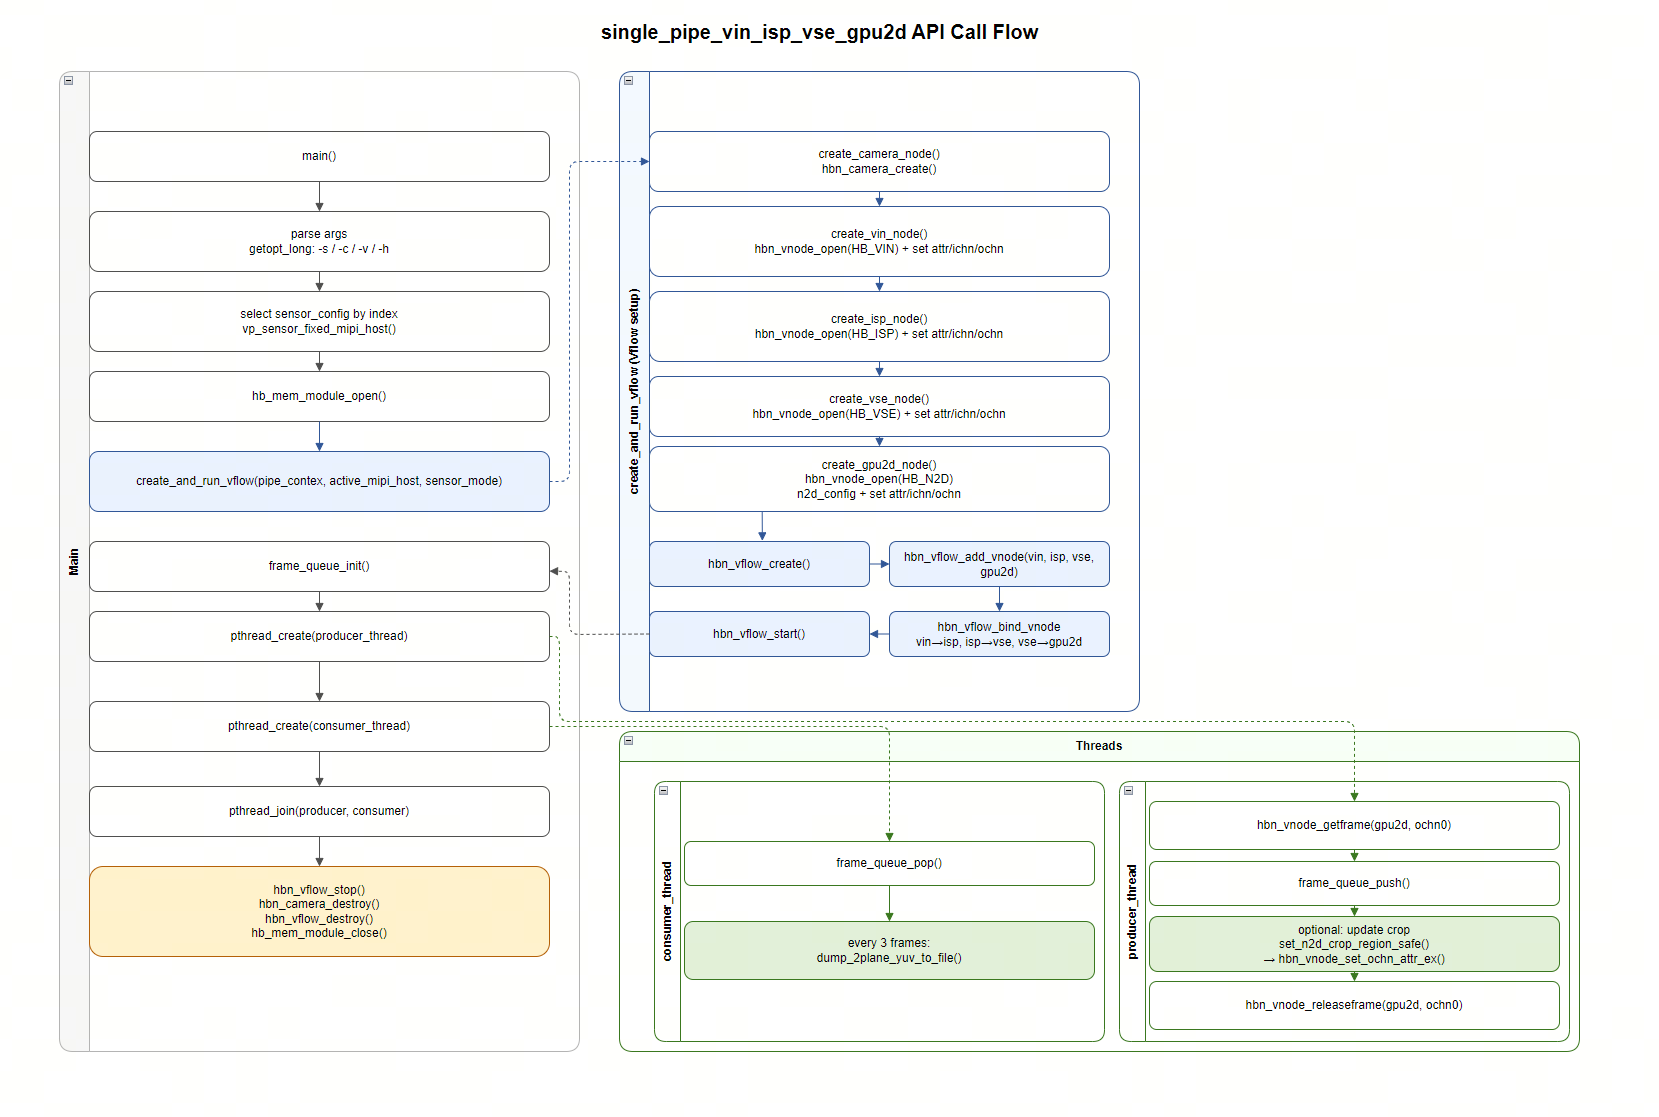
single_pipe_vin_isp_vse_gpu2d 是Sensor → VIN → ISP → VSE → GPU2D 的
程序
经 VIN、ISP、VSE 模块
完成 信号处理; 使用 GPU2D 模块
执行 图像 裁剪(Crop)与 缩放; 最终
通过 队列 处理 将 NV12 图像 保存 为 .yuv 文件。
软件架构说明
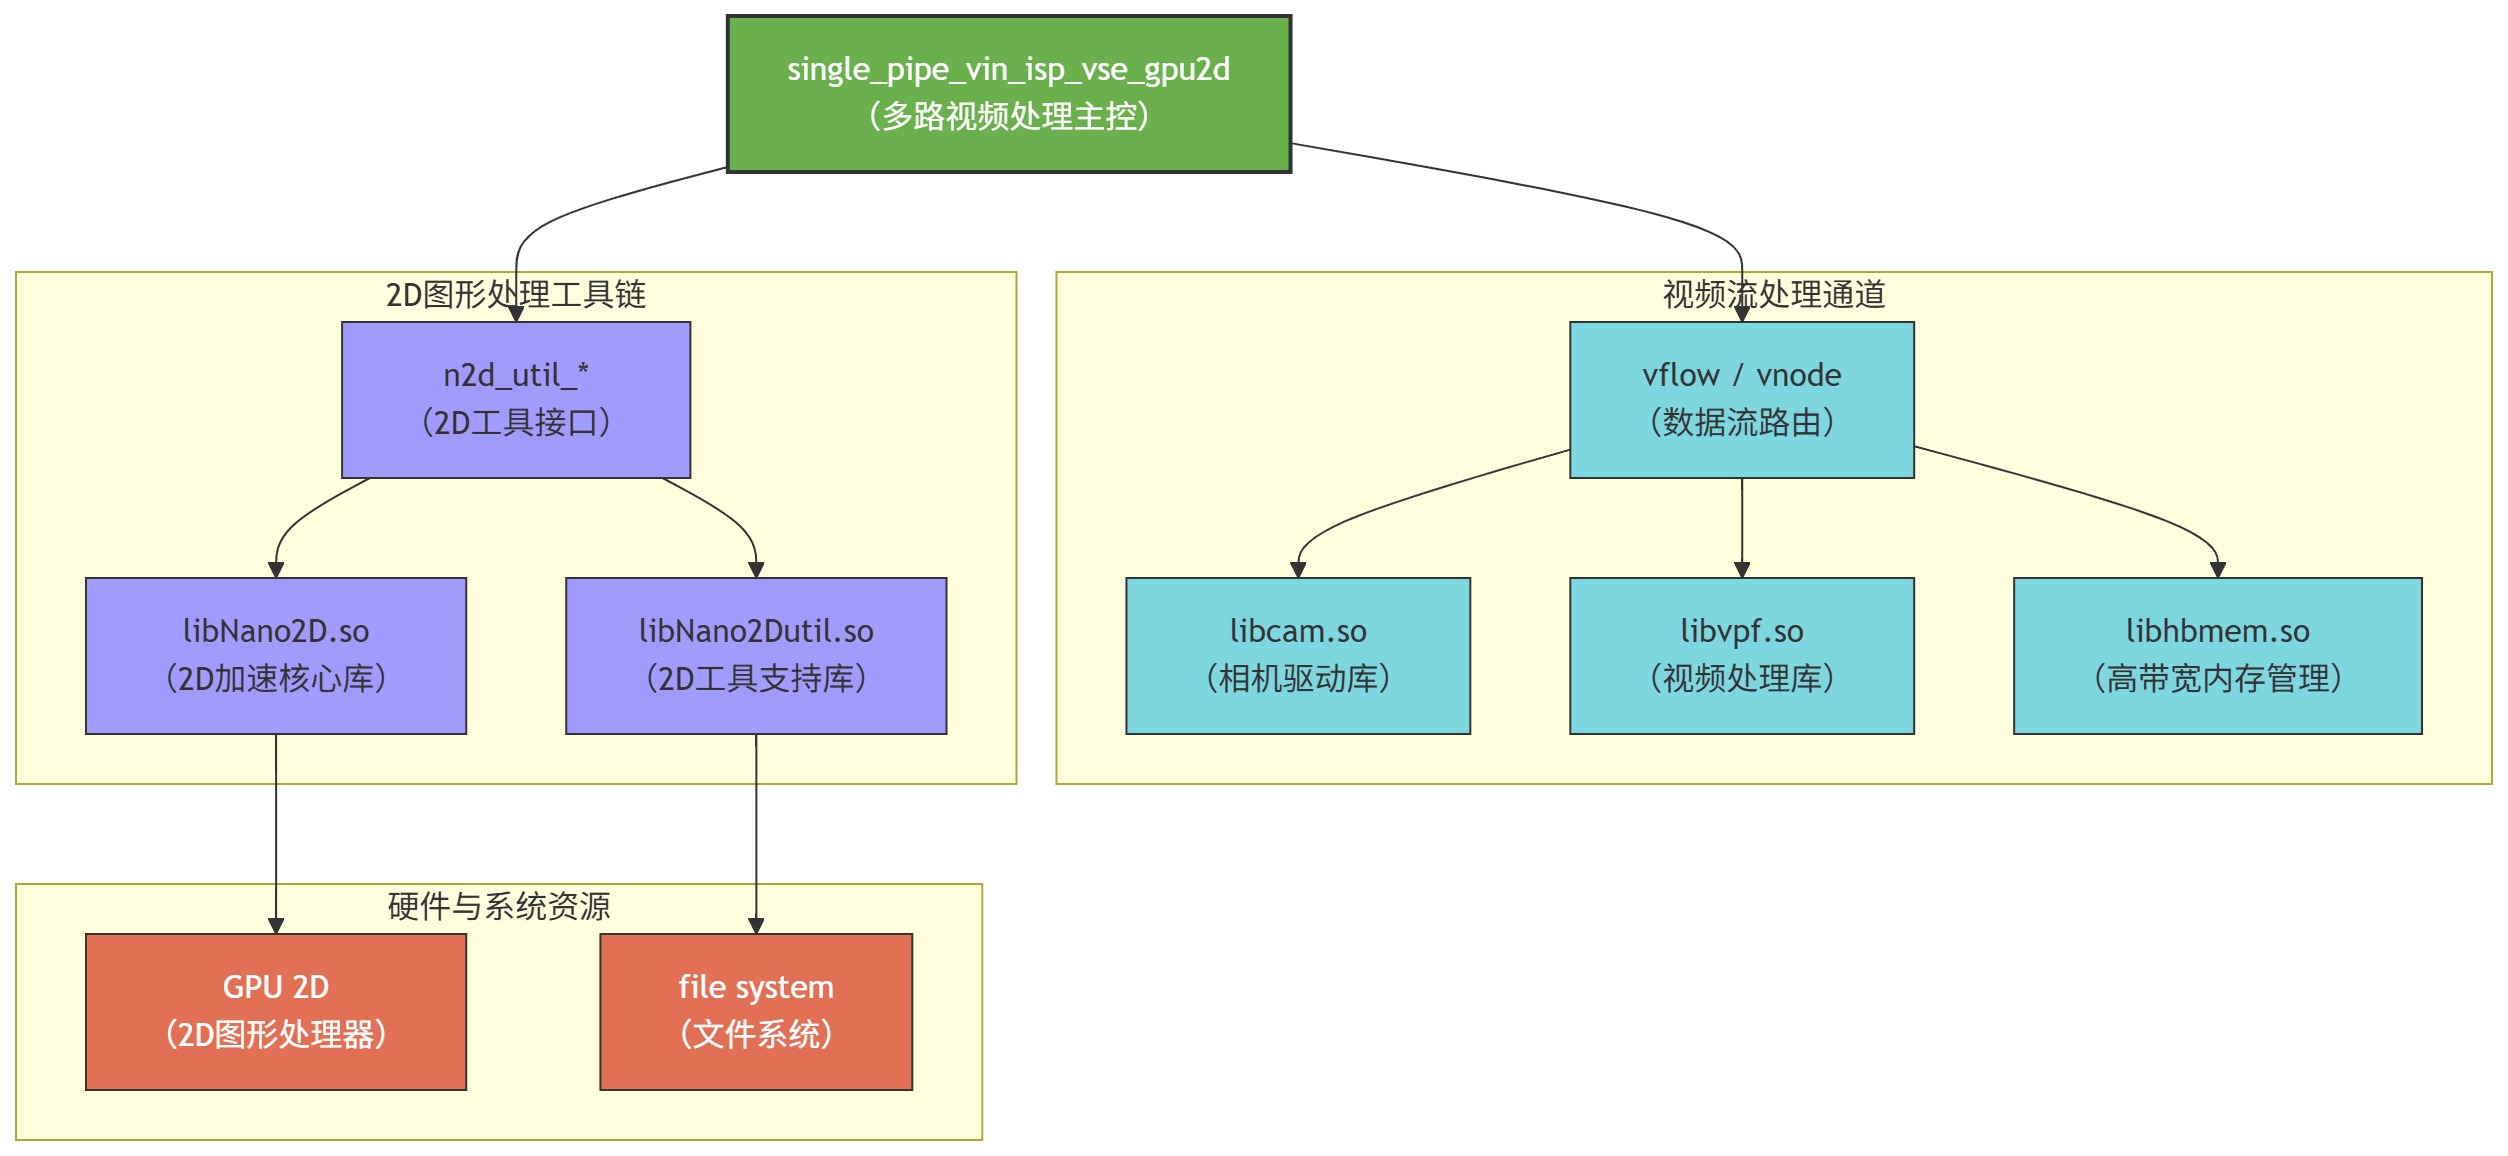
数据流说明

代码位置及目录结构
代码
位置 app/samples/platform_samples/sample_pipeline/single_pipe_vin_isp_vse_gpu2d目录
结构
single_pipe_vin_isp_vse_gpu2d
├── Makefile
├── single_pipe_vin_isp_vse_gpu2d
└── single_pipe_vin_isp_vse_gpu2d.c
API 流程说明
3.15.14.2. 编译部署
编译
进入 single_pipe_vin_isp_vse_gpu2d 目录,执行
make编译输出
成果 物是 single_pipe_vin_isp_vse_gpu2d 源码 目录 下 的 single_pipe_vin_isp_vse_gpu2d详细
程序 编译 方式 请 查阅 编译 方法 章节
程序部署
把 single_pipe_vin_isp_vse_gpu2d 上chmod +x single_pipe_vin_isp_vse_gpu2d命令
3.15.14.3. 运行
程序运行方法
直接./single_pipe_vin_isp_vse_gpu2d 可以
程序参数选项说明
Usage: ./single_pipe_vin_isp_vse_gpu2d [OPTIONS]
Options:
  -s <sensor_index>             Specify sensor index
  -v                            Enable verbose mode
  -c <channel_type>             Specify channel type: vo and vf and io and if, default: vf:if
                Support both individual configuration and combined configuration.
                The individual configuration supports four types:
                                1. vo: vin online isp
                                2. vf: vin offline isp
                                3. io: isp online vse
                                4. if: isp offline vse
                The combination configuration supports four types:
                                1. vo:io  vin online isp + isp online vse
                                2. vo:if  vin online isp + isp offline vse
                                3. vf:io  vin offline isp + isp online vse
                                4. vf:if  vin offline isp + isp offline vse
  -h    Show help message
-s <sensor_index>传感器
索引(必选):整数 类型,对应 vp_show_sensors_list()打印出来 的 sensor 列表。
-c <channel_type>指定 VIN/ISP/VSE 的
在线/离线 组合 方式,默认 vf:if。支持
单独 配置: vo/vf/io/if支持
组合 配置: vo:io/vo:if/vf:io/vf:if
-v打开 verbose 模式,会
打印 更 多 每 帧 相关 日志。
-h显示
帮助 信息 并 退出。
运行效果
本single_pipe_vin_isp_vse_gpu2d
运行
./single_pipe_vin_isp_vse_gpu2d -s 30
日志
root@buildroot:/userdata/app_test# ./single_pipe_vin_isp_vse_gpu2d -s 30
Verbose: 0
Using index:30  sensor_name:imx219-1920x1080-30fps  config_file:linear_1920x1080_raw10_30fps_2lane.c
[INFO] RDK board_id is 0x0503, so skip csi test for index 1 and index 3
mipi mclk is not configed.
Searching camera sensor on device: /proc/device-tree/soc/cam/vcon@0 i2c bus: 6 mipi rx phy: 0
INFO: Found sensor_name:imx219-1920x1080-30fps on mipi rx csi 0, i2c addr 0x10, config_file:linear_1920x1080_raw10_30fps_2lane.c
        Sensor name: imx219-1920x1080-30fps
        Active mipi host: 0
Connection method from VIN to ISP: vin offline isp
Connection method from VIN to ISP: isp offline vse.

csi0 ignore mclk ex attr, because not config mclk.
hbn_vnode_set_ochn_attr: 1920x1080
GPU2D input  1920x1080 stride=1920
GPU2D output 1920x1080 stride=1920
pthread_create
Running... Press Ctrl+C to exit
Saved frame to ./imx219-1920x1080-30fps_1920x1080_frameid0_ts_6076777994522.yuv ok
Saved frame to ./imx219-1920x1080-30fps_1920x1080_frameid3_ts_6076876729480.yuv ok
Saved frame to ./imx219-1920x1080-30fps_1920x1080_frameid6_ts_6076975461272.yuv ok
Saved frame to ./imx219-1920x1080-30fps_1920x1080_frameid9_ts_6077074194939.yuv ok
Saved frame to ./imx219-1920x1080-30fps_1920x1080_frameid12_ts_6077172930814.yuv ok
Saved frame to ./imx219-1920x1080-30fps_1920x1080_frameid15_ts_6077271669189.yuv ok
Saved frame to ./imx219-1920x1080-30fps_1920x1080_frameid18_ts_6077370402606.yuv ok
Saved frame to ./imx219-1920x1080-30fps_1920x1080_frameid21_ts_6077469136064.yuv ok
Saved frame to ./imx219-1920x1080-30fps_1920x1080_frameid24_ts_6077567869564.yuv ok
Saved frame to ./imx219-1920x1080-30fps_1920x1080_frameid27_ts_6077666604439.yuv ok
^CSaved frame to ./imx219-1920x1080-30fps_1920x1080_frameid30_ts_6077765336439.yuv ok
pthread_join success
...
运行
ls -alh
drwxr-xr-x  2 root root  36K Jan  1 06:29 .
drwxr-xr-x 16 root root 4.0K Jan  1 01:13 ..
-rw-r--r--  1 root root 3.0M Jan  1 06:29 imx219-1920x1080-30fps_1920x1080_frameid0_ts_6076777994522.yuv
-rw-r--r--  1 root root 3.0M Jan  1 06:29 imx219-1920x1080-30fps_1920x1080_frameid12_ts_6077172930814.yuv
-rw-r--r--  1 root root 3.0M Jan  1 06:29 imx219-1920x1080-30fps_1920x1080_frameid15_ts_6077271669189.yuv
-rw-r--r--  1 root root 3.0M Jan  1 06:29 imx219-1920x1080-30fps_1920x1080_frameid18_ts_6077370402606.yuv
-rw-r--r--  1 root root 3.0M Jan  1 06:29 imx219-1920x1080-30fps_1920x1080_frameid21_ts_6077469136064.yuv
-rw-r--r--  1 root root 3.0M Jan  1 06:29 imx219-1920x1080-30fps_1920x1080_frameid24_ts_6077567869564.yuv
-rw-r--r--  1 root root 3.0M Jan  1 06:29 imx219-1920x1080-30fps_1920x1080_frameid27_ts_6077666604439.yuv
-rw-r--r--  1 root root 3.0M Jan  1 06:29 imx219-1920x1080-30fps_1920x1080_frameid30_ts_6077765336439.yuv
3.15.15. single_pipe_vin_isp_vse_vo
3.15.15.1. 功能概述
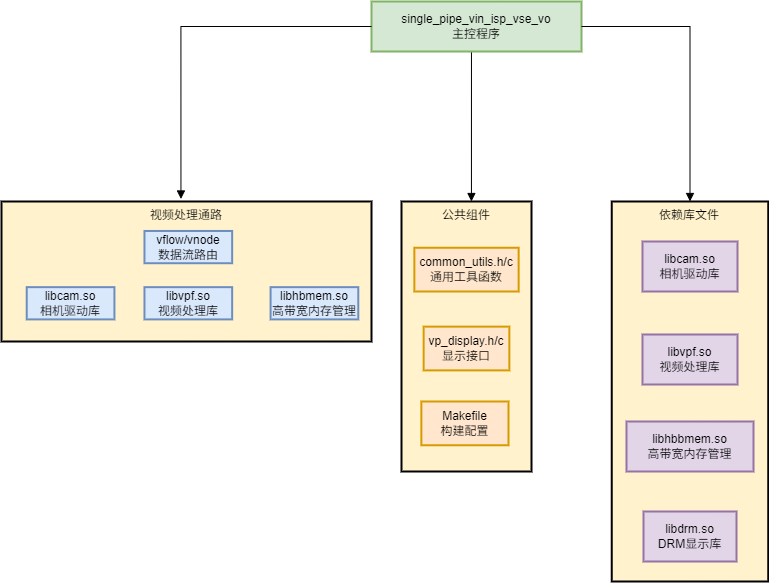
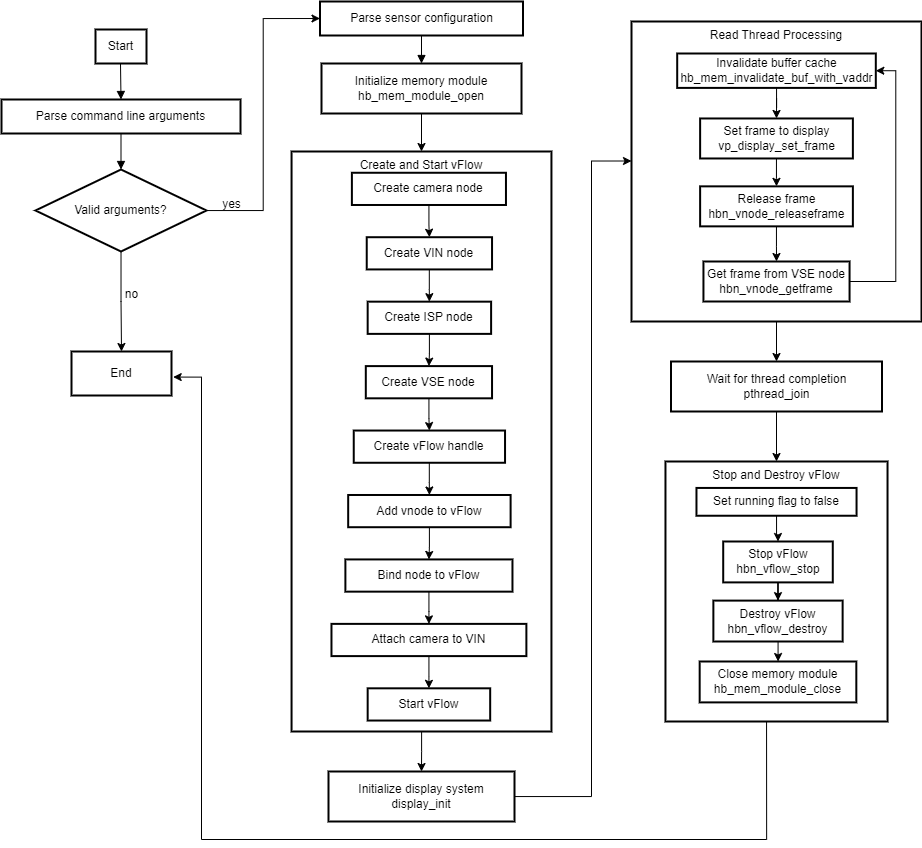
single_pipe_vin_isp_vse_vo 是Sensor → VIN → ISP → VSE → HDMI 显示 的
程序
经 VIN、ISP、VSE 模块
完成 信号处理; 使用 DRM 接口 (vp_display) 在 HDMI 上
实时 显示 图像; 自动
匹配 显示 设备 支持 的 分辨率;若 当前 分辨率 不 在 支持 列表 中,程序 将 尝试 查找 最 接近 的 可用 分辨率;若 仍 无法 匹配,则 终止 运行 并 提示 错误信息。
软件架构说明
数据流说明

代码位置及目录结构
代码
位置 app/samples/platform_samples/sample_pipeline/single_pipe_vin_isp_vse_vo目录
结构
single_pipe_vin_isp_vse_vo
├── Makefile
├── single_pipe_vin_isp_vse_vo
└── single_pipe_vin_isp_vse_vo.c
API 流程说明
3.15.15.2. 编译部署
编译
进入 single_pipe_vin_isp_vse_vo 目录,执行
make编译输出
成果 物是 single_pipe_vin_isp_vse_vo 源码 目录 下 的 single_pipe_vin_isp_vse_vo详细
程序 编译 方式 请 查阅 编译 方法 章节
程序部署
把 single_pipe_vin_isp_vse_vo 上chmod +x single_pipe_vin_isp_vse_vo命令
3.15.15.3. 运行
程序运行方法
在
modprobe panel-jc-050hd134
modprobe galcore
modprobe vio_n2d
modprobe lontium_lt8618
modprobe vs-x5-syscon-bridge
modprobe vs_drm
直接./single_pipe_vin_isp_vse_vo 可以
程序参数选项说明
Usage: ./single_pipe_vin_isp_vse_vo [OPTIONS]
Options:
  -s <sensor_index>             Specify sensor index
  -c <channel_type>             Specify channel type: vo and vf and io and if, default: vf:if
                Support both individual configuration and combined configuration.
                The individual configuration supports four types:
                                1. vo: vin online isp
                                2. vf: vin offline isp
                                3. io: isp online vse
                                4. if: isp offline vse
                The combination configuration supports four types:
                                1. vo:io  vin online isp + isp online vse
                                2. vo:if  vin online isp + isp offline vse
                                3. vf:io  vin offline isp + isp online vse
                                4. vf:if  vin offline isp + isp offline vse
  -h    Show help message
-s --sensor <sensor_index>sensor (必选):传感器
索引,整数 类型,对应 系统 中 的 传感器 列表。
-c <channel_type>channel_type (可
选):指定 VIN 和 ISP 之间,以及 ISP 和 VSE 之间 的 连接 方式,分别 支持 Offline 和 Online 的 连接 方式
-h, --help显示
帮助 信息。
运行效果
本single_pipe_vin_isp_vse_vo
运行
./single_pipe_vin_isp_vse_vo -s 3
日志
Using index:3  sensor_name:sc230ai-30fps  config_file:linear_1920x1080_raw10_30fps_1lane.c
mipi mclk is configed.
Searching camera sensor on device: /proc/device-tree/soc/cam/vcon@0 i2c bus: 4 mipi rx phy: 0
INFO: Found sensor_name:sc230ai-30fps on mipi rx csi 0, i2c addr 0x30, config_file:linear_1920x1080_raw10_30fps_1lane.c
hbn_vnode_set_ochn_attr: 1920x1080
[   59.491765] hobot-sif 3d020000.sif: sif frame size incorrect, hsize count:0x0 vsize count:0x438 for inst:0
Checking resolutions:
Mode 0: 2560x1440 @ 60Hz
Mode 1: 3840x2160 @ 30Hz
Mode 2: 3840x2160 @ 30Hz
Mode 3: 3840x2160 @ 25Hz
Mode 4: 3840x2160 @ 24Hz
Mode 5: 3840x2160 @ 24Hz
Mode 6: 2560x1440 @ 100Hz
Mode 7: 2560x1440 @ 75Hz
Mode 8: 1920x1080 @ 60Hz
hdmi support resolution 1920*1080
------------------------------------------------------
Plane 0:
  Plane ID: 64
  Src W: 1920
  Src H: 1080
  CRTC X: 0
  CRTC Y: 0
  CRTC W: 1920
  CRTC H: 1080
  Format: NV12
  Z Pos: -1
  Alpha: -1
  Pixel Blend Mode: -1
  Rotation: -1
  Color Encoding: -1
  Color Range: -1
------------------------------------------------------
Setting up KMS...
Checking mode 2560x1440@60.00Hz
Checking mode 3840x2160@30.00Hz
Checking mode 3840x2160@29.97Hz
Checking mode 3840x2160@25.00Hz
Checking mode 3840x2160@24.00Hz
Checking mode 3840x2160@23.98Hz
Checking mode 2560x1440@100.00Hz
Checking mode 2560x1440@75.00Hz
Checking mode 1920x1080@60.00Hz
Found resolution match: 1920x1080@60.00Hz
Checking mode 1920x1080@60.00Hz
Checking mode 1920x1080@59.94Hz
Checking mode 1920x1080@60.00Hz
Checking mode 1920x1080@59.94Hz
Checking mode 1920x1080@50.00Hz
Checking mode 1920x1080@50.00Hz
Checking mode 1280x1440@59.91Hz
Checking mode 1680x1050@59.88Hz
Checking mode 1280x1024@75.02Hz
Checking mode 1280x1024@60.02Hz
Checking mode 1440x900@59.90Hz
Checking mode 1280x720@60.00Hz
Checking mode 1280x720@60.00Hz
Checking mode 1280x720@59.94Hz
Checking mode 1280x720@50.00Hz
Checking mode 1024x768@75.03Hz
Checking mode 1024x768@70.07Hz
Checking mode 1024x768@60.00Hz
Checking mode 832x624@74.55Hz
Checking mode 800x600@75.00Hz
Checking mode 800x600@72.19Hz
Checking mode 800x600@60.32Hz
Checking mode 800x600@56.25Hz
Checking mode 720x576@50.00Hz
Checking mode 720x576@50.00Hz
Checking mode 720x480@60.00Hz
Checking mode 720x480@60.00Hz
Checking mode 720x480@59.94Hz
Checking mode 720x480@59.94Hz
Checking mode 640x480@75.00Hz
Checking mode 640x480@72.81Hz
Checking mode 640x480@66.67Hz
Checking mode 640x480@60.00Hz
Checking mode 640x480@59.94Hz
Checking mode 640x480@59.94Hz
Checking mode 720x400@70.08Hz
Using resolution-matched mode: 1920x1080@60.00Hz
vp_display_init ok: 1920x1080 -> 1920x1080
...
程序运行
3.15.16. single_format_convert_gpu2d
3.15.16.1. 功能概述
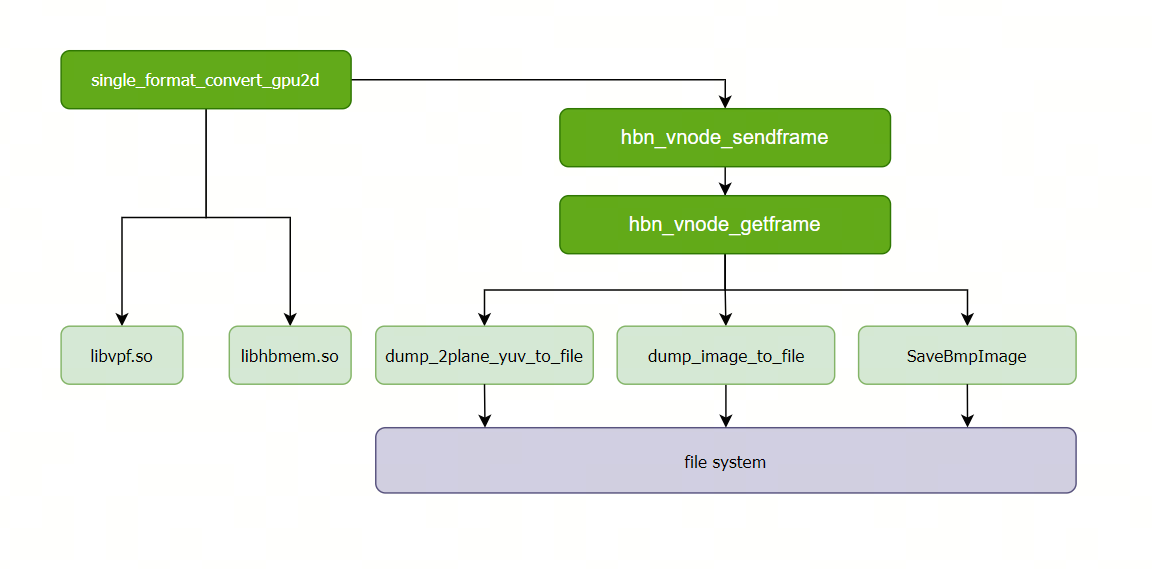
single_format_convert_gpu2d 是
程序
读取
需要 转换 的 图片 文件; 创建
一个2D GPU node,并 创建 和 启动vflow; 向2D GPU node发送数据
和 获取数据; 将
获取 到 的 数据 保存 到 指定 路径。
软件架构说明
代码位置及目录结构
代码
位置 app/samples/platform_samples/sample_pipeline/single_format_convert_gpu2d目录
结构
single_format_convert_gpu2d
├── Makefile
├── bmp.c
├── bmp.h
├── res/nv12_1920x1080.yuv
├── res/yuv422_1920x1080.yuv422
├── single_format_convert_gpu2d
└── single_format_convert_gpu2d.c
API 流程说明
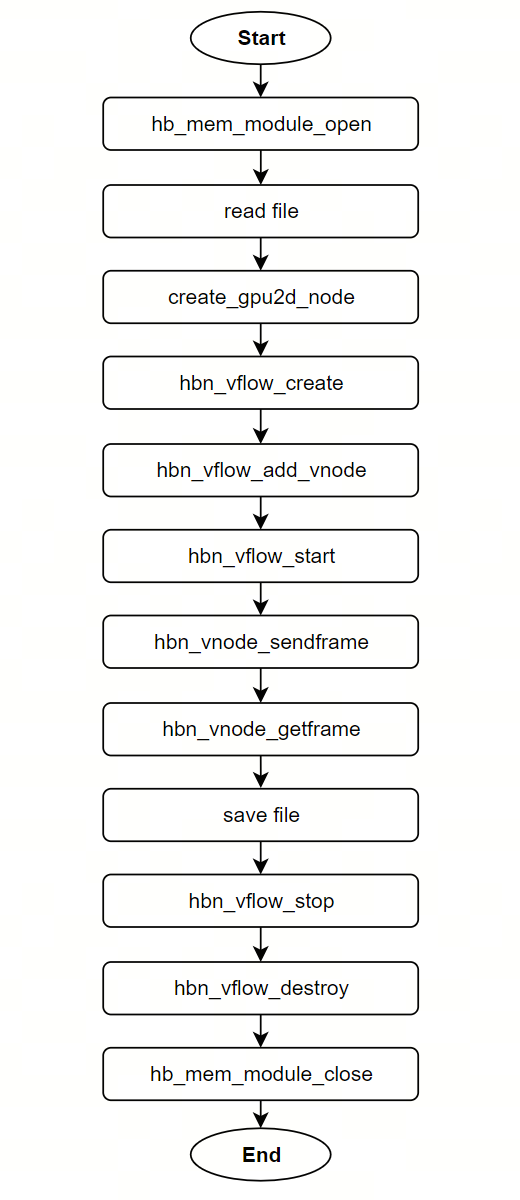
3.15.16.2. 编译部署
编译
进入 single_format_convert_gpu2d 目录,执行
make编译输出
成果 物是 single_format_convert_gpu2d 源码 目录 下 的 single_format_convert_gpu2d详细
程序 编译 方式 请 查阅 编译 方法 章节
程序部署
把 single_format_convert_gpu2d res上chmod +x single_format_convert_gpu2d命令
3.15.16.3. 运行
程序运行方法
直接./single_format_convert_gpu2d -h 可以
程序参数选项说明
Usage: single_format_convert_gpu2d [OPTIONS]
Options:
  -i <input_img_name>       input image name
  -o <output_img_name>      output image name
  -w <image_width>          input image width
  -h <image_height>         input image height
  -j <input_img_format>     intput image format index
  -k <output_img_format>    output image format index
   MEM_PIX_FMT_ARGB    index is 4
   MEM_PIX_FMT_NV12    index is 8
   MEM_PIX_FMT_YUYV422 index is 13
  -h                        Show this help message
Such as: nv12 -> bmp yuv422:
        ./single_format_convert_gpu2d -i ./res/nv12_1920x1080.yuv  -o ./test_nv12_1920x1080.bmp -w 1920 -h 1080 -j 8 -k 3
        ./single_format_convert_gpu2d -i ./res/nv12_1920x1080.yuv  -o ./test_nv12_1920x1080.yuv422 -w 1920 -h 1080 -j 8 -k 13
         yuv422 -> bmp nv12:
        ./single_format_convert_gpu2d -i ./res/yuv422_1920x1080.yuv422 -o ./test_yuv422_1920x1080.bmp -w 1920 -h 1080 -j 13 -k 3
        ./single_format_convert_gpu2d -i ./res/yuv422_1920x1080.yuv422 -o ./test_yuv422_1920x1080.yuv -w 1920 -h 1080 -j 13 -k 8
运行效果
本single_format_convert_gpu2d
运行
./single_format_convert_gpu2d -i ./res/nv12_1920x1080.yuv -o ./test_nv12_1920x1080.bmp -w 1920 -h 1080 -j 8 -k 3
日志
buffer.addr:0xffffaa278000 size:2073600
(read_yuvv_nv12_file):file read(./res/nv12_1920x1080.yuv), y-size(2073600)
input_format is MEM_PIX_FMT_NV12
output_format is MEM_PIX_FMT_ARGB
GPU2D input  1920x1080 stride=1920
GPU2D output 1920x1080 stride=1920
SaveBmpImage ./test_nv12_1920x1080.bmp succ, size=8294400
程序运行
3.15.17. single_pipe_vin_isp_vse_multi_process
3.15.17.1. 功能概述
single_pipe_vin_isp_vse_multi_process 是Sensor → VIN → ISP → VSE 获取 NV12 图像
编码
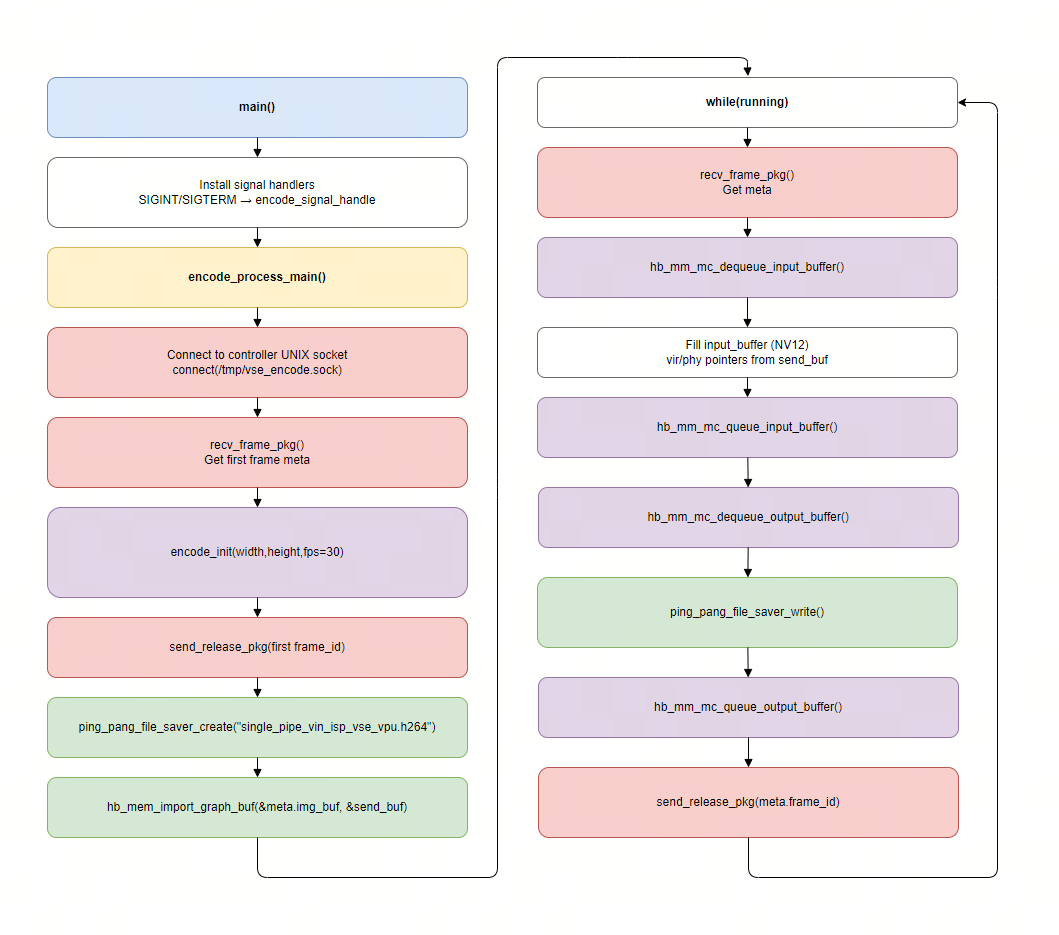
进程 :将 NV12 图像送入 VPU 编码 并 持续 保存 H.264 码流 文件; HDMI 显示
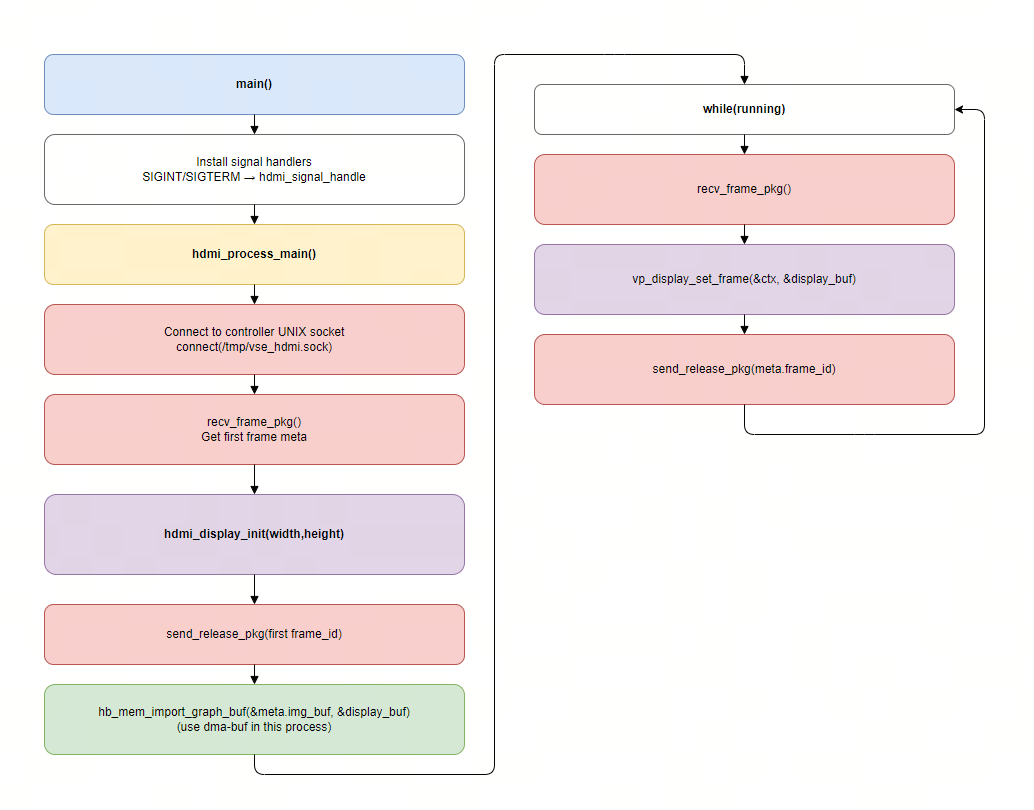
进程 :将 NV12 图像通过 DRM 在 HDMI 显示器 上 实时 显示。
该
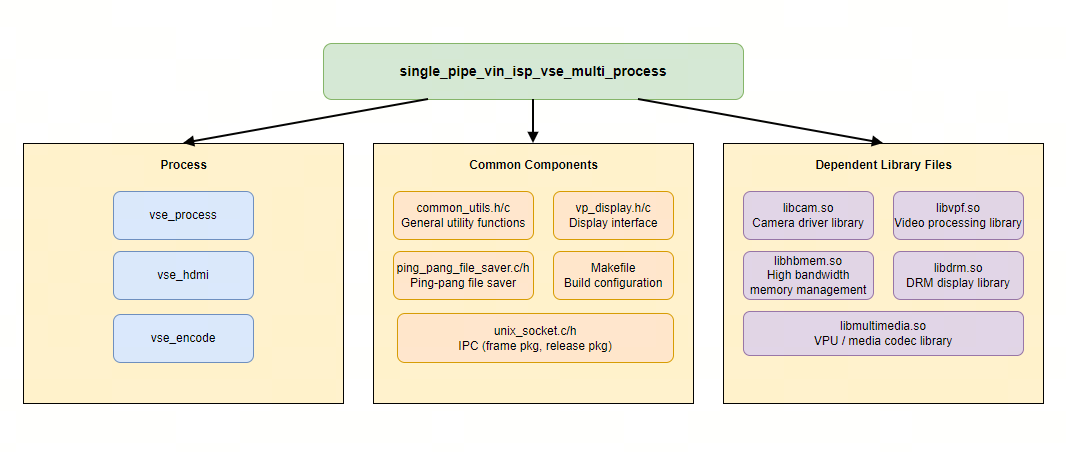
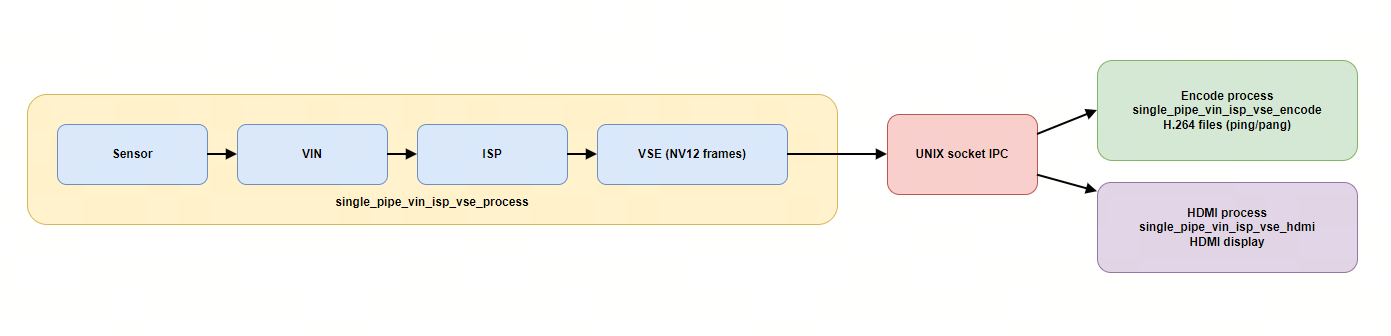
single_pipe_vin_isp_vse_process:主控进程,负责 创建 vflow、从 VSE 获取 帧 并 分 发给 子 进程,同时 接收 子 进程 的 释放 消息; single_pipe_vin_isp_vse_hdmi:显示进程,接收 帧 并 在 HDMI 上 显示; single_pipe_vin_isp_vse_encode:编码进程,接收 帧 并 编码 保存 为 H.264 码流(ping/pang 轮转 文件)。
软件架构说明
数据流说明
3.15.17.2. 函数流程图
VSE进程:single_pipe_vin_isp_vse_process.c
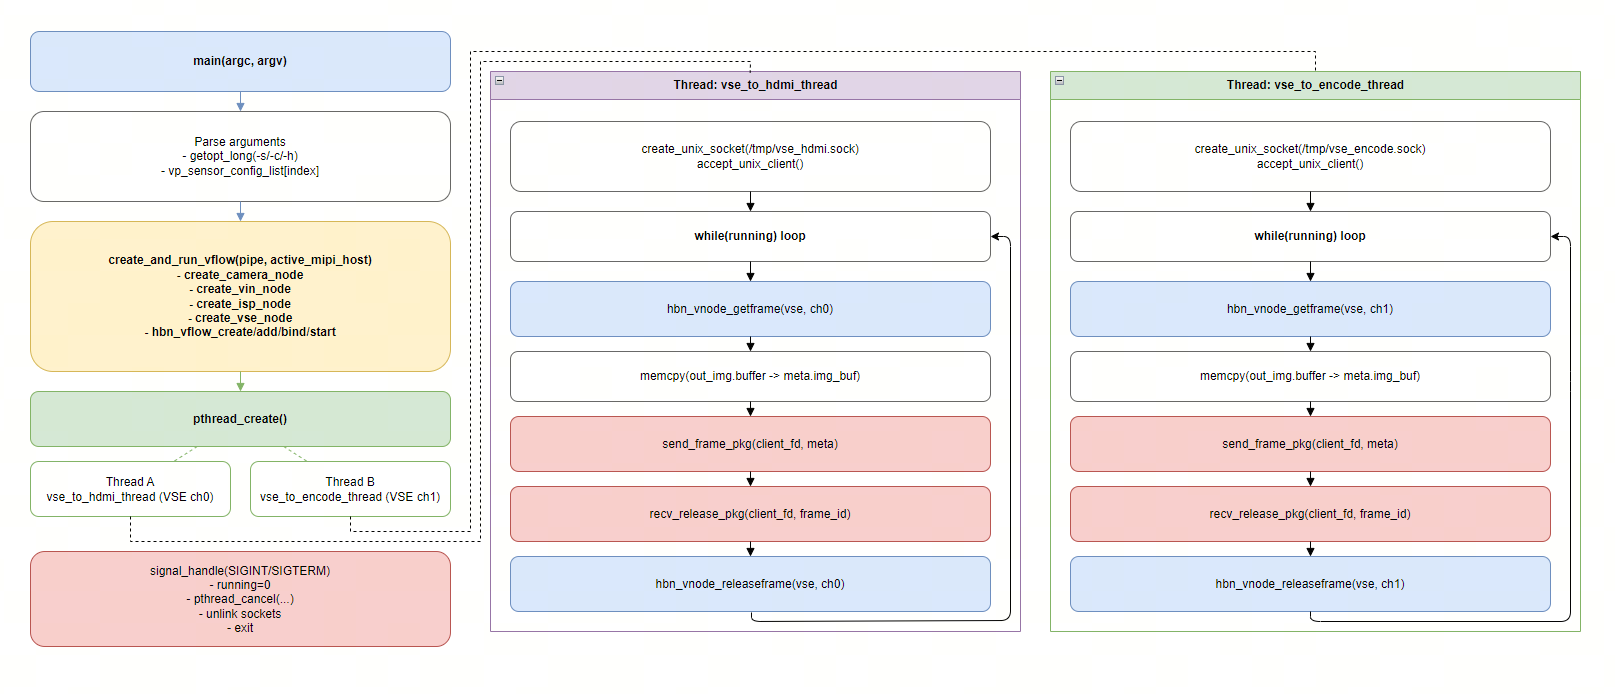
HDMI进程:single_pipe_vin_isp_vse_hdmi.c
编码进程:single_pipe_vin_isp_vse_encode.c
代码位置及目录结构
代码
位置 app/samples/platform_samples/sample_pipeline/single_pipe_vin_isp_vse_multi_process目录
结构
single_pipe_vin_isp_vse_multi_process
├── Makefile
├── single_pipe_vin_isp_vse_process.c
├── single_pipe_vin_isp_vse_encode.c
├── single_pipe_vin_isp_vse_hdmi.c
├── unix_socket.c
├── unix_socket.h
├── ping_pang_file_saver.c
└── ping_pang_file_saver.h
3.15.17.3. 编译部署
编译
进入
single_pipe_vin_isp_vse_multi_process目录,执行make编译输出
成果 物是 该 目录 下 的 3 个 可执行文件: single_pipe_vin_isp_vse_processsingle_pipe_vin_isp_vse_encodesingle_pipe_vin_isp_vse_hdmi
详细
程序 编译 方式 请 查阅 编译 方法 章节
程序部署
把chmod +x single_pipe_vin_isp_vse_* 命令
3.15.17.4. 运行
程序运行方法
在single_pipe_vin_isp_vse_vo 一致):
modprobe panel-jc-050hd134
modprobe galcore
modprobe vio_n2d
modprobe lontium_lt8618
modprobe vs-x5-syscon-bridge
modprobe vs_drm
推荐
启动
主控 进程 single_pipe_vin_isp_vse_process启动HDMI显示
进程 single_pipe_vin_isp_vse_hdmi启动
编码 进程 single_pipe_vin_isp_vse_encode
编码/显示
进程 会 主动 连接 主控 进程 创建 的 socket;若先 启动 编码/显示 进程,会 提示“please start VSE process first”并 退出。
程序参数选项说明
主控single_pipe_vin_isp_vse_process 支持
Usage: ./single_pipe_vin_isp_vse_process [OPTIONS]
Options:
  -s <sensor_index>             Specify sensor index
  -c <channel_type>             Specify channel type: vo and vf and io and if, default: vf:if
                Support both individual configuration and combined configuration.
                The individual configuration supports four types:
                                1. vo: vin online isp
                                2. vf: vin offline isp
                                3. io: isp online vse
                                4. if: isp offline vse
                The combination configuration supports four types:
                                1. vo:io  vin online isp + isp online vse
                                2. vo:if  vin online isp + isp offline vse
                                3. vf:io  vin offline isp + isp online vse
                                4. vf:if  vin offline isp + isp offline vse
  -h    Show help message
-s <sensor_index>传感器
索引(必选):整数 类型,对应 系统 中 的 传感器 列表。
-c <channel_type>指定 VIN/ISP/VSE 的
在线/离线 组合 方式,默认 vf:if。
-h显示
帮助 信息 并 退出。
运行效果
本single_pipe_vin_isp_vse_multi_process。
先
启动 主 进程(示例 以 sensor index=3 为例): ./single_pipe_vin_isp_vse_process -s 3
典型
日志 会 包含: Wait encode process connect... Wait HDMI process connect...
在
另 一个 终端 启动 HDMI 显示 进程: ./single_pipe_vin_isp_vse_hdmi
连接
成功 后,HDMI 显示器 会 实时 显示 来自 VSE 的 图像,同时 终端 会 输出 类似 日志: HDMI display frame success: id=..., resolution=...x...
在
另 一个 终端 启动 编码 进程: ./single_pipe_vin_isp_vse_encode
编码
进程 连接 成功 后 会 开始 打印 接收 帧 信息,并 在 当前目录 生成 ping/pang 轮转 的 H.264 码流 文件: ping_single_pipe_vin_isp_vse_vpu.h264
停止Ctrl+C 退出;主控/tmp/vse_encode.sock 与 /tmp/vse_hdmi.sock。
3.15.18. single_pipe_vin_isp_vse_bpu
3.15.18.1. 功能概述
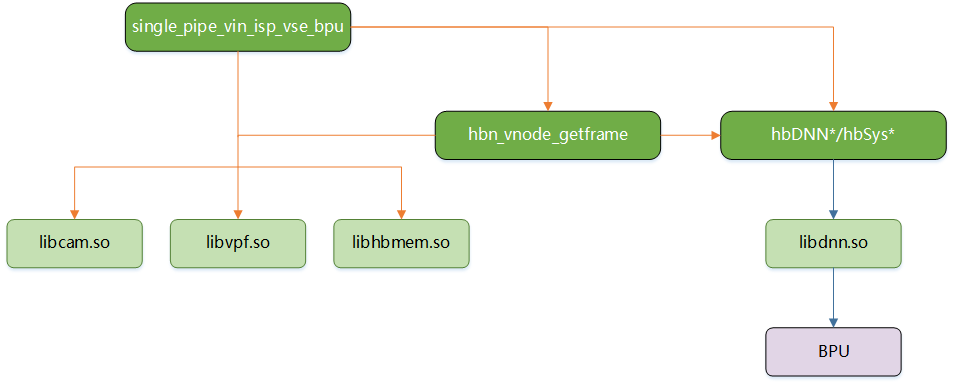
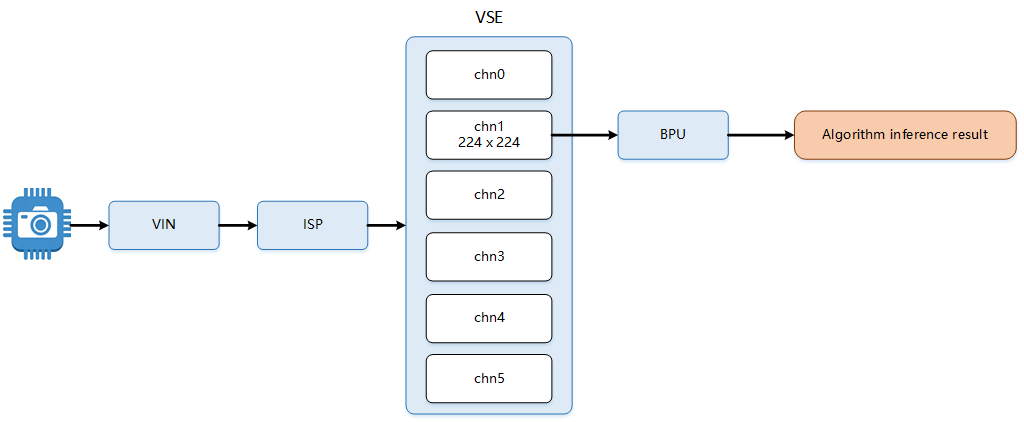
single_pipe_vin_isp_vse_bpu 示例
程序
从 VSE 模块 1 输出 通道 获取 已 完成 缩放 且 分辨率 适配 算法 要求 的 图像 数据 示例
程序 提供 演示 的 算法 是: mobilenetv2
软件架构说明
数据流说明
代码位置及目录结构
代码
位置 app/samples/platform_samples/sample_pipeline/single_pipe_vin_isp_vse_bpu目录
结构
single_pipe_vin_isp_vse_bpu
├── bpu_mobilenetv2.c
├── bpu_mobilenetv2.h
├── Makefile
├── mobilenetv2_image_labels.h
├── model_zoom
│   └── mobilenetv2_224x224_nv12.bin
└── single_pipe_vin_isp_vse_bpu.c
API 流程说明
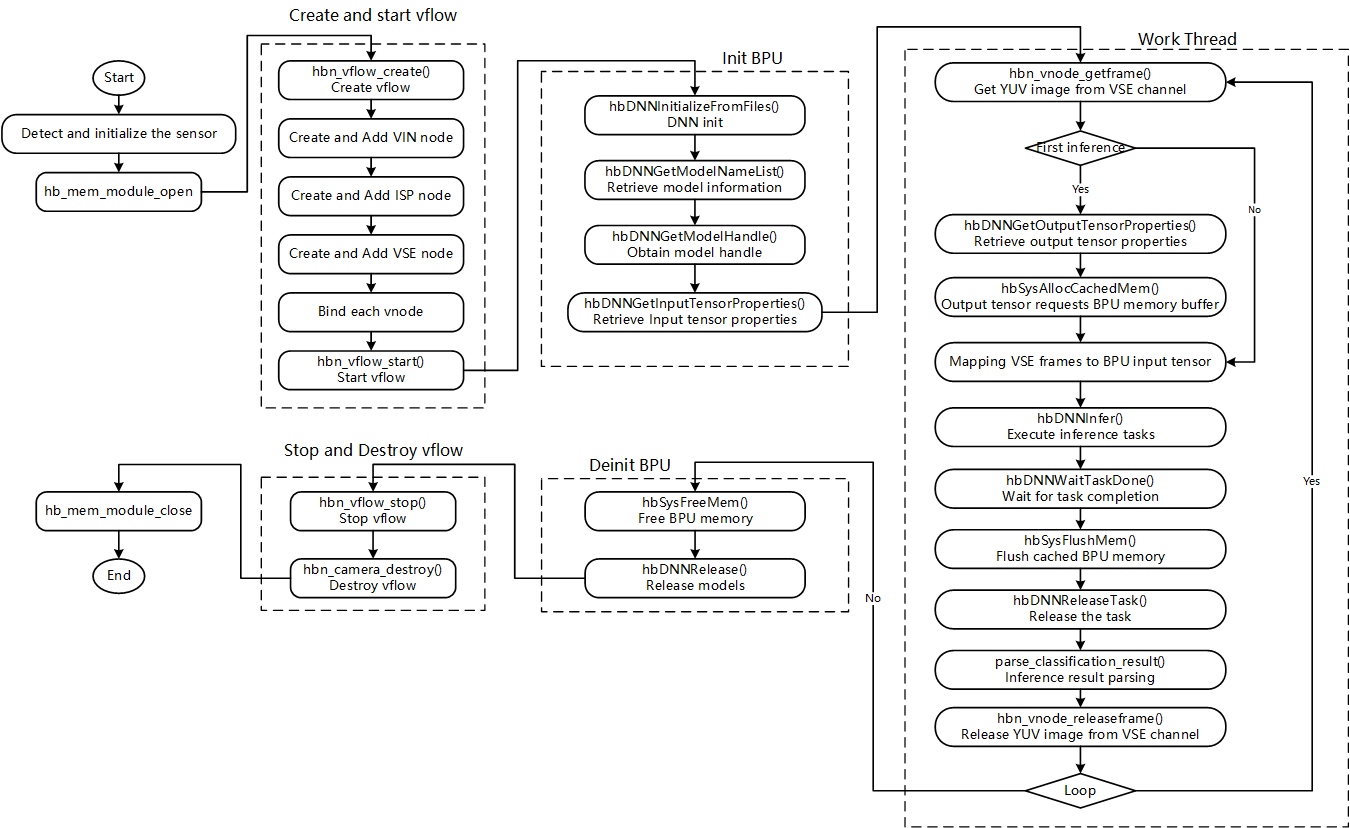
3.15.18.2. 编译部署
编译
进入 single_pipe_vin_isp_vse_bpu 目录,执行
make编译输出
成果 物是 single_pipe_vin_isp_vse_bpu 源码 目录 下 的 single_pipe_vin_isp_vse_bpu详细
程序 编译 方式 请 查阅 编译 方法 章节
程序部署
把 single_pipe_vin_isp_vse_bpu 和 model_zoom 上chmod +x single_pipe_vin_isp_vse_bpu 命令
3.15.18.3. 运行
程序运行方法
直接./single_pipe_vin_isp_vse_bpu 可以
程序参数选项说明
Usage: ./single_pipe_vin_isp_vse_bpu [OPTIONS]
Options:
  -s <sensor_index>             Specify sensor index
  -c <channel_type>             Specify channel type: vo and vf and io and if, default: vf:if
                Support both individual configuration and combined configuration.
                The individual configuration supports four types:
                                1. vo: vin online isp
                                2. vf: vin offline isp
                                3. io: isp online vse
                                4. if: isp offline vse
                The combination configuration supports four types:
                                1. vo:io  vin online isp + isp online vse
                                2. vo:if  vin online isp + isp offline vse
                                3. vf:io  vin offline isp + isp online vse
                                4. vf:if  vin offline isp + isp offline vse
  -h    Show help message
参数
-s: 指定 Camera Sensor 型号和 配置 -c: 指定 VIN 和 ISP 之间,以及 ISP 和 VSE 之间的 连接 方式,分别 支持 Offline 和 Online 的 连接 方式
运行效果
single_pipe_vin_isp_vse_bpu 会mobilenetv2 算法
示例: 以 sc230ai 作为 sensor 输入,执行 ./single_pipe_vin_isp_vse_bpu -s 3 -c vf:if ,实际
Using index:3  sensor_name:sc230ai-30fps  config_file:linear_1920x1080_raw10_30fps_1lane.c
mipi mclk is configed.
Searching camera sensor on device: /proc/device-tree/soc/cam/vcon@0 i2c bus: 4 mipi rx phy: 0
INFO: Found sensor_name:sc230ai-30fps on mipi rx csi 0, i2c addr 0x30, config_file:linear_1920x1080_raw10_30fps_1lane.c

Connection method from VIN to ISP: vin offline isp
Connection method from ISP to VSE: isp offline vse.

hbn_vnode_set_ochn_attr: 0, 1920x1080
hbn_vnode_set_ochn_attr: 1, 224x224
hbn_vnode_set_ochn_attr: 2, 224x224
hbn_vnode_set_ochn_attr: 3, 64x64
hbn_vnode_set_ochn_attr: 4, 480x480
hbn_vnode_set_ochn_attr: 5, 3840x2160
[BPU INFO] model_path[./model_zoom/mobilenetv2_224x224_nv12.bin]
[BPU_PLAT]BPU Platform Version(1.3.6)! soc info(x5)
[HBRT] set log level as 0. version = 3.15.55.0
[DNN] Runtime version = 1.24.5_(3.15.55 HBRT)
[A][DNN][packed_model.cpp:247][Model](1970-01-01,23:08:17.272.839) [HorizonRT] The model builder version = 1.23.0
[W][DNN]bpu_model_info.cpp:491][Version](1970-01-01,23:08:17.300.248) Model: mobilenetv2_224x224_nv12. Inconsistency between the hbrt library version 3.15.55.0 and the model build version 3.15.45.0 detected, in order to ensure correct model results, it is recommended to use compilation tools and the BPU SDK from the same OpenExplorer package.
Model info:
model_name: mobilenetv2_224x224_nv12
Input count: 1
input[0]: tensorLayout: 2 tensorType: 1 validShape:(1, 3, 224, 224, ), alignedShape:(1, 3, 224, 224, )
Output count: 1
Output[0]: tensorLayout: 2 tensorType: 13 validShape:(1, 1000, 1, 1, ), alignedShape:(1, 1000, 1, 1, )
[BPU INFO] model_name_list[0]:mobilenetv2_224x224_nv12
[BPU INFO] packed_dnn_handle: 0x2291840, dnn_handle: 0x22931f0
[BPU INFO] model input NCHW = (1, 3, 224, 224)
[BPU mobilenetv2] [classification result: id=572(goblet(酒杯)), score=0.095]
[BPU mobilenetv2] [classification result: id=794(shower curtain(浴帘)), score=0.149]
[BPU mobilenetv2] [classification result: id=807(solar dish(太阳能板)), score=0.224]
[BPU mobilenetv2] [classification result: id=461(breastplate(盔甲)), score=0.204]
[BPU mobilenetv2] [classification result: id=807(solar dish(太阳能板)), score=0.201]
... ...
... ...
... ...
[BPU mobilenetv2] [classification result: id=897(washer(洗衣机)), score=0.124]
[BPU mobilenetv2] [classification result: id=882(vacuum(吸尘器)), score=0.113]
[BPU mobilenetv2] [classification result: id=897(washer(洗衣机)), score=0.098]
[BPU mobilenetv2] [classification result: id=882(vacuum(吸尘器)), score=0.116]
[BPU mobilenetv2] [classification result: id=897(washer(洗衣机)), score=0.126]
^C[BPU mobilenetv2] [classification result: id=882(vacuum(吸尘器)), score=0.093]
[BPU INFO] bpu_wrap_deinit successful