3.17. Sunrise camera 开发说明
3.17.1. Sunrise camera 系统设计
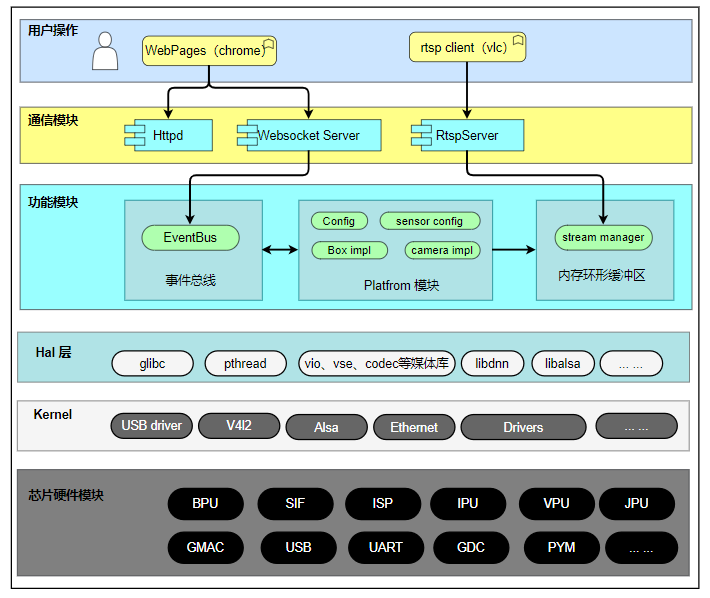
3.17.1.1. 系统框图
Sunrise camera 实现
Sunrise camera 源码
Hal 层
Kernel 版本
软件
3.17.1.2. 微核设计
微核
内核( core )通常
3.17.1.3. 架构优缺点
优点
良好
功能
可
可以
缺点
扩展性
开发
3.17.2. Sunrise camera 架构视图
3.17.2.1. 模块划分
| 模块 | 目录 | 描述 |
|---|---|---|
| 事件 |
communicate | 实现 |
| 公共 |
common | 公共 |
| Camera 模块 | Platform | 芯片 |
| 对外 |
Transport | 设备 |
| 主程序 |
Main | Main 函数 |
顶层
.
├── build.sh			# 当本源码放到 BPS 的 PlatformSDK/unittest 目录下,在 lunch 编译环境后,可以使用本编译脚本
├── common				# 公共库模块代码
├── communicate			# 事件总线模块
├── config				# 编译配置目录
├── docs				# 用户使用文档和开发文档
├── main				# 主入口程序
├── Makefile			# 编译脚本
├── makefile.param		# 编译配置
├── Platform			# Camera 模块,平台、应用场景代码,芯片 IP 相关代码都在本目录下实现
├── start_app.sh	    # 设备上的启动脚本,可以配置成上电自启动
├── Transport			# rtspserver 和 websocket 模块代码实现
└── WebServer			# lighttpd 程序、配置和 web 页面
编译
检查
是否 已经 安装 了 对应 的 交叉 编译 工具链,一般 放在 BSP 资料 包 的 toolchain 目录 下,详细 配置 请 参考 BSP 开发 手册。 在
安装 交叉 编译 工具链 后,可 在 任意 目录 下 执行 make 编译。在 源码 当前目录 会 生成 sunrise_camera 目录。打包 sunrise_camera 目录, WebServer 目录 和 start_app.sh 三个 文件 后 下载 到 设备 上 运行。
3.17.2.2. 事件总线模块( communicate )
概述
事件
当
当
功能描述
模块
插件 静态 插拔 控制 模块 CMD 指令
中转
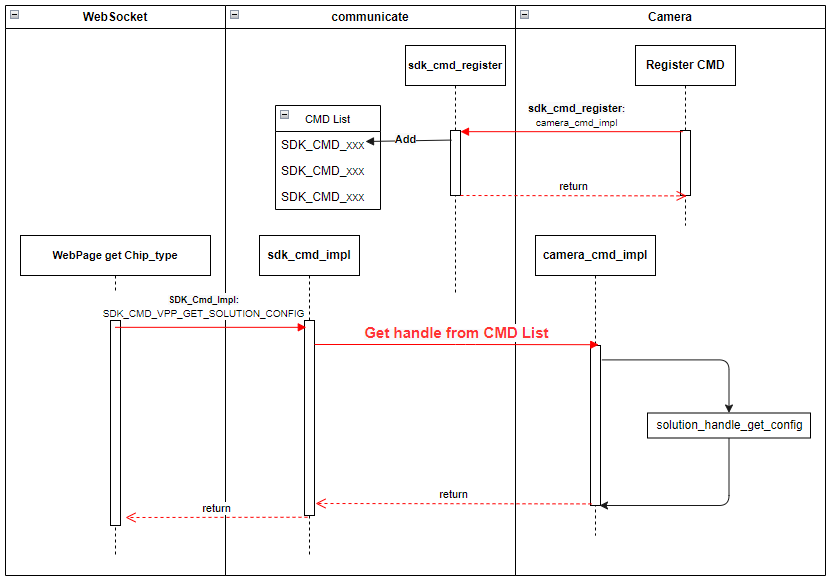
示例:
camera 子
整个
模块代码结构
.
├── include
│   ├── sdk_common_cmd.h			# 定义系统中所有子模块的 CMD
│   ├── sdk_common_struct.h		    # 定义每个 CMD 对应使用到的数据结构
│   └── sdk_communicate.h			# 定义本模块接口函数
├── Makefile
└── src
    └── sdk_communicate.c			# 接口代码实现
接口描述
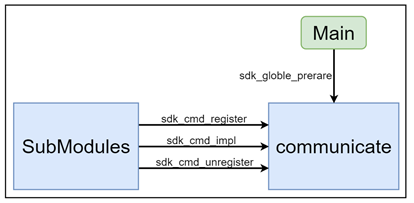
sdk_globle_prerare
各子
每个
示例:
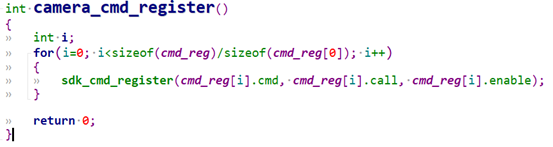
sdk_cmd_register
CMD 注册
sdk_cmd_unregister
CMD 注销
sdk_cmd_impl
子
3.17.2.3. 公共库模块( common )
概述
程序
本
本
功能描述
无
模块代码结构
.
├── Makefile					# 编译脚本
├── makefile.param
└── utils
    ├── include				    # 头文件
    │   ├── aes256.h
    │   ├── base64.h
    │   ├── cJSON_Direct.h
    │   ├── cJSON.h
    │   ├── cmap.h
    │   ├── common_utils.h
    │   ├── cqueue.h
    │   ├── gen_rand.h
    │   ├── lock_utils.h
    │   ├── mqueue.h
    │   ├── mthread.h
    │   ├── nalu_utils.h
    │   ├── sha256.h
    │   ├── stream_define.h
    │   ├── stream_manager.h
    │   └── utils_log.h
    ├── Makefile
    └── src                      # 实现源码
        ├── aes256.c
        ├── base64.c
        ├── cJSON.c
        ├── cJSON_Direct.c
        ├── cmap.c
        ├── common_utils.c
        ├── cqueue.c
        ├── gen_rand.c
        ├── lock_utils.c
        ├── mqueue.c
        ├── mthread.c
        ├── nalu_utils.c
        ├── sha256.c
        ├── stream_manager.c
        └── utils_log.c
3.17.2.4. Platform 模块
概述
模块
本
api_vpp 作为
solution_handle 完成
vpp_camera_impl、 vpp_box_impl 实现
vp_wrap 实现
bpu_wrap 模块
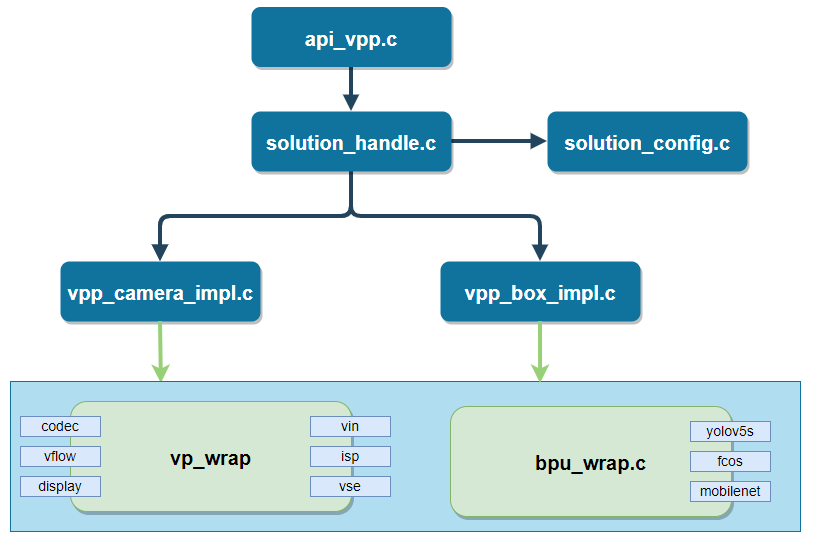
功能描述
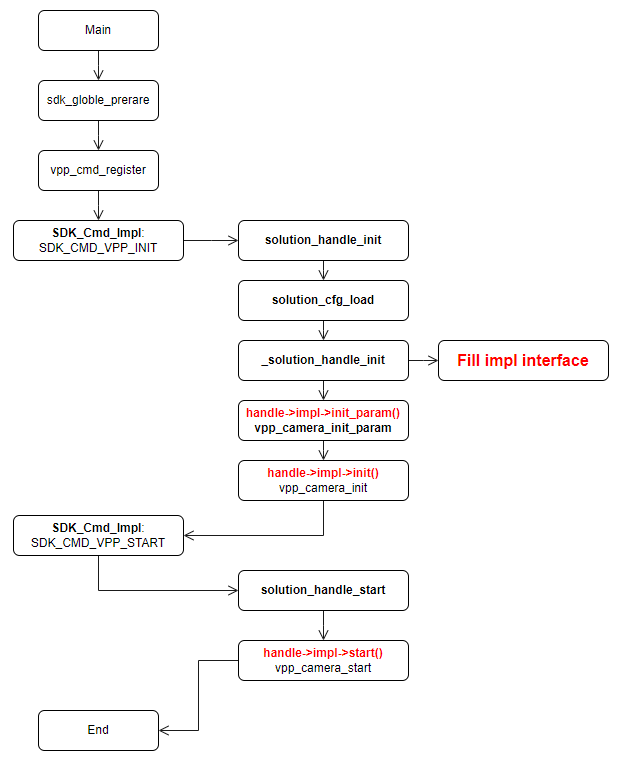
新增
typedef struct vpp_ops {
	int (*init_param)(void); // 初始化 VIN、 VSE、 VENC、 BPU 等模块的配置参数
	int (*init)(void); // sdk 初始化,根据配置初始化
	int (*uninit)(void); // 反初始化
	int (*start)(void); // 启动媒体相关的各个模块
	int (*stop)(void); // 停止
	// 本模块支持的 CMD 都通过以下两个接口简直实现
	int (*param_set)(SOLUTION_PARAM_E type, char* val, unsigned int length);
	int (*param_get)(SOLUTION_PARAM_E type, char* val, unsigned int* length);
} vpp_ops_t;
启动
其他
模块代码结构
代码
.
├── api                                   # CMD 注册
├── bpu_wrap                              # bpu 算法接口使用封装
├── main                                  # CMD 注册的实际功能接口实现
├── Makefile                              # 编译脚本
├── makefile.param                        # 编译配置
├── model_zoom                            # 算法模型仓库
├── test_data                             # 存放测试用的视频码流文件和程序配置文件
├── vpp_impl                              # 应用方案的功能实现
├── vp_sensors -> ../../../vp_sensors/    # Camera Sensor 配置代码,本目录下的代码与其他 sample 模块共用
└── vp_wrap                               # 多媒体接口的封装
3.17.2.5. 对外交互模块( Transport )
概述
遵循
交互
Media Server 模块
本
本
Wesocket Server 模块
本
目前
3.17.2.6. 主程序入口( main )
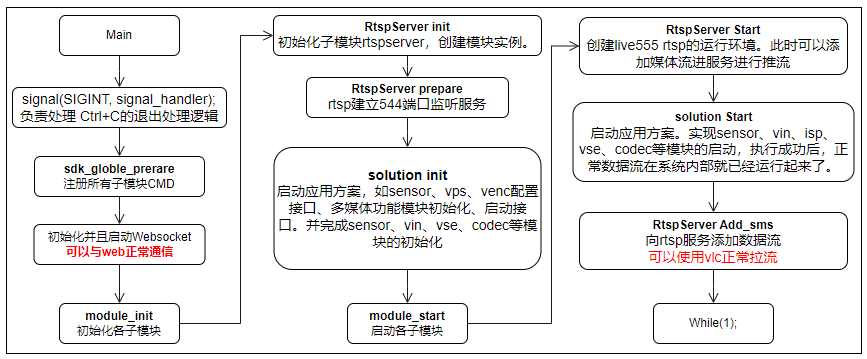
概述
主程序
当前
执行流程
3.17.2.7. WebServer
概述
本
功能描述
提供 lighttpd 编译
模块代码结构
.
├── fcgi					# fcgi 模块库
│   ├── include
│   ├── lib
│   └── version.txt
├── sc_lighttpd				# lighttpd
│   ├── cache
│   ├── cgi-bin
│   ├── config				# 能直接使用的配置文件
│   ├── lib
│   ├── log
│   ├── sbin
│   ├── server.pem
│   ├── share
│   ├── socktes
│   ├── upload
│   ├── vhosts
│   └── webpages			# web 页面、 css、 js 文件
├── pcre					# lighttpd 对其有依赖
│   ├── include
│   ├── lib
│   └── version.txt
├── README.txt
└── start_lighttpd.sh		# 单独启动 WebServer 的脚本
3.17.3. 使用 BPU 进行算法推理
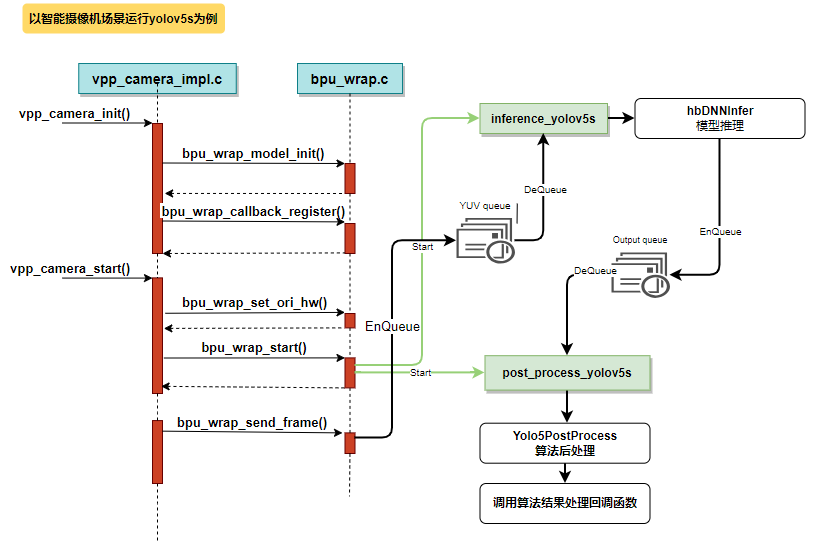
3.17.3.1. 概述
本
模块
3.17.3.2. 添加一个新模型流程
当前 sunrise_camera 仅
| 项目 | 源码 |
说明 |
|---|---|---|
| 准备 |
放到 Platform/x5/model_zoom 目录 |
在 |
| 添加 |
bpu_wrap.c | 在 bpu_models 中 |
| 推理 |
bpu_wrap.c | 在 |
| 后处理 |
bpu_wrap.c | 从 output 队列 |
| 后处理 |
yolov5_post_process.cpp | 算法 |
| Web 页面 |
index.js | 非 |
准备算法模型
开发板
bin 模型:通过
算法 工具链 转换( PTQ )得到 的 模型,以 bin 作为 后缀 hbm 模型:通过
定点 模型 训练 框架( QAT )直接 训练 得到 的 算法 模型
算法
添加初始化过程
在 bpu_wrap.c 中
bpu_model_descriptor bpu_models[] = {
	{
		.model_name = "yolov5s",                                   // 算法名称, web 客户端上会显示这个名称给用户选择
		.model_path = "../model_zoom/yolov5s_672x672_nv12.bin",    // 算法模型文件
		.inference_func = inference_yolov5s,                       // 推理函数
		.post_proc_func = post_process_yolov5s                     // 后处理函数,如果这部分比较简单,可以合并到推理函数中一起处理
	},
	... ( 省略 ) ...
};
算法model_name 启动
推理线程处理函数
在
static void *inference_yolov5s(void *ptr)
{
	// 准备模型输出节点 tensor, 5 组输出 buff 轮转,简单处理,理论上后处理的速度是要比算法推理更快的
	hbDNNTensor output_tensors[5][3];
	int32_t cur_ouput_buf_idx = 0;
	for (i = 0; i < 5; i++) {
		ret = prepare_output_tensor(output_tensors[i], dnn_handle);
		if (ret) {
			SC_LOGE("prepare model output tensor failed");
			return NULL;
		}
	}

	while (privThread->eState == E_THREAD_RUNNING) {
		// 获取需要进行算法运算的图像数据,格式基本都是 NV12 的 yuv
		if (mQueueDequeueTimed(&bpu_handle->m_input_queue, 100, (void**)&input_tensor) != E_QUEUE_OK)
			continue;

        // 模型推理 infer
		hbDNNInferCtrlParam infer_ctrl_param;
		HB_DNN_INITIALIZE_INFER_CTRL_PARAM(&infer_ctrl_param);
		ret = hbDNNInfer(&task_handle,
				&output,
				&input_tensor->m_dnn_tensor,
				dnn_handle,
				&infer_ctrl_param);

		// 后处理数据入队
		Yolo5PostProcessInfo_t *post_info;
		post_info = (Yolo5PostProcessInfo_t *)malloc(sizeof(Yolo5PostProcessInfo_t));
		… …
		mQueueEnqueue(&bpu_handle->m_output_queue, post_info);
		cur_ouput_buf_idx++;
		cur_ouput_buf_idx %= 5;
}
}
后处理线程函数
后处理
static void *post_process_yolov5s(void *ptr)
{
	tsThread *privThread = (tsThread*)ptr;
	Yolov5PostProcessInfo_t *post_info;

	mThreadSetName(privThread, __func__);

	bpu_handle_t *bpu_handle = (bpu_handle_t *)privThread->pvThreadData;
	while (privThread->eState == E_THREAD_RUNNING) {
		// 从后处理数据队列中获取数据
		if (mQueueDequeueTimed(&bpu_handle->m_output_queue, 100, (void**)&post_info) != E_QUEUE_OK)
			continue;

		char *results = Yolov5PostProcess(post_info); // 进行后处理,比如得到检测框、过滤低置信度的结果、把检测框的宽高缩放为显示视频的宽高等

		if (results) {
			if (NULL != bpu_handle->callback) {
				// 算法任务结果回调,当前的应用场景是把算法结果通过 websocket 发送给浏览器
				bpu_handle->callback(results, bpu_handle->m_userdata);
			} else {
				SC_LOGI("%s", results);
			}
			free(results);
		}
		if (post_info) {
			free(post_info);
			post_info = NULL;
		}
	}
	mThreadFinish(privThread);
	return NULL;
}
后处理代码
每个
yolov5 : yolo5_post_process.cpp
mobilenet_v2 :分类
模型 的 处理 较 简单,就是 把 id 和 类型 名 进行 对应
在
分析
算法
// Yolov5 输出 tensor 格式
// 3 次下采样得到三组缩小后的 gred,然后对每个 gred 进行三次预测,最后输出结果
char* Yolov5PostProcess(Yolov5PostProcessInfo_t *post_info) {
	hbDNNTensor *tensor = post_info->output_tensor;

	std::vector<Detection> dets;
	std::vector<Detection> det_restuls;
	uint32_t i = 0;
	char *str_dets;

	// 根据置信度过滤检测框
	for (i = 0; i < default_yolov5_config.strides.size(); i++) {
		_postProcess(&tensor[i], post_info, i, dets);
	}
	// 计算交并比来合并检测框,传入交并比阈值 (0.65) 和返回 box 数量 (5000)
	yolov5_nms(dets, post_info->nms_threshold, post_info->nms_top_k, det_restuls, false);
	std::stringstream out_string;

	// 算法结果转换成 json 格式
	out_string << "\"timestamp\": ";
	unsigned long timestamp = post_info->tv.tv_sec * 1000000 + post_info->tv.tv_usec;
	out_string << timestamp;
	out_string << ",\"detection_result\": [";
	for (i = 0; i < det_restuls.size(); i++) {
		auto det_ret = det_restuls[i];
		out_string << det_ret;
		if (i < det_restuls.size() - 1)
		out_string << ",";
	}
	out_string << "]" << std::endl;

	str_dets = (char *)malloc(out_string.str().length() + 1);
	str_dets[out_string.str().length()] = '\0';
	snprintf(str_dets, out_string.str().length(), "%s", out_string.str().c_str());
	return str_dets;
}
Web 页面上增加渲染处理
本
// 通用的算法回调函数,目前都是通过 websocket 想 web 上发送
int32_t bpu_wrap_general_result_handle(char *result, void *userdata)
{
	int32_t ret = 0;
	int32_t pipeline_id = 0;
	char *ws_msg = NULL;

	if (userdata)
		pipeline_id = *(int*)userdata;

	// json 算法结果添加标志信息
	// 分配内存
	ws_msg = malloc(strlen(result) + 32);
	if (NULL == ws_msg) {
		SC_LOGE("Failed to allocate memory for ws_msg");
		return -1;
	}
	sprintf(ws_msg, "{\"kind\":10, \"pipeline\":%d,", pipeline_id + 1);
	strcat(ws_msg, result);
	strcat(ws_msg, "}");

	ret = SDK_Cmd_Impl(SDK_CMD_WEBSOCKET_SEND_MSG, (void*)ws_msg);
	free(ws_msg);
	return ret;
}
在 WebServer/sc_lighttpd/webpages/js/index.js 文件js 代码。
// web 页面上 websocket 接收数据的处理函数
function handle_ws_recv(params) {
	{
	... ( 省略 ) ...
	} else if (params.kind == REQUEST_TYPES.ALOG_RESULT) {
		// console.log(params);
		// 分类算法算法的帧率计数
		if (params.classification_result) {
			socket.smart_fps[params.pipeline]++;
		}
		// 目标检测算法的帧率计数
		if (params.detection_result) {
			socket.smart_fps[params.pipeline]++;
		}
		// 将 params 放入相应的队列中,在 web 上的视频绘制时会调用根据时间戳来完成视频和算法结果的同步显示
		// 算法结果的渲染请查阅 processVideoFrame 函数的实现
		g_alog_result_queue_array[params.pipeline].push(params);
	}
	... ( 省略 ) ...
}