3.4. sample_vse 使用说明
3.4.1. 功能概述
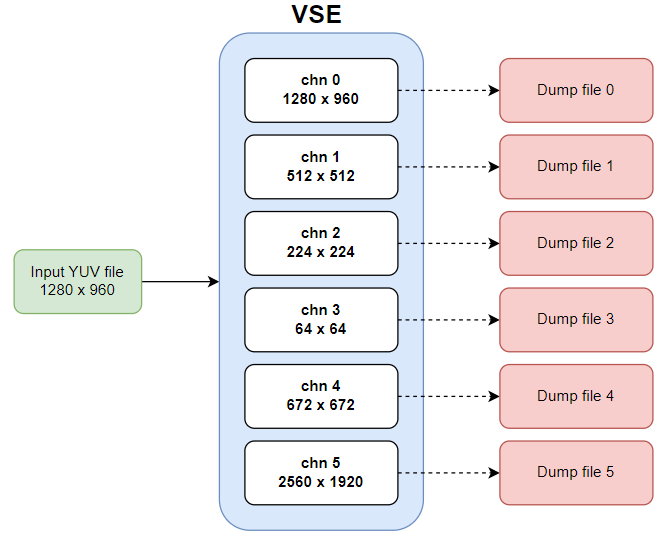
sample_vse 完成 VSE 模块
的 初始化,配置 输入 和 输出 通道 的 参数,实现1路 图像 的 输入,6路 图像 的 经过 缩放、crop 后 输出 的 功能。 sample_vse 还
展示 了 如何 通过 异步 接口 hbn_vnode_sendframe_async 向 VSE 发送 视频 帧。
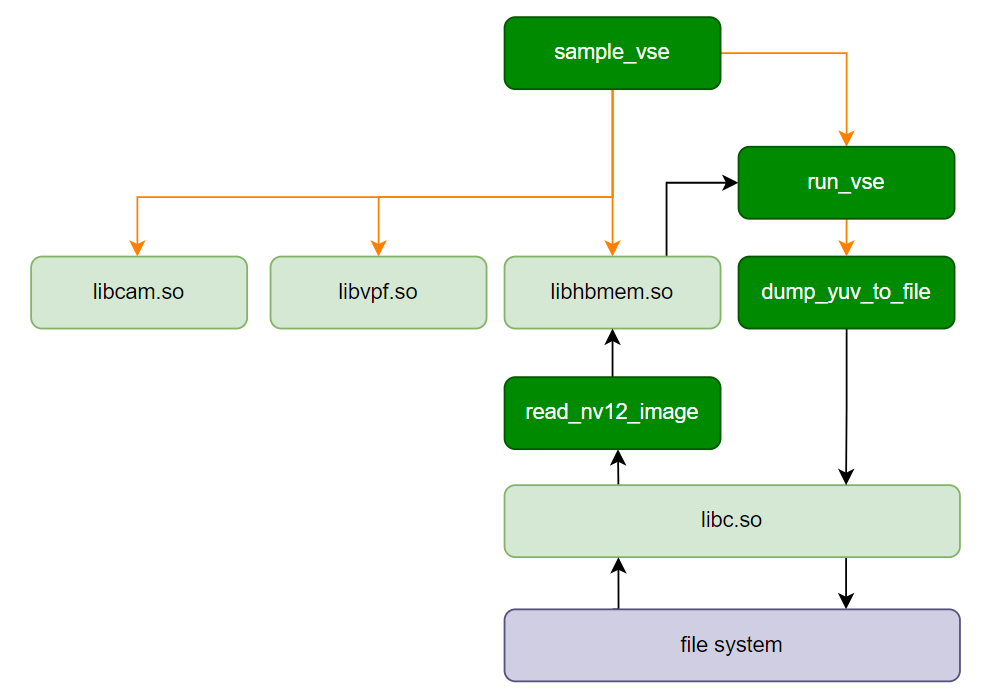
3.4.1.1. 软件架构说明
sample_vse 主要libcam.so libvpf.so libhbmem.so,将 YUV 文件
3.4.1.2. 数据流说明
示例
3.4.1.3. 代码位置及目录结构
代码
位置 app/samples/platform_samples/sample_vse目录
结构
sample_vse/
├── Makefile
└── sample_vse.c
3.4.1.4. API流程说明
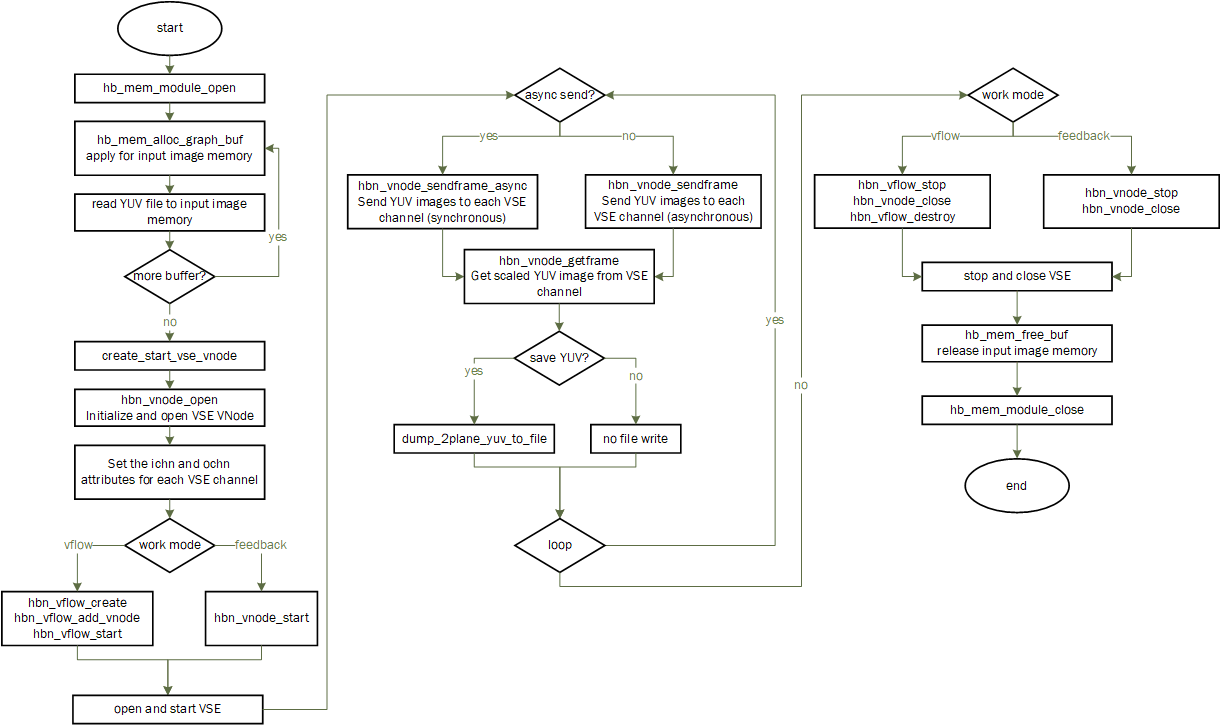
3.4.2. 编译部署
3.4.2.1. 编译
进入 sample_vse 目录,执行
make编译输出
成果 物是 sample_vse 源码 目录 下 的 sample_vse详细
程序 编译 方式 请 查阅 编译 方法 章节
3.4.2.2. 程序部署
把 sample_vse/sample_vse 上chmod +x sample_vse命令
3.4.3. 运行
3.4.3.1. 程序运行方法
直接./sample_vse 可以
3.4.3.2. 程序参数选项说明
./sample_vse
Usage: sample_vse [OPTIONS]
Options:
  -i, --input_file FILE   Input NV12 file path
  -w, --input_width W     Input width in pixels
  -h, --input_height H    Input height in pixels
  -f, --feedback          Feedback mode (hbn_vnode_start)
  -V, --verbose           Verbose dump of frame structures
  -a, --async             Use hbn_vnode_sendframe_async (default: sync sendframe)
  -b, --buf-num N         Ichn buffer index rotation count [1..16], default 1
  -n, --frames N          Send/Get frame loop iterations (default 1)
  -y, --save-yuv          Save ochn NV12 to ./vse_output_nv12_run*_chn*.yuv
i: 指定
输入 的YUV文件,测试程序 默认 使用 NV12 格式 w: 输入 YUV 图像
的 宽度 h: 输入 YUV 图像
的 高度 f: 以 feedback 模式
运行 VSE 节点(不 创建 vflow 流) V: 打印
每 一帧 的 详细信息 a: 用
异步 接口 给 VSE 送 YUV 图像 b: 输入
通道 buffer 轮转 数量,取值 范围:1~16,默认:1,注意:用 异步 接口 给 VSE 送 YUV 图像 时,此参数 必须 大于 等于 3 n: Send/Get 循环
次数 y: 保存 NV12 图像,命名
方式:./vse_output_nv12_run*_chn*.yuv
3.4.3.3. 运行效果
示例 1
以./sample_vse -i 1280x720_NV12.yuv -w 1280 -h 720 -n 10 -y。
把
0 通道
输出 输入 图像 的 原 分辨率:1280 x 720。 1 通道
输出16像素 对齐 的 常用 算法 图像 使用 的 分辨率:512 x 512。 2 通道
输出 非16像素 对齐 的 常用 算法 图像 使用 的 分辨率:224 x 224。 3 通道
输出ROI为 原图 中心点 不变,宽、高 各 裁剪 一半,输出 图像 宽、高等 于ROI区域 宽高,输出 缩小 到 支持 的 最小 分辨率:64 x 64。 4 通道
输出 常用 算法 图像 使用 的 分辨率:672 x 672。 5 通道
输出 放大 到 支持 的 最大 分辨率(注意:图像 只能 最大 放到4倍):2560 x 1440。 Send/Get 循环 10 次。
添加
-y参数保存 图像。
输出 log 如下:
VSE work mode: vflow
sendframe: sync
ichn buffer rotation count (-b): 1
run loop count (-n): 10
save_yuv: yes (-y)
input: 1280x720_NV12.yuv, 1280x720
(read_yuvv_nv12_file):file read(1280x720_NV12.yuv), y-size(921600)
ichn input width = 1280
ichn input height = 720
hbn_vnode_set_ochn_attr: 0, 1280x720
hbn_vnode_set_ochn_attr: 1, 512x512
hbn_vnode_set_ochn_attr: 2, 224x224
hbn_vnode_set_ochn_attr: 3, 64x64
hbn_vnode_set_ochn_attr: 4, 672x672
hbn_vnode_set_ochn_attr: 5, 2560x1440
sample_vse: completed 10 send/get frame iteration(s)
示例 2
运行 Feedback 模式./sample_vse -i 1920x1080_NV12.yuv -w 1920 -h 1080 -n 10 -f -y。
Send/Get 循环 10 次。
添加
-f参数开启 Feedback 模式。 添加
-y参数保存 图像。
输出 log 如下:
VSE work mode: feedback
sendframe: sync
ichn buffer rotation count (-b): 1
run loop count (-n): 10
save_yuv: yes (-y)
input: 1920x1080_NV12.yuv, 1920x1080
(read_yuvv_nv12_file):file read(1920x1080_NV12.yuv), y-size(2073600)
ichn input width = 1920
ichn input height = 1080
hbn_vnode_set_ochn_attr: 0, 1920x1080
hbn_vnode_set_ochn_attr: 1, 512x512
hbn_vnode_set_ochn_attr: 2, 224x224
hbn_vnode_set_ochn_attr: 3, 64x64
hbn_vnode_set_ochn_attr: 4, 672x672
hbn_vnode_set_ochn_attr: 5, 3840x2160
sample_vse: completed 10 send/get frame iteration(s)
示例 3
运行./sample_vse -i 1920x1080_NV12.yuv -w 1920 -h 1080 -n 30 -a -b 6 -y。
Send/Get 循环 30 次。
添加
-a参数开启 异步 接口。 用
异步 接口 时,buffer 轮转 数量 最小 为:3,本 示例 设置 为:6。 添加
-y参数保存 图像。
输出 log 如下:
VSE work mode: vflow
sendframe: async
ichn buffer rotation count (-b): 6
run loop count (-n): 30
save_yuv: yes (-y)
input: 1920x1080_NV12.yuv, 1920x1080
(read_yuvv_nv12_file):file read(1920x1080_NV12.yuv), y-size(2073600)
(read_yuvv_nv12_file):file read(1920x1080_NV12.yuv), y-size(2073600)
(read_yuvv_nv12_file):file read(1920x1080_NV12.yuv), y-size(2073600)
(read_yuvv_nv12_file):file read(1920x1080_NV12.yuv), y-size(2073600)
(read_yuvv_nv12_file):file read(1920x1080_NV12.yuv), y-size(2073600)
(read_yuvv_nv12_file):file read(1920x1080_NV12.yuv), y-size(2073600)
ichn input width = 1920
ichn input height = 1080
hbn_vnode_set_ochn_attr: 0, 1920x1080
hbn_vnode_set_ochn_attr: 1, 512x512
hbn_vnode_set_ochn_attr: 2, 224x224
hbn_vnode_set_ochn_attr: 3, 64x64
hbn_vnode_set_ochn_attr: 4, 672x672
hbn_vnode_set_ochn_attr: 5, 3840x2160
sample_vse: completed 30 send/get frame iteration(s)
浏览YUV图
请
参考Hobot player静态 图片 章节 浏览 图像,图像 的 参数 配置 说明 如下: 按照 如下 图 所示 步骤 配置 选项,其中 file config 里面 关注 pic_type 、 yuv_type 、width 和 height 的 配置,以 vse_output_nv12_run0_chn0_1280x720_stride_1280.yuv为例, 配置为(PIC_YUV, YUV_NV12, 1280, 720)。 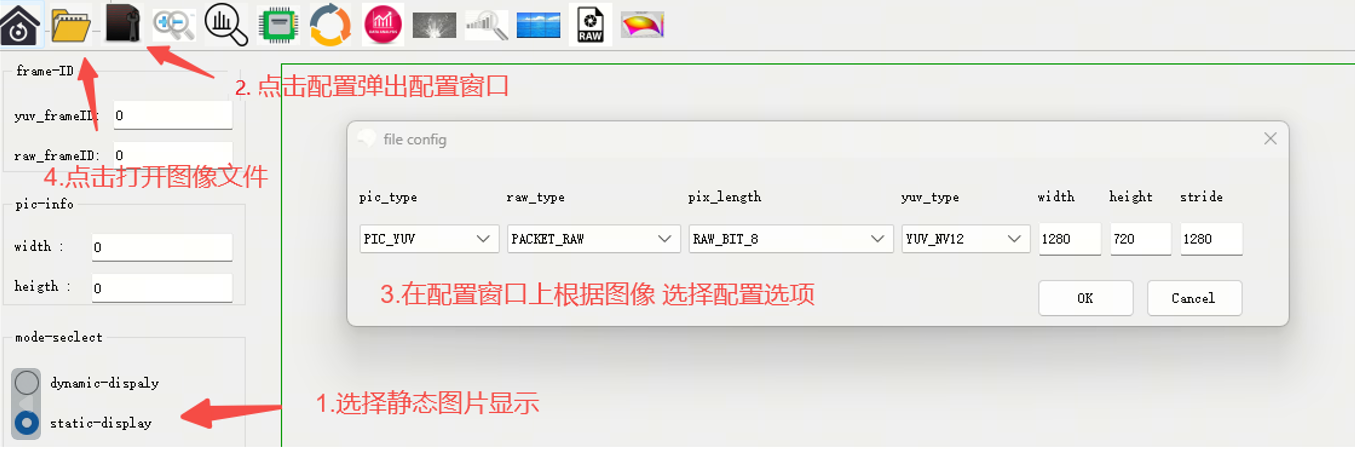
3.4.4. 提示说明
VSE 通道 5 只
[   51.037647] [L485]vse_ochn_attr_check: Invalid Param attr->target_w: 512, min: 64, max: 64
[   51.045960] vse_ochn_attr_check failed