5.17.11. hbplayer and tuning_tool Usage Guide
5.17.11.1. hbplayer
hbplayer is a Windows application that sends requests to the host via the HTTP protocol and retrieves image data transmitted from the board. The main functions of this application include:
Real-time display of image data
Offline display and analysis of image data
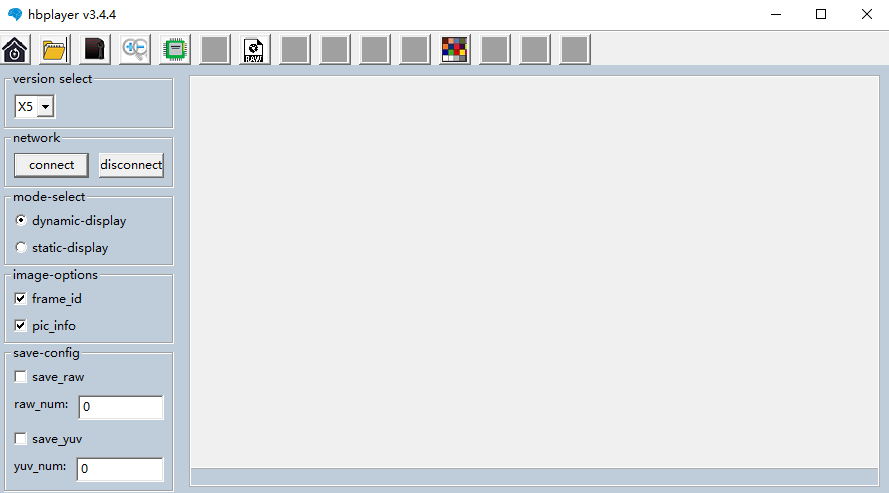
hbplayer Installation and Configuration
Installation:
The current software version is v3.4.4. Installation steps are as follows:
Obtain the
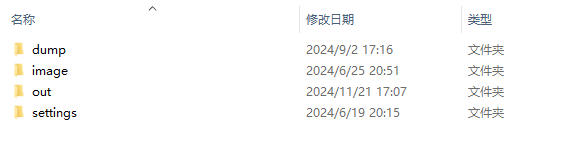
x5_hbplayer_v3.4.4.zippackage from thesoftware_tools/hobotplayerdirectory in the SDK delivery package. After decompression, the directory structure is shown in the figure below.Enter the decompressed path and double-click to run
hbplayer.exeunder the out directory to open the main page, as shown below:
Network Configuration:
Click the icon in the upper-left corner and enter the board’s IP address in the
dynamic_init_configdialog box. The board’s IP can be configured and queried by executingifconfigon the board side. Check the board’s IP address and fill it into the dynamic_init_config input box.Click
Applyto complete the client IP configuration.
hbplayer Main Interface
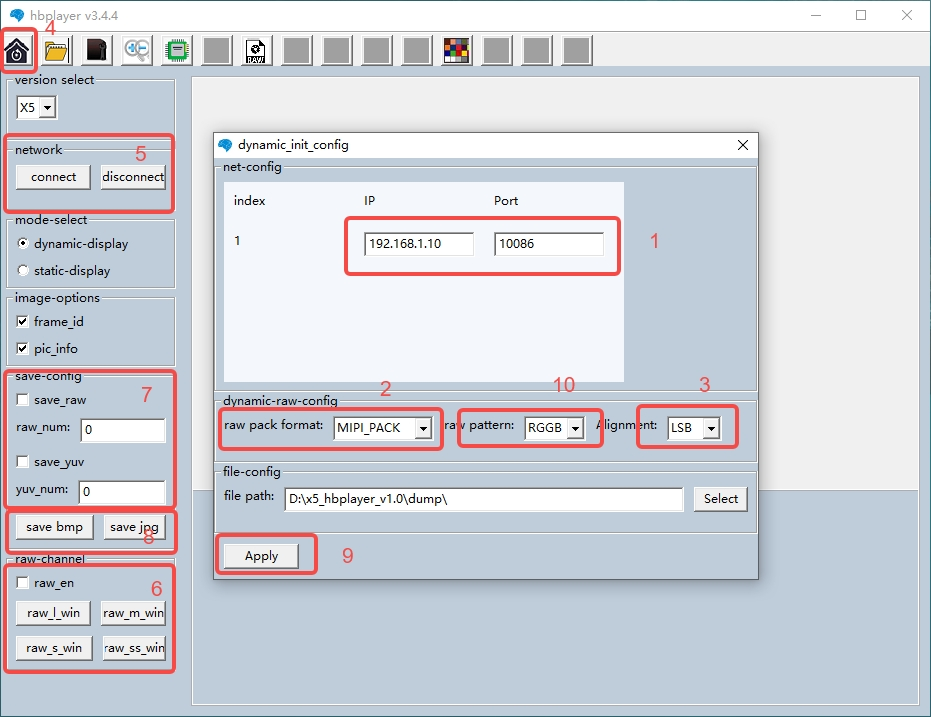
| No. | Description | Remarks |
|---|---|---|
| 1 | Device IP and port number | The port number is generally not modified |
| 2 | Set pack mode for raw in online mode | NA |
| 3 | Configure raw image msb/lsb type | msb means alignment to the most significant bit, lsb means alignment to the least significant bit |
| 4 | Open configuration page | NA |
| 5 | Connect / Disconnect network transmission | In dynamic-displayer mode, connect to the server on the board side. |
| 6 | View raw images, up to dol4 supported | Available when transmitting RAW |
| 7 | Save raw/yuv image information | First set the number to save, then click enable |
| 8 | Save yuv image information as bmp/jpg | This option supports saving single images; format conversion uses opencv |
| 9 | Save configuration information | Configuration information must be saved to take effect |
| 10 | raw_type type | Supports different pattern rggb formats |
hbplayer Static Image Viewing Function Description
The hbplayer tool supports viewing static images in multiple formats (raw/yuv/bmp/jpg) and provides convenient parameter configuration and operation functions. Below are the operation steps and precautions:
Operation Steps (as shown in the figure below):
Select Functional Module Click icon 1 (static-display) to enter the static image viewing interface.
Configure Image Parameters Click icon 2 (fileconfig) to perform parameter configuration. Fill in the specific parameters of the image (e.g., resolution, format, etc.) as needed, then click Apply to save the configuration.
Select and Display Image Click icon 3, select the image file to view, and the image will be displayed in the interface.
Image Zoom When viewing the image, press Ctrl + mouse wheel to zoom in or out.
Configuration Options Description:
For detailed descriptions of configuration options, refer to the table below to ensure correct parameter input for optimal viewing results.
Precautions:
Viewing raw/yuv Images When opening raw or yuv format images, it is necessary to correctly configure the specific image parameters (such as width, height, pixel format, etc.). Incorrect parameters will result in the image failing to open properly or displaying abnormally.
raw preview and save_raw Functions To use the raw preview or save_raw functions, ensure the following conditions:
tuning_tool has sent raw data.
Enable the raw_en function on the hbplayer tool side.
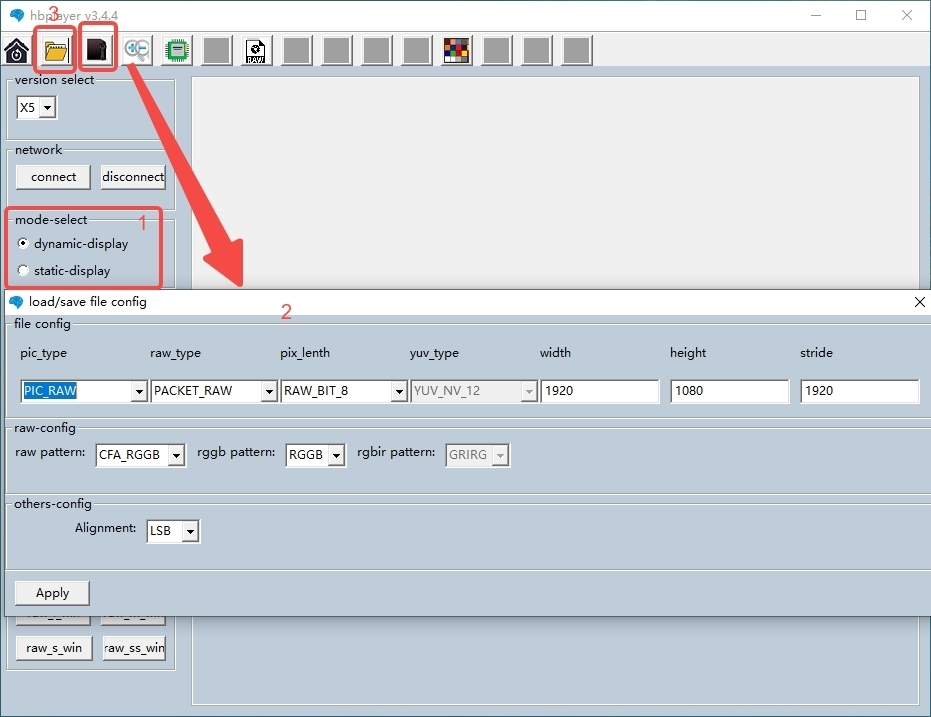
| No. | Description | Remarks |
|---|---|---|
| 1 | Switch between static image display / dynamic transmission display | Static images are supported in static-display mode; data streams are supported in dynamic-display mode. |
| 2 | Configure image information to open | Only items selectable in the box are supported; incorrect image information will cause abnormal display. |
| 3 | Display image size information | Open the file to be displayed |
To view static parameters, corresponding image parameters must be configured. The image parameter configuration description is shown in the table below.
| pic_type | This field sets the type of image to be opened |
|---|---|
| raw_type | This field sets whether the raw image is pack or unpack type. Unpack stores one pixel as a uint16_t data type. |
| yuv_type | yuv_nv12 |
| width | Image width |
| height | Image height |
| stride | Used for pic_raw, mainly for cases where several nop characters are padded at the end of each row in pic_raw. |
hbplayer supports simple image display adjustment functions when viewing static images. Click the icon to open calculation display and input corresponding parameters, then click enable to perform simple adjustments on the image.
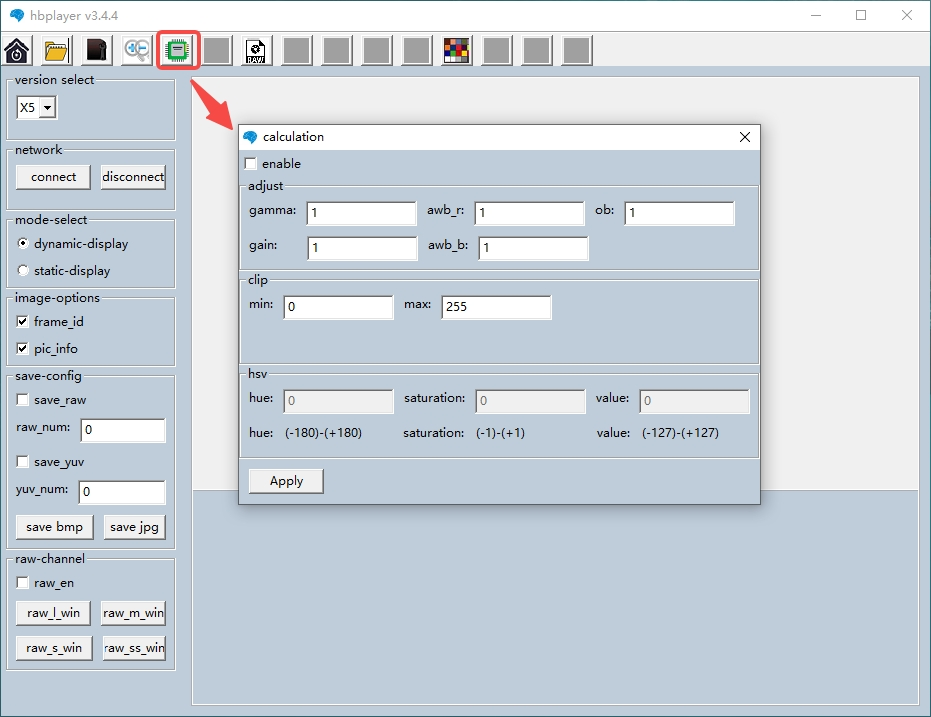
Tips:
Image zooming can be achieved using the mouse wheel or the zoom window. It is recommended not to exceed 10x magnification, otherwise image scaling processing may become slow.
hbplayer FV Curve Function
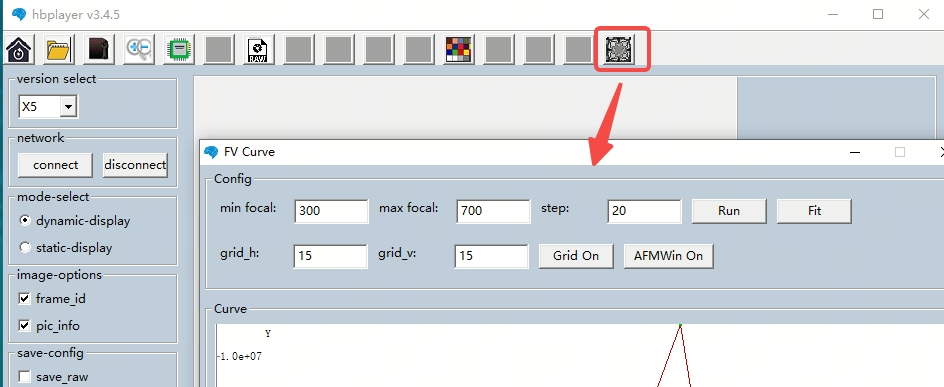
This function is used to obtain the FV value within the motor position and draw the FV-pos curve. It needs to be used together with the tuning tool.
min focal and max focal correspond to the minimum and maximum values of the motor respectively. step is the sampling interval between min focal and max focal. After configuration, click the Run button to display the FV curve within the corresponding range. The Fit button is for fitting the curve to the window display; each click will fit the curve to the window.
grid_h and grid_v correspond to the number of horizontal and vertical grids respectively. After configuration, click the grid_on button to display the grid on the main interface, which can be used with the AFMV3 function.
The AFMWin ON button corresponds to the AFMV1 window. Click it to display the window position on the image in the main interface.
Dump File Name Description
Taking raw data as an example, the dumped file name is: 2026291611170_1_wxh_1920x1080_s_3840_f_445_p_0_c_031.raw. 2026291611170 is the timestamp; 1 is the format information (1 corresponds to raw format); 1920x1080 is the size; s_3840 is the stride; f_445 is the frame ID; p_0 is the pipe ID; c_0 is the channel ID; the last number 31 is the cumulative count of dump files.
Additionally, in DOL mode, tuning_tool uses the channel ID to distinguish between long and short frames, which can be identified by the c_x marker.
5.17.11.2. tuning_tool
This program was primarily developed for tuning image quality, so the data stream only runs up to the ISP and defaults to SIF passthrough ISP mode.
Script location: /app/platform_samples/tuning_tool/run_tuning.sh. It is recommended to run through an SSH window; otherwise, there will be too much printout, making it difficult to distinguish tuning_tool’s output.
Running Method
Directly execute the program bash run_tuning.sh --help to get help information:
Program Parameter Options Description
bash run_tuning.sh --help
run_tuning.sh --list: list all case
run_tuning.sh --run [sensor_index]: run this sensor
run_tuning.sh --online/offline/mcm/: Open the data stream in online/offline/mcm/ mode
run_tuning.sh --enable_vse: Open VSE, Send the width = 640 YUV image to hbplayer
run_tuning.sh --tune 0/1: close/open tuning_server
run_tuning.sh --log 0/1: increase/decrease log level in logcat
run with [-w 2]: dump 20 yuv from the start
run with [-r 1]: send raw to hbplayer
run with [-f xx]: feedback raw list xx times
run with [--param_json file]: use feedback json config (default: feedback_param.json)
run with [--hdmi]: enable HDMI preview (also enables VSE, output to HDMI)
Options:
--list: List all sensors currently supported by the script--run [sensor_index]: Run the corresponding sensor according to the index in the list. Supports--run x xfor multi-channel display. Bandwidth is recommended not to exceed 1920*1080 60fps.--online/offline/mcm/: Specify using one of the online/offline/mcm modes to run the pipeline; defaults to offline.--enable_vse: Enable VSE and send a 640-width YUV image to hbplayer.--hdmi: HDMI display. Display the camera image on an HDMI monitor connected to the board; VSE will be enabled and the resolution will be automatically matched based on HDMI supported modes.--tune 0/1: Enable or disable the vtuner server on the board for connecting to vtuner.--log: Modify the ISP’s logging level.-w 2: Dump the first 20 frames of data after starting the stream.-r 1: Send raw data to hbplayer while sending yuv data.-f, --feedback: Use feedback to feed data back into the ISP.--param_json <file>: Only effective when using the dummy sensor for feedback. Specifies the path tofeedback_param.json; defaults tofeedback_param.jsonin the same directory as the script.
feedback_param.json Configuration Description
When using dummy sensor for feedback, width, height, RAW format, ISP calibration file name, and driver-side tuning_data (Bayer, exposure/gain limits, etc.) are configured through this JSON file.
Top-level Fields:
| Field | Type | Description |
|---|---|---|
width |
Number | Feedback image width, corresponding to the VIN/ISP pipeline configuration |
height |
Number | Feedback image height |
format |
String | RAW format: raw8 / raw10 / raw12, must match the actual raw file |
calib_lname |
String | ISP tuning calibration file name or absolute path (e.g., dummy_tuning.json), must match the resolution, etc. |
tuning_data |
Object | Written to camera_config->sensor_param, parsed by the dummy driver (e.g., Bayer, lines_per_second, exposure and gain limits, etc.) |
tuning_data Field Description
| Field | Description |
|---|---|
enable |
Whether to enable tuning_data configuration |
bayer_start |
Position of the top-left (0,0) pixel in the Bayer array: 0=R, 1=GR, 2=GB, 3=B |
bayer_pattern |
Bayer pattern enumeration, 0 means RGGB |
lines_per_second |
Total exposure lines per second |
exposure_time_max / exposure_time_min |
Exposure line count upper/lower limits |
exposure_time_long_max |
Long exposure upper limit |
analog_gain_max / digital_gain_max |
Analog / digital gain upper limits |
Example:
{
    "width": 1920,
    "height": 1080,
    "format": "raw10",
    "calib_lname": "dummy_tuning.json",
    "tuning_data": {
        "enable": 1,
        "bayer_start": 3,
        "bayer_pattern": 0,
        "lines_per_second": 33750,
        "exposure_time_max": 1012,
        "exposure_time_min": 1,
        "exposure_time_long_max": 2242,
        "analog_gain_max": 251,
        "digital_gain_max": 0
    }
}
After modifying the JSON, re-run the script for the changes to take effect. No recompilation is required.
Usage Steps
ISP Tuning Usage:
Execute
bash run_tuning.sh --listto view the list of currently supported sensors. Running effect is as follows:
# bash run_tuning.sh --list
index: 0  sensor_name: sc1330t                  config_file:linear_1280x960_raw10_30fps_1lane.c
index: 1  sensor_name: irs2875-tof              config_file:linear_208x1413_raw12_15fps_2lane.c
index: 2  sensor_name: sc230ai-10fps            config_file:linear_1920x1080_raw10_10fps_1lane.c
index: 3  sensor_name: sc230ai-30fps            config_file:linear_1920x1080_raw10_30fps_1lane.c
index: 4  sensor_name: sc230ai-dol2-30fps       config_file:dol2_1920x1080_raw10_30fps_2lane.c
index: 5  sensor_name: sc132gs-1280p            config_file:linear_1088x1280_raw10_60fps_1lane.c
index: 6  sensor_name: sc132gs-hdr-2lane        config_file:hdr_1088x1280_raw10_30fps_2lane.c
index: 7  sensor_name: sc035hgs                 config_file:linear_640x480_raw10_30fps_1lane.c
index: 8  sensor_name: sc035hgs_mono            config_file:linear_mono_640x480_raw10_30fps_1lane.c
index: 9  sensor_name: ov5640                   config_file:linear_1920x1080_raw10_30fps_2lane.c
index: 10  sensor_name: f37                     config_file:linear_1920x1080_raw10_30fps_1lane.c
index: 11  sensor_name: imx415-30fps-2lane      config_file:linear_3840x2160_raw10_30fps_2lane.c
index: 12  sensor_name: imx415-30fps-4lane      config_file:linear_3840x2160_raw10_30fps_4lane.c
index: 13  sensor_name: sc202cs-1600x1200       config_file:linear_1600x1200_raw10_30fps_1lane.c
index: 14  sensor_name: irs2381c-tof            config_file:linear_224x1903_raw12_5fps_2lane.c
index: 15  sensor_name: sc035hgs-vc0            config_file:linear_640x480_raw10_30fps_2lane_vc0.c
index: 16  sensor_name: sc035hgs-vc1            config_file:linear_640x480_raw10_30fps_2lane_vc1.c
index: 17  sensor_name: sc231ai-30fps           config_file:linear_1920x1080_raw10_30fps_2lane.c
index: 18  sensor_name: imx586-30fps-4lane      config_file:linear_3840x2160_raw10_30fps_4lane.c
index: 19  sensor_name: os08c10-30fps-2lane     config_file:linear_3840x2160_raw12_30fps_2lane.c
index: 20  sensor_name: ar0233-30fps            config_file:linear_1920x1080_raw12_30fps_2lane.c
index: 21  sensor_name: ar0820std-30fps         config_file:linear_3840x2160_yuv422_30fps_4lane.c
index: 22  sensor_name: sc1336                  config_file:linear_1280x720_raw10_15fps_2lane.c
index: 23  sensor_name: dummy                   config_file:dummy_sensor.c
index: 24  sensor_name: ar0233-30fps            config_file:ar0233_linear_1920x1080_raw12_30fps_2lane_vc0.c
index: 25  sensor_name: ar0233-30fps            config_file:ar0233_linear_1920x1080_raw12_30fps_2lane_vc1.c
index: 26  sensor_name: ov9782-200fps-2lane     config_file:linear_640x360_raw10_200fps_2lane.c
index: 27  sensor_name: ov9782-120fps-2lane     config_file:linear_1280x720_raw10_120fps_2lane.c
index: 28  sensor_name: imx219-640x480-30fps    config_file:linear_640x480_raw10_30fps_2lane.c
index: 29  sensor_name: imx219-1632x1232-30fps  config_file:linear_1632x1232_raw10_30fps_2lane.c
index: 30  sensor_name: imx219-1920x1080-30fps  config_file:linear_1920x1080_raw10_30fps_2lane.c
index: 31  sensor_name: imx219-3264x2464-15fps  config_file:linear_3264x2464_raw10_15fps_2lane.c
index: 32  sensor_name: imx219-3264x2464-21fps  config_file:linear_3264x2464_raw10_21fps_2lane.c
index: 33  sensor_name: ov5647-640x480-60fps    config_file:linear_640x480_raw10_60fps_2lane.c
index: 34  sensor_name: ov5647-1280x960-30fps   config_file:linear_1280x960_raw10_30fps_2lane.c
index: 35  sensor_name: ov5647-1920x1080-30fps  config_file:linear_1920x1080_raw10_30fps_2lane.c
index: 36  sensor_name: ov5647-2592x1944-15fps  config_file:linear_2592x1944_raw10_15fps_2lane.c
index: 37  sensor_name: imx678-30fps-4lane      config_file:linear_3840x2160_raw12_30fps_4lane.c
index: 38  sensor_name: imx678-30fps-4lane-dol2         config_file:dol2_3840x2160_raw12_30fps_4lane.c
index: 39  sensor_name: imx477-1280x960-120fps  config_file:linear_1280x960_raw10_120fps_2lane.c
index: 40  sensor_name: imx477-1920x1080-50fps  config_file:linear_1920x1080_raw12_50fps_2lane.c
index: 41  sensor_name: imx477-2016x1520-21fps  config_file:linear_2016x1520_raw12_21fps_2lane.c
index: 42  sensor_name: imx477-4000x3000-10fps  config_file:linear_4000x3000_raw12_10fps_2lane.c
index: 43  sensor_name: ov50h40-30fps-4lane     config_file:linear_4096x3072_raw10_30fps_4lane.c
index: 44  sensor_name: ox05b1s                 config_file:linear_2592x1944_raw10_30fps_4lane.c
index: 45  sensor_name: ox05b1s_2lane           config_file:linear_2592x1944_raw10_10fps_2lane.c
index: 46  sensor_name: imx415-60fps-4lane      config_file:linear_3840x2160_raw10_60fps_4lane.c
index: 47  sensor_name: sc850sl-30fps           config_file:linear_3840x2160_raw10_30fps_4lane.c
index: 48  sensor_name: shw3g-30fps             config_file:linear_2064x1552_raw12_30fps_4lane.c
index: 49  sensor_name: shw3g-30fps_vc1         config_file:linear_2064x1552_raw12_30fps_4lane_vc1.c
index: 50  sensor_name: sc235hai-30fps          config_file:linear_1920x1080_raw10_30fps_2lane.c
index: 51  sensor_name: ov50h40-30fps-4lane     config_file:linear_4096x3072_raw14_30fps_4lane.c
Taking sc230ai-30fps as an example, its index is 3. Execute
bash run_tuning.sh --run 3to enter interactive mode. Log output is as follows:
# bash run_tuning.sh --run 3
Executing: ./isp_tuning --offline -s sensor=3
Offline mode enabled!!!
Using index:3  sensor_name:sc230ai-30fps  config_file:linear_1920x1080_raw10_30fps_1lane.c
[INFO] board_id is 0x0202, not need skip sci1.
mipi mclk is configed.
Searching camera sensor on device: /proc/device-tree/soc/cam/vcon@0 i2c bus: 4 mipi rx phy: 0
INFO: Found sensor_name:sc230ai-30fps on mipi rx csi 0, i2c addr 0x30, config_file:linear_1920x1080_raw10_30fps_1lane.c
Pipeline index 0:
      Sensor index: 3
      Sensor name: sc230ai-30fps
      Use mipi host: 0
start_hbplayer_thread start success. pid 281473319076096
create_socket_listen---176, listern 0xffff98001410
create a listener, port is 10086
create_socket_event---201, t_base 0x1ffc7080 event base is 0xffff98000c70, listener 0xffff98001410
start_dump_server_thread start success.
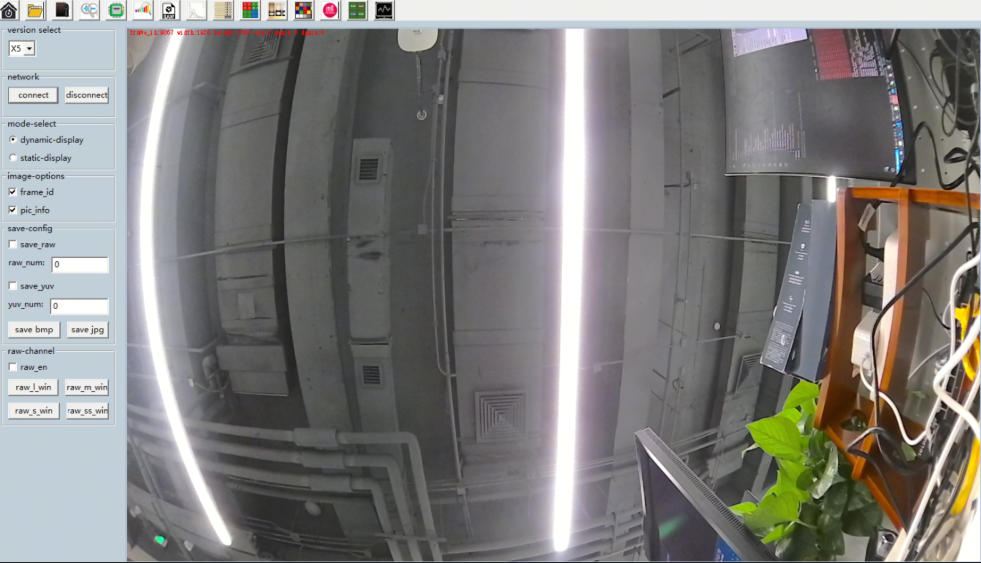
Connect to X5 hbplayer. By default, tuning_tool sends yuv data to hbplayer. After starting the stream, go to hbplayer and click connect to preview the image in real time. To exit, press 【q】 then Enter.
Feedback Usage:
Execute
bash run_tuning.sh --listto confirm theindexcorresponding to dummy (23 in the example; refer to the actual list).Place the raw file to be fed back in the working directory (at the same level as
isp_tuningandfeedback_param.json).Edit
feedback_param.json: Make surewidth,height,formatmatch the raw file; setcalib_lnameto the ISP calibration file matching the resolution (e.g.,dummy_tuning.json); adjusttuning_dataparameters such as Bayer and exposure/gain as needed.Execute the feedback:
bash run_tuning.sh --run 23
If changing the resolution, update both
feedback_param.jsonanddummy_tuning.json(or the corresponding calibration file) to ensure the calibration matches the image size.
HDMI Display:
To view the camera image directly on an HDMI monitor connected to the board, add the
--hdmioption, for example:bash run_tuning.sh --run 3 --hdmi.Prerequisite: Run
insmode_driver.shfirst to load HDMI/DRM related drivers. If the drivers are not loaded, the program will prompt “Please run insmode_driver.sh to load HDMI related drivers before using –hdmi.” and exit.
Features
Press 【h】 then Enter to see the currently supported features.
Dump raw
This function dumps raw data from sif.
After running, press 【s】 then Enter. You will be prompted to input the number of images you want to dump. Press Enter again to dump the raw images at the corresponding moment. Files will be saved to /userdata.
Dump yuv
After running, press 【y】 then Enter. You will be prompted to input the number of images you want to dump. Press Enter again to dump the yuv images at the corresponding moment. Files will be saved to /userdata.
Images are saved by default into a single file. Tools like yuvplayer can be used to view the images continuously.
Dump raw and yuv
This function is mainly used to view the ISP information corresponding to the current consecutive raw and yuv images, generally used for ISP evaluation.
Supports three dump modes: RAW + AE Info, RAW + YUV + AE Info, YUV + AE Info
Automatically calculates the maximum number of frames supported by the current in-memory filesystem /tmp; if exceeding the maximum, dumps at the maximum frame count
After running, press 【a】 then Enter. It will automatically calculate and prompt you to input the number of images you want to dump. Press Enter again to dump the raw and yuv images at the corresponding moment, along with the AE information file AE_INFO.txt. Files will be saved to the in-memory filesystem /tmp.
Images are saved by default into a single file. Tools like yuvplayer can be used to view the images continuously.
1. Since X5's VIN and ISP are bound through a pipeline, and ISP processing takes time, the raw and yuv frame IDs dumped in dynamic scenes may be offset. When observing the results, simply ensure that the timestamps and frame IDs of the raw and yuv images are consistent.
Other Functions
Most other functions, such as AE, AWB, and 3DNR, correspond to get and set functions: get retrieves current parameters, and set configures certain parameters for the ISP. However, some modules have many parameters, making input inconvenient, so they have not been implemented.