4.5.6. UART Stress Test
4.5.6.1. Test Principle
UART stress test is a method to verify the stability and performance of UART communication by conducting large-scale data exchange and high-load operations. Its principle mainly involves sending and receiving massive amounts of data to simulate real-world UART usage scenarios. The specific principles include the following aspects:
Data Transmission and Reception: The core principle of UART stress testing is to send large volumes of data to the UART device and then receive the data back from it.
Sending Data: Generate large-scale data packets via scripts or programs and transmit them to the target device through the UART interface.
Receiving Data: The target device returns the received data (e.g., via UART loopback test or response from external devices). The stress test program receives this data and performs comparison and validation.
Baud Rate and Data Frame Configuration: Baud rate refers to the transmission speed in UART communication, typically expressed in bits per second (bps). UART communication also includes other parameters such as:
Data bits: Number of data bits in each frame (commonly 8 or 7 bits).
Stop bits: Bits indicating the end of data transmission (usually 1 or 2 bits).
Parity bits: Used for error checking during data transmission (e.g., odd or even parity).
Test Content
1. Test Procedure:
The uartstress.sh script uses loopback testing, a common method in UART testing. The principle is to route the transmitted data back to the receiver via physical connection or other means, thereby verifying the integrity of data transmission. In the source code uart_test.c, the function perform_single_loopback_test() implements this test. The steps are as follows:
Open the UART and set related parameters via
open_uart().Initialize semaphore
sem_init()to ensure proper thread synchronization.Create sending thread
uart_send_thread, receiving threaduart_recv_thread, and data checking threadcheck_recv_thread.The sending thread is responsible for transmitting data.
The receiving thread handles data reception and stores it into a buffer.
The data checking thread compares the received data with the sent data to verify consistency.
When all threads complete their tasks,
pthread_join()waits for all threads to terminate, after which the test ends.
2. Command Explanation:
Test command:
uart_test" -l -s 1024 -c "$StressCount" -b "$Baudrate" -d "$Device" > "$uart_test_log_file"Parameter explanation:
-l: Perform loopback test.-s 1024: Specify the data size per test as 1024 bytes.-c "$StressCount": Specify the number of stress test iterations, i.e., how many times the test repeats.-b "$Baudrate": Set the UART baud rate; the variable$Baudratewill be assigned based on the input value.-d "$Device": Specify the UART device; the variable$Deviceholds the path to the UART device.-> "$uart_test_log_file": Redirect test output to the specified log file “$uart_test_log_file”.
4.5.6.2. Preparation
Instructions for Using the Stress Test Script
The UART stress test supports the -h suffix to display command parameter descriptions. For example:
root@buildroot:/app/platform_samples/chip_base_test/04_uart_test# ./uartstress.sh -h
Usage: ./uartstress.sh [options]

Options:
  -b <baudrate>    Set the UART baud rate (default: 115200).
  -d <device>      Set the UART device (default: /dev/ttyS1).
  -c <count>       Set the stress count (default: 100).
  -o <directory>   Set the output directory for logs (default: ../log).
  -h               Show this help message and exit.
Parameter explanations:
-b <baudrate>: Set the baud rate, default is 115200.-d <device>: Specify the UART device under test, default is /dev/ttyS2.-c <count>: Define the number of stress test iterations, default is 100.-o <directory>: Set the log output directory, default is ../log.
Example:
For instance, using the command: ./uartstress.sh -b 115200 -d /dev/ttyS2 -c 50 -o /app/platform_samples/chip_base_test sets the baud rate to 115200, the UART device to ttyS2 (corresponding to the actual UART used), the loop count to 50, and the output directory to /app/platform_samples/chip_base_test.
Instructions for Running the Test Program
uart_test supports multiple test methods with the following command-line options:
Usage: uart_test [OPTIONS]
Options:
  -s, --size      : Specify test data size (KB), default is 1024KB, maximum is 20480KB (20MB)
  -b, --baudrate  : Specify UART baud rate, default is 115200
  -c, --count     : Specify number of test iterations, default is infinite loop
  -d, --device    : Specify UART device path
  -l, --loopback  : Enable UART loopback test (serial loopback)
  -r, --read-only : Enable UART read-only mode test
  -w, --write-only: Enable UART write-only mode test
  -D, --dual-loopback : Enable UART dual-channel loopback test (requires --uart2 parameter)
  -u, --uart2     : Specify second UART device path (required for dual-channel loopback test)
  -V, --verbose   : Set log output mode; debug logs for different modules are output based on bitwise AND operations. Currently supports: 1: send module logs; 2: receive module logs; 4: data verification module logs. Summing numbers enables multiple modules, e.g., setting 3 outputs logs for both send and receive modules.
  -h, --help      : Display help information
To change the test mode, simply replace -l in the script uartstress.sh with another test mode. For example, for UART write-only mode test:
"${script_dir}/uart_test" -w -s 1024 -c "$StressCount" -b "$Baudrate" -d "$Device" > "$uart_test_log_file"
Then connect uart2_rx and uart2_tx to the PC via a TTL serial adapter module, and open a serial tool to receive the transmitted content.
Test uart device:/dev/ttyS1
Test size: 2 KBytes, baudrate: 115200
Performing uart send...
Starting send thread
This is uart send test 1 times
This is uart send test 2 times
This is uart send test 3 times
Notes
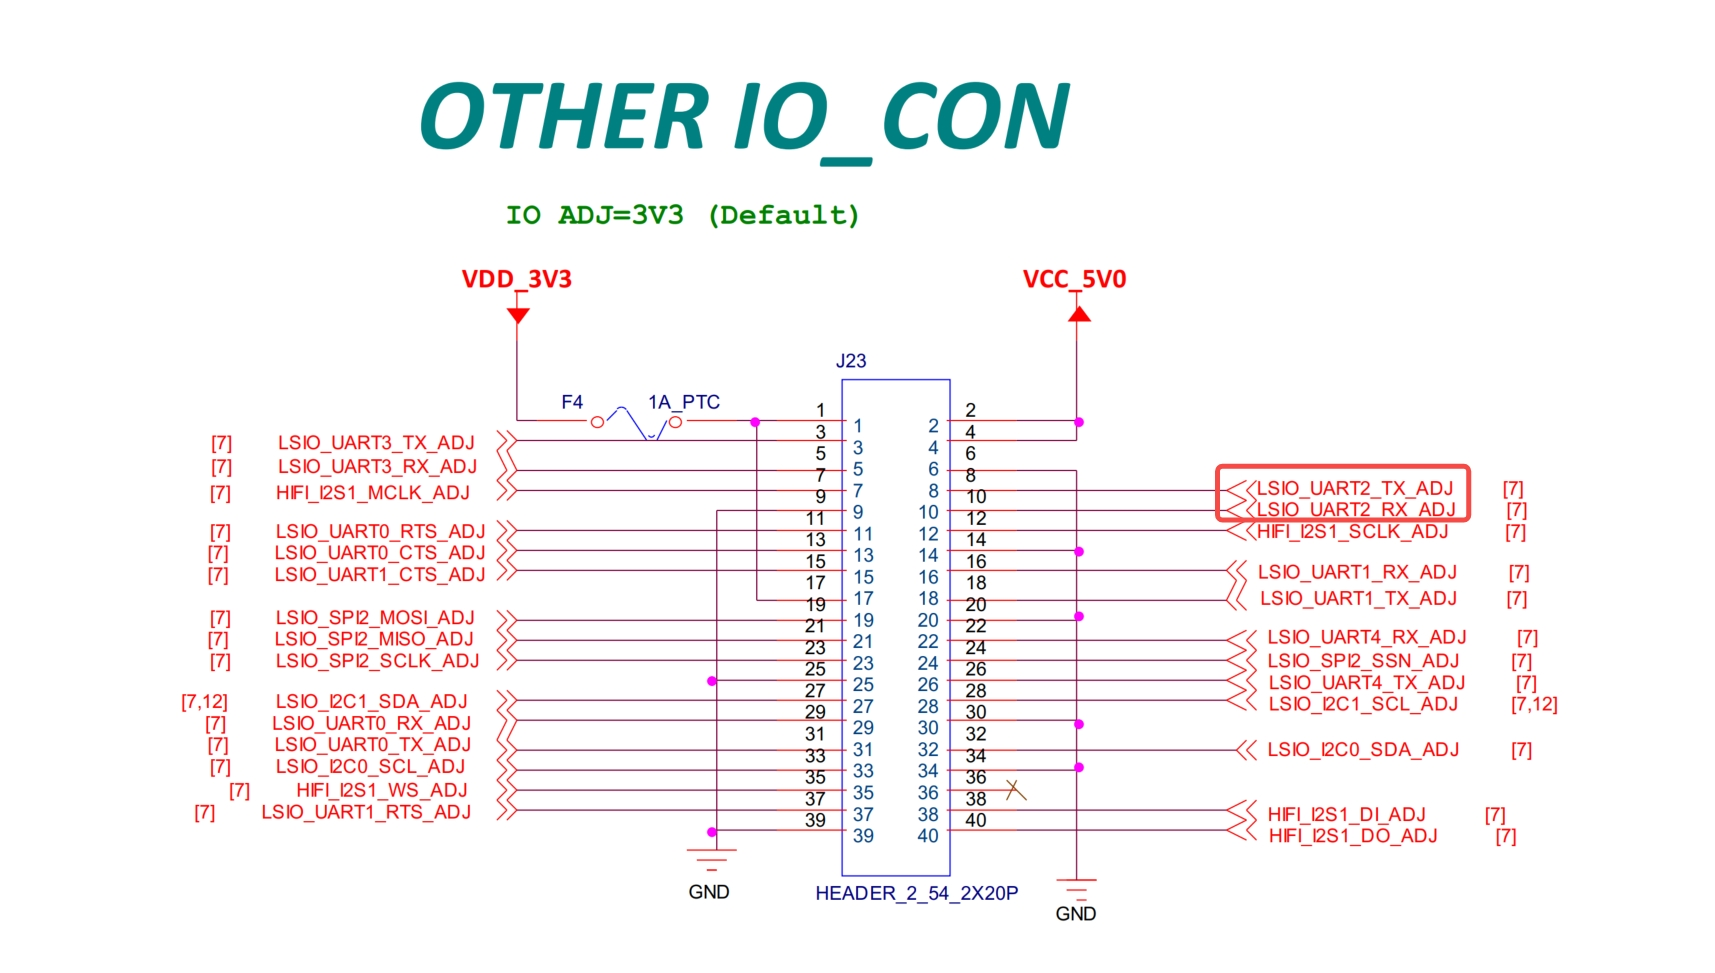
1. Refer to the x5_evb schematic to locate the pins and connector positions corresponding to uart2, as shown in the figure:
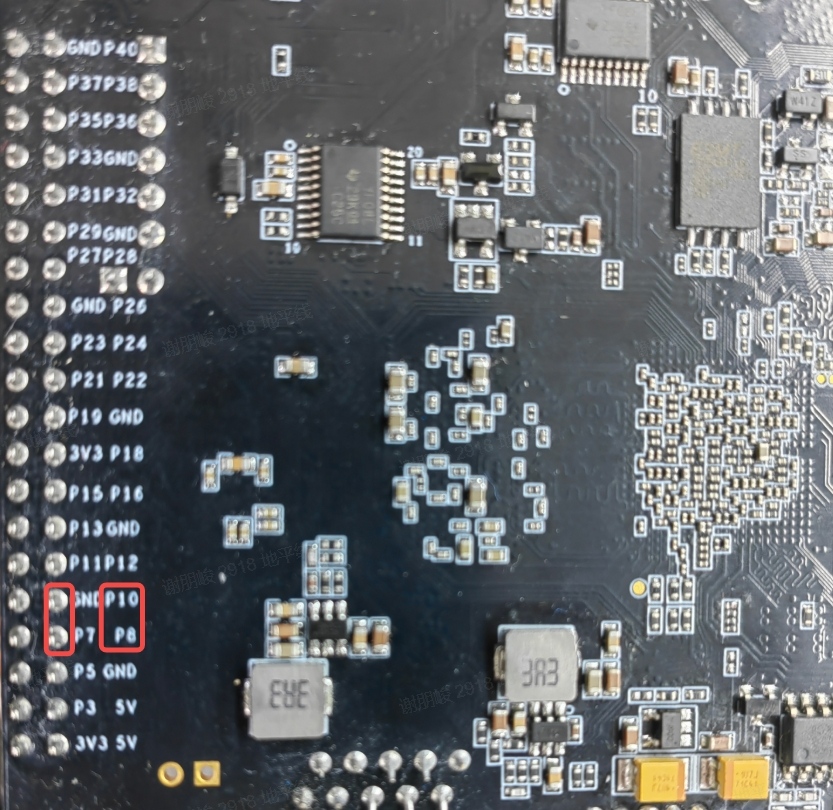
Use a dual female jumper wire to connect uart2_tx and uart2_rx. Flip the x5_evb to the back side; the location is shown in the figure:
2. Confirm that the three files uartstress.sh, uart_test.c, and uart_test exist in the path /app/platform_samples/chip_base_test/04_uart_test.
(base) root@DESKTOP-BD9DR0J:/app/platform_samples/chip_base_test/04_uart_test# tree
.
├── uart_test
├── uart_test.c
└── uartstress.sh
3. You can recompile the executable using the following command:
/opt/arm-gnu-toolchain-11.3.rel1-x86_64-aarch64-none-linux-gnu/bin/aarch64-none-linux-gnu-gcc -o uart_test uart_test.c
After completing the preparation, run the test command:
./uartstress.sh
After running for a period of time, the log output will appear as follows:
root@buildroot:/app/platform_samples/chip_base_test/04_uart_test# ./uartstress.sh
Uart test starting...
Test configuration:
  Baudrate: 115200
  Device: /dev/ttyS2
  Stress count: 100
  Output directory: /app/platform_samples/chip_base_test/log
  Log file: /app/platform_samples/chip_base_test/log/uart_test_log2.txt
At this point, if no additional information is printed in the console, directly check the log file under /app/platform_samples/chip_base_test/log/:
root@buildroot:# cat /app/platform_samples/chip_base_test/log/uart_test_log2.txt
Test uart device:/dev/ttyS2
Test size: 512 KBytes, baudrate: 115200
Performing uart recv...
Performing uart send...
Performing data check...
Starting send thread
Starting receive thread
This is receive test 1 times
This is uart send test 1 times
This is receive test 2 times
Data verification successful. Received data matches sent data. Test total data count: 0x80000
This is uart send test 2 times
This is receive test 3 times
Data verification successful. Received data matches sent data. Test total data count: 0x100000
This is uart send test 3 times
This is receive test 4 times
Data verification successful. Received data matches sent data. Test total data count: 0x180000
This is uart send test 4 times
4.5.6.3. Test Metrics
After the test program starts, the following files are generated under the /app/platform_samples/chip_base_test/log/ directory:
uart_test_log*.txt: Records printed information and current status during stress testing.
The test objective is to ensure the system can operate stably for 48 hours without rebooting or freezing. To verify stability during the test, use the following command to check the log files for any abnormal messages such as fail, error, or timeout:
cd "/app/platform_samples/chip_base_test/log/" && grep -iE 'error|fail|timeout' uart_test_log*.txt
UART Stress Test Results
After running the test script and examining the log files, no abnormal status messages were found, indicating that the stress test has passed.
This is receive test 48 times
Data verification successful. Received data matches sent data. Test total data count: 0x1780000
This is uart send test 48 times
This is receive test 49 times
Data verification successful. Received data matches sent data. Test total data count: 0x1800000
This is uart send test 49 times
This is receive test 50 times
Data verification successful. Received data matches sent data. Test total data count: 0x1880000
This is uart send test 50 times