4.5.12. USB Bus Speed Test
4.5.12.1. Test Principle
The basic principle of USB speed testing is to measure the data transfer rate between a USB device and the host by calculating the data transmission time, thereby evaluating the actual bus speed.
Test Content
The USB bus speed test uses both the USB virtual network interface and the dd command to perform read and write operations on a USB flash drive. These two methods are used to evaluate the transfer speeds of USB 2.0 and USB 3.0.
Explanation of dd Command Principle
Using the dd command to test USB bus speed involves disk I/O performance testing. Although it does not directly measure the speed of the USB bus itself, by testing the throughput during data read/write operations with the USB device, it can indirectly infer the performance bottleneck of the USB bus.
dd if=/dev/zero of=/mnt/usb/testfile bs=1M count=1024 conv=sync oflag=direct
if=/dev/zero: Input file is /dev/zero, which generates continuous zero data.of=/mnt/usb/testfile: Output file is testfile under the mount point of the USB storage device, i.e., writing data to the USB drive.bs=1M: Block size is 1MB. Each operation reads or writes 1MB of data.count=1024: A total of 1024 blocks are written, i.e., 1GB of data.conv=sync: Aligns data to the specified block size, padding insufficient portions with zeros; in this command, since the data source is continuous, its primary role is block-synchronized writing (if=/dev/zero provides continuous data, so “insufficient blocks” will not occur).oflag=direct: Uses direct I/O mode, bypassing the system page cache, to more closely reflect the actual physical write speed of the USB drive.
dd if=/path/to/source_file of=/dev/null bs=4K iflag=direct
if=/path/to/source_file:if(input file) specifies the path of the input file;/path/to/source_fileis the file from which data will be read.of=/dev/null:of(output file) specifies the output destination; here, data is written to/dev/null.bs=4K:bs(block size) sets the size of each read and write operation to 4KB (4096 bytes).iflag=direct: The direct flag ensures data is read directly from the USB drive without going through the operating system’s cache.
By executing dd read and write commands, the system writes zero data to the USB drive and measures the throughput during the write process. After command execution, the system displays the number of bytes written and the time taken, allowing calculation of the write speed. The same applies for the dd read command.
Explanation of USB Virtual Network Interface Principle
Set the USB port to work in device mode, enable the rndis driver, and upon connecting to a PC, a remote network adapter will be created on the computer. After configuring the IP addresses on both the board and the PC, use the iperf3 tool to test the bandwidth rate.
4.5.12.2. Preparation
USB Drive Read/Write Preparation Method
1. Check whether the x5_evb development board is in USB host mode by entering the command:
root@buildroot:~# cat  /sys/kernel/debug/usb/35100000.usb/mode
host
Command to set USB 3.0 to Host mode:
echo host > /sys/class/usb_role/35100000.usb-role-switch/role
Command to set USB 3.0 to Device mode:
echo device > /sys/class/usb_role/35100000.usb-role-switch/role
2. Insert the USB flash drive into the USB 3.0 interface of the x5_evb development board, and enter the command to check the USB interface type:
root@buildroot:~# lsusb
Bus 002 Device 004: ID 0781:55a9
Bus 001 Device 001: ID 1d6b:0002
Bus 002 Device 001: ID 1d6b:0003
From the lsusb command, we see that BUS2: ID 1d6b:0003 indicates a USB 3.0 controller. The newly inserted USB drive is mounted on BUS2, confirming it is connected via a USB 3.0 interface.
4.5.12.3. Test Method
Enter the command lsblk to view the USB drive’s mount path. Different USB drives may have different mount paths, such as /media/UBUNTU_24_1.
root@buildroot:~# lsblk
NAME         MAJ:MIN RM  SIZE RO TYPE MOUNTPOINTS
sda            8:0    1  233G  0 disk
`-sda1         8:1    1  233G  0 part /media/UBUNTU_24_1
mtdblock0     31:0    0  512M  0 disk
mmcblk0      179:0    0  7.1G  0 disk
|-mmcblk0p1  179:1    0    4K  0 part
|-mmcblk0p2  179:2    0  2.3M  0 part
|-mmcblk0p3  179:3    0  2.3M  0 part
|-mmcblk0p4  179:4    0    4K  0 part
|-mmcblk0p5  179:5    0    2M  0 part
|-mmcblk0p6  179:6    0  256K  0 part
|-mmcblk0p7  179:7    0   16K  0 part
|-mmcblk0p8  259:0    0   12M  0 part
|-mmcblk0p9  259:1    0  250M  0 part /
|-mmcblk0p10 259:2    0  200M  0 part /usr/hobot
|-mmcblk0p11 259:3    0  700M  0 part /app
`-mmcblk0p12 259:4    0    6G  0 part /userdata
mmcblk0boot0 179:8    0    4M  1 disk
mmcblk0boot1 179:16   0    4M  1 disk
Enter the dd command to test the USB bus write speed:
root@buildroot:~# dd if=/dev/zero of=/media/UBUNTU_24_1/myfile bs=4K count=256K conv=sync
262144+0 records in
262144+0 records out
1073741824 bytes (1.1 GB, 1.0 GiB) copied, 26.0445 s, 41.2 MB/s
Enter the dd command to test the USB bus read speed:
root@buildroot:~#  dd if=/media/UBUNTU_24_1/myfile of=/dev/null bs=4K count=256K
262144+0 records in
262144+0 records out
1073741824 bytes (1.1 GB, 1.0 GiB) copied, 8.27242 s, 130 MB/s
4.5.12.4. Preparation
USB Virtual Network Interface Preparation Method
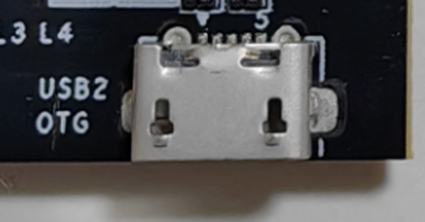
1. Connect the x5_evb development board’s USB 2.0 port to the PC’s USB 2.0 port, as shown in the figure:
2. Virtualize the USB 2.0 port as a network interface using the following commands:
/etc/init.d/usb-gadget.sh stop adb
/etc/init.d/usb-gadget.sh start rndis
Execution output:
Detecting platform:
 board : D-Robotics X5 EVB LP4 1_B board
 udc   : 35300000.usb
Creating the USB gadget
Loading composite module
Mount ConfigFS and create Gadget
configfs mount point:  /sys/kernel/config
Configfs already mounted...
Creating gadget directory g_comp
OK
init configfs...
Setting Vendor and Product ID's
OK
Setting Multi-func Gadget for Windows
Setting English strings
OK
Creating Config
Init functions...
funciton_init, but do nothing, please init on demand
OK
Bind functions...
Bind functions according to .usb-config file
bind gadget rndis...
Creating RNDIS gadget functionality
[  210.814912] using random self ethernet address
[  210.815497] using random host ethernet address
OK
Pre run userspace daemons(eg. adb)...
0
waiting
.
OK
Binding USB Device Controller
UDC set to: 35300000.usb
OK
Run some userspace daemons(eg. usb_camera)...
usb-gadget start succeed.
usb-gadget restart succeed.
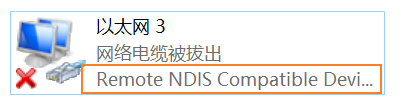
On the PC, open the network configuration page and you should see a network adapter named Remote RNDIS Compatible Device, as shown below.
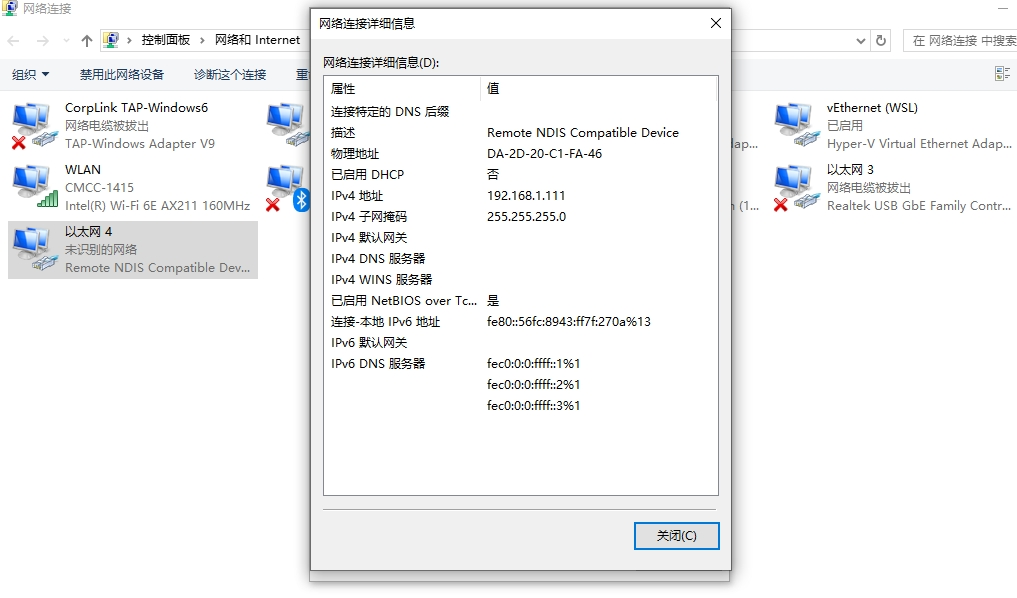
3. Use the following command to configure the IP address of the usb0 network interface so that its subnet matches the IP address of the remote network adapter on the PC side.
ifconfig usb0 192.168.1.10
PC-side remote network adapter IP configuration is shown in the image:
4.5.12.5. Test Method
Run iperf3 on the PC as the Server. Use PowerShell and enter the command as shown:

On the x5_evb development board, run iperf3 as the client, set the same IP address and port number as the Server, connect to the Server, and start the test with the following command:
root@buildroot:~# iperf3 -c 192.168.1.111 -i 1 -t 600 -p 5002
Connecting to host 192.168.1.111, port 5002
[  5] local 192.168.1.20 port 44826 connected to 192.168.1.111 port 5002
[ ID] Interval           Transfer     Bitrate         Retr  Cwnd
[  5]   0.00-1.00   sec  36.9 MBytes   310 Mbits/sec    0   71.3 KBytes
[  5]   1.00-2.00   sec  36.7 MBytes   308 Mbits/sec    0   71.3 KBytes
[  5]   2.00-3.00   sec  36.7 MBytes   308 Mbits/sec    0   71.3 KBytes
[  5]   3.00-4.00   sec  36.8 MBytes   308 Mbits/sec    0   71.3 KBytes
[  5]   4.00-5.00   sec  36.8 MBytes   308 Mbits/sec    0   71.3 KBytes
If the client connects successfully, the PC server will display:
Accepted connection from 192.168.1.20, port 44822
[  5] local 192.168.1.111 port 5002 connected to 192.168.1.20 port 44826
4.5.12.6. Test Metrics
Theoretical maximum speed of USB bus:
USB 2.0: 480 Mbps (i.e., 60 MB/s)
USB 3.0: 5 Gbps (i.e., 625 MB/s)
Actual transfer rates are typically lower than the theoretical maximum due to protocol overhead, hardware limitations, and device performance factors. The actual transfer rate for USB 2.0 usually ranges between 25 MB/s and 35 MB/s, while for USB 3.0 it ranges between 40 MB/s and 200 MB/s.
Common Influencing Factors
USB Version: Bandwidth differences among USB 3.0, 3.1, and 2.0 directly affect data transfer speed. Using a device on a USB 2.0 interface limits theoretical maximum speed to 480 Mbps, with actual speeds likely even lower.
Device Type: USB devices (such as flash drives, external hard drives, SSDs) have varying read/write performance. Flash-based USB drives are generally slower, whereas SSDs offer better performance.
Block Size (
bs): The choice of block size in theddcommand significantly impacts test results. Larger block sizes may improve throughput, while overly small ones may reduce efficiency. Adjustingddcommand parameters appropriately can yield better testing results.
Test Results
Using Method 1 and Method 2 described above, the actual transfer rates of USB 3.0 and USB 2.0 can be effectively tested and are consistent with real-world USB usage performance.