ARM TrustZone
ARM TrustZone technology is a fundamental feature of all Cortex-A class processors, introduced through ARM architecture security extensions. These extensions provide a consistent programmer model across vendors, platforms, and applications, while delivering genuine hardware-backed security environments.
ARM TrustZone technology is a system-wide security approach designed for a wide range of applications on high-performance computing platforms, including secure payments, digital rights management (DRM), enterprise services, and web-based services. TrustZone technology is tightly integrated with Cortex-A processors and extends throughout the system via AMBA AXI buses and dedicated TrustZone system IP blocks, making it a hardware-level security mechanism. This system-wide approach enables protection of secure memory, cryptographic blocks, and peripherals such as keyboards and screens, thereby safeguarding them against software attacks.
Among currently available open-source projects for ARM TrustZone, widely adopted ones include ARM Trusted Firmware and OP-TEE OS. Both are low-level firmware open-source projects designed for ARM chips and can be used either together or independently.
System Architecture
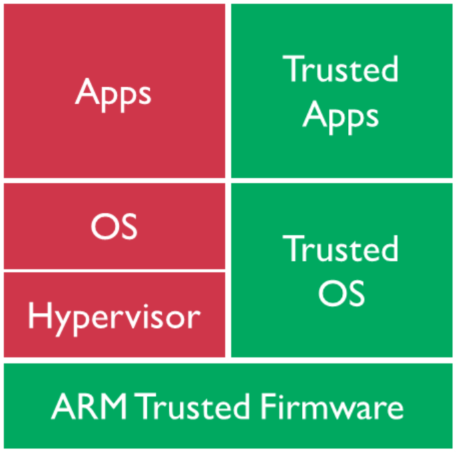
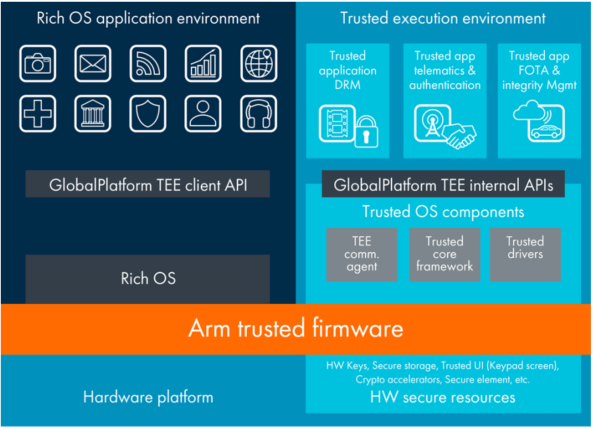
From a system architecture perspective, the following diagram illustrates the system architecture of a 64-bit platform with ARM TrustZone enabled. The entire system is divided into two worlds: the non-secure world on the left, and the secure world on the right. The secure world has access to all resources in both worlds, while the non-secure world can only access resources within its own world. Any attempt by the non-secure world to access secure world resources will result in system bus errors or exceptions, preventing unauthorized access.
Communication between these two worlds requires ARM Trusted Firmware as a bridge. When the CPU is operating in the non-secure world and wishes to enter the secure world, it must first enter ARM Trusted Firmware (via ARM’s SMC hardware instruction). The Secure Monitor code within ARM Trusted Firmware switches the CPU from non-secure to secure state, after which the CPU enters the secure world under secure identity. The reverse process works similarly. This transition between secure and non-secure states is entirely hardware-enforced.
The TEE on the X5 platform can be understood as the combined functionality of ARM Trusted Firmware and OP-TEE OS, implementing both the required secure world functions and the Secure Monitor (the core code responsible for transitions between the two worlds).
CPU Privilege Levels
From the CPU’s perspective, the following diagram shows a standard CPU privilege level architecture with ARM TrustZone enabled. The privilege levels are divided into EL0, EL1, EL2, and EL3, and further categorized by the world the CPU is operating in—either secure EL0, secure EL1, or non-secure EL0, non-secure EL1.
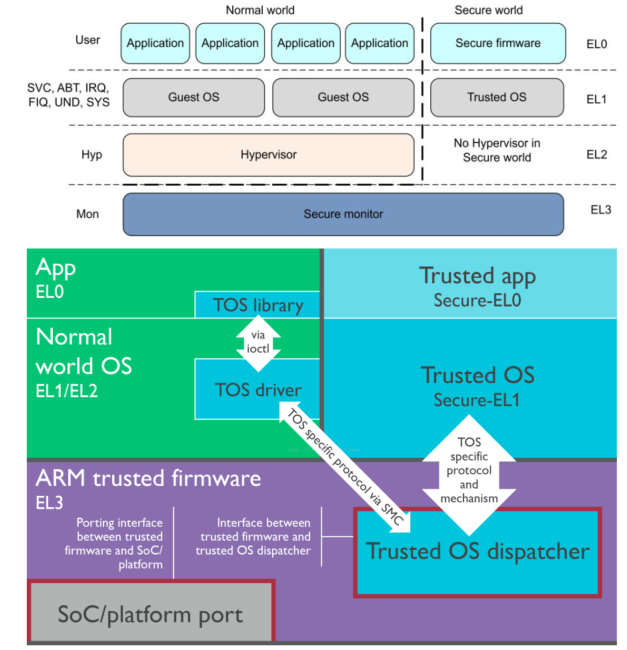
The TEE on the X5 platform can be understood as the combination of EL3 and secure EL1 functionalities.
Glossary
| Abbreviation | Full Name | Description |
|---|---|---|
| TEE | Trusted Execution Environment | A secure execution environment referring to an isolated region within a device where trusted code runs, ensuring that security-sensitive operations are protected from interference by malicious software |
| REE | Rich Execution Environment | The rich execution environment; unlike TEE, REE refers to the non-secure execution environment of the device, typically hosting most applications, operating systems, and services |
| OP-TEE | Open Portable Trusted Execution Environment | An open-source project providing a trusted execution environment (TEE) implementation for ARM architectures, used to run secure applications |
| TA | Trusted Application | Trusted applications are programs running within the TEE, typically used to perform security-critical tasks such as encryption, authentication, etc. |
| EL3 | Exception Level 3 | An exception level in the ARM architecture, usually representing the highest privilege level. In TEE, EL3 is commonly used to run secure code |
| EL1/EL2 | Exception Level 1/2 | Other exception levels in the ARM architecture; EL1 is used for running the operating system kernel, and EL2 is used for virtualization support |
About X5 TEE
Implementation Mechanism
Currently, on 64-bit SoC platforms of the X5 platform, the combination of ARM Trusted Firmware BL31 and OP-TEE OS is used.
The memory range and lifecycle of BL31 and OP-TEE OS are as follows:
| Name | Memory Type | Address Range | Resident in Memory |
|---|---|---|---|
| BL31 | AON SRAM | 0x2000_0000 ~ 0x2002_0000 | Yes |
| OP-TEE OS | DDR | 0x8000_0000 ~ 0x8400_0000 | Yes |
Firmware Acquisition
Currently, only binary files are provided, source code is not available.
OP-TEE binary files are located at the following paths:
miniboot/bl3x/tee-header_v2.bin
miniboot/bl3x/tee-pageable_v2.bin
miniboot/bl3x/tee-pager_v2.bin
BL31 binary file is located at:
miniboot/bl3x/bl31.bin
Version Information
Version information for BL31 and OP-TEE can be obtained from boot log messages.
BL31
BL31 boot log message example:
NOTICE:  BL31: v2.8(release):v1.0.8-77-g72e4fe066
NOTICE:  BL31: Built : 20:12:37, Jun 11 2025
NOTICE:  plat_setup_psci_ops: sec_entrypoint = 0x2000010c
...
From the above information: the ARM Trusted Firmware version is v2.8.
OP-TEE
OP-TEE boot log message example:
I/TC:
I/TC: OP-TEE version: 05e24fd71 (gcc version 11.3.1 20220712 (Arm GNU Toolchain 11.3.Rel1)) #32 Thu Jun  6 13:14:26 UTC 2024 aarch64
...
From the above information: the OP-TEE OS commit hash is 05e24fd71.
Note: The above logs are for reference only; version numbers and dates may vary with SDK releases.
TA Development
Overview
TA (Trusted Application) refers to applications running within the TEE (Trusted Execution Environment). They perform highly secure tasks and sensitive operations such as encryption, key management, authentication, digital signatures, etc. TAs are core components of the TEE, running in an isolated and protected environment, separated from regular applications and operating systems in the REE (non-secure world), ensuring that sensitive data and operations are protected from external malicious attacks.
Building TA
Dependencies required for building TA are located in the project directory miniboot/optee/hobot_tee_devkit, with reference demos in the path ta/demo.
To build a Trusted Application (TA), switch to the directory miniboot/optee/hobot_tee_devkit and follow these steps:
Place your TA source code in the
ta/customerdirectory.Open the
Makefilelocated in theta/customerdirectory.Add the new directory name to the
CTA_DIRSvariable in theMakefile.Switch to the root directory of the project code and execute the following commands to compile the TA:
./bd.sh lunch ## select board typeand./bd.shAfter compilation, navigate to
miniboot/optee/hobot_tee_devkit/out/ta. You will find a directory with the same name as your TA source code, containing the corresponding TA program as an ELF file with the.tasuffix.If you need to clean the build and restart, switch to the project root directory and use the command:
./bd.sh distcleanFlash the compiled image onto the development board, boot into the Linux shell, and you can find the TA program in the file system under
/lib/optee_armtz.
TA Signing and Encryption
TA Signing
TAs are signed by customers. Currently, this is only supported on boards where customer signing is enabled in BL2. Please refer to X5 Customer Root RSA Key Hash Programming and Usage. Boards where BL2 is signed and encrypted by D-Robotics do not support this method.
Generate a New Private Key File
The private key used to sign the TA is located at:
miniboot/optee/hobot_tee_devkit/export-ta_arm64/keys/default_ta.pem
The key format is RSA2048. You can generate a new key using the OpenSSL command:
openssl genrsa -out default_ta.pem 2048
Replace Public Key in OP-TEE OS
The public key used to verify TA signatures resides in OP-TEE OS and must also be replaced with the new public key. Use the following tool to perform the replacement:
miniboot/optee/hobot_tee_devkit/replace_ta_pubkey
Usage:
-H/–header: Input, the header file of OP-TEE, i.e.,
miniboot/bl3x/tee-header_v2.bin-t/–teeos: Input, the OP-TEE OS binary file, i.e.,
miniboot/bl3x/tee-pager_v2.bin-k/–key: Input, the key file, i.e.,
miniboot/optee/hobot_tee_devkit/export-ta_arm64/keys/default_ta.pem-o/–output: Output, the OP-TEE OS file with the updated key
After successful execution, replace miniboot/bl3x/tee-pager_v2.bin with the newly generated file.

Compile TA
After modifying the key file, compile the TA, deploy it to the target board, and flash the new OP-TEE OS binary. The system will then use the customer’s key to verify the TA.
Note
After replacing the key default_ta.pem, running xtest test case 1039 will fail. You must update the subkey according to the method described in ta/subkey_notes.txt in the optee-test repository.
TA Encryption
Enable TA Encryption
By default, TAs are only signed, not encrypted. If customers require encryption, enable the macro CFG_ENCRYPT_TA in the following file: miniboot/optee/hobot_tee_devkit/export-ta_arm64/mk/link.mk. The encryption algorithm used is AES128.
export CFG_ENCRYPT_TA=y
Modify Key File
Also, update the key file with the customer’s key. The key file path is:
device/horizon/x5/board_cfg/soc/bl2_cfg/user_root.key
Compile TA
After modifying the key file, compile the TA and deploy it to the target board. The TA will then be encrypted.
Notes
The customer’s key must be programmed into the efuse. Refer to Programming efuse for instructions.
Building TA Separately
Prerequisites: Ensure that the TA source code has been deployed according to the above Steps 1–3, then follow these steps:
Navigate to the
miniboot/optee/hobot_tee_devkitdirectory.Check the environment variable
TOOLCHAIN_PATHin thebuild.shfile to ensure it points to the correct toolchain path.Run the build script:
./build.shto start compilation.After compilation, go to
miniboot/optee/hobot_tee_devkit/out/ta. You will find a directory with the same name as your TA source code, containing the corresponding.taELF file.To clean the build and restart, use the command:
./build.sh clean
Deploying TA
Prerequisites: Ensure that the compiled TA program (.ta ELF file) exists in the miniboot/optee/hobot_tee_devkit/out/ta directory, and that the target board’s image has the directory /lib/optee_armtz present in the Linux file system after boot. Then follow these steps:
Boot the board normally and locate the directory
/lib/optee_armtz.Connect the board to the PC via USB and transfer the compiled TA program to the
/lib/optee_armtzdirectory on the board. Example using ADB:On the board, remount rootfs as read-write:
mount / -o rw,remount
On the PC, run the following command to deploy the TA: Note: This example uses 5b9e0e40-2636-11e1-ad9e-0002a5d5c51b.ta; replace with your actual compiled .ta file
adb.exe push .\5b9e0e40-2636-11e1-ad9e-0002a5d5c51b.ta /lib/optee_armtz
For ADB usage, refer to Connecting via USB