4.4.9.1. OTA Functionality and Introduction
Overview and Introduction
OTA: (Over-the-Air Technology) refers to the technology that enables remote software updates via wireless networks. Initially introduced by the Android system into mobile devices, OTA technology greatly simplifies traditional software update processes—users no longer need to connect their devices to a computer, and can directly download and install updates on the device itself. This technology significantly enhances user convenience and improves the efficiency of device maintenance.
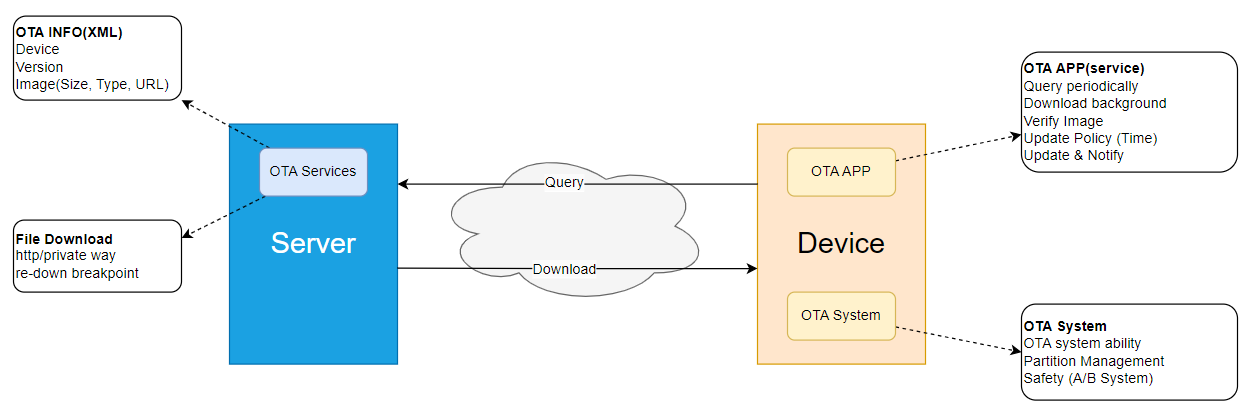
In the broad application of OTA, it can be divided into two main components: the cloud side and the device side. The cloud side handles upgrade requests from devices, including performing upgrade verification, delivering update packages, and collecting upgrade results. The device side relies on the update package delivered from the cloud to complete updates for system firmware (FOTA, Firmware Over-the-Air) or applications (SOTA, Software Over-the-Air).
This document aims to provide a user manual for the low-level device-side OTA functionality, detailing the mechanisms and implementation methods of OTA in upgrading low-level system software and applications, along with relevant development guidance. It should be noted that the system software and applications upgraded via OTA primarily refer to data stored in external storage (such as eMMC).
The deliverables of OTA mainly consist of a set of APIs and their corresponding implementation libraries (e.g., libupdate.so), which implement critical functions such as low-level flashing and verification. The upper-layer OTA service architecture is implemented by the customer to interface with their cloud services. After successfully downloading the update package from the cloud, the OTA service calls interfaces within libupdate.so to perform version upgrades and verifications, ensuring the device completes the software update smoothly and securely.
Abbreviations
| Abbreviation | Full English Name |
|---|---|
| SoC | System on Chip |
| BL[x] | Boot Loader Stage [x] |
| SPL | Secondary Program Loader |
| GPT | GUID Partition Table |
| GUID | Globally Unique Identifier |
| RSA | RSA Algorithm |
| eMMC | embedded Multi-Media Card |
System Partition Table
The external storage eMMC uses GPT (GUID Partition Table) format to organize partitions and manage data. During OTA updates, target partitions are updated on a per-partition basis. These partitions are categorized as follows:
| Partition Type | Attributes | Update Method | Example |
|---|---|---|---|
| Persistent Partition | Parameter partitions: typically store configuration files and parameters required during system runtime, such as ubootenv in the partition table User partitions: refer to partitions unrelated to system boot. They are usually mounted only after the system has started, such as the userdata partition |
Single partitions generally do not have images; partition data needs to be preserved long-term and OTA updates are not supported. | ubootenv, misc, userdata |
| AB Partition | Partitions with the same prefix and suffixes _a and _b are called AB partitions. | AB partitions are updated alternately. | boot_a, boot_b |
| BAK Partition | Partitions with the same prefix and suffixes _bak <num> are called BAK partitions, mainly referring to miniboot partitions, consisting of one primary partition and several backup partitions. | Only the primary partition is updated; after successful update and verification, the content of the primary partition is synchronized to the backup partitions. | miniboot, miniboot_bak1 |
| Single Partition | Single partition supporting OTA upgrade (GOLDEN) | GOLDEN partition can be upgraded via OTA in recovery mode; GOLDEN partition upgrade applies only to NAND and eMMC. | hbre, system |
X5 Standard eMMC Partition Table (Single Partition Format)
| No. | Partition Name | Size | File System | Purpose |
|---|---|---|---|---|
| 1 | gpt | 20k | none | Generic partition table header |
| 2 | mbr | 4k | none | Stores image information loaded by bl2 |
| 3 | miniboot | 1280k | none | bl2, bl31, bl32 |
| 4 | miniboot_bak1 | 1280k | none | bl2, bl31, bl32 |
| 5 | misc | 4k | none | Stores slot ab state machine |
| 6 | uboot | 2m | none | Uboot |
| 7 | ubootenv | 256k | none | Stores Uboot environment variables and system configuration; Uboot environment variables occupy 192k, remaining 64k for system configuration |
| 8 | vbmeta | 16k | none | Signature image for system AVB boot verification |
| 9 | boot | 32m | none | Image.lz4 and dtb |
| 10 | system | 250m | ext4 | Essential libraries and commands for system operation, system |
| 11 | hbre | 200m | ext4 | HOBOT tools and library partition, mounted at /usr/hobot |
| 12 | app | 700m | ext4 | Test cases and samples |
| 13 | private | 256k | ext4 | Stores immutable device data such as MAC address, SN number, etc. |
| 14 | userdata | - | ext4 | Stores user data; extended to the end of eMMC in Uboot |
X5 Standard eMMC Partition Table (AB Partition Format)
| No. | Partition Name | Size | File System | Purpose |
|---|---|---|---|---|
| 1 | gpt | 20k | none | Generic partition table header |
| 2 | mbr | 4k | none | Stores image information loaded by bl2 |
| 3 | miniboot | 1280k | none | bl2, bl31, bl32 |
| 4 | miniboot_bak1 | 1280k | none | bl2, bl31, bl32 |
| 5 | misc | 4k | none | Stores slot ab state machine |
| 6 | uboot_a | 2m | none | Uboot |
| 7 | uboot_b | 2m | none | Uboot |
| 8 | ubootenv | 256k | none | Stores Uboot environment variables and system configuration; Uboot environment variables occupy 192k, remaining 64k for system configuration |
| 9 | vbmeta_a | 16k | none | Signature image for system AVB boot verification |
| 10 | vbmeta_b | 16k | none | Signature image for system AVB boot verification |
| 11 | boot_a | 32m | none | Image.lz4 and dtb |
| 12 | boot_b | 32m | none | Image.lz4 and dtb |
| 13 | system_a | 250m | ext4 | Essential libraries and commands for system operation, system |
| 14 | system_b | 250m | ext4 | Essential libraries and commands for system operation, system |
| 15 | hbre_a | 200m | ext4 | HOBOT tools and library partition, mounted at /usr/hobot |
| 16 | hbre_b | 200m | ext4 | HOBOT tools and library partition, mounted at /usr/hobot |
| 17 | app_a | 700m | ext4 | Test cases and samples |
| 18 | app_b | 700m | ext4 | Test cases and samples |
| 19 | private | 256k | ext4 | Stores immutable device data such as MAC address, SN number, etc. |
| 20 | userdata | - | ext4 | Stores user data; extended to the end of eMMC in Uboot |
Partitions can be added or removed, or partition sizes adjusted based on actual requirements.
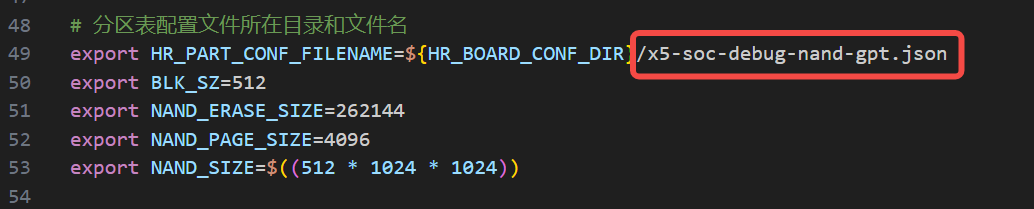
By default, the system uses single partition configuration; if AB partition format is required, the corresponding configuration files must be modified accordingly. The following example illustrates modifications using EVB configuration.
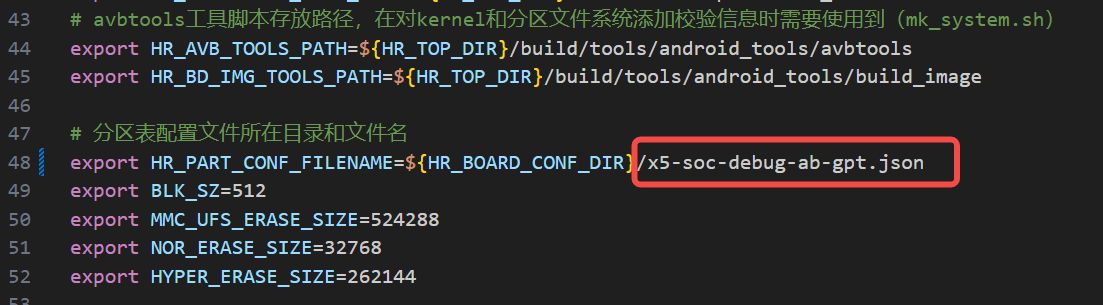
Currently, the specific NAND partition table is not listed. To ensure compatibility, we provide by default a minimal partition table and a dedicated AB-type NAND partition table designed for OTA upgrades, named “x5-soc-debug-nand-ab-ota-gpt.json”. Customers must modify this file according to their specific needs when using it. When switching partition types, please ensure to adjust the NAND_SIZE parameter accordingly. Refer to the diagram below for switching instructions.
Detailed Functional Description
Seamless OTA Update
AB Partition Seamless Update
OTA upgrade supports Android’s AB seamless update mechanism, designed to efficiently upgrade system AB partitions.
AB partitions typically contain a complete set of images, referred to as two slots: a and b. During system boot, the system always boots from one selected _a or _b partition. The AB partition upgrade process uses an alternating update strategy. When the system is currently running on slot a, the OTA update will update slot b, ensuring the next boot starts from slot b, and vice versa—if the system is running on slot b, the OTA update will target slot a.
This alternating update mechanism automatically triggers a rollback upon upgrade failure, ensuring the system can revert to its stable pre-upgrade state. After power-on boot, a program named “ab select” runs during the second stage of the bootloader (bl2) to select the appropriate slot (a or b), ensuring the subsequent system boots from that slot.
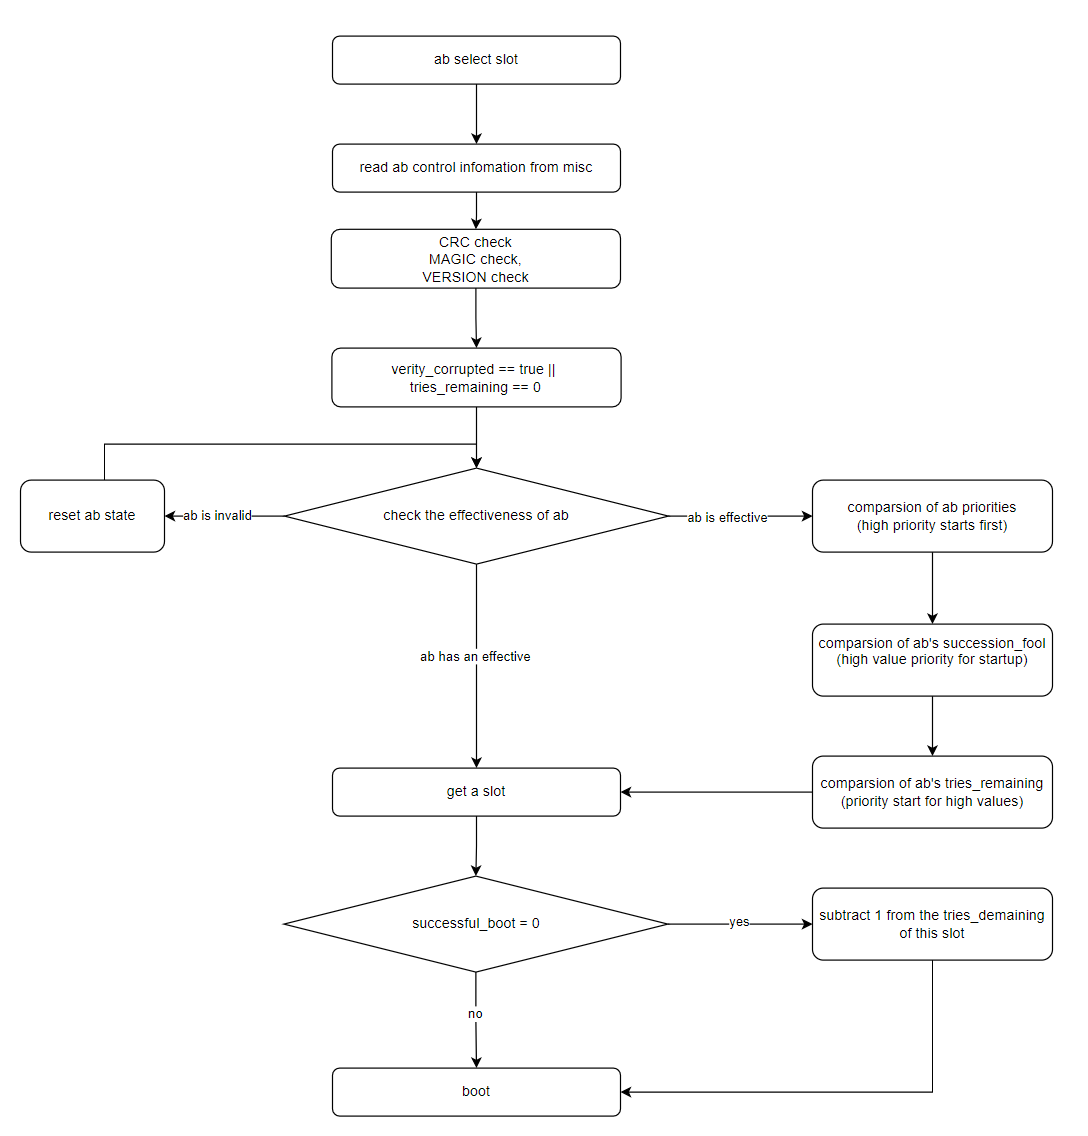
The information structure for each slot is as follows:
struct slot_metadata {
	// Slot priority with 15 meaning highest priority, 1 lowest
	// priority and 0 the slot is unbootable.
	uint8_t priority : 4;
	// Number of times left attempting to boot this slot.
	uint8_t tries_remaining : 3;
	// 1 if this slot has booted successfully, 0 otherwise.
	uint8_t successful_boot : 1;
	// 1 if this slot is corrupted from a dm-verity corruption, 0 otherwise.
	uint8_t verity_corrupted : 1;
	// Reserved for further use.
	uint8_t reserved : 7;
} __attribute__((packed));
In operating system boot management, the bootloader must determine the bootability of each system partition (slot). To this end, the bootloader defines a series of important attributes for each partition, explained as follows:
active (active partition): This flag is exclusive, indicating the currently active boot partition. The bootloader always prioritizes this partition for system boot.
bootable: Indicates the partition contains a complete set of system files suitable for booting, i.e., possesses the necessary conditions for boot.
successful: Indicates the system in this slot can boot normally.
unbootable: Indicates the partition is damaged or has other faults preventing successful boot. During system upgrade, this status is typically marked, and the effect of this marking is equivalent to clearing all the above flags; notably, only when the active flag is set for the current partition will the unbootable flag be cleared.
In system partition management, there are typically two main partitions: slot_a and slot_b. By design, only one partition can be marked as active, while both partitions can simultaneously have bootable and successful attributes.
The figure below illustrates four states during the upgrade process, showing the state transitions of the two partitions (using upgrading a from b as an example):
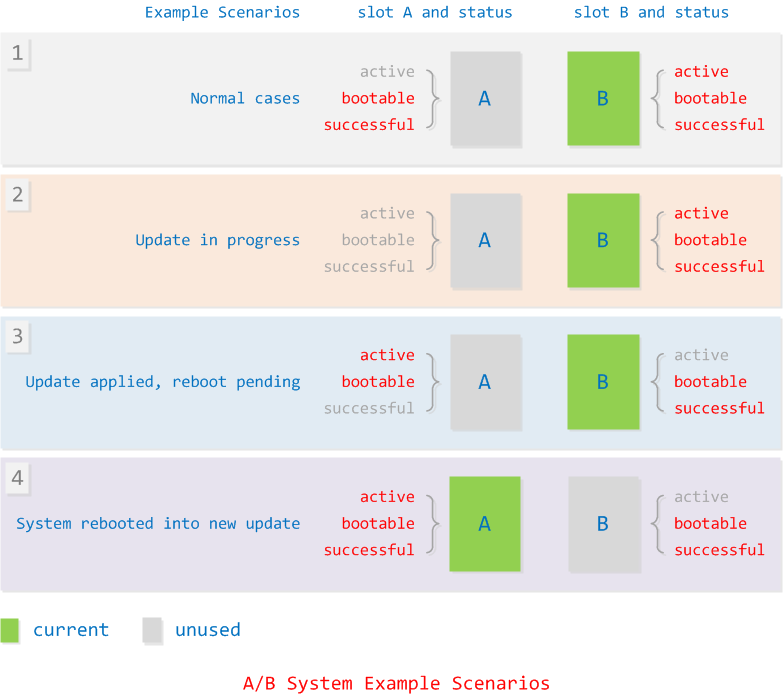
State 1: Default state, both ab slots are bootable. Slot b has higher priority than slot a, so the system defaults to booting from slot b.
slot_a = {
    .priority = 14,         //14 or lower
    .tries_remaining = 1,
    .successful_boot = 1,
    .verity_corrupted = 0,
    .reserved = 0
};

slot_b = {
    .priority = 15,         //15
    .tries_remaining = 1,
    .successful_boot = 1,
    .verity_corrupted = 0,
    .reserved = 0
};
State 2: Upgrade state (flashing state), slot a is unbootable and boot success is 0.
slot_a = {
    .priority = 14,         //14 or lower
    .tries_remaining = 0,   //tries_remaining is 0
    .successful_boot = 0,   //successful_boot is set to 0
    .verity_corrupted = 0,
    .reserved = 0
};

slot_b = {
    .priority = 15,         //15
    .tries_remaining = 1,
    .successful_boot = 1,
    .verity_corrupted = 0,
    .reserved = 0
};
Exception Handling: Next boot will start from slot b.
State 3: Flashing successful, but not yet rebooted. At this point, the target upgrade slot a is set to active, and the current slot b is set to non-active (priority adjusted).
slot_a = {
    .priority = 15,         //15
    .tries_remaining = 1,   //tries_remaining is 1
    .successful_boot = 0,   //successful_boot is 0
    .verity_corrupted = 0,
    .reserved = 0
};

slot_b = {
    .priority = 14,         //14 or lower
    .tries_remaining = 1,
    .successful_boot = 1,
    .verity_corrupted = 0,
    .reserved = 0
};
Exception Handling: If slot a fails verification upon reboot and does not reach successful_boot, tries_remaining will be decremented by 1 during the ab select phase in bl2, making slot a unbootable (equivalent to transitioning back to State 2). The next boot will then start from slot b.
State 4: Reboot verification successful, set slot a to successful boot state.
slot_a = {
    .priority = 15,         //15
    .tries_remaining = 1,   //tries_remaining is 1
    .successful_boot = 1,   //successful_boot is 1
    .verity_corrupted = 0,
    .reserved = 0
};

slot_b = {
    .priority = 14,         //14 or lower
    .tries_remaining = 1,
    .successful_boot = 1,
    .verity_corrupted = 0,
    .reserved = 0
};
For detailed principles and implementation, please refer to the official documentation: OTA Updates
BAK Upgrade
In the device architecture, the miniboot partition is defined as a BAK-type partition. The main function of BAK partitions is to attempt booting from the primary partition first during startup; if the primary partition fails to boot, the system will sequentially switch to the backup partition. Therefore, upgrading using the BAK method is particularly important.
BAK Partition Upgrade Process:
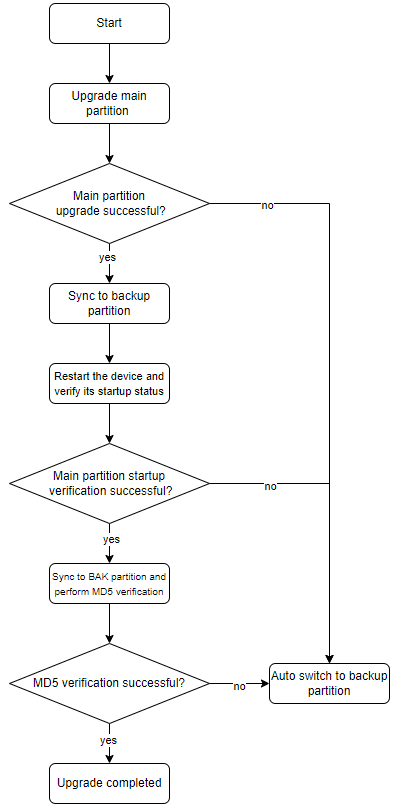
Upgrade operations are performed only on the primary partition, ensuring the security and integrity of its content.
After the primary partition upgrade is completed and verified, the system synchronizes the content to the backup partition to maintain data consistency and recoverability.
Then, the device restarts and re-verifies the boot status of the primary partition.
If verification succeeds, the content of the primary partition is again synchronized to the BAK partition, and an MD5 checksum is performed to ensure data integrity. If verification fails, the system automatically switches to the BAK partition to ensure device availability.
The following is a detailed analysis of this process:
Start:
The process begins at the start node.
Upgrade Main Partition:
First, perform the upgrade operation on the primary partition—this step writes the new firmware or software into the primary partition. The upgrade operation is performed only on the primary partition to ensure its content’s security and integrity.
Main Partition Upgrade Successful?:
Check whether the primary partition upgrade was successful.
If failed (no), the process ends.
If successful (yes), proceed to the next step.
Sync to Backup Partition:
Synchronize the upgraded primary partition data to the backup partition. This step ensures the backup partition has the latest data for recovery when needed.
Restart Device and Verify Startup Status:
Restart the device to apply the new upgrade.
Verify whether the device can boot normally.
Main Partition Startup Verification Successful?:
Check whether the primary partition functions normally after boot.
If verification fails (no), automatically switch to the backup partition to ensure system stability.
If verification succeeds (yes), proceed to the next step.
Sync to BAK Partition and Perform MD5 Verification:
Synchronize data to the BAK partition and perform MD5 checksum to ensure data integrity and consistency.
MD5 Verification Successful?:
Check whether the MD5 checksum passes.
If verification fails (no), automatically switch to the backup partition to ensure system stability.
If verification succeeds (yes), proceed.
Upgrade Completed:
After all steps are successfully completed, the upgrade process ends, and the system is in the latest state.
GOLDEN Upgrade
Supported versions: NAND, eMMC;
Configuration steps (using eMMC version as example):
Set the
HR_RECOVERY_MODEvariable in the board-level configuration file to “yes” to enable system support for recovery mode;
Use a partition table configuration file that supports GOLDEN upgrade;
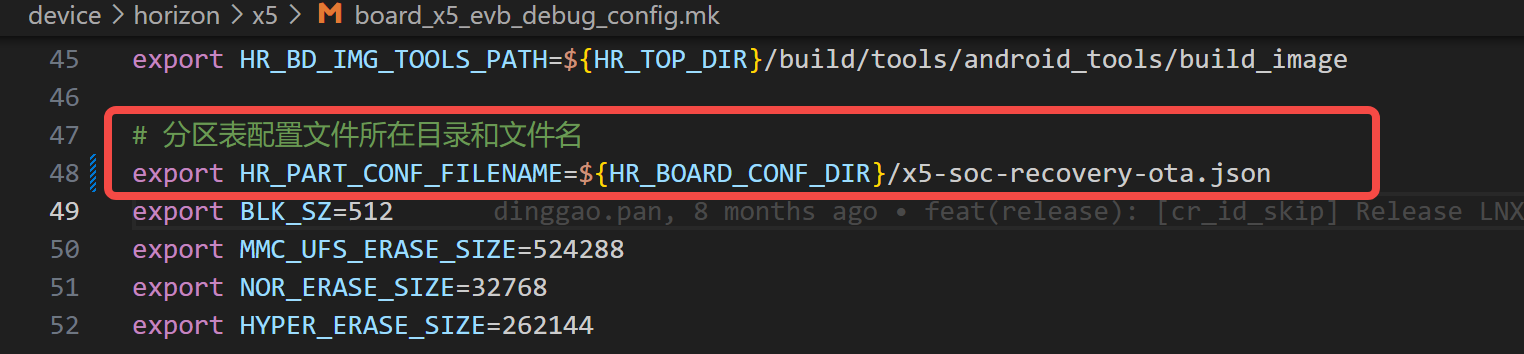
Upgrade process:
Reboot the device into recovery mode;
reboot -m recovery -f
Download the upgrade package from the server to /tmp (memory);
Execute the OTA upgrade application (execution method is the same as in normal mode);
Notes:
GOLDEN partition upgrade must be performed in recovery mode;
Recovery mode uses initramfs; there are requirements for available space under /tmp during upgrade (available space under /tmp is generally half of the available memory under Kernel):
NAND version: Minimum required available space under /tmp is: size of upgrade package image + memory required for program execution (approximately 50M);
eMMC version: Minimum required available space under /tmp is: size of upgrade package image + memory required for program execution (approximately 60M);
Partition Flashing Methods
This system upgrades on a per-partition basis, with each upgradable partition having its own independent image file. During the upgrade process, the corresponding partition’s image file is written directly to the external storage. Currently, full-image upgrade and differential upgrade are supported for eMMC versions, while NAND versions support only full-image upgrade.
Full-Image Upgrade
A full image refers to a complete image file of the target partition. During the upgrade, this image is directly written to the corresponding partition on the external storage. Full-image upgrade ensures partition completeness and consistency, effectively restoring the partition to its intended state. It is suitable for scenarios requiring comprehensive updates or recovery. This method simplifies the upgrade process, reduces potential compatibility issues, and improves system stability and reliability.
Differential Image Upgrade (eMMC only)
Differential upgrade is a difference-based update method that transmits only the differences between the old and new versions of the target partition (i.e., the delta package), rather than the complete image file. During the upgrade, the device receives the delta package and applies it to the current partition data to generate the new version of the target partition. The core advantage of differential upgrade is significantly reduced data transmission, saving bandwidth and upgrade time, especially suitable for scenarios with limited network conditions or frequent upgrades. However, differential upgrade does not save memory. Since the delta package needs to be decompressed and applied on the device, this process typically requires additional memory resources to store temporary data and perform complex algorithmic operations. Therefore, differential upgrade has higher memory requirements, especially when processing large delta packages, which may consume significant memory space.
Notes:
The partition undergoing differential upgrade must be mounted in read-only mode (ro).
OTA Security Measures
Image Rollback Protection
OTA upgrade supports image rollback protection, designed to prevent OTA upgrades to versions lower than the current device’s antirollback version.
Antirollback version number in the OTA upgrade package: obtained by parsing the antirollback version number in the image header.
Antirollback version number of the upgrade device: stored in eFuse.
Limitations of image rollback protection:
Currently, only AB-formatted partitions under eMMC media support image rollback protection;
Antirollback versions can only be updated via OTA upgrade;
Secure and non-secure antirollback versions each support up to 65 iterations [0–64];
Other limitations and implementation details are described in the secure section Software Version Rollback Protection
Enable antirollback
Rollback verification is disabled by default. To enable antirollback version verification, modify the following configuration files:
Check the
have_anti_verattribute in partition table configuration filesboard_cfg/soc/x5-soc-debug-ab-gpt.jsonandboard_cfg/soc/sub_config/miniboot.json. This attribute indicates whether the image package for this partition contains antirollback version information. Ensurehave_anti_veris set to true for miniboot, uboot, and vbmeta partitions; other partitions may omit this attribute or set it to false. Currently,x5-soc-debug-ab-gpt.jsonhas this attribute enabled by default. If customers use a custom partition table, ensure the attribute is enabled.{ "Note": "Miniboot partition configuration information, please do not modify it.", "miniboot": { "bl2": { "size": "256k" }, "bl3x": { "size": "2m" }, "size": "2304k", "part_type": "BAK", "ota_is_update": true, "ota_update_mode": "image", "have_anti_ver": true } }
"uboot": {
        "part_type": "AB",
        "size": "2m",
        "ota_is_update": true,
        "ota_update_mode": "image",
        "have_anti_ver": true
    },
"vbmeta": {
        "part_type": "AB",
        "size": "16k",
        "ota_is_update": true,
        "ota_update_mode": "image",
        "have_anti_ver": true
    }
Modify the configuration file
device/horizon/x5/board_x5_evb_debug_config.mk:If the BL2 chip is signed with the customer’s RSA key hash (X5 Customer root rsa key hash programming and usage), both secure and non-secure antirollback domains will have rollback checks enabled; if the BL2 chip is signed with D-Robotics’ key, only the non-secure antirollback domain supports rollback checks after enabling secure boot. For chips with customer-signed BL2, set the following variable:
export HR_ENABLE_CUSTOMER_KEY="yes"
Modify the
HR_PART_CONF_FILENAMEvariable. Since only AB-formatted partitions under eMMC media support image rollback protection, use thex5-soc-debug-ab-gpt.jsonconfiguration file. If customers use a custom partition configuration file, ensure it is AB-formatted;export HR_PART_CONF_FILENAME=${HR_BOARD_CONF_DIR}/x5-soc-debug-ab-gpt.json
Modify the values of
ANTIROLLBACK_SEC_UPDATEandANTIROLLBACK_NOSEC_UPDATE(true/false) to choose whether to update the antirollback version in the corresponding eFuse;Modify
ANTIROLLBACK_SEC_VERto configure the version number of miniboot.img;Modify
ANTIROLLBACK_NOSEC_VERto configure the version numbers of boot.img and vbmeta.img;# antirollback version export ANTIROLLBACK_SEC_UPDATE="true" export ANTIROLLBACK_SEC_VER=0 export ANTIROLLBACK_NOSEC_UPDATE="true" export ANTIROLLBACK_NOSEC_VER=0
Modify the
uboot/configs/hobot_x5_auto_defconfigconfiguration file, addCONFIG_X5_SUPPORT_CHECK_ROLLBACK=yto enable antirollback check:CONFIG_X5_SUPPORT_CHECK_ROLLBACK=y
Version Number Retrieval
Method to retrieve antirollback version from eFuse:
On the device side, enter the command
ota_tool -vto obtain the current antirollback version (note: the antirollback version takes effect after reboot; otherwise, the queried version remains the old one).root@buildroot:~# ota_tool -v OTA Library version is 1.0.1 system version is V1.1.0_20250617-1317 Nosecure antirollback version is 35 Secure antirollback version is 35
OTA Version Verification
The OTA system supports verifying the version of the upgrade package before the upgrade to ensure the package version is not lower than the current system version. If the package version is detected to be lower, the system automatically stops the upgrade.
The version information in the upgrade package is stored in the
sys_versionfield of the OTA configuration filedata.json.The current device version is obtained by parsing the
/etc/versionfile.
The current version format is as follows:
root@buildroot:~# cat /etc/version
LNX6.1.83_PL5.1_V1.0.16_20250107-1708
The system locates the first occurrence of “_V” in the version string and compares the version part “V1.0.16”, ignoring the timestamp that follows.
Note: If the user has root privileges, they can temporarily unlock downgrade capability by modifying the /etc/version file.
Partition Verification
The OTA system also supports verification of the GPT partition file in the image by comparing the GPT partition table in the image with the current system’s GPT partition table to verify whether any partition adjustments exist. If any GPT partition changes are detected, the system immediately halts the upgrade process.
The OTA upgrade package contains a partition file gpt.conf generated by the build system, with the following format:
mbr:20480:24575:2
miniboot:24576:2383871:2
miniboot_bak1:2383872:4743167:2
misc:4743168:4747263:2
uboot:4747264:6844415:2
ubootenv:6844416:7106559:2
vbmeta:7106560:7122943:2
boot:7122944:19705855:2
system:19705856:281849855:2
hbre:281849856:491565055:2
app:491565056:1225568255:2
private:1225568256:1225830399:2
userdata:1225830400:1278259199:2
The format of the gpt.conf file is: partition_name:start_position:end_position:partition_ID. The content is parsed as follows:
mbr:
Start position: 20480
End position: 24575
Size: 24575 - 20480 + 1 = 4096 bytes
miniboot:
Start position: 24576
End position: 2383871
Size: 2383871 - 24576 + 1 = 2359296 bytes
miniboot_bak1:
Start position: 2383872
End position: 4743167
Size: 4743167 - 2383872 + 1 = 2359296 bytes
misc:
Start position: 4743168
End position: 4747263
Size: 4747263 - 4743168 + 1 = 4096 bytes
uboot:
Start position: 4747264
End position: 6844415
Size: 6844415 - 4747264 + 1 = 2097152 bytes
ubootenv:
Start position: 6844416
End position: 7106559
Size: 7106559 - 6844416 + 1 = 262144 bytes
vbmeta:
Start position: 7106560
End position: 7122943
Size: 7122943 - 7106560 + 1 = 16384 bytes
boot:
Start position: 7122944
End position: 19705855
Size: 19705855 - 7122944 + 1 = 12582912 bytes
system:
Start position: 19705856
End position: 281849855
Size: 281849855 - 19705856 + 1 = 262943000 bytes
hbre:
Start position: 281849856
End position: 491565055
Size: 491565055 - 281849856 + 1 = 209715200 bytes
app:
Start position: 491565056
End position: 1225568255
Size: 1225568255 - 491565056 + 1 = 734002200 bytes
private:
Start position: 1225568256
End position: 1225830399
Size: 1225830399 - 1225568256 + 1 = 262144 bytes
userdata:
Start position: 1225830400
End position: 1278259199
Size: 1278259199 - 1225830400 + 1 = 52428800 bytes
Summary as follows:
| Partition Name | Start Position | End Position | Size |
|---|---|---|---|
| mbr | 20480 | 24575 | 4 KB |
| miniboot | 24576 | 2383871 | 2304 KB |
| miniboot_bak1 | 2383872 | 4743167 | 2304 KB |
| misc | 4743168 | 4747263 | 4 KB |
| uboot | 4747264 | 6844415 | 2048 KB |
| ubootenv | 6844416 | 7106559 | 256 KB |
| vbmeta | 7106560 | 7122943 | 16 KB |
| boot | 7122944 | 19705855 | 12 MB |
| system | 19705856 | 281849855 | 250 MB |
| hbre | 281849856 | 491565055 | 200 MB |
| app | 491565056 | 1225568255 | 700 MB |
| private | 1225568256 | 1225830399 | 256 KB |
| userdata | 1225830400 | 1278259199 | 50 MB |
This partition table can be compared with the single-partition format partition table in the System Partition Table section, and conforms to the system partition size limitations.
Since the system supports automatic expansion of the last partition, its end address changes dynamically. Therefore, during GPT partition verification, verification is only required up to the userdata partition, as the last partition typically does not contain image content and will not affect normal operation.
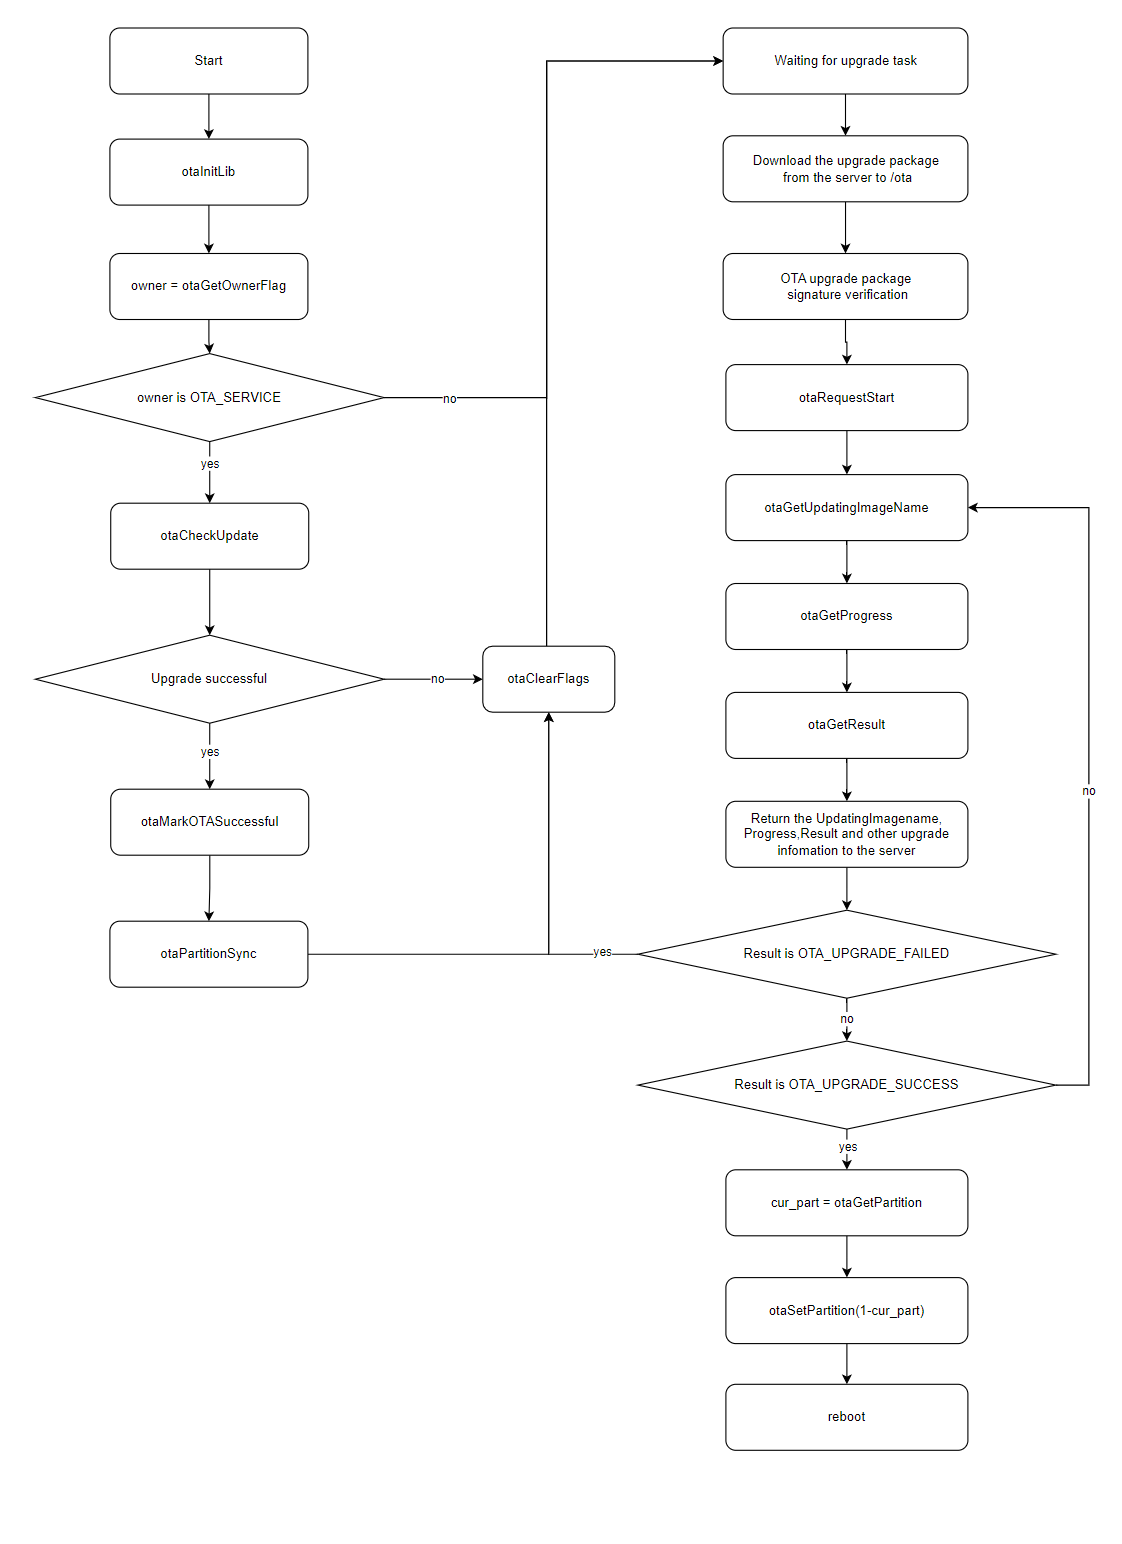
OTA Upgrade Process
The OTA service downloads the update package from the cloud and performs verification. If an OTA partition exists, it downloads the package to
/ota; otherwise, it downloads to/userdata. At this time, it also callsotaInitLibto initialize the dynamic library.An upgrade request is initiated by calling
otaRequestStart. This API decompresses theota_processprogram from the update package and creates a child process to execute this program for actual image flashing. Meanwhile, this API also creates a file lock to prevent multiple upgrades from occurring simultaneously and creates a pipe file to facilitate communication withota_process. Additionally, a thread is started to periodically read from the pipe to obtain real-time upgrade progress, results, and partition information.During the child process upgrade phase, the OTA Service can call
otaGetResultto get the upgrade result,otaGetProgressto get the upgrade progress, andotaGetUpdatingImageNameto get the image currently being upgraded.When
otaGetResultreturnsOTA_UPGRADE_SUCCESS, it indicates that the image has been successfully flashed, and the system enters the verification phase.Call
otaSetPartitionto set the next boot partition to the opposite slot and initiate the reboot process.After rebooting, the OTA Service calls
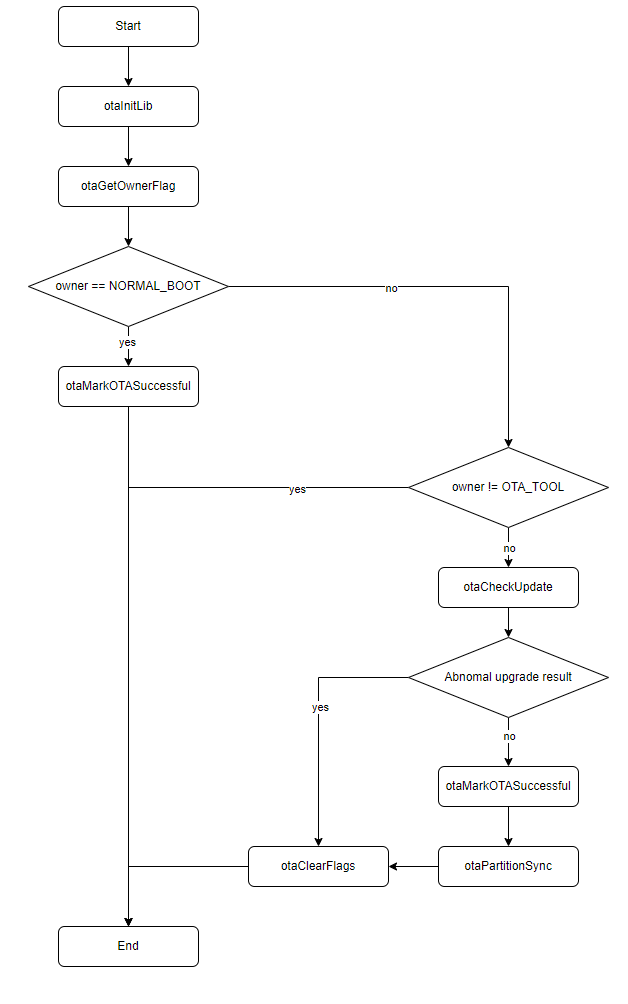
otaGetOwnerFlagto get the upgrade owner. If the owner is the OTA Service, it will be responsible for verifying this upgrade and enters the verification process.Call
otaCheckUpdateto get the upgrade result. This API primarily checks whether the image has been completely written and whether the system boots from the expected AB slot or BAK slot.Call
otaMarkOTASuccessfulto mark the current partition boot as successful. This API operates the AB state machine, marking the current slot asboot_successful, ensuring subsequent boots will occur from this slot. If any reboot occurs before this step, the next boot will revert to the slot containing the old version image, indicating upgrade failure.Call
otaPartitionSyncto synchronize the BAK partition, ensuring the BAK partition content matches the primary partition content.Finally, call
otaClearFlagsto clear upgrade markers, completing the entire upgrade process.
Upgrade flowchart as follows:
Introduction to the OTA Packaging Module
Packaging Images
Usage of Packaging Tool
The help information of the packaging tool can be queried by executing the following command:
./bd.sh otapackage help
Below is the detailed usage of the OTA packaging tool:
==================================================================================
   \  //   Welcome to the OTA Package Build System!
    \//    Working directory: /home/zxs/x5
    //\
   //  \
==================================================================================
Available commands for bd.sh:
./bd.sh otapackage [image | image_diff | all | help] [path]

Support functions:
        help              Displays this help message.
        image|all         Generate an all_in_one.zip package.
        image_diff [path] Generate a differential OTA package using the specified path.

Usage example:
        ./bd.sh otapackage image
        ./bd.sh otapackage all
        ./bd.sh otapackage image_diff /path/to/diff
        ./bd.sh otapackage help
==================================================================================
Note:
  1. If no command is provided, the default action will be 'all'.
  2. The [path] argument must be a valid file path for differential OTA.
==================================================================================
Full Image Packaging Method
After completing the upgrade image creation, the OTA upgrade package (all_in_one.zip) can be packaged by executing the following command:
./bd.sh otapackage
The generated OTA upgrade package will be output to the following path: out/product/ota_packages. In this directory, you will see two files:
ls out/product/ota_packages
all_in_one.signature all_in_one.zip
Among them, all_in_one.zip is the OTA upgrade package, and all_in_one.signature is the signature file for this upgrade package. The signature algorithm uses RSA 4096 SHA-256.
Differential Image Packaging Method
Differential image upgrades depend on the previously flashed old image package. Therefore, when planning to use differential upgrades, please ensure proper preservation of the old image package to avoid loss or damage.
Initial Differential Upgrade Preparation
Generate the old image package: When performing the first differential upgrade, generate the old image package using the full image packaging method before generating the new image. To facilitate distinction, manually rename the generated
all_in_one.ziptoall_in_one_old.zip../bd.sh otapackageGenerate the new image: After properly saving the old image package, compile and generate the new image.
Generate the differential image package: Use the following command to generate the differential image package. A full image package will also be generated simultaneously, which can serve as the old image package for the next differential upgrade.
./bd.sh otapackage image_diff ./out/product/ota_packages/all_in_one_old.zip
The generated OTA package will be output to the following path: out/product/ota_packages. In this directory, you will see four newly generated files:
ls out/product/ota_packages
all_in_one.signature  all_in_one.zip  all_in_one_inc.signature  all_in_one_inc.zip
Among them,
all_in_one.zipis the full OTA image package, which can be renamed toall_in_one_old.zipas the old image package for the next differential upgrade.all_in_one_inc.zipis the differential image package, and.signaturefiles are signature files for the corresponding image packages, using the RSA 4096 SHA-256 signature algorithm.
Subsequent Differential Upgrades
Starting from the second differential upgrade, use the full image package generated during the previous differential packaging as the old image package, eliminating the need to regenerate the old image package.
Signing Keys
The keys used for signing are located at the following path: build/tools/ota_tools/keys, containing two files:
private_key.pem public_key.pem
Among them, private_key.pem is the signing private key, and public_key.pem is the verification public key. When compiling the hbre/otaupdate module, public_key.pem is embedded into the hbre image. On the device side, the public key path is /usr/hobot/share/ota/public_key.pem.
If you need to replace with your own keys, follow these steps:
Private key generation:
openssl genrsa -out private_key.pem 4096
Public key generation:
openssl rsa -RSAPublicKey_out -in private_key.pem -out public_key.pem
Replace
private_key.pemandpublic_key.pemunder the pathbuild/tools/ota_tools/keysRebuild by executing the following commands:
./bd.sh
./bd.sh otapackage
Note: The generated OTA package is by default named all_in_one.zip. The upgrade program verifies the package name, which must contain the keyword “all_in_one” and have the suffix “.zip”. Additionally, the package name must not contain the following keywords: “app”, “APP”, “middleware”, “param”.
OTA Upgrade Package Introduction
Package Structure
Archive:  all_in_one.zip
  Length      Date    Time    Name
---------  ---------- -----   ----
      497  2025-01-09 14:30   gpt.conf
     3030  2025-01-09 14:30   data.json
  1310720  2025-01-09 17:39   miniboot.img
  1210176  2025-01-09 21:04   uboot.img
    16384  2025-01-09 17:40   vbmeta.img
 33554432  2025-01-09 17:40   boot.img
262144000  2025-01-09 17:40   system.img
209190912  2025-01-09 21:09   hbre.img
734003200  2025-01-09 17:41   app.img
   237520  2025-01-09 14:29   ota_process
---------                     -------
1241670871                     10 files
The above content shows the file structure within the current OTA upgrade package for eMMC media, mainly including the following four types of files. The number of image files may vary depending on actual configuration.
| File | Description |
|---|---|
| gpt.conf | Partition table file |
| data.json | OTA configuration file |
| *.img | Partition images |
| ota_process | OTA flashing program |
Note: The OTA package should include images for all partitions that support OTA upgrades. Currently, upgrading individual or partial partitions separately is not supported.
OTA Configuration File
The OTA upgrade package includes a configuration file named data.json. This file is generated during compilation and contains partition and image information of the upgrade package.
General Configuration
| Configuration | Type | Functionality |
|---|---|---|
| sys_version | str | System software version |
| update_partition | arr[str] | Partitions to be upgraded |
| partition_info | arr[obj] | Per-partition configurations |
Per-partition Configuration (partition_info)
| Configuration | Type | Functionality |
|---|---|---|
| md5sum | arr[obj] | MD5 values of each image |
| md5_scope | arr[obj] | MD5 verification length for each image |
| medium | str | External storage medium (nor/eMMC/nand) |
| part_type | str | Partition type (AB/BAK/GOLDEN) |
| upgrade_method | str | Upgrade method (image) |
| imgname | str | Image name, only files with .img/.bin/.ubifs suffixes are supported |
Below is an example of a data.json file:
{
    "sys_version": "LNX6.1.83_PL5.1_V1.0.16_20250111-1657",
    "update_partition": [
        "miniboot",
        "uboot",
        "vbmeta",
        "boot",
        "system",
        "hbre",
        "app"
    ],
    "partition_info": {
        "miniboot": {
            "md5sum": {
                "miniboot.img": "892e12d67ce2f6d8cf4fa77644fb329f"
            },
            "md5_scope": {
                "miniboot.img": 2359296
            },
            "medium": "emmc",
            "part_type": "BAK",
            "upgrade_method": "image",
            "imgname": "miniboot.img"
        },
        "uboot": {
            "md5sum": {
                "uboot.img": "2859118f26e787993551baa1eaf05b79"
            },
            "md5_scope": {
                "uboot.img": 2097152
            },
            "medium": "emmc",
            "part_type": "GOLDEN",
            "upgrade_method": "image",
            "imgname": "uboot.img"
        },
        "vbmeta": {
            "md5sum": {
                "vbmeta.img": "a81d6d6d7c3bd900ab1c6d172fc160c0"
            },
            "md5_scope": {
                "vbmeta.img": 16384
            },
            "medium": "emmc",
            "part_type": "GOLDEN",
            "upgrade_method": "image",
            "imgname": "vbmeta.img"
        },
        "boot": {
            "md5sum": {
                "boot.img": "a0e1065fd364f8d18198f099309b975c"
            },
            "md5_scope": {
                "boot.img": 12582912
            },
            "medium": "emmc",
            "part_type": "GOLDEN",
            "upgrade_method": "image",
            "imgname": "boot.img"
        },
        "system": {
            "md5sum": {
                "system.img": "92d66eb15695e0f29de1368703cf74b2"
            },
            "md5_scope": {
                "system.img": 262144000
            },
            "medium": "emmc",
            "part_type": "GOLDEN",
            "upgrade_method": "image",
            "imgname": "system.img"
        },
        "hbre": {
            "md5sum": {
                "hbre.img": "c7b4a3467667f2b61940aa8b5135b811"
            },
            "md5_scope": {
                "hbre.img": 209715200
            },
            "medium": "emmc",
            "part_type": "GOLDEN",
            "upgrade_method": "image",
            "imgname": "hbre.img"
        },
        "app": {
            "md5sum": {
                "app.img": "4303af014b1f269aa97eb0d91be8cb9f"
            },
            "md5_scope": {
                "app.img": 734003200
            },
            "medium": "emmc",
            "part_type": "GOLDEN",
            "upgrade_method": "image",
            "imgname": "app.img"
        }
    }
}
With the above configuration, the OTA upgrade package ensures that each partition’s image is correctly verified and updated during the upgrade process.
OTA Upgrade End Introduction
This system provides the libupdate.so library, which contains APIs required for OTA upgrades. For detailed API definitions, please refer to the corresponding OTA API Documentation.
ota_tool Usage
ota_tool is a sample tool implemented using the libupdate.so API, designed to manually initiate OTA upgrades on the board. This tool can serve as a reference for developing OTA upgrade services. The related code is located in the hbre/otaupdate/src/ota_tool directory.
ota_tool Usage:
   -v, --version                      get this library's version,
                                          system version,
                                          antirollback version
   -b, --boot                         check ota update status when boot.
   -s, --setpartition [partition]     set A/B slot partition, 0--A; 1--B.
   -g, --getpartition                 get A/B slot partition, 0--A; 1--B.
   -p, --package [package_path]       specify the path of package, the package paths can be relative or absolute, it's length must be smaller than 64 bytes.
   -n, --noreboot                     request ota without reboot.
   -c, --checksign                    signature check.
   -i, --signature                    signature information file.
   -h, --help                         Display this help screen.
Before using ota_tool for upgrades, the OTA upgrade package must be uploaded to the board.
Parameter Introduction:
-h: Get help information.
-v: Get
libupdate.soversion, current system software version.-b: Check upgrade result after boot (this check is automatically performed during system startup; user intervention is not required).
-s: Set the next boot A/B slot; 0 means A, 1 means B.
-g: Get current A/B slot.
-p: Specify the upgrade package.
-n: Do not automatically reboot after successful upgrade.
-c: Enable package integrity verification.
-i: Specify the signature file (must follow the -p parameter).
Examples:
# Full upgrade, without verifying package integrity
ota_tool -p all_in_one.zip

# Full upgrade, with package integrity verification
ota_tool -c -p all_in_one.zip -i all_in_one.signature

# Differential upgrade, without verifying package integrity
ota_tool -p all_in_one_inc.zip

# Differential upgrade, with package integrity verification
ota_tool -c -p all_in_one_inc.zip -i all_in_one_inc.signature
ota_tool Implementation
ota_tool is implemented in C, with the main source file being hbre/otaupdate/src/ota_tool/otainterface.c. It implements functions such as retrieving system software version, setting/getting ab slot, OTA package signature verification, OTA upgrade, upgrade progress display, and reboot detection.
The first half of the main function is responsible for parsing input parameters. For example, if the -c parameter is passed, the corresponding signature file is used to verify the upgrade package.
Finally, the ota_update_all_img function is called to initiate the upgrade process.
ota_update_all_img Implementation
static int32_t ota_update_all_img(const char *zip_path)
{
	int32_t progress = 0;

	uint8_t		    slot = 0;
	uint8_t		    next_slot = 0;
	int32_t		    ret = 0;
	ota_update_result_e result = 0;
	char		    part_name[ARRAY_32] = { 0 };

	ret = otaGetPartition(&slot);
	if (ret < 0) {
		return ret;
	}

	if (slot == 2) {
		next_slot = 0;
		printf("The slot [%d] to be burned\n", next_slot);
	} else {
		next_slot = 1 - slot;
		printf("The slot [%d] to be burned\n", next_slot);
	}

	ret = otaInitLib();
	if (ret < 0) {
		printf("error:init failed!\n");
		return ret;
	}

	ret = otaRequestStart(zip_path, OTA_TOOL);
	if (ret < 0) {
		printf("error: start ota update failed!\n");
		ret = -1;
		goto err;
	}
	while (otaGetResult() != OTA_UPGRADE_SUCCESS && otaGetResult() != OTA_UPGRADE_FAILED) {
		progress = otaGetProgress();
		result = otaGetResult();
		otaGetUpdatingImageName(part_name, sizeof(part_name));

		if (result == UPGRADE_FAILED) {
			printf("error: ota update failed!\n");
			ret = -1;
			break;
		}
		OTA_show_Process_Bar(part_name, progress,
				     "OTA is upgrading ...");
		usleep(100 * 1000);
	}

err:
	if (otaGetResult() == OTA_UPGRADE_SUCCESS) {
		ret = otaSetPartition(next_slot);
		if (ret < 0) {
			printf("error: set partition failed!\n");
			return ret;
		}
		if (g_is_reboot == true) {
			printf("reboot system!\n");
			ota_system_exe("reboot");
		} else {
			printf("ota update success and waiting for reboot!\n");
		}
	}
	otaDeinitLib();

	return ret;
}
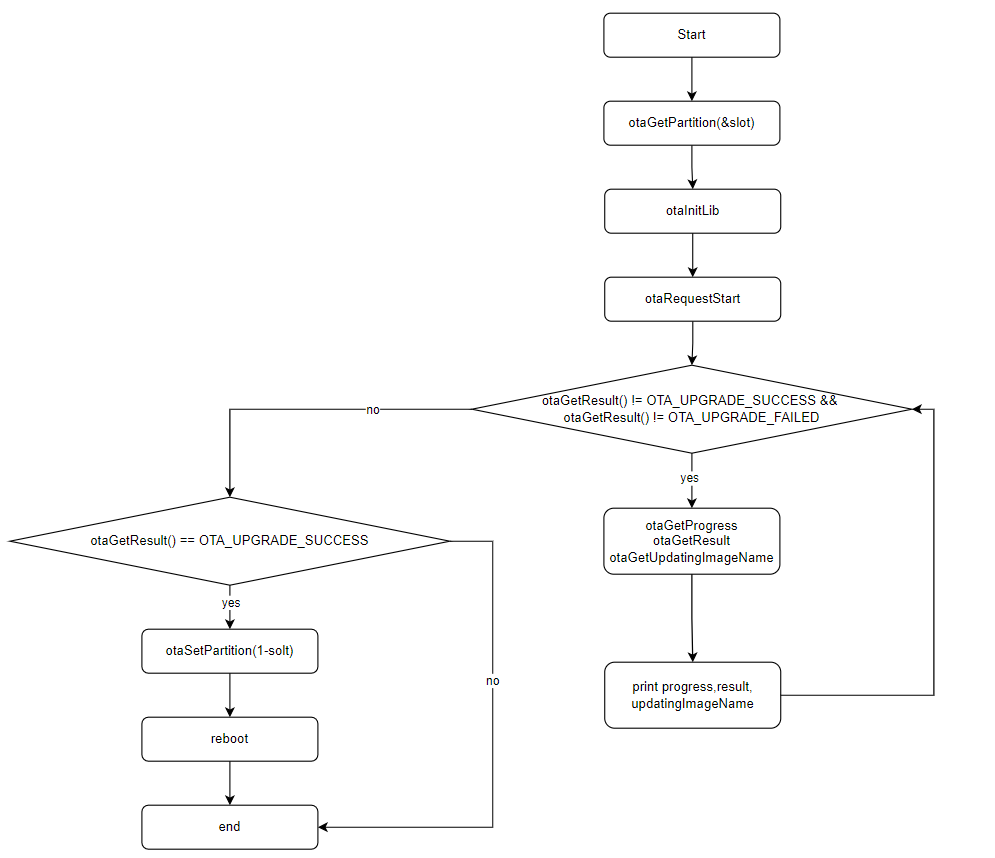
Call
otaGetPartitionto get the current ab slot.Call
otaInitLibto initialize thelibupdate.solibrary.Call
otaRequestStartwith the upgrade package path and owner (OTA_TOOL) to start the upgrade.Wait for
otaGetResultto returnOTA_UPGRADE_SUCCESSorOTA_UPGRADE_FAILED. During this time, callotaGetProgress,otaGetResult, andotaGetUpdatingImageNameto get upgrade progress, result, and the image being upgraded, and print progress on the console viaOTA_show_Process_Bar.If
otaGetResultreturnsOTA_UPGRADE_SUCCESS, consider the upgrade successful, callotaSetPartitionto set the ab slot to the opposite slot, and reboot the system according to configuration.
ota_boot_check Implementation
After system boot, an S99ota_update_check service is started, which calls ota_tool -b to perform upgrade verification, entering the ota_boot_check process.
int32_t ota_boot_check(void)
{
	int32_t		      ret = 0;
	enum ota_update_owner owner = 0;

	if ((ret = otaInitLib()) != 0) {
		printf("error: init failed!\n");
		return ret;
	}

	if ((ret = otaGetOwnerFlag(&owner)) != 0) {
		printf("error: Get owner flag failed!\n");
		goto exit;
	}

	if (owner == NORMAL_BOOT) {
		printf("Normal boot\n");
		if ((ret = otaMarkOTASuccessful()) != 0) {
			printf("error: mark boot success failed\n");
		}
		return ret;
	}

	if (owner != OTA_TOOL) {
		printf("ota_tool is not owner, owner is [%d]\n", owner);
		return otaDeinitLib();
	}

	if ((ret = otaCheckUpdate()) != 0) {
		printf("error: boot check failed\n");
		goto exit;
	}

	if ((ret = otaMarkOTASuccessful()) != 0) {
		printf("error: mark boot success failed\n");
		goto exit;
	}

	if ((ret = otaPartitionSync()) != 0) {
		printf("error: partition sync failed\n");
		goto exit;
	}

exit:
	otaClearFlags();
	otaDeinitLib();
	return ret;
}
Call
otaInitLibto initialize the library.Call
otaGetOwnerFlagto get the current update owner.If the owner is
NORMAL_BOOT, callotaMarkOTASuccessfulto mark boot as successful, then exit.If the owner is not
OTA_TOOL, exit normally and wait for another owner to perform the reboot check.Call
otaCheckUpdateto obtain the update result. If the result is abnormal, callotaClearFlagsto clear the OTA flags and terminate the OTA process.Call
otaMarkOTASuccessfulto mark the boot as successful.Call
otaPartitionSyncto synchronize the A/B partitions with the BAK partition. If this call returns a non-zero value, the synchronization between A/B and BAK partitions has failed, leaving the affected partitions in an unusable state. A new OTA update must be performed to repair the corresponding A/B and BAK partitions.
The ota_boot_check flowchart is shown below: