10.2.3. 快速体验
本章节中,我们为您介绍地平线算法工具链PTQ方案的基本使用流程,便于您实现快速上手。 这里我们以 yolov5s 模型为例,为您进行使用演示,地平线算法工具链PTQ方案的更多详细内容,请阅读 进阶指南-PTQ原理及步骤详解 章节。
10.2.3.1. 开发环境准备
若未准备开发环境,请参考 环境安装 章节进行环境安装。
10.2.3.2. 模型准备
若开发环境已准备完成,请使用命令:source activate horizon_bpu 或 conda activate horizon_bpu 进入开发机模型转换环境。
执行以下命令,检查yolov5s浮点模型是否存在:
ls -l yolov5s_v2.0/04_detection/03_yolov5s/mapper
命令执行完毕后,若出现以下日志,说明模型已准备完成:
    -rwxr-xr-x 1 regular-engineer      645 Mar  9 14:01 01_check.sh
    -rwxr-xr-x 1 regular-engineer      661 Mar  9 11:34 02_preprocess.sh
    -rwxr-xr-x 1 regular-engineer      603 Mar  9 11:34 03_build.sh
    -rwxr-xr-x 1 regular-engineer    13039 Mar  9 11:34 postprocess.py
    -rwxr-xr-x 1 regular-engineer     3133 Mar  9 11:34 preprocess.py
    -rwxr-xr-x 1 regular-engineer     2752 Mar  9 11:34 README.cn.md
    -rwxr-xr-x 1 regular-engineer    10776 Mar  9 14:02 yolov5s_config.yaml
    -rwxr-xr-x 1 regular-engineer 29999538 Mar  9 14:01 YOLOv5s.onnx
若执行命令后,未出现以上日志,请阅读 环境安装 章节下载模型示例包。
10.2.3.3. 模型验证
若示例浮点模型已准备完成,根据以下步骤进行模型验证,确保其符合地平线X3处理器的支持约束。
进入浮点模型转换示例yolov5s模型目录
cd yolov5s_v2.0/04_detection/03_yolov5s/mapper
模型检查
    #确认模型结构及算子是否支持,并提供每个算子执行硬件的分配情况(BPU/CPU)
    bash 01_check.sh
命令执行完毕后,若出现以下日志,说明模型校验成功
    2022-12-21 22:29:51,153 INFO [Wed Dec 21 22:29:51 2022] End to Horizon NN Model Convert.
    2022-12-21 22:29:51,181 INFO ONNX model output num : 3
    2022-12-21 22:29:51,219 INFO End model checking....
10.2.3.4. 模型转换
模型检查通过后,根据以下步骤进行模型转换。
进行校准数据预处理
bash 02_preprocess.sh
命令执行完毕后,若出现以下日志并无任何报错,说明数据预处理成功
    write:./calibration_data_rgb_f32/COCO_val2014_000000181677.rgb
    write:./calibration_data_rgb_f32/COCO_val2014_000000181714.rgb
    write:./calibration_data_rgb_f32/COCO_val2014_000000181739.rgb
模型转换
    #转换时所需的配置文件 yolov5s_config.yaml,已存放在03_build.sh脚本同级文件夹下
    bash 03_build.sh
命令执行完毕后,若出现以下日志并无任何报错,说明模型转换成功
    2022-12-21 22:36:48,087 INFO Convert to runtime bin file sucessfully!
    2022-12-21 22:36:48,087 INFO End Model Convert
模型转换完成后,会在 model_output 文件夹下保存模型文件和静态性能评估文件。
torch-jit-export_subgraph_0.html # 静态性能评估文件(可读性更好)
torch-jit-export_subgraph_0.json # 静态性能评估文件
yolov5s_672x672_nv12.bin # 用于在地平线处理器上加载运行的模型
yolov5s_672x672_nv12_optimized_float_model.onnx # 中间过程模型文件,可用于后续模型的精度校验
yolov5s_672x672_nv12_original_float_model.onnx # 中间过程模型文件,可用于后续模型的精度校验
yolov5s_672x672_nv12_quantized_model.onnx # 中间过程模型文件,可用于后续模型的精度校验
10.2.3.5. 模型上板运行
注意事项:模型上板运行前,请确保已按照 安装系统 章节完成开发板端的环境部署。
将 yolov5s_672x672_nv12.bin 定点模型拷贝 替换 至开发板的 /app/pydev_demo/models 目录下,调用以下命令运行
    cd /app/pydev_demo/07_yolov5_sample/
    sudo python3 ./test_yolov5.py
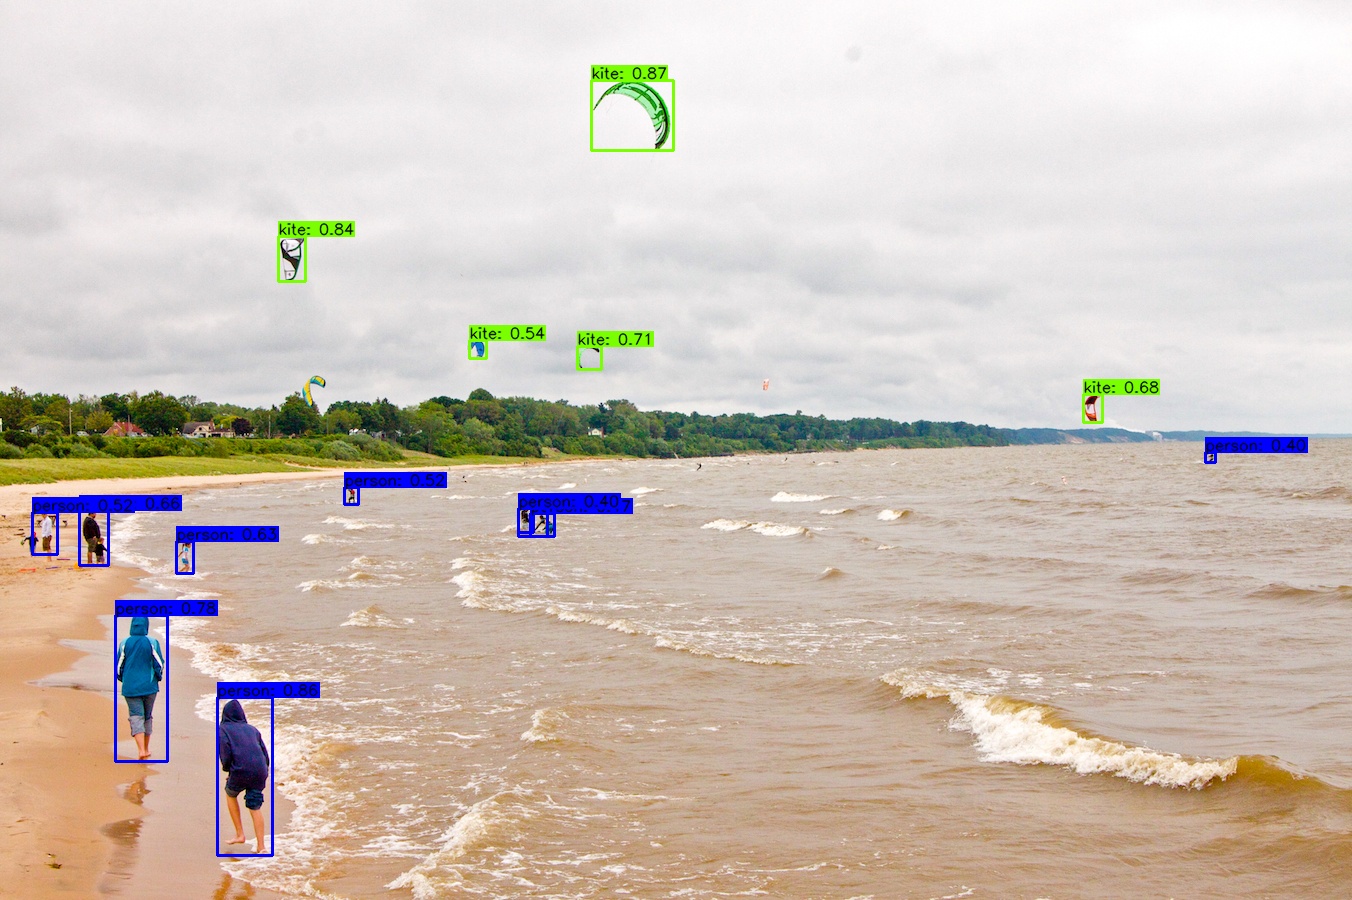
运行成功后,会输出图像的分割结果,并且dump出分割效果图: result.jpg
    ......
    detected item num:  15
    person is in the picture with confidence:0.8555
    person is in the picture with confidence:0.7774
    person is in the picture with confidence:0.6599
    person is in the picture with confidence:0.6310
    person is in the picture with confidence:0.6091
    person is in the picture with confidence:0.5242
    person is in the picture with confidence:0.5182
    person is in the picture with confidence:0.4737
    person is in the picture with confidence:0.4037
    person is in the picture with confidence:0.4023
    kite is in the picture with confidence:0.8651
    kite is in the picture with confidence:0.8428
    kite is in the picture with confidence:0.7063
    kite is in the picture with confidence:0.6806
    kite is in the picture with confidence:0.5446
    ......
常用API示例,请参考 yolov5目标检测算法 章节内容。
更多模型推理API使用说明,请参考 Python开发指南-模型推理接口使用说明 和 C/C++开发指南-模型推理接口使用说明 章节内容。
10.2.3.6. 公版模型性能精度指标
下表提供了典型深度神经网络模型在地平线X3处理器上的性能、精度指标。
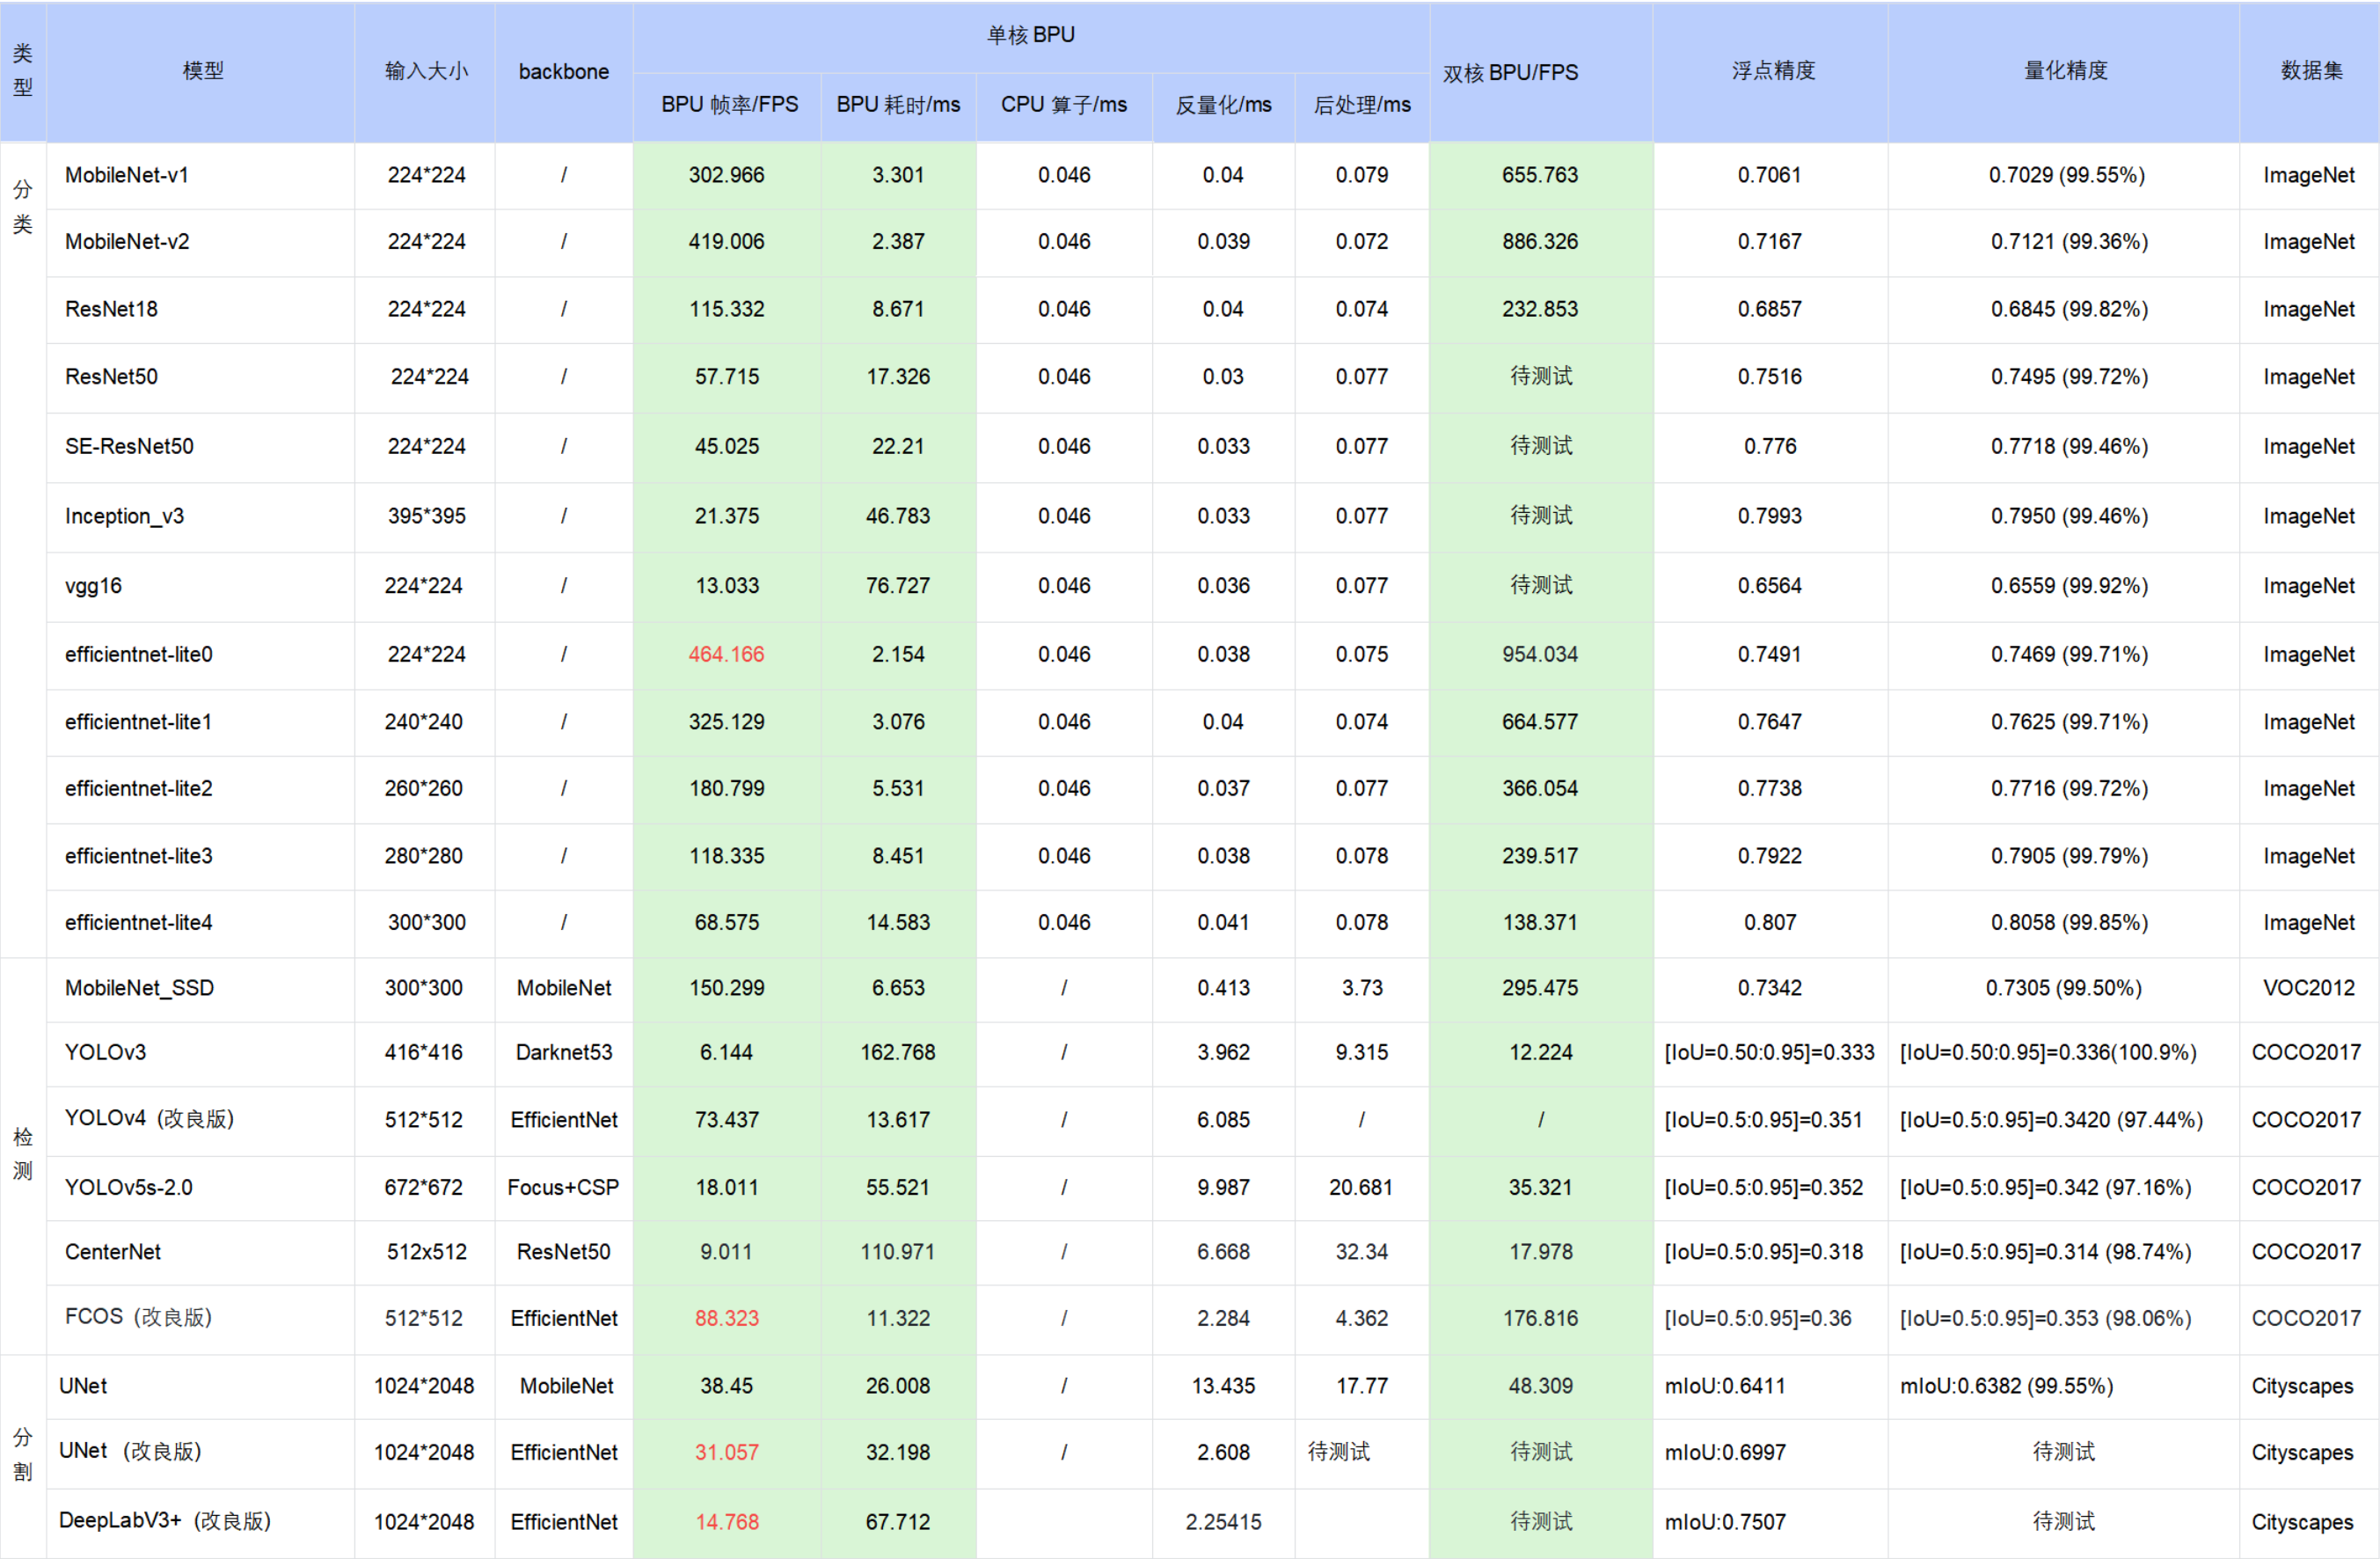
注意:
表格中的数据均为在地平线RDK X3开发板的实测结果,测试模型均来自于 horizon_model_convert_sample 模型示例包;
对于模型示例包中的 BPU/CPU 混合异构模型,单帧的耗时主要由输入量化CPU节点、模型BPU算子、模型CPU算子、输出反量化CPU节点、CPU后处理等模块构成,具体说明如下:
a. 输入量化CPU节点:完成float32到int8的输入量化操作,该节点只在使用 featuremap 输入的模型中包含。量化耗时与输入 shape 大小成正比
b. 模型CPU算子:
 ⅰ. 检测模型中未包含 CPU 算子

 ⅱ. 分类模型尾部的 Softmax 和 Reshape 为 CPU 算子

 ⅲ. 分割模型 DeepLabV3+ 尾部的 Argmax 为 CPU 算子
c. 输出反量化CPU节点:完成int8到float32的输出反量化操作。量化耗时与输出 shape 大小成正比
d. 地平线目前支持将模型的 量化/反量化节点手动摘除,由用户自行融入前后处理代码中实现,以减少数据重复遍历的损耗。以 EfficientDet 模型为例,摘除了反量化节点合入后处理,推理性能从 66FPS提高到100FPS
e. 目前地平线示例模型的后处理均未做针对性的性能优化,您可以根据实际需求采用如近似高效实现等优化手段进行代码级加速
在实际应用中,BPU 和 CPU 可以并发运行,提高整体推理速度。