Quick start
Hardware and software configuration
- RDK X5/Module
- RDK S100/S100P
- RDK S600
- USB Mode
-
Set the DIP switch of the RDK Audio Kit as follows (
101X). In this state, the mode is set to I2S, the number of I2S channels is 1, and the I2S reference level is 3V3.
-
Make sure the system image version is RDK OS 3.5.0, then download the following patch packages to the RDK X5 board.
-
On the board, run
sudo dpkg -i hobot-*to install them.
-
Run
srpi-config, then click 3 Interface Options > I5 Audio > Audio Driver HAT V2 in order, press Enter, and then select<Finish>. Restart as prompted, or runsudo rebootyourself to apply all the configuration.
-
If the RDK Audio Kit is correctly installed as described above, after the reboot completes, run
cat /proc/asound/cardsto list all sound cards detected by ALSA.duplexaudiois the on-board sound card of the RDK X5, andduplexaudioi2s1is the sound card of the RDK Audio Kit, which means the configuration is effective.
-
Run
ls -l /dev/sndto list the recording and playback nodes.pcmC0D0pis the playback node of PCM channel 0 device 0, andpcmC0D1cis the recording node of PCM channel 0 device 1, and so on. These two nodes correspond to the RDK Audio Kit on the RDK X5.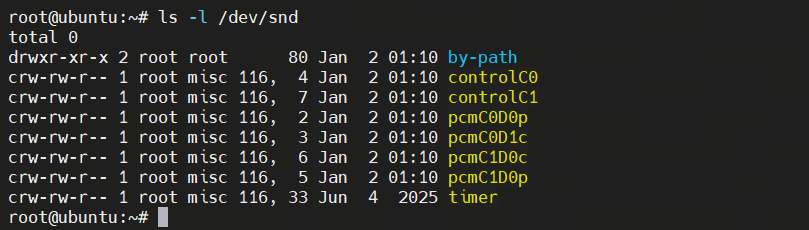
-
On the RDK S100/S100P,
PCM0is connected to the Wi-Fi & BT module by default for Bluetooth audio. To use the RDK Audio Kit, set thePCM0function switch toOFFto route thePCM0-related pins to the 40PIN header.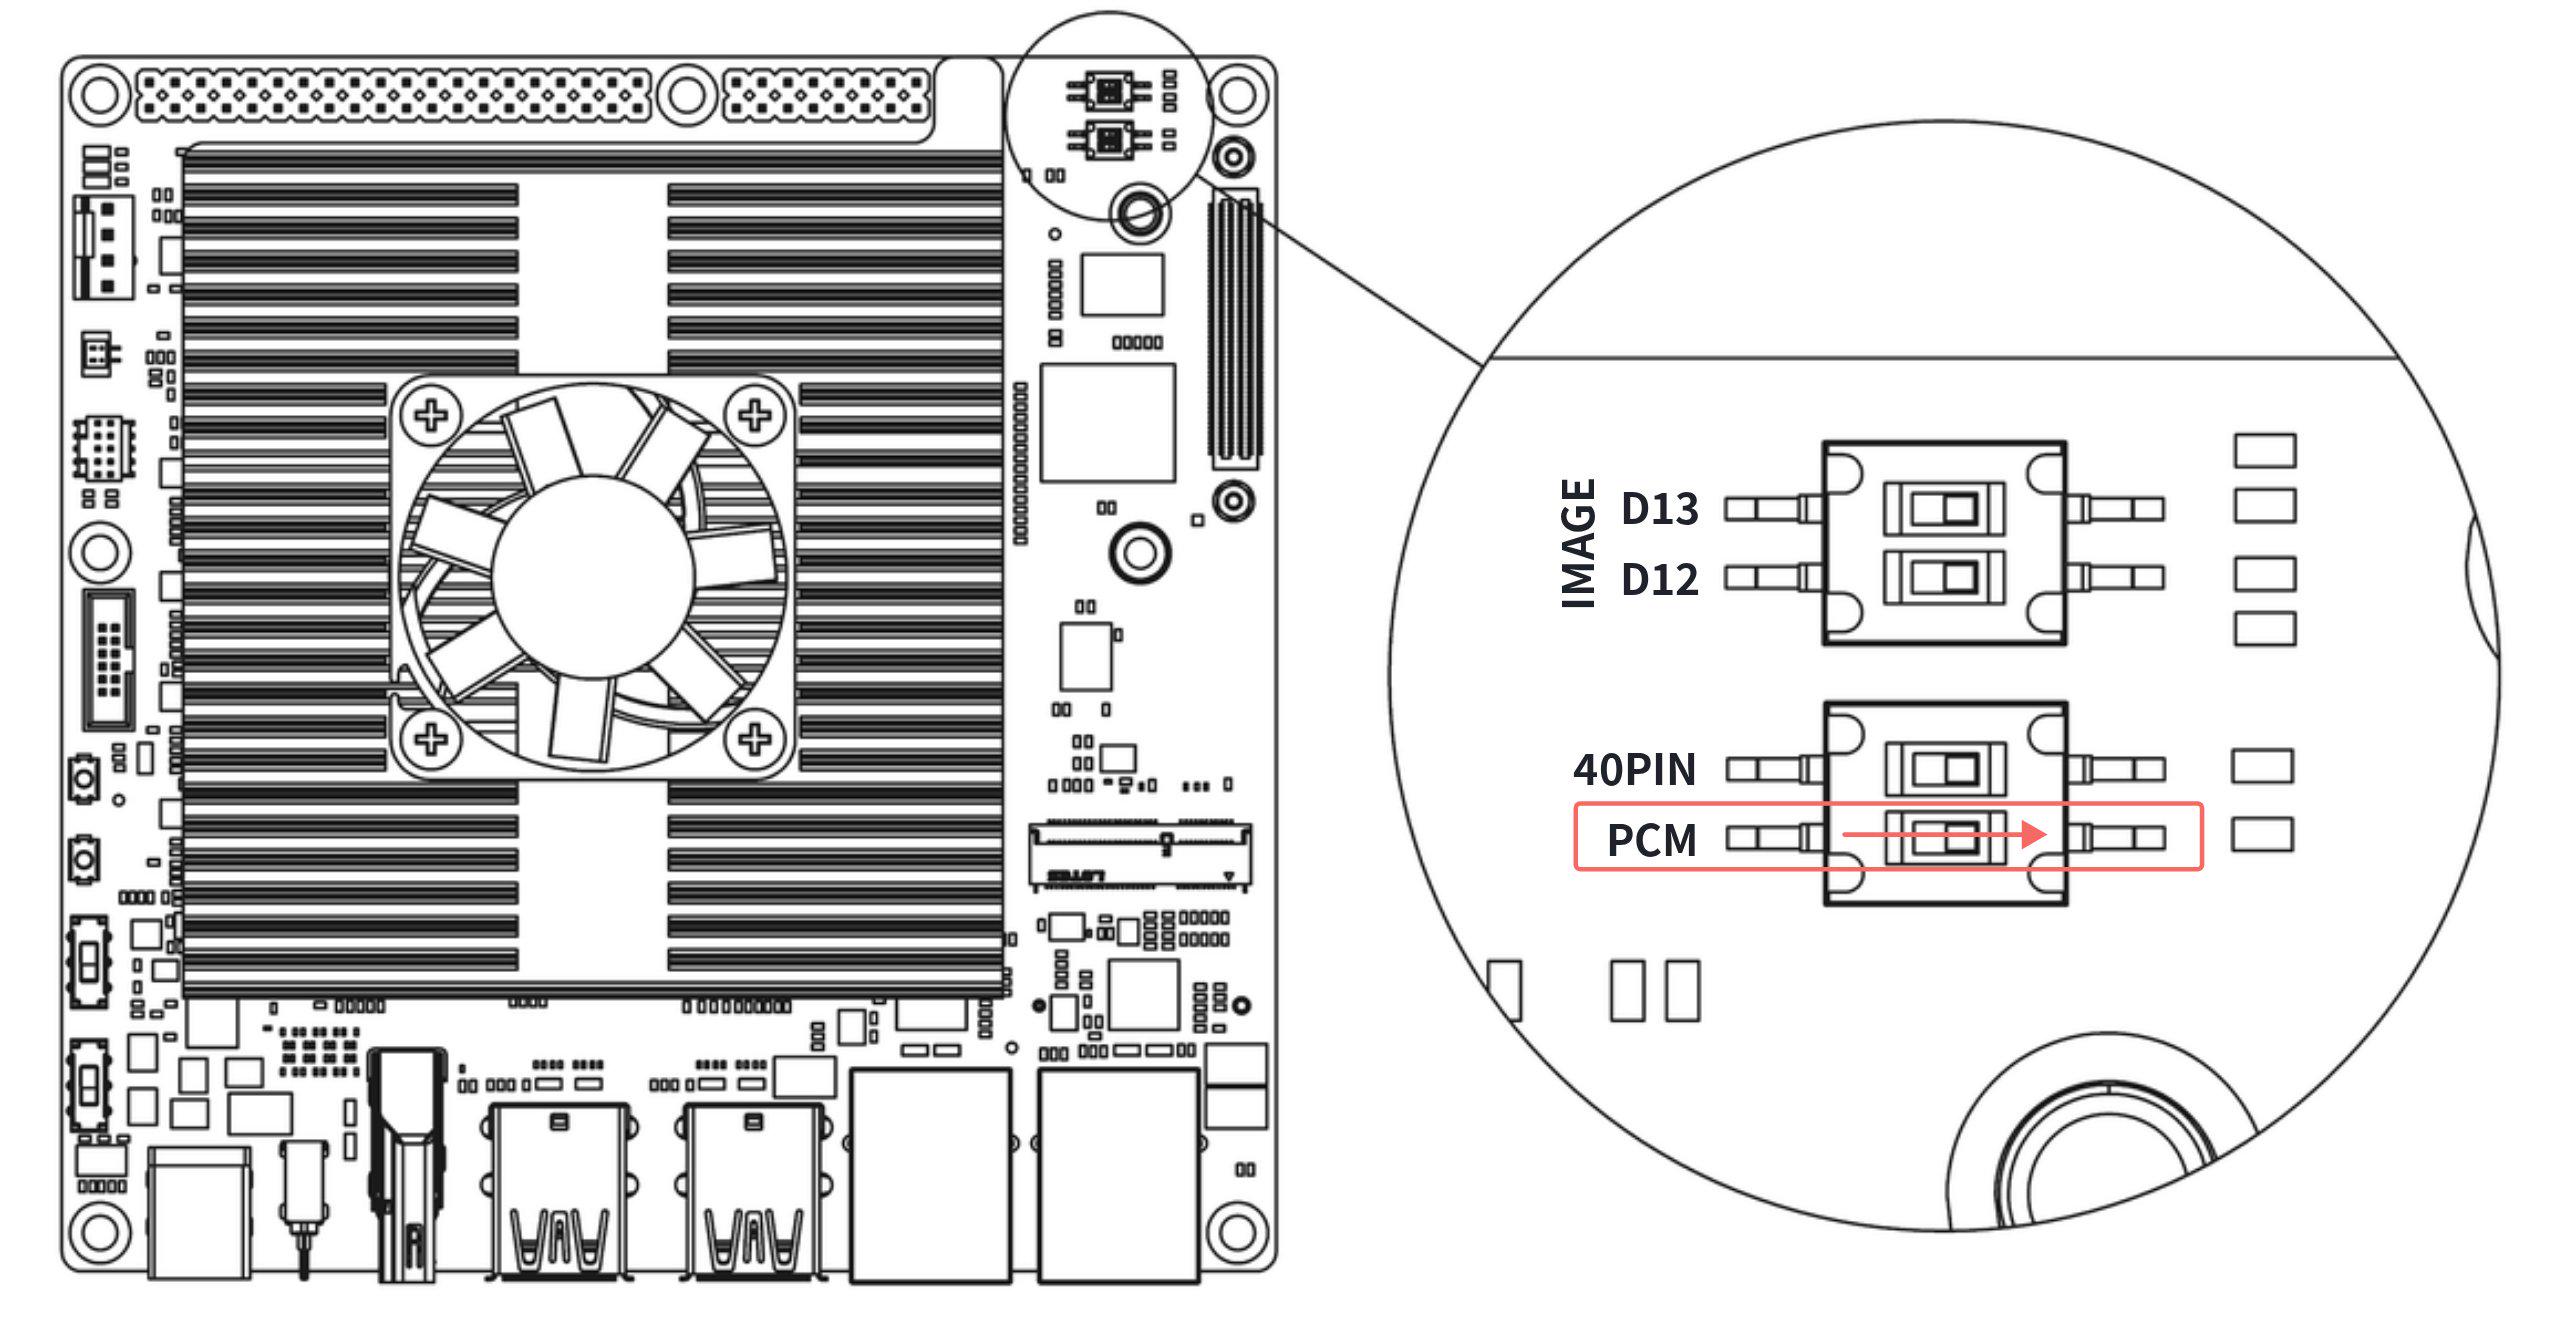
-
Set the DIP switch of the RDK Audio Kit as follows (
101X). In this state, the mode is set to I2S, the number of I2S channels is 1, and the I2S reference level is 3V3.
-
Make sure the system image version is RDK OS 4.0.5-20260507. You can confirm it by running the
cat /proc/versioncommand, as shown below. If the version does not match, please update to the latest version.
-
Download the following patch packages to the RDK S100 system.
-
On the board, run
sudo dpkg -i linux-*to install, and then reboot.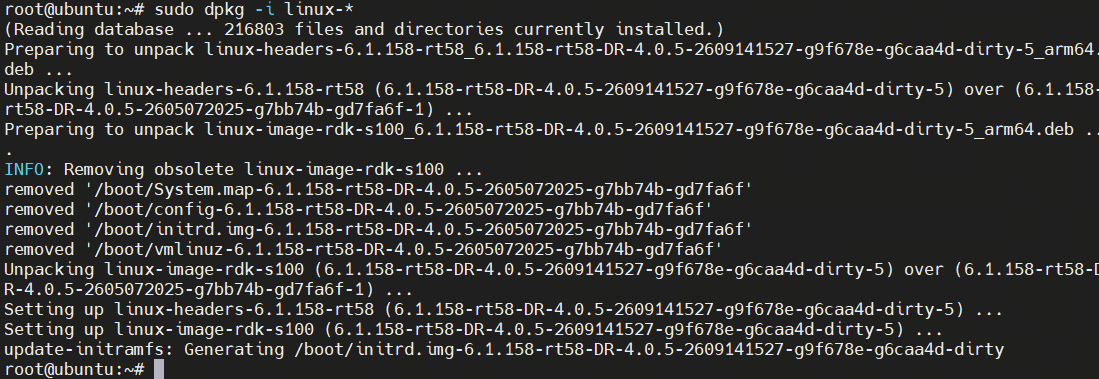
-
After the reboot, enter the following commands to load the drivers:
modprobe hobot_cpudai_super
modprobe snd-soc-es8156
modprobe snd-soc-es7210
modprobe hobot_snd_s100_ac_fdx_host -
Run
cat /proc/asound/cardsto list all sound cards detected by ALSA.s100snd2is the sound card of the RDK Audio Kit, which means the configuration is effective.
-
Run
ls -l /dev/sndto list the recording and playback nodes.pcmC0D0cis the recording node of PCM channel 0 device 0, andpcmC0D1pis the playback node of PCM channel 0 device 1, and so on. These two nodes correspond to the RDK Audio Kit on the RDK S100.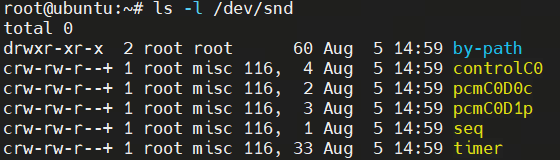
-
Set the DIP switch of the RDK Audio Kit as follows (
100X) to set the RDK Audio Kit to single-channel full-duplex I2S mode with a 1.8V reference level.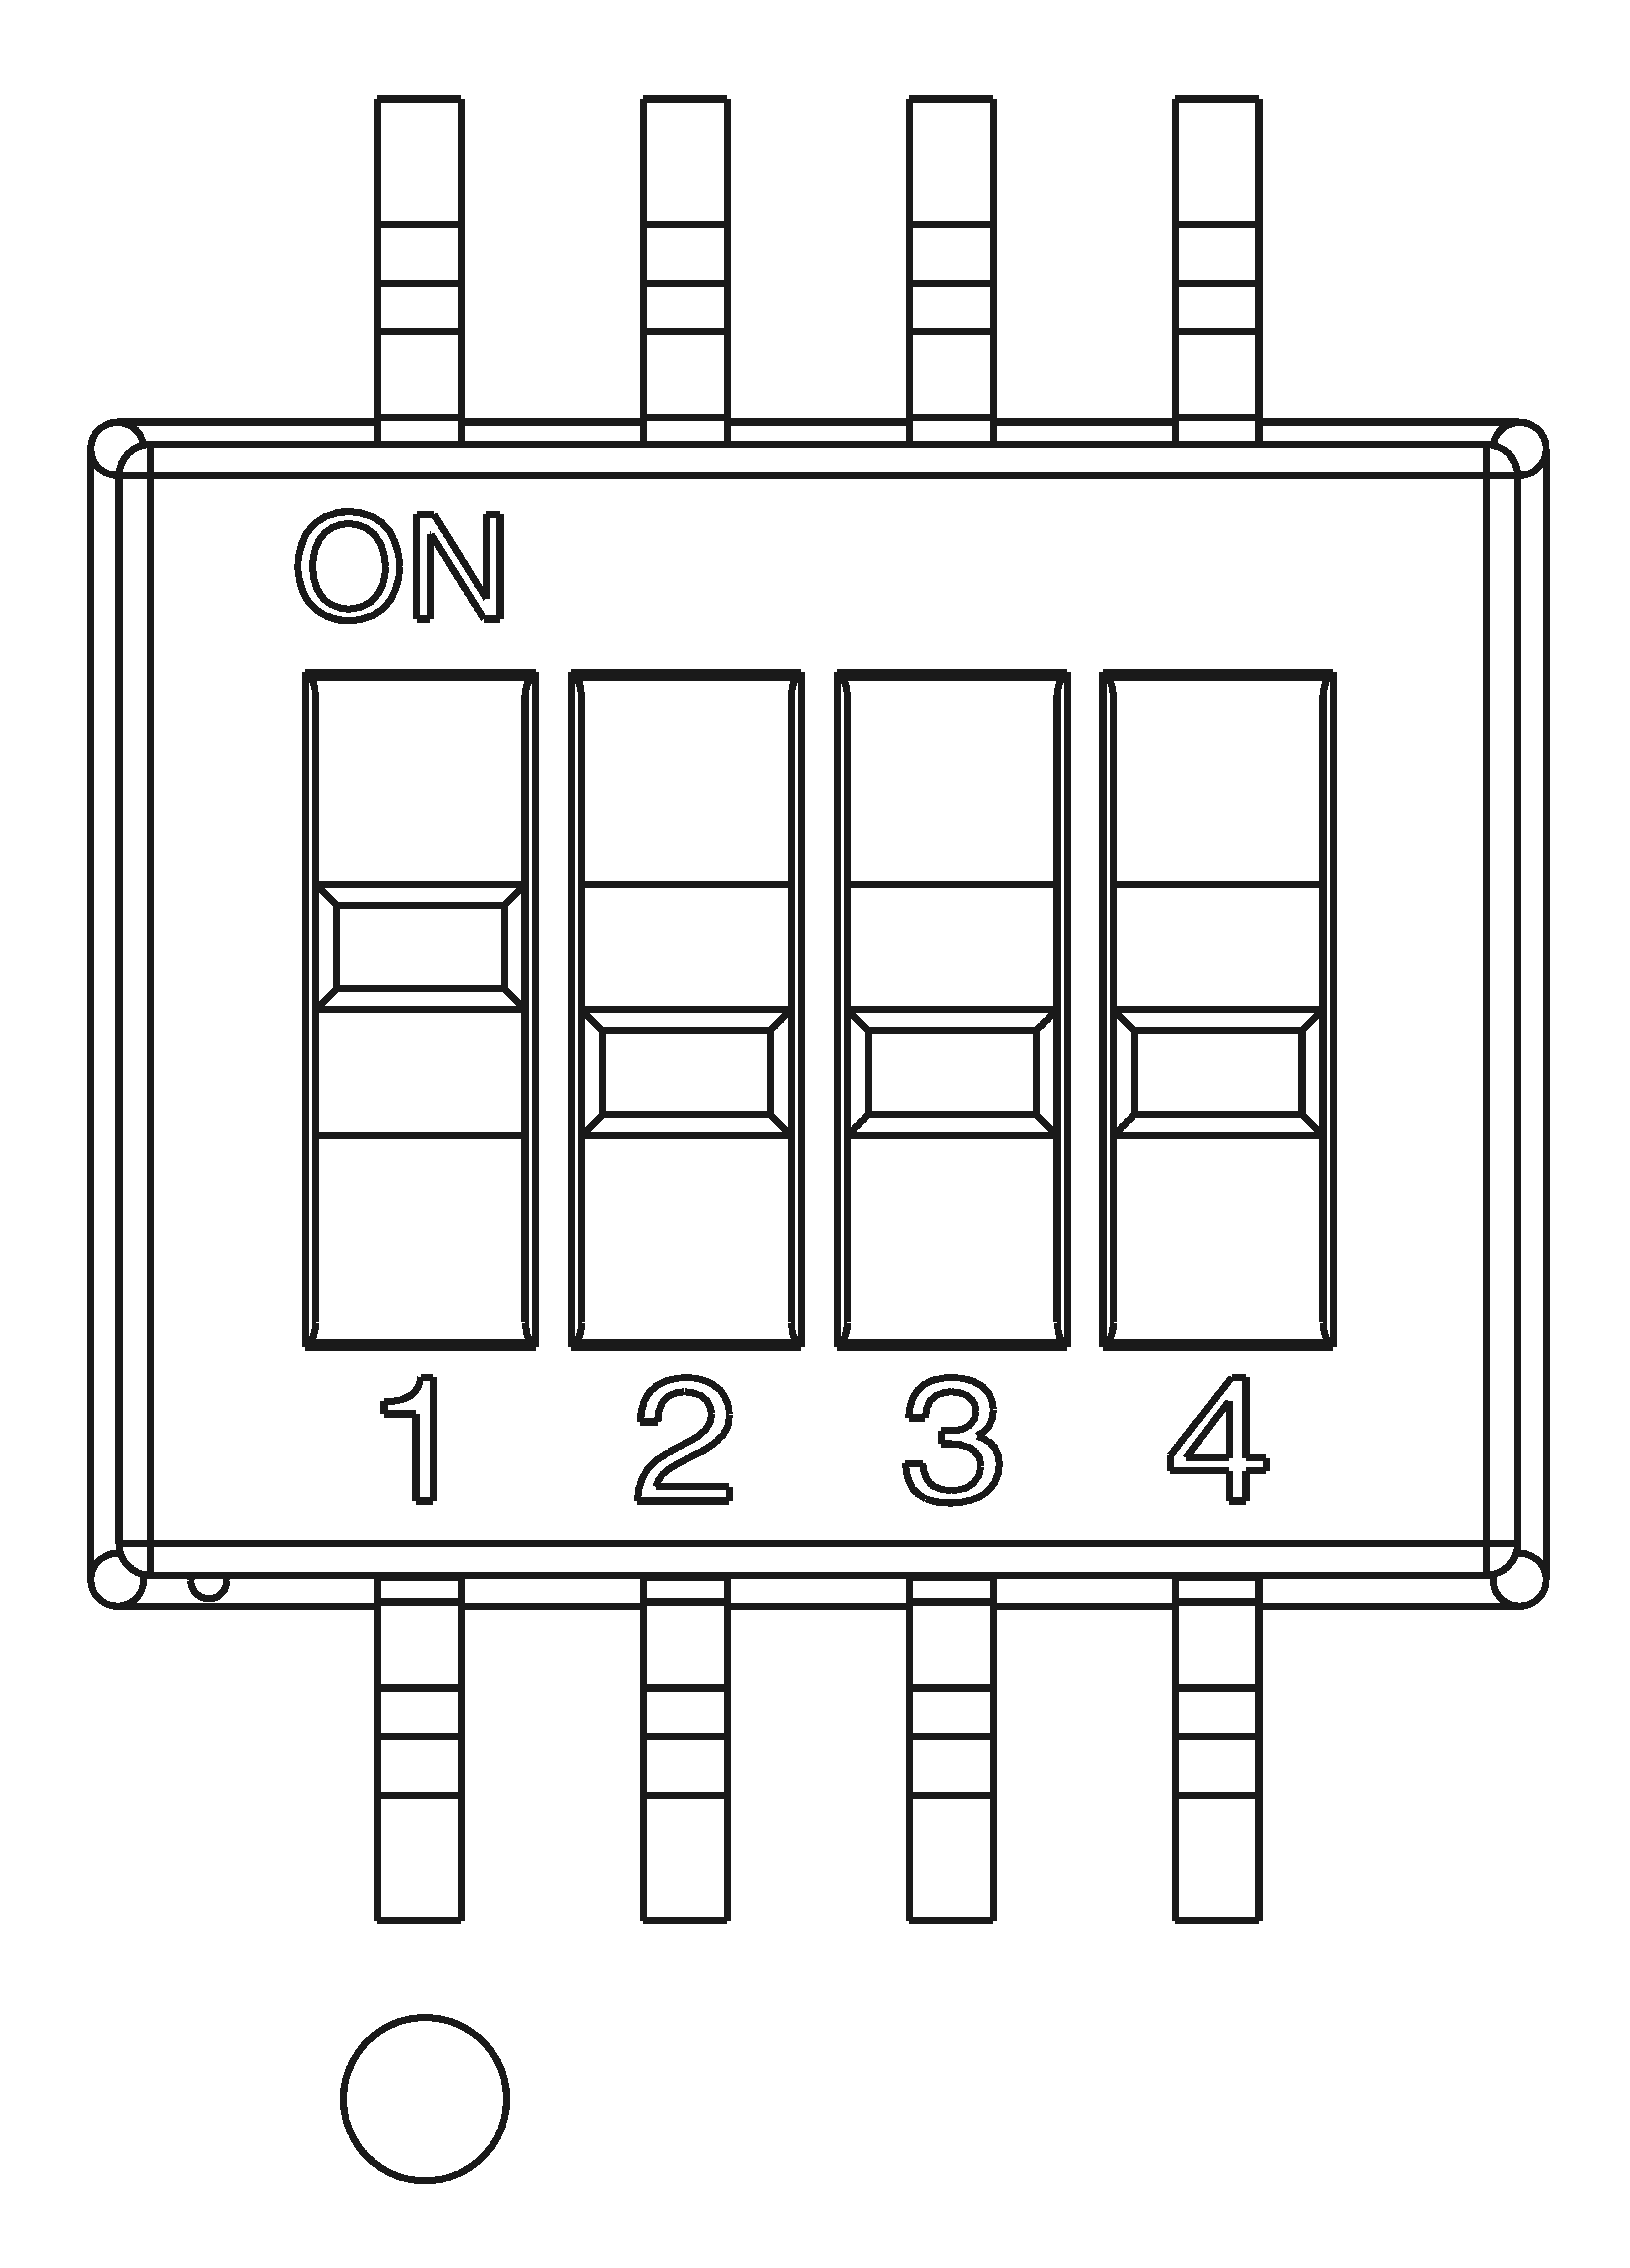
Only the RDK S600 can use dual-channel simplex I2S for recording and playback with independent clocks and independent sample rates. It must be configured as shown below (
110X). For details, see Hardware interface description.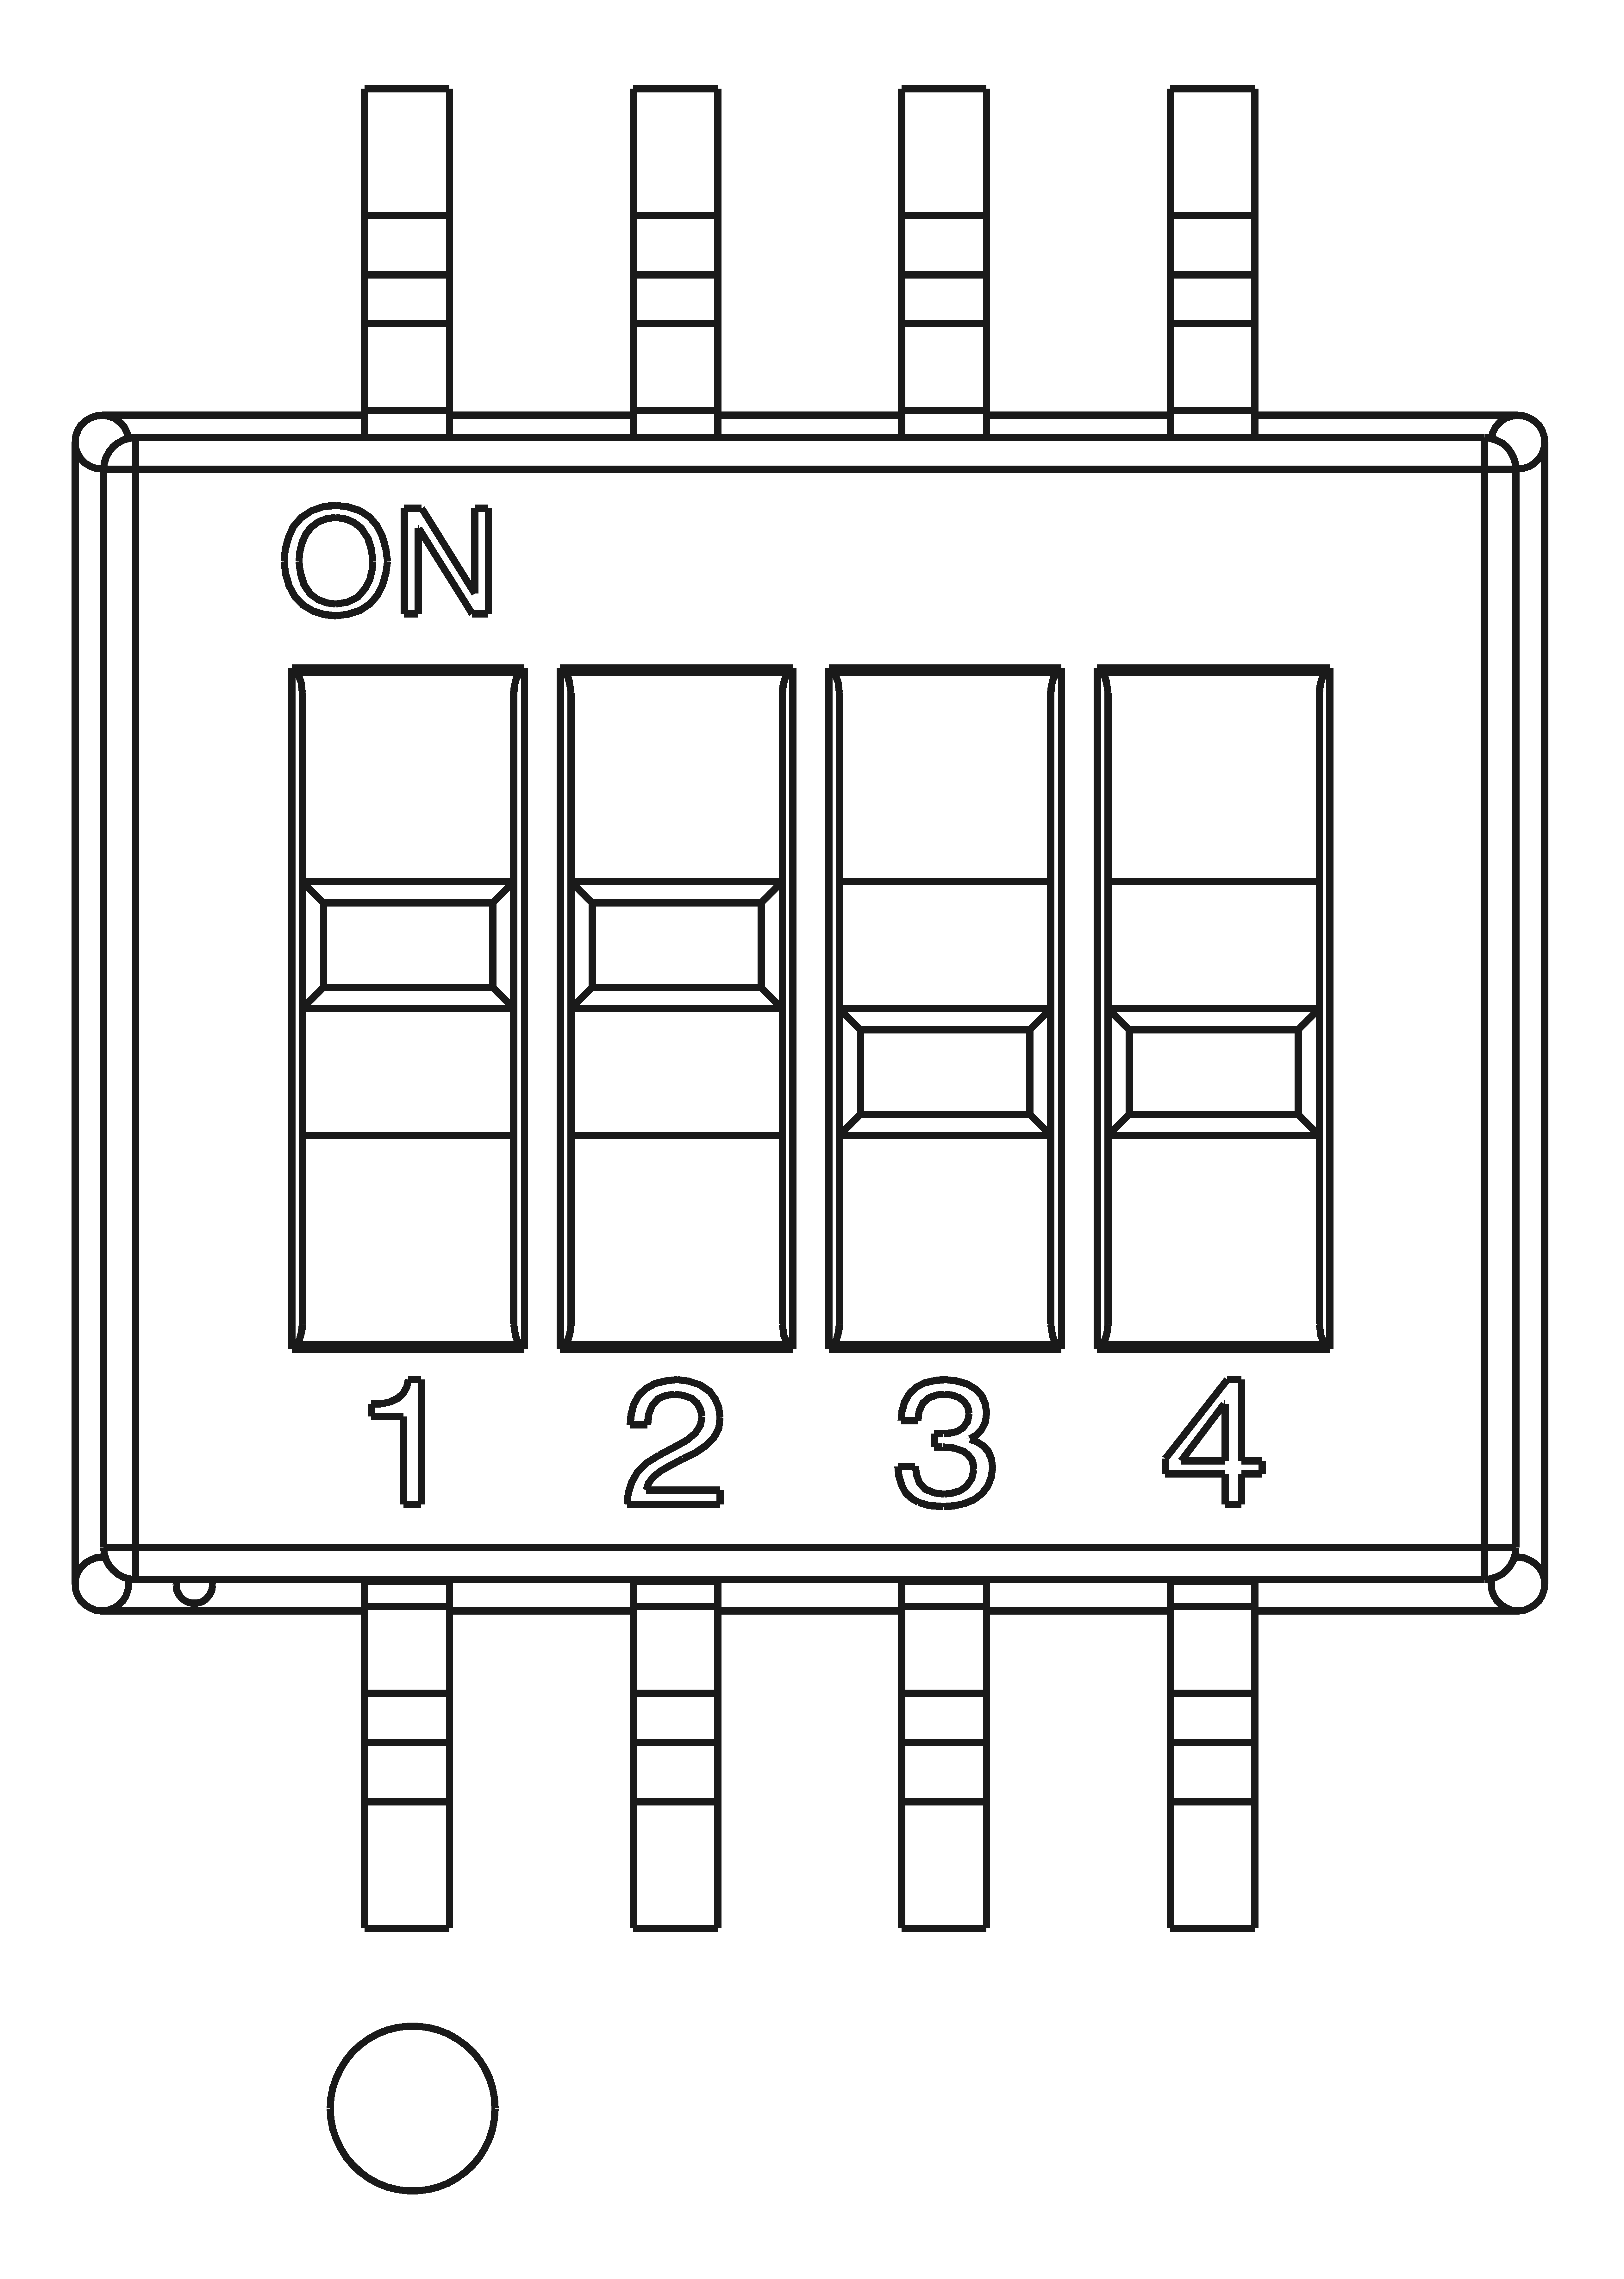
-
Make sure the system image version is RDK OS 5.1.0, then download the following patch package to the RDK S600.
-
On the board, run
sudo dpkg -i linux-*to install, and then reboot. -
After rebooting, enter the following commands to load the drivers (use the full-duplex commands when the number of I2S channels is 1, and the simplex commands when it is 2):
# Full-duplex:
modprobe hobot_cpudai_super
modprobe snd-soc-es8156
modprobe snd-soc-es7210
modprobe hobot_snd_super_ac_fdx_host

# Simplex:
modprobe hobot_cpudai_super
modprobe snd-soc-es8156
modprobe snd-soc-es7210
modprobe hobot_snd_super_ac_master -
Modify the I2S drive capability:
devmem 0x33805088 32 0x00000033
devmem 0x3380508c 32 0x00000033
devmem 0x34830020 32 0x17171717
The above configuration is lost after a reboot.
-
Run
cat /proc/asound/cardsto list all sound cards detected by ALSA.s600snd2is the sound card of the RDK Audio Kit, which means the configuration is effective.
-
Run
ls -l /dev/sndto list the recording and playback nodes.pcmC0D0cis the recording node of PCM channel 0 device 0, andpcmC0D1pis the playback node of PCM channel 0 device 1, and so on. These two nodes correspond to the RDK Audio Kit on the RDK S600.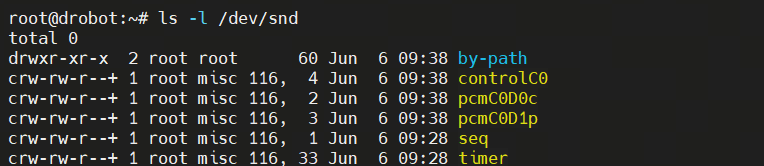
-
Set the DIP switch to the following state (
0XXX) to switch the RDK Audio Kit to USB audio mode.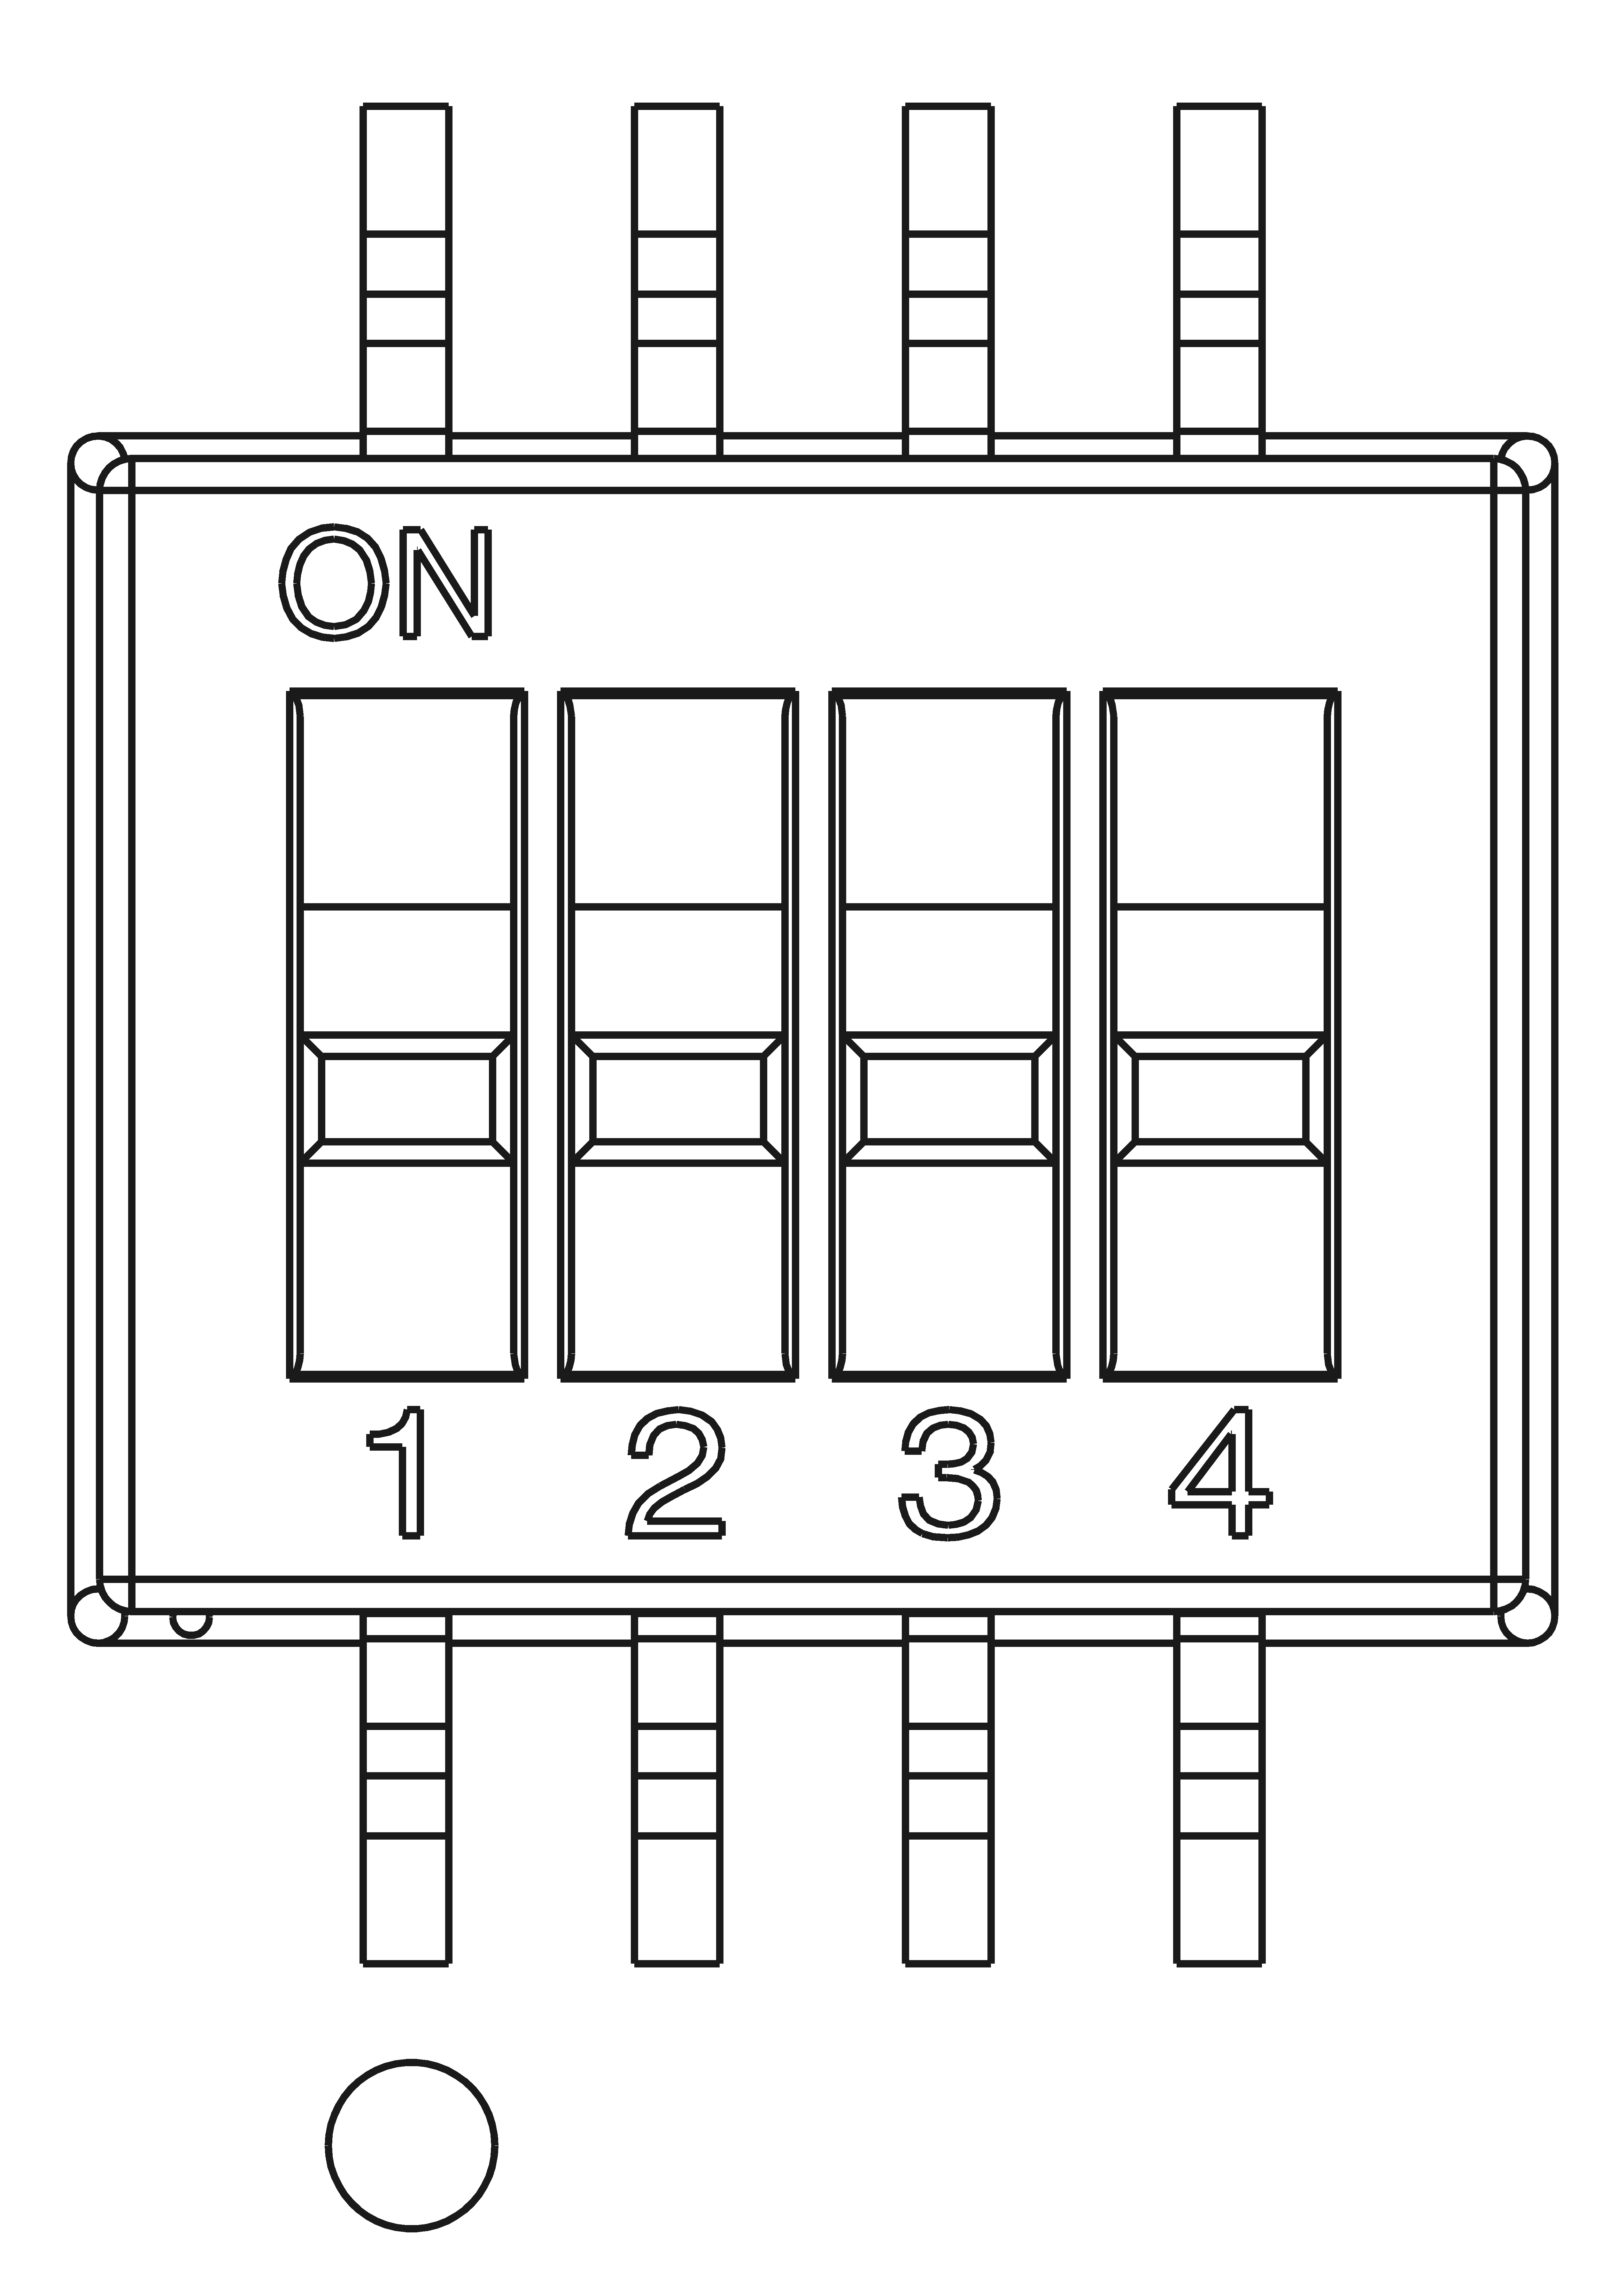
-
No driver loading is required. As a standard
UACdevice, the RDK Audio Kit automatically creates its nodes. Runcat /proc/asound/cardsto list all sound cards detected by ALSA; the entries containingAudioArrayand USB are the nodes created by the RDK Audio Kit.
-
Run
ls -l /dev/sndto list the recording and playback nodes.pcmC1D0cis the recording node of PCM channel 1 device 0, andpcmC1D1pis the playback node of PCM channel 1 device 1, and so on. These two nodes correspond to the current RDK Audio Kit.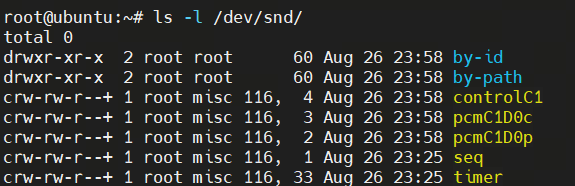
Feature walkthrough
This section uses the RDK X5 + RDK Audio Kit as an example to demonstrate how to record multi-channel audio with the arecord tool, play back multi-channel audio with the aplay tool, and perform full-duplex recording and playback.
Record multi-channel audio
Make sure the recording node exists. You can use the arecord command to record audio. A brief description of the arecord recording usage:
arecord [options] [output file path]
    -D path:CARD,DEVICE    path can be hw (direct to hardware), plughw (automatic format conversion), or default (default value)
    -d recording duration
    -f sample format    options: S16_LE, S24_LE, S32_LE, etc.
    -r sample rate    common values: 8000/16000/22050/44100/48000/96000, etc.
    -c channel count
Here we do not perform format conversion. Assume the sound card channel number shown by ls -l /dev/snd is 0 and the recording device number is 1. Use the S16_LE format, a sample rate of 16000, and record 8-channel audio for 10 seconds:
arecord -D hw:0,1 -d 10 -r 16000 -f S16_LE -c 8 record.wav

Note that regardless of whether you use a 4-Mic or 6-Mic array, you must record 8 channels of audio. Among the 8 channels, the first 4/6 channels are the microphones of the mic array, and channels 7 and 8 are the loopback data of the stereo amplifier. When recording with 4 channels, channels 5 and 6 are empty and contain only white noise.
If you cannot record audio, you can try to use the following commands to adjust the ADC gain of the RDK Audio Kit:
amixer -c 0 sset ADC 10%+ cap     # turn up
amixer -c 0 sset ADC 10%- cap     # turn down
amixer -c 0 sget ADC              # view the current value
amixer -c 0 sset ADC 80% cap      # set the percentage
Play stereo audio
Make sure the playback node exists. You can use the aplay command to play audio. A brief description of the aplay playback usage:
aplay [options] [input file path]
    -D path:CARD,DEVICE    path can be hw (direct to hardware), plughw (automatic format conversion), or default (default value)
    -d playback duration (seconds)
    -f sample format    options: S16_LE, S24_LE, S32_LE, etc.
    -r sample rate    common values: 8000/16000/22050/44100/48000/96000, etc.
    -c channel count
Assume the sound card channel number shown by ls -l /dev/snd is 0 and the playback device number is 0, and play the audio file:
aplay -D hw:0,0 record.wav
The amplifier of the RDK Audio Kit is stereo. When playing multi-channel audio, the aplay tool only plays the first 2 channels.
If the sound is too low, use the following commands to adjust the DAC amplifier volume of the RDK Audio Kit. A volume of 75% is recommended for testing:
amixer -c 0 sset DAC 10%+    # turn up
amixer -c 0 sset DAC 10%-    # turn down
amixer -c 0 sget DAC         # view the current value
amixer -c 0 sset DAC 80%     # set the percentage
Record and play back in full-duplex mode
The recording and playback nodes of the RDK Audio Kit are independent channels, supporting full-duplex recording and playback.
-
Open two terminals. In the first terminal, play a long audio file:
aplay -D hw:0,0 demo.wav -
Place the speaker close to the mic array, and in the second terminal enter the following command to record 5 seconds of audio:
arecord -D hw:0,1 -d 5 -r 16000 -f S16_LE -c 8 record.wav -
If you can hear the played audio content in the recorded audio, full-duplex recording and playback is working.
In addition, you can write a program that uses the recording and playback devices simultaneously in two threads or two processes, which also achieves full-duplex recording and playback.
-
When DIP switch 2 is set to off, a single I2S channel is used for full-duplex recording and playback. Currently the RDK X5 and RDK S100/S100P only support this mode. For the RDK S600, you can set DIP switch 2 to on to use two independent I2S channels for recording and playback separately.
-
When the number of I2S channels is 1, the sample rate and sample format of playback and recording must be the same, because the recording and playback data channels share the same bit clock.
Next steps
At this point, you have experienced the basic functions of the RDK Audio Kit.
Next:
- Mounting instructions describes the structural parameters and installation precautions of the RDK Audio Kit in detail; recommended for structural developers.
- Hardware interface description describes the hardware interfaces of the RDK Audio Kit in detail; recommended for hardware developers.
- To develop audio applications using this product with an RDK development board, see the USB Audio Device Usage Guide.
- To use audio preprocessing, DOA, VAD, wake word, custom command words, ASR, TTS, and other algorithms based on the RDK Audio Kit, see the Smart Voice Box.