6.4.4. 深入探索
6.4.4.1. FX Quantization 原理介绍
阅读
FX 采用nn.Module 或 function 的
量化流程
Fuse(可选)
FX 可以
fused_model = horizon.quantization.fuse_fx(model)
注意
fuse_fx没有inplace参数,因为内部 需要 对模型 做 symbolic trace 生成 一个 GraphModule,所以无法 做到 inplace 的 修改 fused_model和model会共享 几乎 所有 属性(包括 子 模块、算子 等),因此 在 fuse 之后 请 不要 对 model做任何 修改,否则 可能 影响 到 fused_model用户
不必 显式 调用 fuse_fx接口,因为后续 的 prepare_qat_fx接口内部 集成 了 fuse 的 过程
Prepare
用户prepare_qat_fx 接口horizon.nn.qat 中
用户
可以 根据 需要 选择 合适 的 qconfig(Calibtaion 或 QAT,注意 两种 qconfig 不能 混用) 和
fuse_fx类似,此接口 不 支持 inplace参数,且在 prepare_qat_fx之后请 不要 对 输入 的 模型 做 任何 修改
# 设置 march **X3** 设置BERNOULLI2, **X5** 设置为 BAYES_E 。
horizon.march.set_march(horizon.march.March.BAYES_E)
qat_model = horizon.quantization.prepare_qat_fx(
    model,
    {
        "": horizon.qconfig.default_calib_8bit_fake_quant_qconfig,
        "module_name": {
            "<module_name>": custom_qconfig,
        },
    },)
Convert
和
fuse_fx类似,此接口 不 支持 inplace参数,且在 convert_fx之后请 不要 对 输入 的 模型 做 任何 修改
quantized_model = horizon.quantization.convert_fx(qat_model)
Eager Mode 兼容性
大部分prepare_qat -> prepare_qat_fx, convert -> convert_fx),但是
FX 不
支持 的 操作:torch 的 symbolic trace 支持 的 操作 是 有限 的,例如 不 支持 将 非 静态 变量 作为 判断 条件、默认 不 支持 torch 以外 的 pkg(如 numpy)等,且 未 执行 到 的 条件 分支 将 被 丢弃 不想
被 FX 处理 的 操作:如果 模型 的 前后 处理 中 使用 了 torch 的 op,FX 在 trace 时会 将 他们 视为 模型 的 一部分,产生 不 符合 预期 的 行为(例如 将 torch 的 某些 function 调用 替换 为 FloatFunctional)。
以上
from horizon_plugin_pytorch.utils.fx_helper import wrap as fx_wrap

class RetinaNet(nn.Module):
    def __init__(
        self,
        backbone: nn.Module,
        neck: Optional[nn.Module] = None,
        head: Optional[nn.Module] = None,
        anchors: Optional[nn.Module] = None,
        targets: Optional[nn.Module] = None,
        post_process: Optional[nn.Module] = None,
        loss_cls: Optional[nn.Module] = None,
        loss_reg: Optional[nn.Module] = None,
    ):
        super(RetinaNet, self).__init__()

        self.backbone = backbone
        self.neck = neck
        self.head = head
        self.anchors = anchors
        self.targets = targets
        self.post_process = post_process
        self.loss_cls = loss_cls
        self.loss_reg = loss_reg

    def rearrange_head_out(self, inputs: List[torch.Tensor], num: int):
        outputs = []
        for t in inputs:
            outputs.append(t.permute(0, 2, 3, 1).reshape(t.shape[0], -1, num))
        return torch.cat(outputs, dim=1)

    def forward(self, data: Dict):
        feat = self.backbone(data["img"])
        feat = self.neck(feat) if self.neck else feat
        cls_scores, bbox_preds = self.head(feat)

        if self.post_process is None:
            return cls_scores, bbox_preds

        # 将不需要建图的操作封装为一个 method 即可,FX 将不再关注 method 内部的逻辑,
        # 仅将它原样保留(method 中调用的 module 仍可被设置 qconfig,被
        # prepare_qat_fx 和 convert_fx 替换)
        return self._post_process( data, feat, cls_scores, bbox_preds)

    @fx_wrap()  # fx_wrap 支持直接装饰 class method
    def _post_process(self, data, feat, cls_scores, bbox_preds)
        anchors = self.anchors(feat)

        # 对 self.training 的判断必须封装起来,否则在 symbolic trace 之后,此判断
        # 逻辑会被丢掉
        if self.training:
            cls_scores = self.rearrange_head_out(
                cls_scores, self.head.num_classes
            )
            bbox_preds = self.rearrange_head_out(bbox_preds, 4)
            gt_labels = [
                torch.cat(
                    [data["gt_bboxes"][i], data["gt_classes"][i][:, None] + 1],
                    dim=-1,
                )
                for i in range(len(data["gt_classes"]))
            ]
            gt_labels = [gt_label.float() for gt_label in gt_labels]
            _, labels = self.targets(anchors, gt_labels)
            avg_factor = labels["reg_label_mask"].sum()
            if avg_factor == 0:
                avg_factor += 1
            cls_loss = self.loss_cls(
                pred=cls_scores.sigmoid(),
                target=labels["cls_label"],
                weight=labels["cls_label_mask"],
                avg_factor=avg_factor,
            )
            reg_loss = self.loss_reg(
                pred=bbox_preds,
                target=labels["reg_label"],
                weight=labels["reg_label_mask"],
                avg_factor=avg_factor,
            )
            return {
                "cls_loss": cls_loss,
                "reg_loss": reg_loss,
            }
        else:
            preds = self.post_process(
                anchors,
                cls_scores,
                bbox_preds,
                [torch.tensor(shape) for shape in data["resized_shape"]],
            )
            assert (
                "pred_bboxes" not in data.keys()
            ), "pred_bboxes has been in data.keys()"
            data["pred_bboxes"] = preds
            return data
6.4.4.2. RGB888 数据部署
场景
BPU 中
由于
YUV 格式简介
YUV 一般
BPU 支持
在训练时对 RGB 输入进行预处理
在horizon.functional.rgb2centered_yuv 或 horizon.functional.bgr2centered_yuv 将 RGB 图像rgb2centered_yuv 为例,该
def rgb2centered_yuv(input: Tensor, swing: str = "studio") -> Tensor:
    """Convert color space.

    Convert images from RGB format to centered YUV444 BT.601

    Args:
        input: input image in RGB format, ranging 0~255
        swing: "studio" for YUV studio swing (Y: -112~107,
                U, V: -112~112)
                "full" for YUV full swing (Y, U, V: -128~127).
                default is "studio"

    Returns:
        output: centered YUV image
    """
函数swing 参数swing 设
在推理时对 YUV 输入进行实时转换
在
算子定义
您horizon.functional.centered_yuv2rgb 或 horizon.functional.centered_yuv2bgr 算子centered_yuv2rgb 为例,其
def centered_yuv2rgb(
    input: QTensor,
    swing: str = "studio",
    mean: Union[List[float], Tensor] = (128.0,),
    std: Union[List[float], Tensor] = (128.0,),
    q_scale: Union[float, Tensor] = 1.0 / 128.0,
) -> QTensor:
swing 为 YUV 的swing 设mean, std 均q_scale 为
该
根据
给定 的 swing所对应 的 转换 公式 将 输入 图像 转换成 RGB 格式 使用
给定 的 mean和std对 RGB 图像进行 归一化 使用
给定 的 q_scale对 RGB 图像进行 量化
由于
插入

该算子为部署专用算子,请勿在训练阶段使用该算子。
使用方法
在
获取
量化 训练 时 模型 QuantStub 所 使用 的 scale 值,以及 RGB 图像 所 使用 的 归一化 参数; 调用
convert_fx接口将 qat 模型 转换 为 quantized 模型; 在
模型 的 QuantStub 后面 插入 centered_yuv2rgb算子,算子需要 传入 步骤 1 中 所 获取 的 参数; 将 QuantStub 的
scale参数修改 成 1。
示例:
import torch
from horizon_plugin_pytorch.quantization import (
    QuantStub,
    prepare_qat_fx,
    convert_fx,
)
from horizon_plugin_pytorch.functional import centered_yuv2rgb
from horizon_plugin_pytorch.quantization.qconfig import (
    default_qat_8bit_fake_quant_qconfig,
)
from horizon_plugin_pytorch import set_march

class Net(torch.nn.Module):
    def __init__(self):
        super().__init__()
        self.quant = QuantStub()
        self.conv = torch.nn.Conv2d(3, 3, 3)
        self.bn = torch.nn.BatchNorm2d(3)
        self.relu = torch.nn.ReLU()

    def forward(self, input):
        x = self.quant(input)
        x = self.conv(x)
        x = self.bn(x)
        x = self.relu(x)
        return x

    def set_qconfig(self):
        self.qconfig = default_qat_8bit_fake_quant_qconfig


data = torch.rand(1, 3, 28, 28)
net = Net()

# 设置 march **X3** 设置为bernoulli2, **X5** 设置为bayes-e。
set_march("bayes")

net.set_qconfig()
qat_net = prepare_qat_fx(net)
qat_net(data)
quantized_net = convert_fx(qat_net)
traced = quantized_net
print("Before centered_yuv2rgb")
traced.graph.print_tabular()

# Replace QuantStub nodes with centered_yuv2rgb
patterns = ["quant"]
for n in traced.graph.nodes:
    if any(n.target == pattern for pattern in patterns):
        with traced.graph.inserting_after(n):
            new_node = traced.graph.call_function(centered_yuv2rgb, (n,), {"swing": "full"})
            n.replace_all_uses_with(new_node)
            new_node.args = (n,)

traced.quant.scale.fill_(1.0)
traced.recompile()
print("\nAfter centered_yuv2rgb")
traced.graph.print_tabular()
对比
Before centered_yuv2rgb
opcode       name     target    args        kwargs
-----------  -------  --------  ----------  --------
placeholder  input_1  input     ()          {}
call_module  quant    quant     (input_1,)  {}
call_module  conv     conv      (quant,)    {}
output       output   output    (conv,)     {}

After centered_yuv2rgb
opcode         name              target                                         args                 kwargs
-------------  ----------------  ---------------------------------------------  -------------------  -----------------
placeholder    input_1           input                                          ()                   {}
call_module    quant             quant                                          (input_1,)           {}
call_function  centered_yuv2rgb  <function centered_yuv2rgb at 0x7fa1c2b48040>  (quant,)             {'swing': 'full'}
call_module    conv              conv                                           (centered_yuv2rgb,)  {}
output         output            output                                         (conv,)              {}
6.4.4.3. 模型分段部署
场景
在
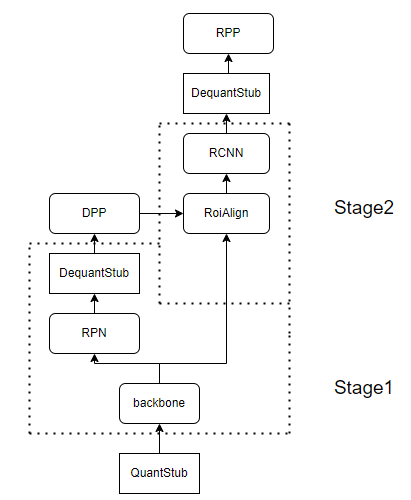
方法
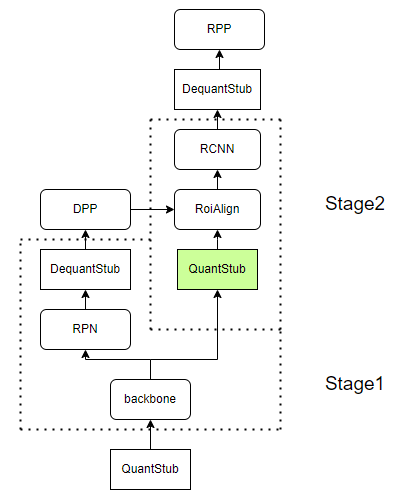
模型
修改:如上图 所示,在 正常 可以 进行 量化 训练 的 模型 基础 上,用户 需要 在 prepare_qat 前 在 模型 分段 的 分界点 后 插入 QuantStub,注意 若 使用 了 horizon_plugin_pytorch.quantization.QuantStub,必须 设置 scale = None。 QAT 训练:正常
作为 一个 整体 对 修改 后 的 模型 进行 量化 感知 训练,插入 的 QuantStub 会 将 Stage2 模型 输入 数据 的 scale 记录 在 buffer 中 转
定点:正常 作为 一个 整体 使用 convert 接口 将 训练 好 的 QAT 模型 转为 定点 拆分
和 编译:将 模型 按照 上板 后 的 形态 进行 拆分,对 拆分 出 的 多 段 模型 分别 进行 trace 和 编译。需要 注意 的 是,虽然 在 训练 时 Stage2 的 输入 为 量化 数据,但是 在 对 Stage2 做 trace 时 的 example_input 依然 需要 是 浮点 的 形式,Stage2 中 插入 的 QuantStub 会 负责 给 数据 配置 正确 的 scale 并 进行 量化。
6.4.4.4. 算子融合
训练
吸收 BN
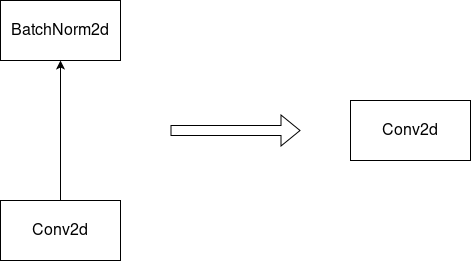
吸收 BN 的BN 是BN 和 Conv 一起BN 的Conv 的BN 的
吸收

通过BN ,可以Conv2d + BN2d 简化Conv2d
融合 Add、ReLU(6)
和 CUDA Kernel Fusion 中将 CUDA Kernel 融合
BPU 硬件Conv -> Add -> ReLU 这种Conv -> Add -> ReLU 视为
由于torch.nn.Module 为Conv -> Add -> ReLU 视为Module
算子
(由于
实现原理
得益于 FX 可以
(吸收 BN 和
import torch
from torch import nn
from torch.quantization import DeQuantStub
from horizon_plugin_pytorch.quantization import QuantStub
from horizon_plugin_pytorch.quantization import fuse_fx


class ModelForFusion(torch.nn.Module):
    def __init__(
        self,
    ):
        super(ModelForFusion, self).__init__()
        self.quantx = QuantStub()
        self.quanty = QuantStub()
        self.conv = nn.Conv2d(3, 3, 3)
        self.bn = nn.BatchNorm2d(3)
        self.relu = nn.ReLU()
        self.dequant = DeQuantStub()

    def forward(self, x, y):
        x = self.quantx(x)
        y = self.quanty(y)
        x = self.conv(x)
        x = self.bn(x)
        x = x + y
        x = self.relu(x)
        x = self.dequant(x)

        return x


float_model = ModelForFusion()
fused_model = fuse_fx(float_model)

print(fused_model)
"""
ModelForFusion(
  (quantx): QuantStub()
  (quanty): QuantStub()
  (conv): Identity()
  (bn): Identity()
  (relu): Identity()
  (dequant): DeQuantStub()
  (_generated_add_0): ConvAddReLU2d(
    (conv): Conv2d(3, 3, kernel_size=(3, 3), stride=(1, 1))
    (relu): ReLU()
  )
)


def forward(self, x, y):
    quantx = self.quantx(x);  x = None
    quanty = self.quanty(y);  y = None
    _generated_add_0 = self._generated_add_0
    add_1 = self._generated_add_0(quantx, quanty);  quantx = quanty = None
    dequant = self.dequant(add_1);  add_1 = None
    return dequant
"""
可以_generated_add_0)。原本Identity,且forward 代码
(FX 自动x = x + y 的_generated_add_0 的 Module 形式,以
可以融合的算子
目前
import operator
import torch
from torch import nn
from horizon_plugin_pytorch import nn as horizon_nn


def register_fusion_patterns():
    convs = (
        nn.Conv2d,
        nn.ConvTranspose2d,
        nn.Conv3d,
        nn.Linear,
    )
    bns = (nn.BatchNorm1d, nn.BatchNorm2d, nn.BatchNorm3d, nn.SyncBatchNorm)
    adds = (
        nn.quantized.FloatFunctional.add,
        horizon_nn.quantized.FloatFunctional.add,
        torch.add,
        operator.add,  # 即代码中使用的加号
    )
    relus = (nn.ReLU, nn.ReLU6, nn.functional.relu, nn.functional.relu6)

    for conv in convs:
        for bn in bns:
            for add in adds:
                for relu in relus:
                    # conv bn
                    register_fusion_pattern((bn, conv))(ConvBNAddReLUFusion)

                    # conv relu
                    register_fusion_pattern((relu, conv))(ConvBNAddReLUFusion)

                    # conv add
                    register_fusion_pattern((add, conv, MatchAllNode))(
                        ConvBNAddReLUFusion
                    )  # conv 的输出作为 add 的第一个输入
                    register_fusion_pattern((add, MatchAllNode, conv))(
                        ConvBNAddedReLUFusion
                    )  # conv 的输出作为 add 的第二个输入

                    # conv bn relu
                    register_fusion_pattern((relu, (bn, conv)))(
                        ConvBNAddReLUFusion
                    )

                    # conv bn add
                    register_fusion_pattern((add, (bn, conv), MatchAllNode))(
                        ConvBNAddReLUFusion
                    )
                    register_fusion_pattern((add, MatchAllNode, (bn, conv)))(
                        ConvBNAddedReLUFusion
                    )

                    # conv add relu
                    register_fusion_pattern((relu, (add, conv, MatchAllNode)))(
                        ConvBNAddReLUFusion
                    )
                    register_fusion_pattern((relu, (add, MatchAllNode, conv)))(
                        ConvBNAddedReLUFusion
                    )

                    # conv bn add relu
                    register_fusion_pattern(
                        (relu, (add, (bn, conv), MatchAllNode))
                    )(ConvBNAddReLUFusion)
                    register_fusion_pattern(
                        (relu, (add, MatchAllNode, (bn, conv)))
                    )(ConvBNAddedReLUFusion)
6.4.4.5. Adaround(实验性功能)
Adaround 是
基本原理
Adaround 旨在
接口定义
def weight_reconstruction(
    calib_model: torch.nn.Module,
    batches: Union[list, tuple, DataLoader],
    batch_process_func: Callable = None,
    custom_config_dict: dict = None,
):
    pass
其中,custom_config_dict 为 adaround 相关
    custom_config_dict = {
        "num_batches": 10,
        "num_steps": 100,
        "exclude_prefix": [],
        "warm_up": 0.2,
        "weight": 0.01,
        "b_range": [20, 2],
    }
num_batches: 仅
num_step: 每个 Conv/Linear 的
exclude_prefix: 如果
warm_up: [0, 1] 之间
weight: round loss 的
b_range: b 是b_range 控制
batch_size * num_step 是batch_size * num_step 在 10000~20000 左右。
1. `num_step` **是影响 Adaround 精度的主要参数,您在调整超参时一般只需关注该参数即可。**

2. 在我们的实验中,Adaround 在大部分任务中都可以通过简单调节 `num_step` 参数稳定地提升 calibration 精度,但在检测任务中,可能需要仔细设置 `exclude_prefix` 过滤 head 中的部分层才能实现精度的提升。当您在检测任务中遇到 Adaround 导致模型 calibration 精度下降的情况时,我们建议您直接选择量化感知训练(QAT)提升量化精度。
其余
使用方法
我们
list/tuple(推荐)
由于
# 先走正常的 calibration 流程
calib_model = horizon.quantization.prepare_qat_fx(float_model)
calib_model.eval()
horizon.quantization.set_fake_quantize(
    calib_model, horizon.quantization.FakeQuantState.CALIBRATION
)
for image, label in dataloader:
    calib_model(image)

# 准备 adaround 所需数据
batches = []
n = 0
for image, label in dataloader:
    if n >= 10:
        break
    batches.append(image)
    n += 1

# 自定义 adaround 配置。用户自定义不优化模型中的 head。
custom_config_dict = {"num_steps": 100, "exclude_prefix": ["head",]}

horizon.quantization.weight_reconstruction(
    calib_model,
    batches,
    None, # batch_process_func,由于 batches 中的数据已经满足要求,此处保持默认即可
    custom_config_dict,
)

# eval
calib_model.eval()
horizon.quantization.set_fake_quantize(
    calib_model, horizon.quantization.FakeQuantState.VALIDATION
)
for image, label in eval_dataloader:
    pred = calib_model(image)
    pass
torch.utils.data.DataLoader
尽管
# 先走正常的 calibration 流程
calib_model = horizon.quantization.prepare_qat_fx(float_model)
calib_model.eval()
horizon.quantization.set_fake_quantize(
    calib_model, horizon.quantization.FakeQuantState.CALIBRATION
)
for image, label in dataloader:
    calib_model(image)

# 自定义 adaround 配置,这里和上面不同的是设置了 num_batches 为 16,表示 dataloader 中实际只有 16 个 batch 会参与优化
custom_config_dict = {"num_batches": 16, "num_steps": 100, "exclude_prefix": ["head",]}

horizon.quantization.mix_calibration(
    calib_model,
    dataloader, # 直接传 dataloader
    lambda x: x[0], # batch_process_func,由于该 dataloader 返回的 batch 是 Tuple[image, label] 的格式,所以需要索引后才能送入模型
    custom_config_dict,
)

# eval
calib_model.eval()
horizon.quantization.set_fake_quantize(
    calib_model, horizon.quantization.FakeQuantState.VALIDATION
)
for image, label in eval_dataloader:
    pred = calib_model(image)
    pass
6.4.4.6. 自动校准(实验性功能)
量化
本
Mix Observer 在
搜索 某一 算子 的 量化 参数 时,只 将 该 算子 的 输出 相似 度 作为 评价 指标。而本 接口 将 模型 最终 输出 的 相似 度 作为 评价 指标 来 搜索 最优 量化 参数。 Mix Observer 在
搜索 某一 算子 的 量化 参数 时,前面 的 算子 都 是 浮点 计算,没有 考虑 累积 的 量化 误差。而本 接口 在 搜索 某一 算子 的 量化 参数 时,其 前面 所有 的 激活 和 权重 都 是 量化 的。
我们
需要
基本原理
记录
浮点 模型 所有 DeQuantize 算子 的 输出 以
拓扑 排序 逐个 遍历 各个 待 量化 的 算子: 校准
某个 算子 时, 将 其 weight(如果 有) 和 activation 进行 量化,遍历 用户 指定 的 calibration 策略,记录 模型 对应 的 DeQuantize 输出 对
量化 输出 和 浮点 输出 计算 L2 距离 ,更新 最优 量化 参数 遍历
完 所有 的 calibration 策略 后,将 最优 量化 参数 应用 到 该 算子 上,开始 搜索 下 一个 算子
接口定义
def auto_calibrate(
    calib_model: torch.nn.Module,
    batches: Union[list, tuple, DataLoader],
    num_batches: int = 10,
    batch_process_func: Callable = None,
    observer_list: list = ("percentile", "mse", "kl", "min_max"),
    percentile_list: list = None,
):
    pass
进一步
使用方法
我们
list/tuple(推荐)
由于
calib_model = horizon.quantization.prepare_qat_fx(float_model)
batches = []
n = 0
for image, label in dataloader:
    if n >= 10:
        break
    batches.append(image)
    n += 1

horizon.quantization.auto_calibration(
    calib_model,
    batches,
    10, # num_batches,该方式下不起作用,保持默认即可。list 中所有的 batch 都会被用来校准
    None, # batch_process_func,由于 batches 中的数据已经满足要求,此处保持默认即可
    ["percentile", "min_max"], # 自定义搜索的 calibration 策略
    [99.99, 99.999, 99.9995, 999.9999], # 自定义的 percentile 参数
)

# eval
calib_model.eval()
horizon.quantization.set_fake_quantize(
    calib_model, horizon.quantization.FakeQuantState.VALIDATION
)
for image, label in eval_dataloader:
    pred = calib_model(image)
    pass
torch.utils.data.DataLoader
尽管
calib_model = horizon.quantization.prepare_qat_fx(float_model)

horizon.quantization.auto_calibration(
    calib_model,
    dataloader, # 直接传 dataloader
    10, # num_batches,只用 dataloader 中的 10 个 batch 进行校准
    lambda x: x[0], # batch_process_func,由于该 dataloader 返回的 batch 是 Tuple[image, label] 的格式,所以需要索引后才能送入模型
    ["percentile", "min_max"], # 自定义搜索的 calibration 策略
    [99.99, 99.999, 99.9995, 999.9999], # 自定义的 percentile 参数
)

# eval
calib_model.eval()
horizon.quantization.set_fake_quantize(
    calib_model, horizon.quantization.FakeQuantState.VALIDATION
)
for image, label in eval_dataloader:
    pred = calib_model(image)
    pass