7.1. Environment Configuration
7.1.1. How to Check Software Version Information of the Current System
cat /etc/version: View the SDK version and build time of the current system
# cat /etc/version
LNX6.1.12_PL5.1_V0.0.8_20240319-1108
uname -a: View kernel version
# uname -a
Linux buildroot 6.1.12-rt7+ #1 SMP PREEMPT Tue Mar 19 11:12:22 CST 2024 aarch64 GNU/Linux
strings /dev/block/platform/by-name/uboot | grep "U-Boot 2022.10": View U-Boot version
# strings /dev/block/platform/by-name/uboot | grep "U-Boot 2022.10"
U-Boot 2022.10-g4432fbb999
U-Boot 2022.10-g4432fbb999 (Mar 19 2024 - 17:22:42 +0800)
7.1.2. How to Set U-Boot bootargs
Connect via serial port. During system boot, quickly and continuously press the space bar to enter U-Boot command line mode. Then configure bootargs as follows:
Set temporary boot arguments: Replace
<items to add>in the following command with required parameters. After configuration, executebootin U-Boot command line to boot the kernel. The configuration becomes invalid after device reboot.
setenv bootargs <items to add>
boot
# For example, enable kernel earlycon logging
setenv bootargs earlycon=uart8250,mmio32,0x32120000
boot
Set persistent boot arguments: Replace
<items to add>with required parameters, then executesaveenvto save configuration to theenvpartition. The configuration remains effective after power-off or reboot.
setenv bootargs <items to add>
saveenv
reset
Modify boot arguments via configuration file: Create a
uboot.envfile under theuboot/toolspath in the SDK source directory. Write required parameters in key-value format. After full compilation (./bd.sh) or individual U-Boot compilation (./bd.sh uboot), anubootenv.imgimage file will be generated underout/product. Use the fastboot tool to flashubootenv.img. The configuration remains effective after power-off or reboot.
# Flash ubootenv using fastboot
fastboot flash ubootenv ubootenv.img
Note: The following parameters cannot be modified via configuration file:
Hobot>
boot_device=emmc
bootcmd=run ab_select_cmd;run avb_boot;
dev_index=0
dev_name=mmc
ethaddr=46:a1:a3:75:e4:a4
fdtcontroladdr=8beb2680
hb_board_id=0x0202
reset_reason=COLD_BOOT
stderr=serial@32120000
stdin=serial@32120000
stdout=serial@32120000
7.1.3. Why Can a Program Run Manually but Not Automatically via /etc/init.d?
If you are developing multimedia or BPU-related programs, their dynamic libraries are stored in the /usr/hobot/ directory. When executed manually, /usr/hobot/ is automatically added to the shell environment at startup. However, during auto-startup, this configuration may not be applied. Therefore, you need to add environment settings in your startup script. For example, in S90cam-service:
export LD_LIBRARY_PATH="/usr/hobot/lib:${LD_LIBRARY_PATH}"
Alternatively, before launching the program, use source /etc/profile.d/environment.sh to add all multimedia, BPU, and app-related dynamic libraries and executables to environment variables.
7.2. System Software
7.2.1. How to Check System Temperature, CPU, and BPU Frequency Statistics
hrut_somstatus
7.2.2. How to Read Chip UID
cat /sys/class/socinfo/soc_uid
7.2.3. How to Check Supported BPU Frequencies
cat /sys/class/devfreq/3a000000.bpu/available_frequencies
7.2.4. How to Check CPU Scheduling Mode
cat /sys/devices/system/cpu/cpufreq/policy0/scaling_governor
7.2.5. How to Check Supported and Current CPU Frequencies
cat /sys/devices/system/cpu/cpufreq/policy0/scaling_available_frequencies
cat /sys/devices/system/cpu/cpufreq/policy0/cpuinfo_cur_freq
7.2.6. How to Check CPU Throttling Temperature
cat /sys/devices/virtual/thermal/thermal_zone1/trip_point_1_temp
7.2.7. How to Disable a CPU Core
echo 0 > /sys/devices/system/cpu/cpu1/online

# To disable another CPU core, replace <x> with the corresponding number
echo 0 > /sys/devices/system/cpu/cpu<x>/online
Note: CPU0 cannot be disabled. Valid values for x are 1–7.
After disabling a CPU core, use the lscpu command to check the current CPU status:
root@buildroot:~# echo 0 > /sys/devices/system/cpu/cpu1/online
root@buildroot:~# lscpu
Architecture:             aarch64
  CPU op-mode(s):         32-bit, 64-bit
  Byte Order:             Little Endian
CPU(s):                   8
  On-line CPU(s) list:    0,2-7
  Off-line CPU(s) list:   1
......
The log shows that cpu1 is offline, indicating successful deactivation.
7.2.8. Method to Bind Interrupts to CPU Cores
Note:
The interrupt numbers and CPU cores used in the following commands are for reference only. Users should select appropriate CPUs and interrupt numbers based on actual requirements.
# Bind to CPU3; 8 after echo corresponds to CPU3, 1/2/4/8/16/64/128/256 correspond to CPU0–7, 175 is the interrupt number
echo 8 > /proc/irq/175/smp_affinity
7.2.9. eMMC Flasher Files
For blank eMMC flashing, use the disk*.img file directly. This is a binary file that can be flashed directly to eMMC via a programmer. (Note: After a full flash of disk.img, individual partitions like uboot.img can then be flashed separately.)
For mass production, pre-flashing before PCB assembly is recommended:
Confirm whether the factory programmer supports the eMMC model. If supported, proceed with flashing.
If the programmer does not support the model but supports the same package type, request the programmer vendor to add support for the eMMC model.
If no programmers support this package type, consider using a third-party specialized flashing service.
Consult the programmer vendor for configuration details, as interfaces may vary.
7.2.10. How to View and Modify Chip Registers
Use the devmem command to directly access physical addresses and read/write registers. Typical usage:
devmem ADDRESS [WIDTH [VALUE]]

# For example, read the value of the HSIO_GPIO_00 multiplexing register
devmem 0x3505005C 32
7.2.11. I2C Command Usage
# List I2C buses and all connected devices
i2cdetect -l
# Detect devices on bus 1
i2cdetect -y -r 1
# Write: 0x36 is the I2C device address, 0x5081 is the register address, 0x01 is the value to write
i2ctransfer -f -y 1 w3@0x36 0x50 0x81 0x01
# Read: 0x36 is the I2C device address, 0x300A is the register address, r3 means read 3 bytes continuously; 0x56 0x08 0x41 are the read register values
i2ctransfer -f -y 1 w2@0x36 0x30 0x0A r3
7.2.12. Enhancing Drive Strength (Using I2C4 as Example)
First, update the device tree. Relevant content is typically in the device tree file kernel/arch/arm64/boot/dts/hobot/pinmux-func.dtsi. Below is an excerpt:
......

pconf_drv_pu_ds7_1v8: pconf-dev-pu-ds7-1v8 {
  bias-pull-up;
  power-source = <HORIZON_IO_PAD_VOLTAGE_1V8>;
  drive-strength = <7>; /* drive strength */
};

......

pinctrl_i2c4: i2c4grp {
  horizon,pins = <
    LSIO_I2C4_SCL  LSIO_PINMUX_3 BIT_OFFSET0  MUX_ALT0 &pconf_drv_pu_ds5_1v8
    LSIO_I2C4_SDA  LSIO_PINMUX_3 BIT_OFFSET2  MUX_ALT0 &pconf_drv_pu_ds5_1v8
  >;
};
......
After compilation and burning, in the system using cat /sys/kernel/debug/pinctrl/34180000.lsio_iomuxc/pinconf-pins, Check whether the modification has taken effect.
root@ubuntu:~# cat /sys/kernel/debug/pinctrl/34180000.lsio_iomuxc/pinconf-pins
Pin config settings per pin
Format: pin (name): configs
......
......
pin 47 (lsio_i2c4_scl): input bias pull down (0 ohms), input bias pull up (0 ohms), output drive strength (10 mA), input enabled, input schmitt enabled, pin output (1 level)
pin 48 (lsio_i2c4_sda): input bias pull down (2097152 ohms), input bias pull up (2097152 ohms), output drive strength (10 mA), input enabled, input schmitt enabled, pin output (1 level)
On X5 platform, drive-strength = <2> typically corresponds to 3mA. After selecting a node with drive-strength = <7>, the drive current becomes 10mA.
7.2.13. Does the Kernel Support PREEMPT_RT Patch?
Yes, RT Patch (rt7) is supported.
7.2.14. Can the Root Filesystem Be Customized?
Currently, buildroot-based filesystem is supported. Users can rebuild it as needed.
7.2.15. Is Digital Audio Interface (Audio PDM) Supported?
Yes, supported. Configuration as follows:
Pin Port Confirmation
Chip pin definitions are shown below. Check for potential multiplexing conflicts before use.

Device Tree Configuration Confirmation
The pinctrl section is located in the pinmux-func.dtsi file within the BSP source code:
pinctrl_dsp_pdm_cko: pdmckogrp {
  horizon,pins = <
    DSP_PDM_CKO  DSP_PINMUX_0  BIT_OFFSET24  MUX_ALT0 &pconf_drv_pu_ds2_1v8
  >; /* PDM clock output pin configuration, defines pin multiplexing and power settings; check for reuse when using */
};

pinctrl_dsp_pdm_in: pdmingrp {
  horizon,pins = <
    DSP_PDM_IN0  DSP_PINMUX_0  BIT_OFFSET26  MUX_ALT0 &pconf_drv_pu_ds2_1v8
    DSP_PDM_IN1  DSP_PINMUX_0  BIT_OFFSET28  MUX_ALT0 &pconf_drv_pu_ds2_1v8
    DSP_PDM_IN2  DSP_PINMUX_0  BIT_OFFSET30  MUX_ALT0 &pconf_drv_pu_ds2_1v8
    DSP_PDM_IN3  DSP_PINMUX_1  BIT_OFFSET0  MUX_ALT0 &pconf_drv_pu_ds2_1v8
  >; /* PDM input pin configuration, defines four input pins' multiplexing and power settings; check for reuse when using */
};
PDM binding to DSP is located in the x5.dtsi file within the BSP source code:
archband_pdm: archband_pdm@320d0000 {
      compatible = "archband,pdm-driver";
      reg = <0x320d0000 0x00010000>;
      clocks = <&dspclks X5_DSP_PDM_HMCLKA_CLK>, <&dspclks X5_DSP_PDM_APB_CLK>;
      clock-names = "pdmclk", "pdm_pclk";
      pinctrl-names = "default";
      pinctrl-0 = <&pinctrl_dsp_pdm_cko &pinctrl_dsp_pdm_in>;
      arb-syscon = <&dsp_crm_syscon 0x10>;
      arb,osr = <1>;
      dmas = <&dsp_axi_dma 20>, <&dsp_axi_dma 19>, <&dsp_axi_dma 18>, <&dsp_axi_dma 17>;
      dma-names = "rx0", "rx1", "rx2", "rx3";
      channel = <2>;
      #sound-dai-cells = <0>;
      status = "disabled";
      resets = <&dsprst DSP_PDM_RESET>;
};
Enable Corresponding Config Options
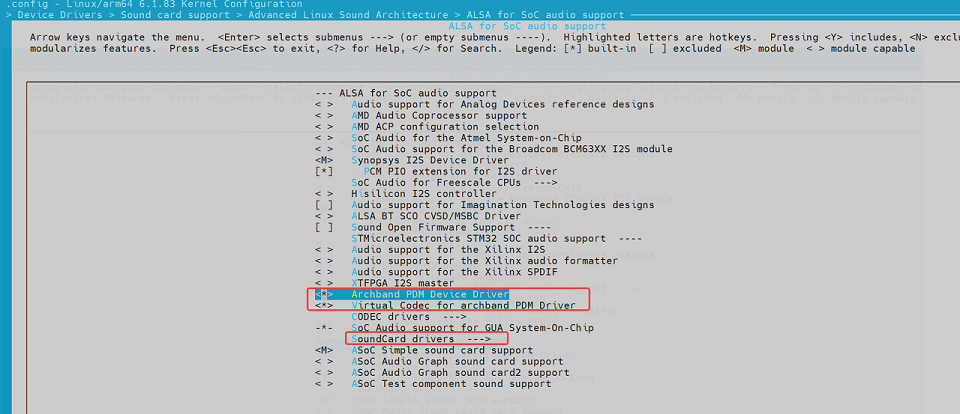
The above image shows GUI selection. The following platform config options must be confirmed:
CONFIG_SND_ARCHBAND_PDM
CONFIG_SND_VIRT_CODEC

CONFIG_SND_SOC_HOBOT_SIMPLE_CARD
CONFIG_SND_DUPLEX_CARD
CONFIG_SND_HOBOT_SOUND_MACHINE
CONFIG_SND_HOBOT_SOUND_DUPLEX_HOST

CONFIG_SND_SIMPLE_CARD_UTILS
Verification Reference
Based on actual configuration and codec, refer to the following commands:
modprobe designware_i2s i2s_ms=1 /* select i2s master/slave mode */
modprobe es7210
modprobe es8156
modprobe snd-soc-hobot-sound-duplex-host
arecord –l /* list sound cards, confirm sound card used for pdm recording */
arecord -Dhw:1,2 -c 2 -r 16000 -f S24_LE -t wav -d 5 /userdata/test.wav	/* recording command */
After recording, check if /userdata/test.wav is normal.
PDM Usage Limitations
Channels: 8 chn (Testing via ALSA framework only allows 2 channels at a time, i.e., one HIFI_PIN_INx, because each digital mic data output requires one DMA handshake. ALSA framework does not support single input pin connected to multiple DMA handshakes.) Sampling Rate: 16/32/48k Bit Width: 24-bit
7.2.16. Why Can’t the System Boot After Flashing Miniboot via Fastboot?
Incorrect Flashing Method:
fastboot flash addr:0x0 miniboot.img
Cause: In older versions, miniboot included miniboot.img, partition table, and misc partition. However, the current version’s flashing script has changed: miniboot_all.img = gpt.img + mbr.img + miniboot.img + misc.img (i.e., the old version miniboot), whereas the current miniboot.img = bl2.img + bl3x.img. Therefore, there are two correct ways to flash miniboot.
Flash miniboot Partition Correct Command:
fastboot flash miniboot miniboot.img
Flash miniboot with Full Partition Table and misc Correct Command:
fastboot flash addr:0x0 miniboot_all.img
7.2.17. Internal Compiler Error: Illegal Instruction During SDK Compilation
Error Log:

Cause: The arm-gnu-toolchain-11.3.rel1 GCC version has compatibility issues on older CPU models and cannot handle floating-point data. See details: Bug 5825 - Illegal instruction: 4 on questionable float conversion.
Solution: Upgrade the development host to use a newer CPU model.
7.2.18. Why Are My Changes Not Included in hbre.img After Compiling hbre Module?
Symptom: After running ./bd.sh hbre camsys/libcam, the modifications are not included in hbre.img.
Cause & Solution: Running ./bd.sh hbre or ./bd.sh app without specifying a module compiles all modules and regenerates hbre.img and app.img. However, when a module name is specified (e.g., ./bd.sh hbre camsys/libcam or ./bd.sh hbre liblog), only that module is compiled—no packaging occurs. This allows users to compile and debug modules individually on the target board. To repackage the image after compiling a single module, append the pack option to the command, e.g., ./bd.sh hbre camsys/libcam pack, which will repackage the hbre.img partition image after compiling camsys/libcam. Alternatively, after completing the module compilation, run ./bd.sh hbre pack to solely repackage the hbre.img partition image.
7.2.19. Warning: “You Are Leaving 9 Commits Behind” When Building Root Filesystem with Buildroot
Symptom: Warning: you are leaving 9 commits behind, not connected to

Cause: This warning appears when recompiling buildroot. During the first build, patches from hb_patch_buildroot are applied to the buildroot source. On subsequent builds, this warning is shown.
Solution: This has no impact on compilation. The build script will restore the source to its initial state and reapply the patches.
7.2.20. LD_LIBRARY_PATH Error When Building Root Filesystem with Buildroot
Symptom: When compiling buildroot to generate the root filesystem, the following error appears:
You seem to have the current working directory in your LD_LIBRARY_PATH environment variable. This doesn’t work.

Cause: This indicates that LD_LIBRARY_PATH is already set in your environment variables, which is not allowed during buildroot compilation.
Solution: Check the contents of ~/.profile and ~/.bashrc, locate the LD_LIBRARY_PATH setting, comment it out, and log in to the terminal again. Run echo ${LD_LIBRARY_PATH} to verify it’s empty. Once cleared, compilation should proceed normally.
7.2.21. “mount not found” Error When Building System Root Filesystem with Buildroot
Symptom: ../output/build/libglib2-2.72.3/meson.build:2124:2: ERROR: Dependency “mount” not found, tried pkgconfig and cmake

Cause: This error occurs when attempting to build the system filesystem immediately after building initramfs without cleaning.
Solution: After building initramfs, delete the framework/output directory and recompile the system.
7.2.22. utils_funcs.sh File Not Found When Running bd.sh lunch
Symptom: ./bd.sh lunch
./bd.sh: line 7: /home/work/x5_bjs1/utils_funcs.sh: No such file or directory
Cause: When executing ./bd.sh, the script attempts to get the absolute path of xbuild.sh via:
SCRIPT_DIR=”$( cd “$( dirname “$(readlink -f “${BASH_SOURCE[0]}”)” )” && pwd )”
source “$SCRIPT_DIR/utils_funcs.sh”
bd.sh is a symbolic link to build/xbuild.sh, so SCRIPT_DIR becomes the absolute path of the build directory.
However, during SDK packaging and copying, the symbolic link may be converted to a regular file, causing SCRIPT_DIR to be incorrect and resulting in the missing dependency error.
Solution:
Restore bd.sh as a symbolic link:
ln -sf build/xbuild.sh bd.sh
Avoid using ZIP to package files on Linux, as it may convert symbolic links to regular files or alter file permissions.
When using cp, include the -a option to preserve symbolic links.
7.2.23. Compilation Shortcut Commands Fail in ZSH Shell Environment
Symptom: As described, after sourcing source build/quickcmd.sh in zsh, using the b command for compilation fails as shown:

Cause: When adding bd.sh to the PATH environment variable, the absence of the BASH_SOURCE global variable in zsh causes incorrect path resolution.
Solution: Refer to ${BASH_SOURCE[0]} equivalent in zsh?. When BASH_SOURCE is unavailable, fall back to ${(%):-%x}.

7.2.24. Can I Avoid Flashing the Full Image If Only Modifying Kernel dts?
Question: Requires understanding of partition table definition and kernel compilation/packaging process. DTS and kernel are packaged together into a FIT format image. The storage definition is in device/horizon/x5/board_cfg/soc/x5.its, which describes how board_id maps to kernel image and device tree.
Solution: The kernel and DTS are bundled in boot.img. Simply update the boot partition.
7.2.25. How to Include a New Code Directory in App Compilation
Solution: Code under the app directory is compiled by the build/mk_app.sh script. To add a new directory and include it in the build, add the directory name to the components list in build/mk_app.sh.
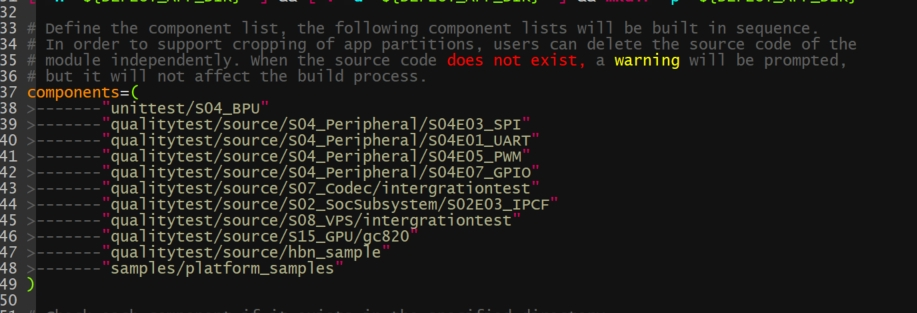
build/mk_app.sh iterates over components, searching for build.sh (preferred) and Makefile in each directory. If found, it compiles them.
Note: Code in the app directory consists of independent test programs that may be added or removed as needed. Missing directories or absence of build.sh/Makefile will not cause overall build failure—only a warning about missing modules.
7.3. Chip Specifications
7.3.1. Maximum Memory Size Supported by the Chip
Up to 8GB of memory is supported.
7.3.2. BPU Memory Access Mode
The BPU shares memory with the CPU. A contiguous block of physical memory is reserved for BPU usage in the system.
7.4. Codec
7.4.1. Incorrect Video Stream Header Information Error
[ERROR][MM][src/vdi/linux/vdi_osal.c:174] [ERROR][869.56942][3344:3543][VideoDecoder] DecodeHeader:1554 FAILED TO DEC_PIC_HDR: ret(1), SEQERR(00005000) [ERROR][MM][src/vdi/linux/vdi_osal.c:174] [ERROR][869.56980][3344:3543][COMPONENT] Component wave_decoder will be terminated
The first frame sent to the decoder must include SPS, PPS, and IDR. If only SPS is provided, the above error occurs.
7.5. Peripherals
7.5.1. How to Check if Sensor Hardware Connection Is Normal
First, enable sensor power supply, which typically includes multiple voltages (e.g., 1.8V, 2.8V). The method varies depending on the development board.
Then, enable the sensor’s MCLK; otherwise, the sensor’s I2C cannot be properly detected.
echo 1 > /sys/class/vps/mipi_host1/param/snrclk_en
echo 24000000 > /sys/class/vps/mipi_host1/param/snrclk_freq
echo 1 > /sys/class/vps/mipi_host0/param/snrclk_en
echo 24000000 > /sys/class/vps/mipi_host0/param/snrclk_freq
Use the
i2cdetect -y -f <i2c_bus>command to detect the sensor. Fill in the correcti2c_busnumber based on hardware design.
7.5.2. How to Read ETH PHY Registers
In U-Boot, use the mii command directly, for example:
mii dump
mii read
7.5.3. Software Method to Switch USB Between Host and Device Mode
There are two software methods to switch USB between host and device mode: using debugfs or class/usb_role to change the USB controller’s operating mode. Software switching enables more flexible USB connections, facilitating testing and debugging.
* Using debugfs
echo device > /sys/kernel/debug/usb/35100000.usb/mode                     # usb3.0 port
echo host > /sys/kernel/debug/usb/35100000.usb/mode                       # usb3.0 port

echo device > /sys/kernel/debug/usb/35300000.usb/mode                     # usb2.0 port
echo host > /sys/kernel/debug/usb/35300000.usb/mode                       # usb2.0 port

* Using class/usb_role
echo device > /sys/class/usb_role/35100000.usb-role-switch/role            # usb3.0 port
echo host > /sys/class/usb_role/35100000.usb-role-switch/role              # usb3.0 port

echo device > /sys/class/usb_role/35300000.usb-role-switch/role            # usb2.0 port
echo host > /sys/class/usb_role/35300000.usb-role-switch/role              # usb2.0 port
7.6. Algorithm Toolchain
7.6.1. Common Troubleshooting
7.6.1.1. hb_mapper checker Common Issues
Background: Model checking command (hb_mapper checker)
In practical projects, not all floating-point models can be converted into quantized models. Therefore, a pre-check is required before conversion. This check process simulates the entire model conversion procedure but simplifies time-consuming steps. After completing the model check, this command outputs the check results and operator deployment status on the target device.
Issue Scenarios: Below are common issues encountered when using hb_mapper checker:
Issue 1:
ERROR The shape of model input:input is [xxx] which has dimensions of 0.
Please specify input-shape parameter.
Possible Cause: This issue may occur because the model input has a dynamic shape.
Suggested Solution: To resolve this, use the parameter
--input-shape "input_name input_shape"to explicitly specify the shape of the input node.Issue 2:
ERROR HorizonRT not support these cpu operators: {op_type}
Possible Cause: This issue may arise because the CPU operator used is not supported by Horizon.
Suggested Solution: You can replace the operator according to our operator support list. If the unsupported CPU operator is a core component of the model, please contact Horizon for development evaluation.
Issue 3:
Unsupported op {op_type}
Possible Cause: This issue may occur because the BPU operator used is not supported by Horizon.
Suggested Solution: If the overall model performance meets your requirements, you may ignore this log. Otherwise, consider replacing the operator using our operator support list.
Issue 4:
ERROR nodes:['{op_type}'] are specified as domain:xxx, which are not supported by official onnx.
Please check whether these ops are official onnx ops or defined by yourself
Possible Cause: This issue may occur because a custom operator used is not supported by Horizon.
Suggested Solution: You can either replace the operator according to our operator support list or refer to Custom Operator Development to register a custom CPU operator.
7.6.1.2. hb_mapper makertbin Common Issues
Background: Model compilation command (hb_mapper makertbin)
This command generates an ONNX quantized model and a runtime model for simulation and deployment based on configuration files and model types.
Issue Scenarios: Below are common issues encountered when using hb_mapper makertbin:
Issue 1
  Layer {op_name}
    xxx expect data shape range:[[xxx][xxx]], but the data shape is [xxx]
  Layer {op_name}
    Tensor xxx expects be n dimensions, but m provided
Possible Cause: This issue may occur because the {op_name} operator exceeds hardware support limits and falls back to CPU execution.
Suggested Solution: If the performance impact of CPU execution is acceptable, this warning can be ignored. Otherwise, modify the operator to fall within BPU-supported ranges using our operator support list.
Issue 2
ERROR There is an error in pass: {op_name}. Error message:xxx
Possible Cause: This issue may occur due to optimization failure for the {op_name} operator.
Suggested Solution: Collect the model and .log files and provide them to Horizon technical support for analysis.
Issue 3
  Error There is an error in pass:constant_folding.
  Error message: Could not find an implementation for the node {op_name}
Possible Cause: The operator is not yet supported by ONNX Runtime.
Suggested Solution: Replace the operator using our operator support list. If it is a core operator, contact Horizon for development evaluation.
Issue 4
  Start to parse the onnx model
  core dump
Possible Cause: Model parsing failed, possibly because only one output/input node was named during model export.
Suggested Solution: Re-export the ONNX model and ensure validity—either avoid specifying input/output names or assign names to each input/output node.
Issue 5
  Start to calibrate/quantize the model
  core dump

  Start to compile the model
  core dump
Possible Cause: Model quantization or compilation failed.
Suggested Solution: Collect the model and .log files and provide them to Horizon technical support for analysis.
Issue 6
ERROR model conversion faild: Inferred shape and existing shape differ in dimension x: (n) vs (m)
Possible Cause: The ONNX model has invalid input shapes, or there is an error in tool optimization passes.
Suggested Solution: Ensure the ONNX model is valid. If the model can be normally inferred, provide it to Horizon technical support for further analysis.
Issue 7
WARNING got unexpected input/output/sumin threshold on conv {op_name}! value: xxx
Possible Cause: Incorrect data preprocessing or extremely small/large weight values at this node.
Suggested Solution: Review data preprocessing steps. We recommend using BN operators to normalize data distribution.
Issue 8
ERROR hbdk-cc compile hbir model failed with returncode -n
Possible Cause: Model compilation failed.
Suggested Solution: Collect the model and .log files and provide them to Horizon technical support for analysis.
Issue 9
ERROR {op_type} only support 4 dim input
Possible Cause: The toolchain currently only supports 4-dimensional input for this operator.
Suggested Solution: Adjust the operator input to 4 dimensions.
Issue 10
ERROR {op_type} Not support this attribute/mode=xxx
Possible Cause: The toolchain does not support this operator attribute.
Suggested Solution: Replace the operator using our operator support list or contact Horizon for development evaluation.
Issue 11
  ERROR There is no node can execute on BPU in this model,
  please make sure the model has at least one conv node which is supported by BPU.
Possible Cause: The model contains no quantizable BPU nodes.
Suggested Solution: Ensure the ONNX model is valid and includes at least one convolution node. If these conditions are met, provide the model and .log files to Horizon technical support.
Issue 12
ERROR The opset version of the onnx model is n, only model with opset_version 10/11 is supported
Possible Cause: The model’s opset version exceeds toolchain support limits.
Suggested Solution: Re-export the model ensuring opset_version is set to 10 or 11.
Issue 13
Error occurs when using run_on_bpu for conversion.
Possible Cause: Currently, the operator is not supported for run_on_bpu.
Suggested Solution: run_on_bpu currently only supports specifying Relu, Softmax, Reshape, pooling (maxpool, avgpool, etc.) operators, and CPU*+Transpose combinations (by naming the Transpose node, both CPU* and Transpose can run on BPU, where CPU* refers to BPU-supported ops). If conditions are met but still fails, contact Horizon technical support. If not met, contact Horizon for development evaluation.
Issue 14
ERROR unsupported model: BAYES-E not support excute one model on 2core simultaneously now
Possible Cause: X5 currently does not support compiling dual-core models.
Suggested Solution: Set core_num to 1 in the YAML configuration file.
Issue 15
ERROR : There is an ERROR during shape inference,···,The error model has been saved as shape_inference_fail.onnx
Possible Cause: The model may be invalid or the tool failed to parse it.
Suggested Solution: Provide the
.logfile and the generatedshape_inference_fail.onnxto Horizon technical support for analysis.
7.6.1.3. hb_model_modifier Common Issues
Background: The hb_model_modifier tool removes Transpose and Quantize nodes at the input, and Transpose, Dequantize, DequantizeFilter, Cast, Reshape, and Softmax nodes at the output of a specified runtime model. The removed node information is stored in the BIN model and can be viewed using hb_model_info.
Issue Scenarios: Below are common issues when using hb_model_modifier:
Issue:
ERROR Can not find value info {op_name}
Possible Cause: This is a known issue resolved in OE1.1.14.
Suggested Solution: Fully update the OE SDK or upgrade horizon-tc-ui to version 1.7.8.
7.6.1.4. hb_verifier Common Issues
Background: The hb_verifier tool verifies results from a specified fixed-point model and runtime model.
If an image is specified before using the tool, hb_verifier performs inference on the fixed-point model and runtime model (on-device and X86 simulator), then compares the results pairwise and reports whether they pass (this process is optional and customizable).
If no image is specified, hb_verifier uses randomly generated tensor data for inference.
Issue Scenarios: Below are common issues when using hb_verifier:
Issue:
ERROR Quanti onnx and Arm result Strict check FAILED
Possible Cause: Model consistency comparison failed.
Suggested Solution: Provide the model to Horizon technical support for analysis.
7.6.1.5. hb_onnxruntime Common Issues
Background: hb_onnxruntime is primarily used for ONNX model inference.
Issue Scenarios: Below are common issues when using hb_onnxruntime:
Issue 1:
  ERROR [ONNXRuntimeError] : 2:INVALID_ARGUMENT : Unexpected input data type.
  Actual: (N11onnxruntime17PrimitiveDataTypexxx), expected: (N11onnxruntime17PrimitiveDataTypexxx)
Possible Cause: Input data type does not match the model.
Suggested Solution: Typically, floating-point ONNX models expect float32 input, while quantized models expect int8. Use a visualization tool to inspect the input node properties of the ONNX model.
Issue 2:
  [libprotobuf FATAL google/protobuf/stubs/common.cc:83] This program was compiled against version 3.6.1 of the Protocol Buffer runtime library,
  which is not compatible with the installed version (3.19.4).
Possible Cause: Version conflict between the protobuf used by PyTorch and Horizon; import order matters.
Suggested Solution: Place from horizon_tc_ui import HB_ONNXRuntime at the top of import statements. Apply the same fix for other APIs with similar errors.
7.6.1.6. libDNN Common Issues
Background: libDNN is primarily used as Horizon’s model inference library.
Issue Scenarios: Below are common issues when using libDNN:
Issue 1:
(common.h:79): HR:ERROR: op_name:xxx invalid attr key xxx
Possible Cause: libDNN does not currently support a certain attribute of this operator (future versions will move such constraints earlier to the model conversion phase).
Suggested Solution: Replace the operator using our operator support list or contact Horizon for development evaluation.
Issue 2:
(hb_dnn_ndarray.cpp:xxx): data type of ndarray do not match specified type. NDArray dtype_: n, given:m
Possible Cause: libDNN does not currently support this input data type.
Suggested Solution: Replace the operator using our operator support list or contact Horizon for development evaluation.
Issue 3:
(validate_util.cpp:xxx):tensor aligned shape size is xxx , but tensor hbSysMem memSize is xxx,
tensor hbSysMem memSize should >= tensor aligned shape size!
Possible Cause: Insufficient memory allocated for input data.
Suggested Solution: Use
hrt_model_exec model_infoto check thealigned shapeof the model’sinputnode. ForlibDNNversions above 1.5.4b, usehbDNNTensorProperties.alignedByteSizefor memory allocation. For versions below 1.5.4b, usealigned shape * size_of(tensor type).Issue 4:
(bpu_model_info.cpp:xxx): HR:ERROR: hbm model input feature names must be equal to graph node input names
Possible Cause: Known issue related to the hb_model_modifier tool, fixed in OE1.1.14.
Suggested Solution: Fully update the OE SDK or upgrade horizon-tc-ui to version 1.7.8.
7.6.2. Model Quantization and Deployment Tips
7.6.2.1. Transformer Usage Guide
This section explains the concepts and parameters of each transformer and provides usage examples to assist you in transformer operations.
Before reading this document, please note the following:
Image data is
3D, but the transformers provided by Horizon process data as4D. The transformer will only apply the operation to thefirst imagein the input.
AddTransformer
Description:
Adds a specified value to all pixel values in the input image. This transformer converts the output data type to float32.
Parameters:
value: The value added to each pixel. Note: value can be negative, e.g., -128.
Usage Examples:
  # Subtract 128 from image data
  AddTransformer(-128)

  # Add 127 to image data
  AddTransformer(127)
MeanTransformer
Description:
Subtracts the mean_value from all pixel values in the input image.
Parameters:
means: Values to subtract from each pixel. Can be negative, e.g., -128.
data_format: Input layout type, options: [”CHW”, “HWC”], default “CHW”.
Usage Examples:
  # Subtract 128.0 from each pixel, input format CHW
  MeanTransformer(np.array([128.0, 128.0, 128.0]))

  # Subtract different values: 103.94, 116.78, 123.68, input format HWC
  MeanTransformer(np.array([103.94, 116.78, 123.68]), data_format="HWC")
ScaleTransformer
Description:
Multiplies all pixel values in the input image by a scale factor.
Parameters:
scale_value: The coefficient to multiply, e.g., 0.0078125 or 1/128.
Usage Examples:
  # Scale pixel values from range -128~127 to -1~1
  ScaleTransformer(0.0078125)
  # or
  ScaleTransformer(1/128)
NormalizeTransformer
Description:
Normalizes the input image. This transformer converts the output data type to float32.
Parameters:
std: Value to divide the first image by.
Usage Examples:
  # Scale pixel values from [-128, 127] to -1~1
  NormalizeTransformer(128)
TransposeTransformer
Description:
Performs layout transformation.
Parameters:
order: Output layout order relative to input. For HWC (0,1,2), converting to CHW requires order (2,0,1).
Usage Examples:
  # HWC to CHW
  TransposeTransformer((2, 0, 1))
  # CHW to HWC
  TransposeTransformer((1, 2, 0))
HWC2CHWTransformer
Description:
Converts NHWC layout to NCHW.
Parameters: None.
Usage Examples:
  # NHWC to NCHW
  HWC2CHWTransformer()
CHW2HWCTransformer
Description:
Converts NCHW layout to NHWC.
Parameters: None.
Usage Examples:
  # NCHW to NHWC
  CHW2HWCTransformer()
CenterCropTransformer
Description:
Crops a square image from the center of the input image by truncation. This transformer outputs float32 by default. When data_type is uint8, output is uint8.
Parameters:
crop_size: Side length of the cropped square.
data_type: Output data type, options: [”float”, “uint8”].
Usage Examples:
  # Center crop with 224x224, default output type float32
  CenterCropTransformer(crop_size=224)

  # Center crop with size 224*224, output data type as uint8
  CenterCropTransformer(crop_size=224, data_type="uint8")
PILCenterCropTransformer
Description:
Performs a center crop to extract a square image from the center of the input image using PIL. This transformer converts the data format to float32 upon output.
Parameters:
size: The side length of the square to be cropped from the center.
Usage Example:
  # Perform center cropping with size 224*224 using PIL
  PILCenterCropTransformer(size=224)
LongSideCropTransformer
Description:
Performs cropping based on the longer side of the image. This transformer converts the data format to float32 upon output.
If the width is greater than the height, a square with side length equal to the height is cropped from the center. For example, for an image of size 100 (width) × 70 (height), the output will be 70×70.
If the height is greater than the width, a rectangle is cropped from the center with width unchanged, and height calculated as:
width + (height - width) / 2. For example, for an image of size 70 (width) × 100 (height), the output will be 70×85.
Parameters: None.
Usage Example:
LongSideCropTransformer()
PadResizeTransformer
Description:
Resizes the image by padding to reach the target size. This transformer converts the data format to float32 upon output.
Parameters:
target_size: Target size as a tuple, e.g., (240, 240).
pad_value: Value used for padding, default is 127.
pad_position: Position to apply padding, options are [”boundary”, “bottom_right”], default is “boundary”.
Usage Example:
  # Resize to 512*512, pad to bottom-right with value 0
  PadResizeTransformer((512, 512), pad_position='bottom_right', pad_value=0)

  # Resize to 608*608, pad to boundary with value 127
  PadResizeTransformer(target_size=(608, 608))
ResizeTransformer
Description:
Resizes the input image to a specified size.
Parameters:
target_size: Target size as a tuple, e.g., (240, 240).
mode: Image processing backend, options are (”skimage”, “opencv”), default is “skimage”.
method: Interpolation method, effective only when mode is “skimage”. Values range from 0 to 5, default is 1:
0: Nearest-neighbor
1: Bi-linear (default)
2: Bi-quadratic
3: Bi-cubic
4: Bi-quartic
5: Bi-quintic
data_type: Output data type, options are (”uint8”, “float”), default is “float”. When set to “uint8”, output type is uint8; otherwise float32.
interpolation: Interpolation method, effective only when mode is “opencv”. Default is None. Currently supports only None (defaults to INTER_LINEAR) or INTER_CUBIC.
Supported OpenCV interpolation methods (others will be supported in future iterations):
INTER_NEAREST: Nearest neighbor interpolation
INTER_LINEAR: Bilinear interpolation (default when interpolation is None)
INTER_CUBIC: Bicubic interpolation over 4x4 pixel neighborhood
INTER_AREA: Resampling using pixel area relation, preferred for image decimation
INTER_LANCZOS4: Lanczos interpolation over 8x8 neighborhood
INTER_LINEAR_EXACT: Bit-exact bilinear interpolation
INTER_NEAREST_EXACT: Bit-exact nearest neighbor interpolation (matches PIL, scikit-image, or MATLAB)
INTER_MAX: Mask for interpolation codes
WARP_FILL_OUTLIERS: Flag to fill all target image pixels; outliers set to zero
WARP_INVERSE_MAP: Flag to use inverse transformation
Usage Example:
  # Resize image to 224*224 using OpenCV with bilinear interpolation, output as float32
  ResizeTransformer(target_size=(224, 224), mode='opencv', method=1)

  # Resize image to 256*256 using skimage with bilinear interpolation, output as float32
  ResizeTransformer(target_size=(256, 256))

  # Resize image to 256*256 using skimage with bilinear interpolation, output as uint8
  ResizeTransformer(target_size=(256, 256), data_type="uint8")
PILResizeTransformer
Description:
Resizes images using the PIL library.
Parameters:
size: Target size as a tuple, e.g., (240, 240).
interpolation: Interpolation method, options are (Image.NEAREST, Image.BILINEAR, Image.BICUBIC, Image.LANCZOS), default is Image.BILINEAR.
Image.NEAREST: Nearest neighbor sampling
Image.BILINEAR: Linear interpolation
Image.BICUBIC: Cubic spline interpolation
Image.LANCZOS: High-quality downsampling filter
Usage Example:
  # Resize image to 256*256 using bilinear interpolation
  PILResizeTransformer(size=256)

  # Resize image to 256*256 using high-quality downsampling filter
  PILResizeTransformer(size=256, interpolation=Image.LANCZOS)
ShortLongResizeTransformer
Description:
Resizes the input image while preserving aspect ratio. The new image dimensions are determined as follows:
Compute scale factor by dividing short_size by the smaller dimension (width or height) of the original image.
If the scaled larger dimension exceeds long_size, the scale factor is recalculated as long_size divided by the original larger dimension.
Resize the image using OpenCV’s resize function with the computed scale factor.
Parameters:
short_size: Desired length of the shorter side after resizing.
long_size: Desired length of the longer side after resizing.
include_im: Default is True. If True, returns both the resized image and the original image.
Usage Example:
  # Short side 20, long side 100, return processed and original image
  ShortLongResizeTransformer(short_size=20, long_size=100)
PadTransformer
Description:
Resizes the image by scaling using a factor derived from dividing target_size by the maximum of the original width or height. Then, the new dimensions are rounded up to the nearest multiple of size_divisor to generate the final image.
Parameters:
size_divisor: Divisor used to round up dimensions, default is 128.
target_size: Target size for scaling, default is 512.
Usage Example:
  # Pad to 1024*1024
  PadTransformer(size_divisor=1024, target_size=1024)
ShortSideResizeTransformer
Description:
Resizes the image so that the shorter side matches the specified short_size, preserving aspect ratio, and then performs center cropping.
Parameters:
short_size: Desired length of the shorter side.
data_type: Output data type, options are (”float”, “uint8”), default is “float32”. When set to “uint8”, output type is uint8.
interpolation: Interpolation method (OpenCV style), default is None. Currently supports only None (defaults to INTER_LINEAR) or INTER_CUBIC.
Supported OpenCV interpolation methods:
INTER_NEAREST: Nearest neighbor
INTER_LINEAR: Bilinear interpolation (default when None)
INTER_CUBIC: Bicubic interpolation
INTER_AREA: Area-based resampling
INTER_LANCZOS4: Lanczos interpolation
INTER_LINEAR_EXACT: Bit-exact bilinear
INTER_NEAREST_EXACT: Bit-exact nearest neighbor
INTER_MAX: Mask for interpolation codes
WARP_FILL_OUTLIERS: Fill outliers with zero
WARP_INVERSE_MAP: Use inverse mapping
Usage Example:
  # Resize short side to 256 using bilinear interpolation
  ShortSideResizeTransformer(short_size=256)

  # Resize short side to 256 using Lanczos interpolation
  ShortSideResizeTransformer(short_size=256, interpolation=Image.LANCZOS4)
PaddedCenterCropTransformer
Description:
Performs center cropping with padding.
Note:
Only applicable to EfficientNet-lite related models.
Calculation steps:
Compute scaling factor:
int((float(image_size) / (image_size + crop_pad))).Compute center crop size:
factor * np.minimum(original_height, original_width).Perform center crop using the computed size.
Parameters:
image_size: Input image size, default is 224.
crop_pad: Padding size for center cropping, default is 32.
Usage Example:
  # Crop to 240*240 with padding 32
  PaddedCenterCropTransformer(image_size=240, crop_pad=32)

  # Crop to 224*224 with padding 32
  PaddedCenterCropTransformer()
BGR2RGBTransformer
Description:
Converts input image from BGR to RGB format.
Parameters:
data_format: Data layout, options are (”CHW”, “HWC”), default is “CHW”.
Usage Example:
  # Convert BGR to RGB when layout is NCHW
  BGR2RGBTransformer()

  # Convert BGR to RGB when layout is NHWC
  BGR2RGBTransformer(data_format="HWC")
RGB2BGRTransformer
Description:
Converts input image from RGB to BGR format.
Parameters:
data_format: Data layout, options are (”CHW”, “HWC”), default is “CHW”.
Usage Example:
  # Convert RGB to BGR when layout is NCHW
  RGB2BGRTransformer()

  # Convert RGB to BGR when layout is NHWC
  RGB2BGRTransformer(data_format="HWC")
RGB2GRAYTransformer
Description:
Converts input image from RGB to grayscale.
Parameters:
data_format: Input layout, options are (”CHW”, “HWC”), default is “CHW”.
Usage Example:
  # Convert RGB to GRAY when layout is NCHW
  RGB2GRAYTransformer(data_format='CHW')

  # Convert RGB to GRAY when layout is NHWC
  RGB2GRAYTransformer(data_format='HWC')
BGR2GRAYTransformer
Description:
Converts input image from BGR to grayscale.
Parameters:
data_format: Input layout, options are [”CHW”, “HWC”], default is “CHW”.
Usage Example:
  # Convert BGR to GRAY when layout is NCHW
  BGR2GRAYTransformer(data_format='CHW')

  # Convert BGR to GRAY when layout is NHWC
  BGR2GRAYTransformer(data_format='HWC')
RGB2GRAY_128Transformer
Description:
Converts input image from RGB to grayscale with pixel values in range (-128, 127).
Parameters:
data_format: Input layout, options are [”CHW”, “HWC”], default is “CHW”, required.
Usage Example:
  # Convert RGB to GRAY_128 when layout is NCHW
  RGB2GRAY_128Transformer(data_format='CHW')

  # Convert RGB to GRAY_128 when layout is NHWC
  RGB2GRAY_128Transformer(data_format='HWC')
RGB2YUV444Transformer
Description:
Converts input image from RGB to YUV444 format.
Parameters:
data_format: Input layout, options are [”CHW”, “HWC”], default is “CHW”, required.
Usage Example:
  # Convert BGR to YUV444 when layout is NCHW
  BGR2YUV444Transformer(data_format='CHW')

  # Convert BGR to YUV444 when layout is NHWC
  BGR2YUV444Transformer(data_format='HWC')
BGR2YUV444Transformer
Description:
Converts input image from BGR to YUV444 format.
Parameters:
data_format: Input layout, options are [”CHW”, “HWC”], default is “CHW”, required.
Usage Example:
  # Convert BGR to YUV444 when layout is NCHW
  BGR2YUV444Transformer(data_format='CHW')

  # Convert BGR to YUV444 when layout is NHWC
  BGR2YUV444Transformer(data_format='HWC')
BGR2YUV444_128Transformer
Description:
Converts input image from BGR to YUV444 format with pixel values in range (-128, 127).
Parameters:
data_format: Input layout, options are [”CHW”, “HWC”], default is “CHW”, required.
Usage Example:
  # Convert BGR to YUV444_128 when layout is NCHW
  BGR2YUV444_128Transformer(data_format='CHW')

  # Convert BGR to YUV444_128 when layout is NHWC
  BGR2YUV444_128Transformer(data_format='HWC')
RGB2YUV444_128Transformer
Description:
Converts input image from RGB to YUV444 format with pixel values in range (-128, 127).
Parameters:
data_format: Input layout, options are [”CHW”, “HWC”], default is “CHW”, required.
Usage Example:
  # Convert RGB to YUV444_128 when layout is NCHW
  RGB2YUV444_128Transformer(data_format='CHW')

  # Convert RGB to YUV444_128 when layout is NHWC
  RGB2YUV444_128Transformer(data_format='HWC')
BGR2YUVBT601VIDEOTransformer
Description:
Converts input image from BGR to YUV_BT601_Video_Range format.
YUV_BT601_Video_Range: Some camera inputs use YUV BT601 (Video Range) format with pixel values in the range 16–235. This transformer is designed to handle such data.
Parameters:
data_format: Input layout, options are [”CHW”, “HWC”], default is “CHW”, required.
Usage Example:
  # Convert BGR to YUV_BT601_Video_Range when layout is NCHW
  BGR2YUVBT601VIDEOTransformer(data_format='CHW')

  # Convert BGR to YUV_BT601_Video_Range when layout is NHWC
  BGR2YUVBT601VIDEOTransformer(data_format='HWC')
RGB2YUVBT601VIDEOTransformer
Description:
Converts input image from RGB to YUV_BT601_Video_Range format.
YUV_BT601_Video_Range: Some camera inputs use YUV BT601 (Video Range) format with pixel values in the range 16–235. This transformer is designed to handle such data.
Parameters:
data_format: The layout type of input, valid values are [”CHW”, “HWC”], default is “CHW”. This parameter is required.
Usage Examples:
  # When layout is NCHW, convert RGB to YUV_BT601_Video_Range
  RGB2YUVBT601VIDEOTransformer(data_format='CHW')

  # When layout is NHWC, convert RGB to YUV_BT601_Video_Range
  RGB2YUVBT601VIDEOTransformer(data_format='HWC')
YUVTransformer
Description:
Operation to convert input format to YUV444.
Parameters:
color_sequence: Color sequence. This parameter is required.
Usage Examples:
  # Convert image read as BGR to YUV444
  YUVTransformer(color_sequence="BGR")

  # Convert image read as RGB to YUV444
  YUVTransformer(color_sequence="RGB")
ReduceChannelTransformer
Description:
Operation to reduce the C channel to a single channel. This transformer mainly targets the C channel, for example, changing shape from 1*3*224*224 to 1*1*224*224. When using, ensure that the layout aligns with the data_format value to avoid incorrectly removing channels.
Parameters:
data_format: The layout type of input, valid values are [”CHW”, “HWC”], default is “CHW”.
Usage Examples:
  # Remove C channel when layout is NCHW
  ReduceChannelTransformer()
  # or
  ReduceChannelTransformer(data_format="CHW")

  # Remove C channel when layout is NHWC
  ReduceChannelTransformer(data_format="HWC")
BGR2NV12Transformer
Description:
Operation to convert input format from BGR to NV12.
Parameters:
data_format: The layout type of input, valid values are [”CHW”, “HWC”], default is “CHW”.
cvt_mode: Conversion mode, valid values are (rgb_calc, opencv), default is rgb_calc.
rgb_calc: Process image using mergeUV method;
opencv: Process image using OpenCV method.
Usage Examples:
  # When layout is NCHW, convert BGR to NV12 using rgb_calc mode
  BGR2NV12Transformer()
  # or
  BGR2NV12Transformer(data_format="CHW")

  # When layout is NHWC, convert BGR to NV12 using opencv mode
  BGR2NV12Transformer(data_format="HWC", cvt_mode="opencv")
RGB2NV12Transformer
Description:
Operation to convert input format from RGB to NV12.
Parameters:
data_format: The layout type of input, valid values are [”CHW”, “HWC”], default is “CHW”.
cvt_mode: Conversion mode, valid values are (rgb_calc, opencv), default is rgb_calc.
rgb_calc: Process image using mergeUV method;
opencv: Process image using OpenCV method.
Usage Examples:
  # When layout is NCHW, convert RGB to NV12 using rgb_calc mode
  RGB2NV12Transformer()
  # or
  RGB2NV12Transformer(data_format="CHW")

  # When layout is NHWC, convert RGB to NV12 using opencv mode
  RGB2NV12Transformer(data_format="HWC", cvt_mode="opencv")
NV12ToYUV444Transformer
Description:
Operation to convert input format from NV12 to YUV444.
Parameters:
target_size: Target size, value is a tuple, e.g., (240, 240).
yuv444_output_layout: Output layout for YUV444, valid values are (HWC, CHW), default is “HWC”.
Usage Examples:
  # Layout is NCHW, size is 768*768, convert NV12 to YUV444
  NV12ToYUV444Transformer(target_size=(768, 768))

  # Layout is NHWC, size is 224*224, convert NV12 to YUV444
  NV12ToYUV444Transformer((224, 224), yuv444_output_layout="HWC")
WarpAffineTransformer
Description:
Operation for performing image affine transformation.
Parameters:
input_shape: Input shape value.
scale: Multiplication coefficient.
Usage Examples:
  # Size is 512*512, long side length is 1.0
  WarpAffineTransformer((512, 512), 1.0)
F32ToS8Transformer
Description:
Operation to convert input format from float32 to int8.
Parameters: Not applicable.
Usage Examples:
  # Convert input format from float32 to int8
  F32ToS8Transformer()
F32ToU8Transformer
Description:
Operation to convert input format from float32 to uint8.
Parameters: Not applicable.
Usage Examples:
  # Convert input format from float32 to uint8
  F32ToU8Transformer()
7.6.2.2. Example Usage Instructions for YOLOv5x Model
YOLOv5x Model:
Download the corresponding
.ptfile from URL: yolov5-2.0.When cloning the code, ensure that the tag you are using is
v2.0, otherwise the conversion will fail.md5sum codes:
| md5sum | File |
|---|---|
| 2e296b5e31bf1e1b6b8ea4bf36153ea5 | yolov5l.pt |
| 16150e35f707a2f07e7528b89c032308 | yolov5m.pt |
| 42c681cf466c549ff5ecfe86bcc491a0 | yolov5s.pt |
| 069a6baa2a741dec8a2d44a9083b6d6e | yolov5x.pt |
To better adapt to the post-processing code, we made the following modifications to the GitHub code before exporting the ONNX model (code reference: https://github.com/ultralytics/yolov5/blob/v2.0/models/yolo.py):
    def forward(self, x):
        # x = x.copy()  # for profiling
        z = []  # inference output
        self.training |= self.export
        for i in range(self.nl):
            x[i] = self.m[i](x[i])  # conv
            bs, _, ny, nx = x[i].shape  # x(bs,255,20,20) to x(bs,3,20,20,85)
            #  x[i] = x[i].view(bs, self.na, self.no, ny, nx).permute(0, 1, 3, 4, 2).contiguous()
            x[i] = x[i].permute(0, 2, 3, 1).contiguous()
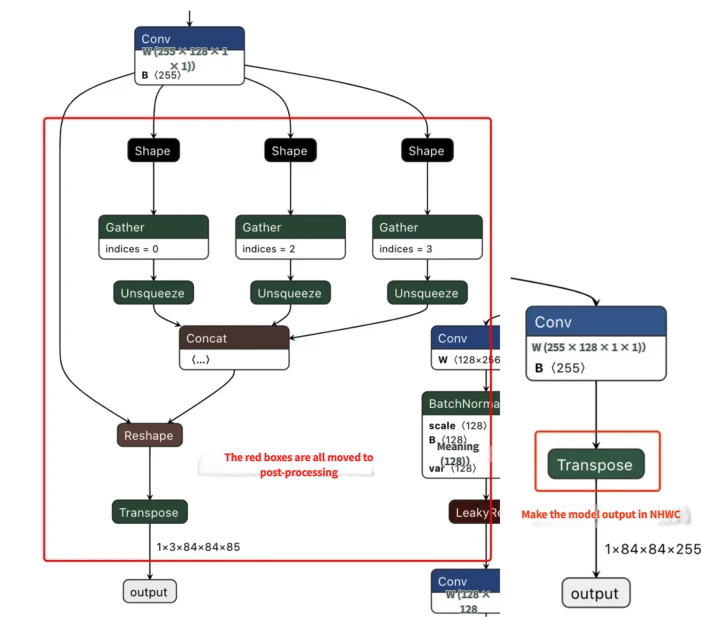
Description: Removed the reshape operation from 4D to 5D at the end of each output branch (i.e., do not split channel from 255 into 3x85), then convert the layout from NHWC to NCHW before output.
The left image below shows the visualization of one output node of the model before modification, and the right image shows the corresponding output node after modification.
After download, use the script https://github.com/ultralytics/yolov5/blob/v2.0/models/export.py to convert the
.ptfile to.onnx.Notes
When using the
export.pyscript, please note:Since the D-Robotics AI toolchain supports ONNX opset versions
10and11, modify theopset_versionparameter intorch.onnx.exportaccording to the version you intend to use.Change the default input name parameter in
torch.onnx.exportfrom'images'to'data', consistent with the YOLOv5x example script in the model conversion sample package.Change the default input data size 640x640 in the
parser.add_argumentsection to 672x672 as used in the YOLOv5x example of the model conversion sample package.
7.6.2.3. Model Accuracy Tuning Checklist
Please strictly follow steps 1–5 in the figure below to validate model accuracy and retain the code and results for each step:
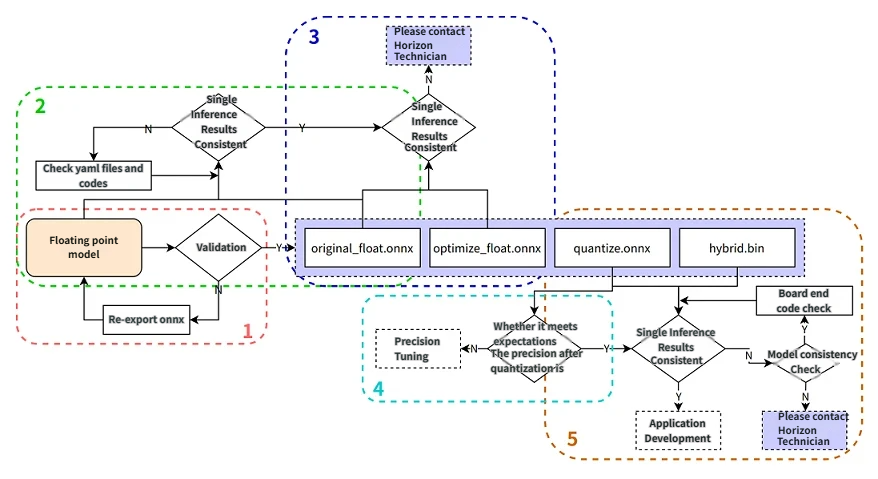
Before troubleshooting, confirm the Docker image or conversion environment version used for the current model conversion, and retain the version information.
1. Verify Inference Results of the Floating-Point ONNX Model
Enter the model conversion environment to test the single-image result of the floating-point ONNX model (specifically the ONNX model exported from the DL framework). The result of this step should be completely consistent with the inference result of the trained model (except for nv12 format, which may introduce slight differences).
Refer to the following example code steps to verify the correctness of the inference process, data preprocessing, and post-processing code for the floating-point ONNX model:
  from horizon_tc_ui import HB_ONNXRuntime
  import numpy as np
  import cv2

  def preprocess(input_name):
      # BGR->RGB, Resize, CenterCrop...
      # HWC->CHW
      # normalization
      return data

  def main():
      # Load model file
      sess = HB_ONNXRuntime(model_file=MODEL_PATH)
      # Get input & output node names
      input_names = [input.name for input in sess.get_inputs()]
      output_names = [output.name for output in sess.get_outputs()]
      # Prepare model input data
      feed_dict = dict()
      for input_name in input_names:
          feed_dict[input_name] = preprocess(input_name)

      # Original floating-point ONNX, data dtype=float32, start inference. The return value is a list, corresponding one-to-one with output_names.
      outputs = sess.run(output_names, feed_dict)

      # Post-processing
      postprocess(outputs)

  if __name__ == '__main__':
      main()
2. Verify the Correctness of the YAML Configuration File and Pre/Post-Processing Code
Test the single-image result of the original_float.onnx model, which should be completely consistent with the inference result of the floating-point ONNX model (except for nv12 format, where minor differences may arise due to lossy nv12 data).
Use the open-source tool Netron to open the original_float.onnx model and inspect the detailed attributes of the preprocessing node HzPreprocess operator to obtain the parameters required for data preprocessing: data_format and input_type.
Due to the presence of the HzPreprocess node, the preprocessing operation in the converted model may differ from the original model. This operator is added during model conversion based on configuration parameters in the YAML file (input_type_rt, input_type_train, norm_type, mean_value, scale_value). For details on how the preprocessing node is generated, refer to the norm_type Configuration Parameter Description section in the PTQ Principle and Detailed Steps chapter. Additionally, the preprocessing node appears in all artifacts produced during the conversion process.
Ideally, the HzPreprocess node should fully convert from input_type_rt to input_type_train. However, in practice, the entire type conversion process relies on D-Robotics AI chip hardware, which is not included in the ONNX model. Therefore, the actual input type in the ONNX model uses an intermediate type—the result type of hardware processing of input_type_rt. Hence, for models with image input data types: RGB/BGR/NV12/YUV444/GRAY and data dtype=uint8, a -128 operation is required in the preprocessing code. For featuremap data types using float32, the -128 operation is not needed in the preprocessing code. The data layout (NCHW/NHWC) of original_float.onnx remains consistent with that of the original floating-point model.
Refer to the following example code steps to verify the correctness of the inference process, data preprocessing, and post-processing code for the original_float.onnx model:
For data preprocessing, it is recommended to refer to the preprocessing methods of Caffe, ONNX, and other example models in the D-Robotics model conversion horizon_model_convert_sample sample package.
  from horizon_tc_ui import HB_ONNXRuntime
  import numpy as np
  import cv2

  def preprocess(input_name):
      # BGR->RGB, Resize, CenterCrop...
      # HWC->CHW (determine whether layout conversion is needed based on the specific shape of the ONNX model input node)
      # normalization (if normalization has already been embedded into the model via the YAML file, do not repeat in preprocessing)
      # -128 (required for all input types except featuremap, i.e., convert from uint8 to int8)
      return data

  def main():
      # Load model file
      sess = HB_ONNXRuntime(model_file=MODEL_PATH)
      # Get input & output node names
      input_names = [input.name for input in sess.get_inputs()]
      output_names = [output.name for output in sess.get_outputs()]
      # Prepare model input data
      feed_dict = dict()
      for input_name in input_names:
          feed_dict[input_name] = preprocess(input_name)
      # For image input models (RGB/BGR/NV12/YUV444/GRAY), data dtype=uint8; for featuremap models, data dtype=float32
      outputs = sess.run(output_names, feed_dict)

      # Post-processing
      postprocess(outputs)

  if __name__ == '__main__':
      main()
3. Verify That Graph Optimization Stage Did Not Introduce Accuracy Errors
Test the single-image result of the optimize_float.onnx model, which should be completely consistent with the inference result of original_float.onnx.
Use the open-source tool Netron to open the optimize_float.onnx model and inspect the detailed attributes of the preprocessing node HzPreprocess operator to obtain the parameters required for data preprocessing: data_format and input_type.
Refer to the following example code steps to verify the correctness of the inference process, data preprocessing, and post-processing code for the optimize_float.onnx model:
For data preprocessing, it is recommended to refer to the preprocessing methods of Caffe, ONNX, and other example models in the D-Robotics model conversion horizon_model_convert_sample sample package.
  from horizon_tc_ui import HB_ONNXRuntime
  import numpy as np
  import cv2

  def preprocess(input_name):
      # BGR->RGB, Resize, CenterCrop...
      # HWC->CHW (determine whether layout conversion is needed based on the specific shape of the ONNX model input node)
      # normalization (if normalization has already been embedded into the model via the YAML file, do not repeat in preprocessing)
      # -128 (required for all input types except featuremap, i.e., convert from uint8 to int8)
      return data

  def main():
      # Load model file
      sess = HB_ONNXRuntime(model_file=MODEL_PATH)
      # Get input & output node names
      input_names = [input.name for input in sess.get_inputs()]
      output_names = [output.name for output in sess.get_outputs()]
      # Prepare model input data
      feed_dict = dict()
      for input_name in input_names:
          feed_dict[input_name] = preprocess(input_name)
      # For image input models (RGB/BGR/NV12/YUV444/GRAY), data dtype=uint8; for featuremap models, data dtype=float32
      outputs = sess.run(output_names, feed_dict)

      # Post-processing
      postprocess(outputs)

  if __name__ == '__main__':
      main()
4. Verify Quantization Accuracy Meets Expectations
Test the accuracy metrics of quantized.onnx.
Use the open-source tool Netron to open the quantized.onnx model and inspect the detailed attributes of the preprocessing node HzPreprocess operator to obtain the parameters required for data preprocessing: data_format and input_type.
Refer to the following example code steps to verify the correctness of the inference process, data preprocessing, and post-processing code for the quantized.onnx model:
For data preprocessing, it is recommended to refer to the preprocessing methods of Caffe, ONNX, and other example models in the D-Robotics model conversion horizon_model_convert_sample sample package.
  from horizon_tc_ui import HB_ONNXRuntime
  import numpy as np
  import cv2

  def preprocess(input_name):
      # BGR->RGB, Resize, CenterCrop...
      # HWC->CHW (determine whether layout conversion is needed based on the specific shape of the ONNX model input node)
      # normalization (if normalization has already been embedded into the model via the YAML file, do not repeat in preprocessing)
      # -128 (required for all input types except featuremap, i.e., convert from uint8 to int8)
      return data

  def main():
      # Load model file
      sess = HB_ONNXRuntime(model_file=MODEL_PATH)
      # Get input & output node names
      input_names = [input.name for input in sess.get_inputs()]
      output_names = [output.name for output in sess.get_outputs()]
      # Prepare model input data
      feed_dict = dict()
      for input_name in input_names:
          feed_dict[input_name] = preprocess(input_name)
      # For image input models (RGB/BGR/NV12/YUV444/GRAY), data dtype=uint8; for featuremap models, data dtype=float32
      outputs = sess.run(output_names, feed_dict)

      # Post-processing
      postprocess(outputs)

  if __name__ == '__main__':
      main()
5. Ensure Model Compilation Is Correct and On-Device Inference Code Is Accurate
Use the hb_verifier tool to verify consistency between quantized.onnx and .bin. Model outputs should align to at least 2–3 decimal places.
For detailed usage of the hb_verifier tool (refer to hb_verifier Tool in the PTQ Principle and Detailed Steps chapter).
If model consistency verification passes, carefully review the pre- and post-processing code on the development board!
If consistency verification between quantized.onnx and .bin fails, contact D-Robotics technical support.
7.6.2.4. Model Quantization YAML Configuration File Template
Caffe Model Quantization YAML File Template
Create a new file named caffe_config.yaml, copy the content below directly, and only fill in the parameters marked as Required Parameters to proceed with model conversion. For more parameter usage details, refer to the YAML Configuration File Details section.
# Copyright (c) 2020 Horizon Robotics. All Rights Reserved.

# Model conversion related parameters
model_parameters:

  # Required parameter
  # Caffe floating-point network data model file, e.g., caffe_model: './horizon_ultra_caffe.caffemodel'
  caffe_model: ''

  # Required parameter
  # Caffe network description file, e.g., prototxt: './horizon_ultra_caffe.prototxt'
  prototxt: ''

  march: "bayes-e"
  layer_out_dump: False
  working_dir: 'model_output'
  output_model_file_prefix: 'horizon_x5'

# Model input related parameters
input_parameters:

  input_name: ""
  input_shape: ''
  input_type_rt: 'nv12'
  input_layout_rt: ''

  # Required parameter
  # Data type used in the original floating-point model training framework, valid values: rgb/bgr/gray/featuremap/yuv444, e.g., input_type_train: 'bgr'
  input_type_train: ''

  # Required parameter
  # Data layout used in the original floating-point model training framework, valid values: NHWC/NCHW, e.g., input_layout_train: 'NHWC'
  input_layout_train: ''

  #input_batch: 1

  # Required parameter
  # Data preprocessing method used in the original floating-point model training framework, configurable as: no_preprocess/data_mean/data_scale/data_mean_and_scale
  # no_preprocess: no operation, corresponding mean_value or scale_value not required
  # data_mean: subtract channel mean (mean_value must be configured, scale_value commented out)
  # data_scale: multiply pixel values by scale factor (scale_value must be configured, mean_value commented out)
  # data_mean_and_scale: subtract channel mean then multiply by scale factor (both mean_value and scale_value must be configured)
  norm_type: ''

  # Required parameter
  # Mean values to subtract from image, use space to separate values for per-channel means
  # e.g., mean_value: 128.0 or mean_value: 111.0 109.0 118.0
  mean_value:

  # Required parameter
  # Image preprocessing scaling factor, use space to separate values for per-channel scaling, formula: scale = 1/std
  # e.g., scale_value: 0.0078125 or scale_value: 0.0078125 0.001215 0.003680
  scale_value:

# Model quantization related parameters
calibration_parameters:

  # Required parameter
  # Directory containing reference images for model quantization, supported formats: Jpeg, Bmp, etc. Images are generally selected from the test set (around 100 images), covering typical scenes; avoid extreme cases such as overexposure, saturation, blur, pure black, pure white, etc.
  # Configure according to the folder path in the 02_preprocess.sh script, e.g., cal_data_dir: './calibration_data_yuv_f32'
  cal_data_dir: ''

  cal_data_type: 'float32'
  calibration_type: 'default'
# Compiler-related parameters
compiler_parameters:

  compile_mode: 'latency'
  debug: False
  optimize_level: 'O3'
ONNX Model Quantization YAML File Template
Please create a new file named onnx_config.yaml, copy the following content directly, and only fill in the parameters marked as Required Parameters to perform model conversion. For more detailed usage instructions on additional parameters, refer to the YAML Configuration File Details section.
# Copyright (c) 2020 Horizon Robotics. All Rights Reserved.

# Parameters related to model conversion
model_parameters:

  # Required parameter
  # Onnx floating-point network model file, e.g.: onnx_model: './horizon_ultra_onnx.onnx'
  onnx_model: ''

  march: "bayes-e"
  layer_out_dump: False
  working_dir: 'model_output'
  output_model_file_prefix: 'horizon_ultra'

# Model input-related parameters
input_parameters:

  input_name: ""
  input_shape: ''
  input_type_rt: 'nv12'
  input_layout_rt: ''

  # Required parameter
  # Data type used in the original floating-point model training framework; valid values: rgb/bgr/gray/featuremap/yuv444, e.g.: input_type_train: 'bgr'
  input_type_train: ''

  # Required parameter
  # Data layout used in the original floating-point model training framework; valid values: NHWC/NCHW, e.g.: input_layout_train: 'NHWC'
  input_layout_train: ''

  #input_batch: 1

  # Required parameter
  # Data preprocessing method used in the original floating-point model training framework; configurable options: no_preprocess/data_mean/data_scale/data_mean_and_scale
  # no_preprocess: no operation; corresponding mean_value or scale_value need not be configured
  # data_mean: subtract channel mean (mean_value); mean_value must be configured and scale_value commented out
  # data_scale: multiply pixel values by data_scale factor; scale_value must be configured and mean_value commented out
  # data_mean_and_scale: subtract channel mean then multiply by scale factor; both mean_value and scale_value must be configured
  norm_type: ''

  # Required parameter
  # Mean value(s) to be subtracted from image(s); if per-channel means, values must be space-separated
  # e.g.: mean_value: 128.0 or mean_value: 111.0 109.0 118.0
  mean_value:

  # Required parameter
  # Image preprocessing scaling factor; if per-channel, values must be space-separated; formula: scale = 1/std
  # e.g.: scale_value: 0.0078125 or scale_value: 0.0078125 0.001215 0.003680
  scale_value:

# Model quantization-related parameters
calibration_parameters:

  # Required parameter
  # Directory containing reference images for model quantization; image formats supported: JPEG, BMP, etc. Images should generally be selected from the test set (e.g., 100 images) and cover typical scenarios, avoiding extreme cases such as overexposure, saturation, blur, pure black, or pure white images.
  # Please configure according to the folder path in the 02_preprocess.sh script, e.g.: cal_data_dir: './calibration_data_yuv_f32'
  cal_data_dir: ''

  cal_data_type: 'float32'
  calibration_type: 'default'

# Compiler-related parameters
compiler_parameters:

  compile_mode: 'latency'
  debug: False
  optimize_level: 'O3'
7.6.2.5. Instructions for Using Multi-Batch with Fixed-Point .bin Models on Device
During model conversion, configure batch_size via the
input_batchparameter in the YAML configuration file;
When inputting the .bin model on-device, using an original model dimension of 1×3×224×224 and modifying
input_batchto 10 (i.e., 10×3×224×224) as an example:
Data preparation:
Image data: Set
aligned_shape = valid_shape, then prepare data as single-image format and sequentially write 10 images into the allocated memory space;FeatureMap data: Pad data according to
aligned_shape, then prepare data as single-batch format and sequentially write 10 batches into the allocated memory space. The inference process remains the same as for single-batch models.
7.6.2.6. Custom Operator Development Guide
Introduction
The Horizon toolchain already supports a rich set of operators, and in most cases, your model should be successfully deployed onto the Horizon computing platform using the model conversion methods described earlier.
For a list of currently supported operators, please refer to the Operator Support Constraints List section.
In the rare case where certain operators are unsupported, we strongly recommend first attempting to replace them with supported alternatives. This approach better leverages the capabilities of the Horizon computing platform and reduces development costs.
Custom operators only provide CPU-side operator development capabilities. A complete custom operator application process includes: template creation, operator implementation, compilation, model conversion with custom operators, and running models containing custom operators. The specific workflow is illustrated below:
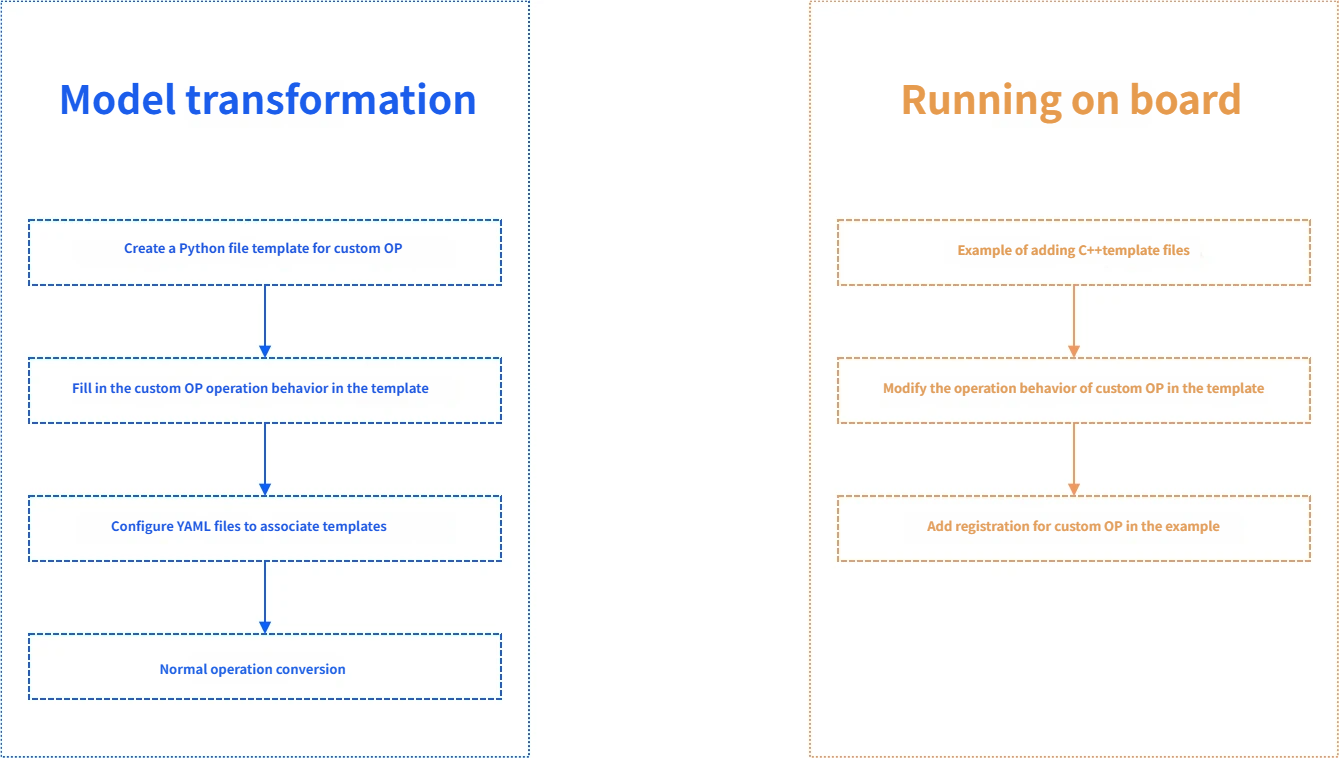
As shown in the figure, defining a custom OP involves two parts: during the model conversion phase, you need to provide Python code for the custom OP; during the simulator/on-device inference phase, you need to provide C++ code for the custom OP.
Consistency between these two parts of code must be ensured.
Model Conversion with Custom Operators
Model File Modification
After preparing the custom operator implementation, you need to make corresponding adjustments in both the original model file and the model conversion configuration (examples provided below for Caffe and ONNX models).
Caffe Model
In the original model file, mark the operator type corresponding to the custom operator as Custom, and provide a set of custom_param, as shown in the example below.
  layer {
    name: "hr_op"
    type: "Custom"
    bottom: "res3d_in"
    top: "res3d"
    custom_param {
      kind: "CustomIdentity"
      shape {
        dim: 1
        dim: 512
        dim: 28
        dim: 28
      }
      params: "'kernel_size': 10 \n'threshold': 0.5"
    }
  }
In the complete custom_param example above:
kindis the internal implementation name of the custom operator. Since this custom OP is an identity operator, it is namedCustomIdentity. This name will also appear in subsequent Python and C++ code.shapespecifies the output dimensions of the operator and must be fully defined.paramsspecifies the input parameters in the format'param_name': param_value, with multiple parameters separated by\n.
In the model conversion configuration, to use a custom operator, you must add a new custom op parameter group in the configuration file as follows:
  #...

  custom_op:
    # Calibration method for custom op
    custom_op_method: register

    # Implementation file for custom OP
    op_register_files: sample_custom.py
For Caffe models, both parameters in the above parameter group are mandatory. custom_op_method must be set to register.op_register_files is the implementation file for the custom operator computation; use relative paths.
After completing these configurations, the subsequent model conversion steps are consistent with those of general model conversions.
ONNX Model
Obtaining an ONNX model containing custom operators
Converted from other frameworks such as PyTorch
import torch
from horizon_nn.horizon_onnx.onnx_pb import TensorProto
from torch.onnx.symbolic_helper import parse_args
from torch.onnx.utils import register_custom_op_symbolic
from torch import Tensor

model = torch.hub.load('pytorch/vision:v0.10.0', 'googlenet', pretrained=True)

def _transform_input(x: Tensor) -> Tensor:
    return x

model._transform_input = _transform_input

@parse_args("v", "v")
def horizon_pool(g, input, output_size):
    return g.op(
        'horizon.custom::PyOp', #required, ! must be 'horizon.custom' domain !
        input,
        class_name_s="GlobalAveragePool",  #required ! must match the class def name in sample_custom python file !
        compute_s="compute",  #optional, 'compute' by default
        module_s="sample_custom",  #required ! must match the file name of the "op_register_files" !
        input_types_i=[TensorProto.FLOAT],  #required
        output_types_i=[TensorProto.FLOAT],  #required
        output_shape_s=["1, 1024, 1, 1"]) #required

d_input = torch.rand(1, 3, 224, 224)
register_custom_op_symbolic('::adaptive_avg_pool2d',
                            horizon_pool,
                            opset_version=11)
torch.onnx.export(model, d_input, "googlenet_cop.onnx", opset_version=11)
Directly generating an ONNX model
Reference code:
import onnx
import numpy as np
from onnx import helper, checker, shape_inference, numpy_helper, TensorProto


def make_normal_data(shape):
    return np.random.normal(loc=0.0, scale=1.0, size=shape).astype(np.float32)


# conv
def make_simple_model():

    # create nodes
    conv_input_shape = (1, 3, 224, 224)
    conv_output_shape = (1, 3, 224, 224)

    add_param_shape = (1, 3, 224, 224)
    add_1_param_data = np.zeros(add_param_shape).astype(np.float32)
    add_2_param_data = np.ones(add_param_shape).astype(np.float32)

    conv_weight_shape = (3, 3, 3, 3)
    conv_output_shape = (1, 3, 224, 224)
    conv_weight_data = make_normal_data(conv_weight_shape)

    add_1_node = helper.make_node(
        "PyOp",  # required, type must be 'PyOp'
        name="add_1",  # required, names of different ops must be unique
        inputs=["input0", "add_1_param"],  # required, must be a list, consistent with input count in implementation file
        outputs=["add_1_out"],  # required, must be a list, consistent with output count in implementation file
        domain="horizon.cop1",  # required, different domain names are needed for different custom operator implementations
        class_name="Cop1",  # required, must match the class name in the implementation file
        module="custom_op.horizon_ops",  # required, must match the path of the implementation file containing the custom operator
        compute="compute",  # required, must match the compute function in the implementation class
        input_types=[
            TensorProto.FLOAT,
            TensorProto.FLOAT,
        ],  # required, must be a list, length matching number of inputs, consistent with implementation file
        output_types=[
            TensorProto.FLOAT
        ],  # required, must be a list, length matching number of outputs, consistent with implementation file
        output_shape=["1, 3, 224, 224"],  # optional, required if output value_info is not added to the model
    )

    add_2_node = helper.make_node(
        "PyOp",
        name="add_2",
        inputs=["input1", "add_1_out", "add_2_param"],
        outputs=["add_2_out", "output0"],
        domain="horizon.cop2",
        class_name="Cop2",
        module="custom_op.horizon_ops",
        compute='compute',
        input_types=[TensorProto.FLOAT, TensorProto.FLOAT,
                      TensorProto.FLOAT],  #required
        output_types=[TensorProto.FLOAT, TensorProto.FLOAT],  #required
        output_shape=["1, 3, 224, 224", "1, 3, 224, 224"])

    conv_1_node = helper.make_node("Conv",
                                    inputs=["add_2_out", "W0"],
                                    outputs=["output1"],
                                    dilations=(1, 1),
                                    group=1,
                                    kernel_shape=(3, 3),
                                    pads=(1, 1, 1, 1),
                                    name="conv_1")
    # nodes
    nodes = [add_1_node, add_2_node, conv_1_node]

    # inputs
    model_input_1 = helper.make_tensor_value_info("input0", TensorProto.FLOAT,
                                                  conv_input_shape)
    model_input_2 = helper.make_tensor_value_info("input1", TensorProto.FLOAT,
                                                  conv_input_shape)

    # Outputs
    model_output_1 = helper.make_tensor_value_info("output0",
                                                    TensorProto.FLOAT,
                                                    conv_output_shape)
    model_output_2 = helper.make_tensor_value_info("output1",
                                                    TensorProto.FLOAT,
                                                    conv_output_shape)

    # Intermediate tensors
    add_1_out = helper.make_tensor_value_info("add_1_out", TensorProto.FLOAT,
                                              conv_output_shape)
    add_2_out = helper.make_tensor_value_info("add_2_out", TensorProto.FLOAT,
                                              conv_output_shape)

    # create constant tensor
    W0_tensor = helper.make_tensor("W0", TensorProto.FLOAT, conv_weight_shape,
                                    conv_weight_data.flatten())

    add_1_param = helper.make_tensor("add_1_param",
                                      TensorProto.FLOAT, add_param_shape,
                                      add_1_param_data.flatten())
    add_2_param = helper.make_tensor("add_2_param",
                                      TensorProto.FLOAT, add_param_shape,
                                      add_2_param_data.flatten())

    # make graph
    graph = helper.make_graph(
        nodes,
        "simple_conv_model",
        inputs=[model_input_1, model_input_2],  # input
        outputs=[model_output_1, model_output_2],  # output
        initializer=[W0_tensor, add_1_param, add_2_param],  # initializer
        value_info=[add_1_out, add_2_out],  # value_info
    )

    # make model
    onnx_model = helper.make_model(graph,
                                    opset_imports=[
                                        helper.make_opsetid("", 11),
                                        helper.make_opsetid("horizon.cop1", 1),
                                        helper.make_opsetid("horizon.cop2", 1)
                                    ],
                                    producer_name="onnx-test")

    # shape inference
    onnx_model = shape_inference.infer_shapes(onnx_model)

    # # model check
    checker.check_model(onnx_model)

    # save model
    onnx.save(onnx_model, "custom_op.onnx")
Note:
Key points regarding PyOp attributes in ONNX models:
The
domainattribute must be set; otherwise, it defaults to the ONNX standard domain and may cause errors. Different custom operator implementations must be placed under different domains.The
modulemust match the name of the registration file used. If the registration file is in a subdirectory, the module path must be adjusted accordingly. For example, ifsample_custom.pyis located in thecustom_opsubdirectory, the module should be set tocustom_op.sample_custom.Currently, only ONNX models support multiple types of custom operators. If you need multi-type custom operators in other frameworks, please contact Horizon technical support.
Similar to
Caffemodels, you need to add a new custom op parameter group in the model conversion configuration as follows:#... custom_op: # Calibration method for custom op custom_op_method: register # Implementation file for custom OP op_register_files: sample_custom.py
For
ONNXmodels, both parameters in the above group are mandatory.custom_op_methodmust be set toregister.op_register_filesis the implementation file for the custom operator computation; use relative paths.After completing these configurations, the subsequent model conversion steps are consistent with general model conversion processes.
Operator Implementation
During the model conversion phase, you must provide a Python implementation of the custom operator. The tool will use this implementation to perform the inference required for model calibration.
Note:
Since the tool uses
working_diras the working directory during PTQ conversion, we strongly recommend using absolute paths when configuring paths in the operator implementation.If relative paths are required, they should be specified relative to the
working_dir.
Python template file (sample_custom.py) example:
from horizon_nn.custom.op_registration import op_implement_register, op_shape_infer_register

@op_implement_register("CustomIdentity")
class CustomIdentity(object):
    def __init__(self, kernel_size, threshold):
        self._kernel_size = kernel_size
        self._default_threshold = threshold

    def compute(self, X):
        return X

@op_shape_infer_register("CustomIdentity")
def infer_shape(inputs_shape):
    outputs_shape = inputs_shape
    return outputs_shape
Example configuration file for custom_op (horizon_ops.py):
from horizon_nn.custom.op_registration import op_implement_register

@op_implement_register("Cop1")
class Cop1(object):
    def __init__(self, ):
        pass

    def compute(self, x1, x2):
        out = x1 + x2 + 1
        return out


@op_implement_register("Cop2")
class Cop2(object):
    def __init__(self, ):
        pass

    def compute(self, x1, x2, x3):
        out = x1 + x2 + x3 + 1
        return out, out
The filename of this file (e.g., sample_custom.py) must be filled into the op_register_files field in the model conversion YAML configuration file; otherwise, the tool cannot properly import the custom operator definition. Additionally, the name registered by the decorator op_implement_register (e.g., CustomIdentity) must match the kind attribute in the Caffe custom OP or the class_name attribute in the ONNX custom OP.
For Caffe models, parameters in the __init__ function (kernel_size, threshold) are passed via the params field in the prototxt file and used to initialize the custom OP module. The op_shape_infer_register decorator is used for operator shape registration in Caffe models.
For ONNX models, there are two ways to resolve custom operator shapes: either add the PyOp output value_info when creating the ONNX model, or define the output_shape attribute in the corresponding PyOp. Also note that the module in the custom operator must match the file containing the implementation. For example, if set to custom_op.horizon_ops, the implementation file must be named horizon_ops.py and located in the custom_op folder, maintaining the same directory structure as the ONNX model. Since operators with the same name in the same domain must have identical implementations, different custom operators must use different domain attributes.
After completing the above steps, you can proceed with floating-point to fixed-point conversion to generate the corresponding .bin file.
Running Models with Custom Operators on Device
After obtaining the .bin file, you cannot directly run it on the development board. Before running, you must first provide the C++ implementation of the custom operator. You can modify the template provided below and integrate it into your example code.
If you only wish to test the functionality of the custom operator, you may directly use our provided template file, which simply assigns input to output, thus having no effect on the final result.
Custom Operator C++ Template
Runtime template file example:
  // custom_identity_add1.h
  #ifndef ADVANCED_SAMPLES_CUSTOM_IDENTITY_ADD1_H_
  #define ADVANCED_SAMPLES_CUSTOM_IDENTITY_ADD1_H_

  #include <string>
  #include <vector>

  #include "dnn/hb_dnn.h"
  #include "dnn/plugin/hb_dnn_layer.h"
  #include "dnn/plugin/hb_dnn_ndarray.h"

  namespace hobot {
  namespace dnn {

  Layer *Cop1_layer_creator();

  class Cop1 : public Layer {
  public:
    Cop1() = default;
    ~Cop1() override = default;

  public:
    int32_t Init(const Attribute &attributes) override;

    int32_t Forward(const std::vector<NDArray *> &bottomBlobs,
                    std::vector<NDArray *> &topBlobs,
                    const hbDNNInferCtrlParam *inferCtrlParam) override;

    std::string GetType() const override { return "Cop1"; }

    uint32_t GetInputCount() const override { return num_args_; }

  private:
    std::string custom_op_name_;
    int32_t num_args_;
  };
 // custom_identity_add1.cpp
  #include "custom_identity_add1.h"

  namespace hobot {
  namespace dnn {

  Layer *Cop1_layer_creator() { return new Cop1; }

  int32_t Cop1::Init(const Attribute &attributes) {
    // unused attribute, just demonstrating
    attributes.GetAttributeValue(&custom_op_name_, "custom_op_name");
    // node's input count
    attributes.GetAttributeValue(&num_args_, "num_args");
    return 0;
  }

  int32_t Cop1::Forward(const std::vector<NDArray *> &bottomBlobs,
                        std::vector<NDArray *> &topBlobs,
                        const hbDNNInferCtrlParam *inferCtrlParam) {
    const NDArray *input0 = bottomBlobs[0];
    const NDArray *input1 = bottomBlobs[1];
    NDArray *out = topBlobs[0];

    const auto *input0_data = input0->Dptr<float>();
    const auto *input1_data = input1->Dptr<float>();

    auto *out_data = out->Dptr<float>();
    uint32_t size = out->Size();

    for (uint32_t i = 0U; i < size; i++) {
      out_data[i] = input0_data[i] + input1_data[i] + 1;
    }
    return 0;
  }
  }  // namespace dnn
  }  // namespace hobot
  // custom_identity_add2.h
  #ifndef ADVANCED_SAMPLES_CUSTOM_IDENTITY_ADD2_H_
  #define ADVANCED_SAMPLES_CUSTOM_IDENTITY_ADD2_H_

  #include <string>
  #include <vector>

  #include "dnn/hb_dnn.h"
  #include "dnn/plugin/hb_dnn_layer.h"
  #include "dnn/plugin/hb_dnn_ndarray.h"

  namespace hobot {
  namespace dnn {

  Layer *Cop2_layer_creator();

  class Cop2 : public Layer {
  public:
    Cop2() = default;
    ~Cop2() override = default;

  public:
    int32_t Init(const Attribute &attributes) override;

    int32_t Forward(const std::vector<NDArray *> &bottomBlobs,
                    std::vector<NDArray *> &topBlobs,
                    const hbDNNInferCtrlParam *inferCtrlParam) override;

    std::string GetType() const override { return "Cop2"; }

    uint32_t GetInputCount() const override { return num_args_; }

    uint32_t GetOutputCount() const override { return 2U; }

  private:
    std::string custom_op_name_;
    int32_t num_args_;
  };

  }  // namespace dnn
  }  // namespace hobot

  #endif
// custom_identity_add2.cpp
  #include "custom_identity_add2.h"

  namespace hobot {
  namespace dnn {

  Layer *Cop2_layer_creator() { return new Cop2; }

  int32_t Cop2::Init(const Attribute &attributes) {
    // unused attribute, just demonstrating
    attributes.GetAttributeValue(&custom_op_name_, "custom_op_name");
    // node's input count
    attributes.GetAttributeValue(&num_args_, "num_args");
    return 0;
  }

  int32_t Cop2::Forward(const std::vector<NDArray *> &bottomBlobs,
                        std::vector<NDArray *> &topBlobs,
                        const hbDNNInferCtrlParam *inferCtrlParam) {
    const NDArray *input0 = bottomBlobs[0];
    const NDArray *input1 = bottomBlobs[1];
    const NDArray *input2 = bottomBlobs[2];
    NDArray *out0 = topBlobs[0];
    NDArray *out1 = topBlobs[1];

    const auto *input0_data = input0->Dptr<float>();
    const auto *input1_data = input1->Dptr<float>();
    const auto *input2_data = input2->Dptr<float>();

    auto *out0_data = out0->Dptr<float>();
    auto *out1_data = out1->Dptr<float>();

    uint32_t size = out0->Size();

    for (uint32_t i = 0U; i < size; i++) {
      out0_data[i] = input0_data[i] + input1_data[i] + input2_data[i] + 1;
      out1_data[i] = out0_data[i];
    }
    return 0;
  }
  }  // namespace dnn
  }  // namespace hobot
Remarks:
The prefix of the function name (i.e., Cop1 and Cop2) must match the type (Kind) of the custom OP. The parameters passed in are:
bottom_blobs: Input data of the custom OP node.top_blobs: Output data of the custom OP node.inferCtrlParam: Input parameters during the initialization phase of the custom operator.
Note: The operation rule defined in the template is that the output equals the sum of all input data plus 1. Therefore, if different behavior is required, the operation logic should be modified accordingly.
Custom Operator Registration
After modifying the C++ template, you only need to add the template files to the example’s CMakeLists.txt and register the operators in your application. Refer to the following code for registration:
  #include "custom_identity_add1.h"
  #include "custom_identity_add2.h"

  hbDNNRegisterLayerCreator("Cop1", hobot::dnn::Cop1_layer_creator);
  hbDNNRegisterLayerCreator("Cop2", hobot::dnn::Cop2_layer_creator);
  ....
Once dependencies on the template files are included and operators are registered, you can execute models containing custom operators.
Note:
Before using, please ensure that the custom operator names in the model match the registered operator names.
For reference, see advanced_samples in the Runtime examples.