4.1.3.2. Common Algorithm Model Samples
4.1.3.2.1. Where to Find
The common algorithmic model samples are located at 02_preq_examples/, 03_classification/, 04_detection/ and 07_segmentation/ folders in the horizon_model_convert_sample path.
4.1.3.2.2. Prepare Dataset
4.1.3.2.2.1. Dataset Download Address
The dataset can be downloaded from the following address.
Dataset |
Address |
|---|---|
ImageNet |
|
COCO |
|
VOC |
http://host.robots.ox.ac.uk/pascal/VOC/ (need to download both versions 2007 and 2012) |
Cityscapes |
|
CIFAR-10 |
4.1.3.2.2.2. Dataset Reference Structure
To facilitate your subsequent steps, after the dataset has been downloaded, you need to process the evaluation dataset according to the structure suggested by D-Robotics below.
4.1.3.2.2.2.1. ImageNet
imagenet/
├── calibration_data
│   ├── ILSVRC2012_val_00000001.JPEG
│   ├── ...
│   └── ILSVRC2012_val_00000100.JPEG
├── ILSVRC2017_val.txt
├── val
│   ├── ILSVRC2012_val_00000001.JPEG
│   ├── ...
│   └── ILSVRC2012_val_00050000.JPEG
└── val.txt
4.1.3.2.2.2.2. COCO
coco/
├── calibration_data
│   ├── COCO_val2014_000000181007.jpg
│   ├── ...
│   └── COCO_val2014_000000181739.jpg
└── coco_val2017
    ├── annotations
    │   ├── instances_train2017.json
    │   └── instances_val2017.json
    └── images
        ├── 000000000139.jpg
        ├── 000000000285.jpg
        ├── ...
        ├── 000000581615.jpg
        └── 000000581781.jpg
4.1.3.2.2.2.3. VOC
Attention
Please note that the VOC2012 directory currently stores two datasets, VOC2007 and VOC2012, so please follow the directory structure below for the evaluation dataset.
VOCdevkit/
└── VOC2012
    ├── Annotations
    │   ├── 2007_000027.xml
    │   ├── ...
    │   └── 2012_004331.xml
    ├── ImageSets
    │   ├── Action
    │   │   ├── jumping_train.txt
    │   │   ├── jumping_trainval.txt
    │   │   ├── jumping_val.txt
    │   │   ├── ...
    │   │   ├── val.txt
    │   │   ├── walking_train.txt
    │   │   ├── walking_trainval.txt
    │   │   └── walking_val.txt
    │   ├── Layout
    │   │   ├── train.txt
    │   │   ├── trainval.txt
    │   │   └── val.txt
    │   ├── Main
    │   │   ├── aeroplane_train.txt
    │   │   ├── aeroplane_trainval.txt
    │   │   ├── aeroplane_val.txt
    │   │   ├── ...
    │   │   ├── train.txt
    │   │   ├── train_val.txt
    │   │   ├── trainval.txt
    │   │   ├── tvmonitor_train.txt
    │   │   ├── tvmonitor_trainval.txt
    │   │   ├── tvmonitor_val.txt
    │   │   └── val.txt
    │   └── Segmentation
    │       ├── train.txt
    │       ├── trainval.txt
    │       └── val.txt
    ├── JPEGImages
    │   ├── 2007_000027.jpg
    │   ├── ...
    │   └── 2012_004331.jpg
    ├── SegmentationClass
    │   ├── 2007_000032.png
    │   ├── ...
    │   └── 2011_003271.png
    ├── SegmentationObject
    │   ├── 2007_000032.png
    │   ├── ...
    │   └── 2011_003271.png
    └── train.txt
4.1.3.2.2.2.4. Cityscapes
cityscapes/
├── cityscapes_calibration_data
│   ├── aachen_000000_000019_leftImg8bit.png
│   ├── ...
│   └── aachen_000099_000019_leftImg8bit.png
├── gtFine
│   ├── test
│   │   ├── berlin
│   │   ├── ...
│   │   └── munich
│   ├── train
│   │   ├── aachen
│   │   ├── ...
│   │   └── zurich
│   └── val
│       ├── frankfurt
│       ├── lindau
│       └── munster
├── leftImg8bit
│   ├── test
│   │   ├── berlin
│   │   ├── ...
│   │   └── munich
│   ├── train
│   │   ├── aachen
│   │   ├── ...
│   │   └── zurich
│   └── val
│       ├── frankfurt
│       ├── lindau
│       └── munster
├── license.txt
└── README
4.1.3.2.2.2.5. CIFAR-10
cifar-10/
├── batches.meta
├── cifar10_val.txt
├── data_batch_1
├── data_batch_2
├── data_batch_3
├── data_batch_4
├── data_batch_5
├── readme.html
└── test_batch
4.1.3.2.3. Prepare Models
When using the model conversion sample package, please prepare the corresponding floating-point model first.
Note
If you need to do this process in the sample folder, you need to execute the 00_init.sh script in the folder first to get the corresponding original model and dataset.
Sources and modifications (if any) of the original models, please refer to below subsections.
4.1.3.2.3.1. Fcos_efficientnetb0
Attention
This model is a trained model using the QAT method.
To achieve optimal on-board performance, we modified the
remove_node_typeparameter in the YAML file used for bin model compilation and removed theDequantizenode from the bin model.
1.Model source: Please Download OE Package to get the model.
2.MD5sum code:
md5sum |
File |
|---|---|
fa43f723e269a7568d06753d32a5cc9b |
fcos_efficientnetb0_mscoco.onnx |
3.Model accuracy:
[IoU=0.50:0.95]: 0.347(FLOAT)/0.348(INT8)
4.1.3.2.3.2. Fcos_efficientnetb1
Attention
To achieve optimal on-board performance, we modified the remove_node_type parameter in the YAML file used for bin model compilation and removed the Dequantize node from the bin model.
1.Model source: Please Download OE Package to get the model.
2.MD5sum code:
md5sum |
File |
|---|---|
482bf179df995b9fd84a9cec8ac085c5 |
fcos_efficientnetb1_mscoco.onnx |
3.Model accuracy:
[IoU=0.50:0.95]: 0.403(FLOAT)/0.404(INT8)
4.1.3.2.3.3. Fcos_efficientnetb2
Attention
To achieve optimal on-board performance, we modified the remove_node_type parameter in the YAML file used for bin model compilation and removed the Dequantize node from the bin model.
1.Model source: Please Download OE Package to get the model.
2.MD5sum code:
md5sum |
File |
|---|---|
a2fc8b613c4506039e14789afaa37770 |
fcos_efficientnetb2_mscoco.onnx |
3.Model accuracy:
[IoU=0.50:0.95]: 0.445(FLOAT)/0.446(INT8)
4.1.3.2.3.4. MobileNetv1/v2
1.Model source: https://github.com/shicai/MobileNet-Caffe
2.md5sum code:
md5sum |
File |
|---|---|
3fd6889ec48bda46451d67274144e2a8 |
mobilenet.caffemodel |
8922f90f629d428fecf866e798ac7c08 |
mobilenet_deploy.prototxt |
54aab8425ea068d472e8e4015f22360c |
mobilenet_v2.caffemodel |
13101ee86ab6d217d5fd6ed46f7a4faa |
mobilenet_v2_deploy.prototxt |
3.Model Accuracy:
MobileNetv1:0.7061(FLOAT)/0.7034(INT8)
MobileNetv2:0.7167(FLOAT)/0.7122(INT8)
4.1.3.2.3.5. GoogleNet
1.Model source: Please Download OE Package to get the model.
2.md5sum code:
md5sum |
File |
|---|---|
f107ae6806ea1016afbc718210b7a617 |
googlenet.onnx |
3.Model Accuracy: 0.7001(FLOAT)/0.6992(INT8)
4.1.3.2.3.6. ResNet18
1.Model source: https://github.com/HolmesShuan/ResNet-18-Caffemodel-on-ImageNet
2.md5sum code:
md5sum |
File |
|---|---|
0904d601fc930d4f0c62a2a95b3c3b93 |
resnet18.caffemodel |
3.Model accuracy: 0.6836(FLOAT)/0.6830(INT8)
4.1.3.2.3.7. Mobilenet_onnx
1.Model source: Please Download OE Package to get the model.
2.md5sum code:
md5sum |
File |
|---|---|
bfa26b2b247bb060a35b67062a3ebbd1 |
mobilenetv2.onnx |
3.Model accuracy: 0.7080(FLOAT)/0.7078(INT8)
4.1.3.2.3.8. EfficientNet_Lite0/1/2/3/4
Attention
To quickly start running samples and avoid the risks caused by third party tools, you are strongly recommended to utilize the off-the-shelf ONNX model in the model_zoo/mapper/ directory in D-Robotics’ model release package. However, if you find it interersting to reproduce the tflite2onnx model conversion process, you can still try to use below third party tool, but D-Robotics will not be able to guarantee the quality and successful rate of the conversion.
1.Model source: obtain the TAR package from https://github.com/tensorflow/tpu/tree/master/models/official/efficientnet/lite
2.md5sum of the ONNX models in D-Robotics’ model_zoo:
md5sum |
File |
|---|---|
001a329bd367fbec22b415c7a33d7bdb |
efficientnet_lite0_fp32.onnx |
1205e95aea66650c71292bde236d55a9 |
efficientnet_lite1_fp32.onnx |
474741c15494b79a89fe51d89e0c43c7 |
efficientnet_lite2_fp32.onnx |
550455b41848d333f8359279c89a6bae |
efficientnet_lite3_fp32.onnx |
bde7fe57eadb4a30ef76f68da622dcd5 |
efficientnet_lite4_fp32.onnx |
3.Find the .tflite file from the downloaded TAR package, and then convert it into ONNX model using the tflite2onnx tool(https://pypi.org/project/tflite2onnx/).
Note that model layouts may vary by tflite2onnx version.
If the input layout of the converted ONNX model is NHWC, when building, the configure input_layout_train of the EfficientNet_Lite0/1/2/3/4 should be NHWC.
4.Model accuracy:
EfficientNet_Lite0: 0.7491(FLOAT)/0.7473(INT8)
EfficientNet_Lite1: 0.7647(FLOAT)/0.7625(INT8)
EfficientNet_Lite2: 0.7738(FLOAT)/0.7714(INT8)
EfficientNet_Lite3: 0.7922(FLOAT)/0.7901(INT8)
EfficientNet_Lite4: 0.8070(FLOAT)/0.8059(INT8)
4.1.3.2.3.9. YOLOv2_Darknet19
Attention
To quickly start running samples and avoid the risks caused by third party tools, you are strongly recommended to utilize the off-the-shelf Caffe model in the model_zoo/mapper/ directory in D-Robotics’ model release package. However, if you find it interersting to reproduce the darknet2caffe model conversion process, you can still try to use below third party tool, but D-Robotics will not be able to guarantee the quality and successful rate of the conversion.
1.Download the 608x608 .cfg and .weight files of YOLOv2_Darknet19 from YOLO’s official website (https://pjreddie.com/darknet/yolo/)
and convert into Caffe model using the darknet2caffe conversion tool (https://github.com/xingyanan/darknet2caffe).
(note that the conversion tool is a simplified version and requires modifying the 'Reshape' layer into
'Passthrough' layer in the .prototxt file before the conversion. Details about the parameters of the modified
Passthrough layer please refer to the yolov2.prototxt sample. A NCHW2NHWC Permute operation is also added into the output node.)
2.md5sum:
md5sum |
File |
|---|---|
7aa7a6764401cebf58e73e72fcbd2a45 |
yolov2.caffemodel |
72e9a51c1e284e4b66e69f72ca9214c8 |
yolov2_transposed.prototxt |
3.Model accuracy:
[IoU=0.50:0.95]: 0.276(FLOAT)/0.270(INT8)
4.1.3.2.3.10. YOLOv3_Darknet53
Attention
To ensure optimal performance on the board, we configured the remove_node_type parameter in the yaml file that compiles the bin model to remove the Dequantize node of the bin model.
- 1.YOLOv3_Darknet53 model, URL: https://github.com/ChenYingpeng/caffe-yolov3/ The caffemodel file can be downloaded from the Baidu cloud
url in the README.md file in github.
2.md5sum code:
md5sum |
File |
|---|---|
935af6e1530af5c0017b3674adce95e9 |
yolov3_transposed.prototxt |
9a0f09c850656913ec27a6da06d9f9cc |
yolov3.caffemodel |
3.Model accuracy:
[IoU=0.50:0.95]: 0.333(FLOAT)/0.336(INT8)
4.1.3.2.3.11. YOLOv5s
1.YOLOv5s model, download the corresponding pt file from: https://github.com/ultralytics/yolov5/releases/tag/v2.0
Important
When cloning the source code, please be sure that you’re using the v2.0 Tag, otherwise it will cause conversion failure.
2.md5sum code:
md5sum |
File |
|---|---|
2e296b5e31bf1e1b6b8ea4bf36153ea5 |
yolov5l.pt |
16150e35f707a2f07e7528b89c032308 |
yolov5m.pt |
42c681cf466c549ff5ecfe86bcc491a0 |
yolov5s.pt |
069a6baa2a741dec8a2d44a9083b6d6e |
yolov5x.pt |
To better adapt to post-processing code, before exporting the ONNX model, we should modify the code at Github as follows (more code details please refer to: https://github.com/ultralytics/yolov5/blob/v2.0/models/yolo.py):
def forward(self, x):
    # x = x.copy()  # for profiling
    z = []  # inference output
    self.training |= self.export
    for i in range(self.nl):
        x[i] = self.m[i](x[i])  # conv
        bs, _, ny, nx = x[i].shape  # x(bs,255,20,20) to x(bs,3,20,20,85)
        #  x[i] = x[i].view(bs, self.na, self.no, ny, nx).permute(0, 1, 3, 4, 2).contiguous()
        x[i] = x[i].permute(0, 2, 3, 1).contiguous()
Note
Remove the reshape from 4D to 5D at the end of each output branch (i.e. not to split the channel from 255 to 3x85) then convert the layout from NHWC to NCHW before dumping.
The bottom left image displays the visualization of a certain output node before modifying the model; while the bottom right image displays the visualization of the corresponding output node after modification.
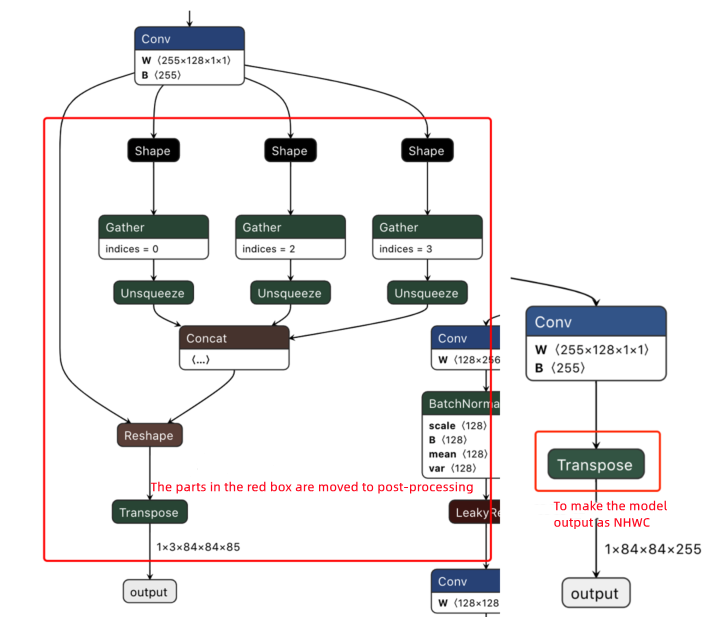
After download, convert the pt file into ONNX file using the https://github.com/ultralytics/yolov5/blob/v2.0/models/export.py script.
Attention
When using the export.py script:
Because D-Robotics Algorithm Toolchain can only support ONNX opset 10 and 11, please modify the
opset_versionparameter in thetorch.onnx.exportbased on your expected opset version.Modify the default input name parameter in the
torch.onnx.exportfrom'image'into'data'so as to keep it consistent with that of in the YOLOv5s sample in the model conversion sample package.Modify the default data input size in the
parser.add_argument640x640 into 672x672 so as to keep it consistent with that of in the YOLOv5x sample in the model conversion sample package.
3.Model accuracy:
[IoU=0.50:0.95]: 0.352(FLOAT)/0.342(INT8)
4.1.3.2.3.12. SSD_MobileNetv1
Attention
To ensure optimal performance on the board, we configured the remove_node_type parameter in the yaml file that compiles the bin model to remove the Dequantize node of the bin model.
1.SSD_MobileNetv1 model: Obtain Caffe model from URL: https://github.com/chuanqi305/MobileNet-SSD
2.md5sum code:
md5sum |
File |
|---|---|
bbcb3b6a0afe1ec89e1288096b5b8c66 |
mobilenet_iter_73000.caffemodel |
3c230e4415195a50c6248be80c49882d |
MobileNetSSD_deploy.prototxt |
3.Model accuracy: mAP: 0.7342(FLOAT)/0.7274(INT8)
4.1.3.2.3.13. EfficientDetd0
Attention
To ensure optimal performance on the board, we configured the remove_node_type parameter in the yaml file that compiles the bin model to remove the Dequantize node of the bin model.
1.Model source: Please Download OE Package to get the model.
2.md5sum code:
md5sum |
File |
|---|---|
ec4129c4b300cd04f1e8f71e0fe54ca5 |
efficientdet_nhwc.onnx |
3.Model accuracy:
[IoU=0.50:0.95]: 0.324(FLOAT)/0.315(INT8)
4.1.3.2.3.14. CenterNet_Resnet50
Attention
To ensure optimal performance on the board, we configured the remove_node_type parameter in the yaml file that compiles the bin model to remove the Dequantize node of the bin model.
1.Model source: Please Download OE Package to get the model.
2.md5sum code:
md5sum |
File |
|---|---|
fa1e884882a54fa3520d1e51477b4c1a |
centernet_resnet50.onnx |
3.Model accuracy:
[IoU=0.50:0.95]: 0.318(FLOAT)/0.313(INT8)
4.1.3.2.3.15. Fcos_efficientnetb0
Attention
This model is a trained model using the PTQ method.
1.Model source: Please Download OE Package to get the model.
2.md5sum code:
md5sum |
File |
|---|---|
996b2b44f45f55fab4d100749a8a6c44 |
fcos_effb0.onnx |
3.Model accuracy:
[IoU=0.50:0.95]: 0.363(FLOAT)/0.348(INT8)
4.1.3.2.3.16. UNet_mobilenet
Attention
To ensure optimal performance on the board, we configured the remove_node_type parameter in the yaml file that compiles the bin model to remove the Dequantize node of the bin model.
1.Model source: Please Download OE Package to get the model.
2.md5sum code:
md5sum |
File |
|---|---|
21c6c645ebca92befbebc8c39d385c1e |
tf_unet_trained.onnx |
3.Model accuracy: mIoU: 0.6411(FLOAT)/0.6382(INT8)
4.1.3.2.3.17. DeeplabV3plus_efficientnetb0
Attention
To achieve optimal on-board performance, we modified the remove_node_type parameter in the YAML file used for bin model compilation and removed the Cast node from the bin model.
1.Model source: Please Download OE Package to get the model.
2.MD5sum code:
md5sum |
File |
|---|---|
e220212e712551398ce1ed12658907bd |
deeplabv3plus_efficientnetb0_float.onnx |
3.Model accuracy: mIoU: 0.7630(FLOAT)/0.7567(INT8)
4.1.3.2.3.18. Fastscnn_efficientnetb0
1.Model source: Please Download OE Package to get the model.
2.MD5sum code:
md5sum |
File |
|---|---|
5dbb04f3098f01f4ae51e9e09f4d154f |
fastscnn_efficientnetb0_float.onnx |
3.Model accuracy: mIoU: 0.6997(FLOAT)/0.6927(INT8)
4.1.3.2.4. A Demonstration of the Algorithm Model Samples
Taking the GoogleNet model as an example, This section illustrates the steps of floating-point to fixed-point model conversion
by using the scripts in 03_classification/02_googlenet/mapper/.
4.1.3.2.4.1. Docker Container Prep
First complete the docker installation and configuration and enter the docker container accoridng to Docker Container Deployment.
4.1.3.2.4.2. Obtain the Original Model and Calibration Dataset
Execute 00_init.sh in the 03_classification/02_googlenet/mapper/ folder to obtain the model and calibration dataset needed for the current sample.
# 1. Enter the folder the demo script resides
cd ddk/samples/ai_toolchain/horizon_model_convert_sample/03_classification/02_googlenet/mapper
# 2. Execute the script to obtain the original model and calibration dataset
sh 00_init.sh
4.1.3.2.4.3. Check If the Model is Executable
1.As shown below, run below script:
# Execute model checking
sh 01_check.sh
2.Output of model check:
The abovementioned script uses the hb_mapper checker tool to check whether the model can be supported by D-Robotics’
ASIC. Meanwhile, an OP list should be dumped in order to display whether an OP is processed by the BPU or the CPU.
==========================================================
Node                   ON   Subgraph  Type
----------------------------------------------------------
Conv_0                 BPU  id(0)     HzSQuantizedConv
MaxPool_3              BPU  id(0)     HzQuantizedMaxPool
Conv_4                 BPU  id(0)     HzSQuantizedConv
Conv_7                 BPU  id(0)     HzSQuantizedConv
MaxPool_10             BPU  id(0)     HzQuantizedMaxPool
Conv_11                BPU  id(0)     HzSQuantizedConv
Conv_14                BPU  id(0)     HzSQuantizedConv
Conv_17                BPU  id(0)     HzSQuantizedConv
Conv_20                BPU  id(0)     HzSQuantizedConv
Conv_23                BPU  id(0)     HzSQuantizedConv
MaxPool_26             BPU  id(0)     HzQuantizedMaxPool
Conv_27                BPU  id(0)     HzSQuantizedConv
Concat_30              BPU  id(0)     Concat
Conv_31                BPU  id(0)     HzSQuantizedConv
Conv_34                BPU  id(0)     HzSQuantizedConv
Conv_37                BPU  id(0)     HzSQuantizedConv
Conv_40                BPU  id(0)     HzSQuantizedConv
Conv_43                BPU  id(0)     HzSQuantizedConv
MaxPool_46             BPU  id(0)     HzQuantizedMaxPool
Conv_47                BPU  id(0)     HzSQuantizedConv
Concat_50              BPU  id(0)     Concat
MaxPool_51             BPU  id(0)     HzQuantizedMaxPool
Conv_52                BPU  id(0)     HzSQuantizedConv
Conv_55                BPU  id(0)     HzSQuantizedConv
Conv_58                BPU  id(0)     HzSQuantizedConv
Conv_61                BPU  id(0)     HzSQuantizedConv
Conv_64                BPU  id(0)     HzSQuantizedConv
MaxPool_67             BPU  id(0)     HzQuantizedMaxPool
Conv_68                BPU  id(0)     HzSQuantizedConv
Concat_71              BPU  id(0)     Concat
Conv_72                BPU  id(0)     HzSQuantizedConv
Conv_75                BPU  id(0)     HzSQuantizedConv
Conv_78                BPU  id(0)     HzSQuantizedConv
Conv_81                BPU  id(0)     HzSQuantizedConv
Conv_84                BPU  id(0)     HzSQuantizedConv
MaxPool_87             BPU  id(0)     HzQuantizedMaxPool
Conv_88                BPU  id(0)     HzSQuantizedConv
Concat_91              BPU  id(0)     Concat
Conv_92                BPU  id(0)     HzSQuantizedConv
Conv_95                BPU  id(0)     HzSQuantizedConv
Conv_98                BPU  id(0)     HzSQuantizedConv
Conv_101               BPU  id(0)     HzSQuantizedConv
Conv_104               BPU  id(0)     HzSQuantizedConv
MaxPool_107            BPU  id(0)     HzQuantizedMaxPool
Conv_108               BPU  id(0)     HzSQuantizedConv
Concat_111             BPU  id(0)     Concat
Conv_112               BPU  id(0)     HzSQuantizedConv
Conv_115               BPU  id(0)     HzSQuantizedConv
Conv_118               BPU  id(0)     HzSQuantizedConv
Conv_121               BPU  id(0)     HzSQuantizedConv
Conv_124               BPU  id(0)     HzSQuantizedConv
MaxPool_127            BPU  id(0)     HzQuantizedMaxPool
Conv_128               BPU  id(0)     HzSQuantizedConv
Concat_131             BPU  id(0)     Concat
Conv_132               BPU  id(0)     HzSQuantizedConv
Conv_135               BPU  id(0)     HzSQuantizedConv
Conv_138               BPU  id(0)     HzSQuantizedConv
Conv_141               BPU  id(0)     HzSQuantizedConv
Conv_144               BPU  id(0)     HzSQuantizedConv
MaxPool_147            BPU  id(0)     HzQuantizedMaxPool
Conv_148               BPU  id(0)     HzSQuantizedConv
Concat_151             BPU  id(0)     Concat
MaxPool_152            BPU  id(0)     HzQuantizedMaxPool
Conv_153               BPU  id(0)     HzSQuantizedConv
Conv_156               BPU  id(0)     HzSQuantizedConv
Conv_159               BPU  id(0)     HzSQuantizedConv
Conv_162               BPU  id(0)     HzSQuantizedConv
Conv_165               BPU  id(0)     HzSQuantizedConv
MaxPool_168            BPU  id(0)     HzQuantizedMaxPool
Conv_169               BPU  id(0)     HzSQuantizedConv
Concat_172             BPU  id(0)     Concat
Conv_173               BPU  id(0)     HzSQuantizedConv
Conv_176               BPU  id(0)     HzSQuantizedConv
Conv_179               BPU  id(0)     HzSQuantizedConv
Conv_182               BPU  id(0)     HzSQuantizedConv
Conv_185               BPU  id(0)     HzSQuantizedConv
MaxPool_188            BPU  id(0)     HzQuantizedMaxPool
Conv_189               BPU  id(0)     HzSQuantizedConv
Concat_192             BPU  id(0)     Concat
GlobalAveragePool_193  BPU  id(0)     HzSQuantizedConv
Gemm_195               BPU  id(0)     HzSQuantizedConv
4.1.3.2.4.4. Prepare Calibration Dataset
Perform the 02_preprocess.sh script in the same directory as shown below:
# convert the images in 01_common/data/imagenet/calibration_data
# into: ./calibration_data_rgb_f32
sh 02_preprocess.sh
Note
We extracted 100 images from the ImageNet dataset and use them as a calibration dataset. Before calibration, we pre-processed the data and convert short size resize/crop size/NHWC to NCHW/to rgb.
The
hb_mappertool will load data from the converted binaries, the format of binary data file after pre-processing is: c-order matrix storage, and data type of each matrix value is int8.
4.1.3.2.4.5. Building Heterogeneous Models
Perform the 03_build.sh script in the same directory, as shown below:
sh 03_build.sh
Note
The above script uses the hb_mapper tool to convert the model,
the most important thing to focus on is the conversion configuration file,
please refer to Convert The Model Using The hb_mapper makertbin Tool.
Output of the abovementioned script is shown as below:
ls model_output | cat
googlenet_224x224_nv12.bin
googlenet_224x224_nv12_calibrated_model.onnx
googlenet_224x224_nv12_optimized_float_model.onnx
googlenet_224x224_nv12_original_float_model.onnx
googlenet_224x224_nv12_quantized_model.onnx
torch-jit-export_subgraph_0.html
torch-jit-export_subgraph_0.json
Note
For now you ONLY need to focus on the googlenet_224x224_nv12.bin file.
4.1.3.2.4.6. Single Image Inference
Run the 04_inference.sh script to inference a single image, as follows:
sh 04_inference.sh
Note
As image pre-processing, model data post-processing are required in the image inference, we offered a Python sample script, please refer to
sh 04_inference.sh.This script is to perform the inference against a single image and verify whether the inference result meets the expectations. If you want to perform accuracy evaluation, refer to the script
05_evaluate.sh.
4.1.3.2.4.7. Accuracy Evaluation
As shown below, perform the 05_evaluate.sh script to evaluate accuracy:
export PARALLEL_PROCESS_NUM=${parallel_process_num}
sh 05_evaluate.sh
Note
As image pre-processing, model data post-processing are required in accuracy evaluation, a Python sample script is offered for your reference. Please refer to
sh 05_evaluate.shfor more details.To accelerate evaluation, please adjust the number of processes at the same time through the
-poption, also pay attention to the capacitance. When the-poption value is not filled or set to 0, the fixed-point model in the CPU environment will be processed according to the number of 10 processes, and other scenarios will be processed according to the number of processes.
4.1.3.2.5. FAQ
4.1.3.2.5.1. How to match the inference results of the ONNX original floating-point model and the hb_mapper makertbin tool generated *_original_float_model.onnx model?
Note
D-Robotics’ hb_mapper tools can match user trained ONNX original floating-point model and tool generated
*_original_float_model.onnx model. Therefore, this validation is not part of the required model conversion process.
1. Understand the concepts of the 2 models
Let’s first be crystal clear about the concepts of the 2 models.
The former refers to developer own trained ONNX floating-point models using opensource frameworks e.g. TensorFlow、PyTorch、MXNet, who are also referred to as the original floating-point model here.
While the latter refers to the *_original_float_model.onnx intermediate model as the output of either the hb_mapper makertbin tool,
or the 03_classification/${modelname}/mapper/03_build.sh script in D-Robotics’ model conversion sample package
(i.e. the horizon_model_convert_sample). Wherein, the * denotes the name of a specific model (e.g. MobileNetv1 or UNet etc.).
2. Understand the distinctions between the 2 models
The computing accuracy of the *_original_float_model.onnx model and the original floating-point model, as conversion input, should be the same. While a vital distinction is that some data pre-processing compute are added into the *_original_float_model.onnx. Typically, you don’t really need to use this model unless there is abnormality in conversion results. In such case, giving this model to D-Robotics’ technical support personnel can help quickly find out the root cause of conversion abnormality.
3. Write your own script to match the 2 models
Note
The following contents take the mobilenet_onnx model in horizon_model_convert_sample package as an example to describe how to match the inference results of the 2 models.
To do this, you need to write your own scripts, where you need to note the following:
Attention
The logic between the following two should be consistent to avoid inconsistent inference results caused by different image data processing logic:
The image data processing logic in your own script
The logic in the mapper/preprocess.py script in the sample package
Note that code logic may vary by sample package version. In such cases, please refer to the image data preprocessing script or contact our technical staff.
See the following code block for each preprocessing transformer method:
import sys
sys.path.append("../../../01_common/python/data/")
from transformer import *
from dataloader import *

# image calibration transformer
def calibration_transformers():
  """
  step:
      1、PIL resize to 256
      2、crop size 224*224 from PIL center
      3、NHWC to NCHW
  """
    transformers = [
        PILResizeTransformer(size=256),
        PILCenterCropTransformer(size=224),
        HWC2CHWTransformer(),
    ]
    return transformers

# image inference transformer
def infer_transformers():
  """
  step:
      1、PIL resize to 256
      2、crop size 224*224 from PIL center
      3、bgr to nv12
      4、nv12 to yuv444
  """
    transformers = [
        PILResizeTransformer(size=256),
        PILCenterCropTransformer(size=224),
        BGR2NV12Transformer(data_format="HWC"),
        NV12ToYUV444Transformer((224, 224)),
    ]
    return transformers
Developers can refer to the following example code to match image data pre-processing logic:
def ShortSideResizeTransformer(data, short_size):
    image = data
    height, width, _ = image.shape
    if height < width:
        off = width / height
        image = cv2.resize(image,
                            (int(short_size * off), short_size))
    else:
        off = height / width
        image = cv2.resize(image,
                            (short_size, int(short_size * off)))
    data = image
    data = data.astype(np.float32)
    return data

def CenterCropTransformer(data, crop_size):
    image = data
    resize_height, resize_width, _ = image.shape
    resize_up = resize_height // 2 - crop_size // 2
    resize_left = resize_width // 2 - crop_size // 2
    data = image[resize_up:resize_up +
                    crop_size, resize_left:resize_left +
                    crop_size, :]
    data = data.astype(np.float32)
    return data

def preprocess(data):
    data = ShortSideResizeTransformer(data, short_size=256)  # ShortSideResize
    data = CenterCropTransformer(data, crop_size=224)  # CenterCrop
    data = np.transpose(data, (2, 0, 1))   # HWC2CHW
    data = data * 255  # (0, 1) --> (0, 255)
Attention
As shown in below graph, a HzPreprocess operator is added into the mobilenetv2_224x224_nv12_original_float_model.onnx model,
in order to implement the data_mean_and_scale operation in mobilenetv2_config.yaml.
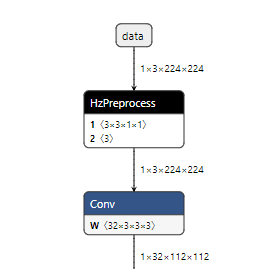
Therefore, developers need to implement normalization based on the mean_value and scale_value
parameters in mobilenetv2_config.yaml. Refer to below code block:
# Normalize
data = data.astype(np.float32)
mean = np.array([123.675, 116.28, 103.53])
scale = np.array([0.01712, 0.0175, 0.01743])
norm_data = np.zeros(data.shape).astype(np.float32)
for i in range(data.shape[0]):
    norm_data[i,:,:] = (data[i,:,:] - mean[i]) * scale[i]
norm_data = norm_data.reshape(1, 3, 224, 224).astype(np.float32)
Attention
By default, the mapper/04_inference.sh script in all model sub-folders implement fixed-point model
inference, therefore, when validating the inference result of a floating-point model, the command
should be changed into sh 04_inference.sh origin in order to inference floating-point model.
Note that code logic varies as sample package updates, please refer to the annotations in the
03_classification/04_mobilenet_onnx/mapper/04_inference.sh script.
After the abovementioned points are implemented, you can align the results of the original floating-point model with mobilenetv2_224x224_nv12_original_float_model.onnx model.
4.1.3.2.5.2. Why is the reproduced accuracy slightly different from the indicators in the documentation?
There are two possible reasons:
There may be minor differences in calculation methods when in different server environments, which can cause small data fluctuations in the accuracy of the compiled fixed-point ONNX models in different server environments when compared with the documentation.
The user side uses different versions of third-party libraries such as OpenCV and NumPy, which may produce different results after pre-processing, and this may also lead to slight data fluctuations in reproduced accuracy when compared with the documentation.
No need to worry much about this situation, the records provided in the documentation is only for reference, and it is ok that your reproduced accuracy is slightly different from those in documents.
4.1.3.2.5.3. Why is the fixed-point model accuracy not aligned with the on-board accuracy of the bin file in the ai_benchmark example?
In the standard delivery, when adding the example, we have already aligned the fixed-point model accuracy with the bin on-board accuracy in the ai_benchmark example.
If you find any unaligned accuracy, we recommend you first checking the model input for consistency.
When executing the fixed-point model evaluation script, you use the dataset of image type, while for the bin model used on board, you use the binary dataset converted by the hb_eval_preprocess tool.
Based on this, if the dataset you used on-board is not generated by using the above methods, we recommend that you first use our data preprocessing tool (i.e., hb_eval_preprocess) to regenerate the dataset needed for on-board running on the same server that you run the fixed-point model accuracy and rerun the on-board accuracy to ensure the model inputs are consistent.
Attention
Make sure to use the same environment to generate the dataset by using the hb_eval_preprocess tool and to run the fixed-point model accuracy.