9.1. Embedded Application Development
9.1.1. Overview
This section describes how to develop applications on D-Robotics platforms and how to deploy the converted model to the X5 development board for running.
The relevant considerations that require your attention are also described in this section.
Attention
Prior to the application development, make sure that you have completed the development environment preparations as described in Environment Deployment.
The simplest application development can be divided into 3 stages: project creation, project implementation, and project compilation and operation.
However, given the fact that the development of actual business scenarios are more complicated, we also provide explanations on multi-model control concepts and suggestions on application tuning.
9.1.2. Project Creation
We recommend using CMake to manage your application development engineering.
As described in the previous sections, by now, you should have installed CMake. Before reading this section, we assume that you understand how to use CMake.
D-Robotics development library provides ARM-based dependency environment and dev board application programs.
We provide the following information on engineering dependencies:
D-Robotics evaluation library libdnn.so under
~/.horizon/ddk/x5_aarch64/dnn/lib/.D-Robotics compiler dependency libhbrt_bayes_aarch64.so under
~/.horizon/ddk/x5_aarch64/dnn/lib/.The aarch64-linux-gnu-gcc C compiler.
The aarch64-linux-gnu-g++ C++ compiler.
To create a new project, you need to compile the CMakeLists.txt file.
The script defines the path of the compiler tool, the CMakeLists.txt file defines some compilation options,
as well as the path to the dependency libs and header files, as follows:
cmake_minimum_required(VERSION 2.8)

project(your_project_name)

# libdnn.so depends on system software dynamic link library, use -Wl,-unresolved-symbols=ignore-in-shared-libs to shield during compilation
set(CMAKE_CXX_FLAGS "${CMAKE_CXX_FLAGS} -std=c++11 -Wl,-unresolved-symbols=ignore-in-shared-libs")

set(CMAKE_CXX_FLAGS_DEBUG " -Wall -Werror -g -O0 ")
set(CMAKE_C_FLAGS_DEBUG " -Wall -Werror -g -O0 ")
set(CMAKE_CXX_FLAGS_RELEASE " -Wall -Werror -O3 ")
set(CMAKE_C_FLAGS_RELEASE " -Wall -Werror -O3 ")
if (NOT CMAKE_BUILD_TYPE)
    set(CMAKE_BUILD_TYPE Release)
endif ()

message(STATUS "Build type: ${CMAKE_BUILD_TYPE}")
# define dnn lib path
set(DNN_PATH "~/.horizon/ddk/x5_aarch64/dnn/")

set(DNN_LIB_PATH ${DNN_PATH}/lib)

include_directories(${DNN_PATH}/include)
link_directories(${DNN_LIB_PATH})

add_executable(user_app main.cc)
target_link_libraries(user_app
                      dnn
                      pthread
                      rt
                      dl)
Note
In the above sample, we did not specify the compiler location. We will specify it at the project compilation stage, as described in the section Project Compilation and Running.
9.1.3. Project Implementation
This section explains you how to run the aforementioned bin models converted from the floating-point models on D-Robotics platforms.
The simplest procedure consists of model loading, input data preparations, output memory preparations, inference and result parsing. The sample code for simple model loading and deployment are as follows:
#include <iostream>
#include "dnn/hb_dnn.h"
#include "dnn/hb_sys.h"

float quanti_shift(int32_t data, uint32_t shift) {
  return static_cast<float>(data) / static_cast<float>(1 << shift);
}

float quanti_scale(int32_t data, float scale) { return data * scale; }

int main(int argc, char **argv) {
  // Step 1: Load the model
  hbPackedDNNHandle_t packed_dnn_handle;
  const char* model_file_name= "./mobilenetv1_cls/compile/model.hbm";
  hbDNNInitializeFromFiles(&packed_dnn_handle, &model_file_name, 1);

  // Step 2: Get model names
  const char **model_name_list;
  int model_count = 0;
  hbDNNGetModelNameList(&model_name_list, &model_count, packed_dnn_handle);

  // Step 3: Get dnn_handle
  hbDNNHandle_t dnn_handle;
  hbDNNGetModelHandle(&dnn_handle, packed_dnn_handle, model_name_list[0]);

  // Step 4: Prepare input data
  hbDNNTensor input;
  hbDNNTensorProperties input_properties;
  hbDNNGetInputTensorProperties(&input_properties, dnn_handle, 0);
  input.properties = input_properties;
  auto &mem = input.sysMem[0];

  int yuv_length = 224 * 224 * 3;
  hbSysAllocCachedMem(&mem, yuv_length);
  //memcpy(mem.virAddr, yuv_data, yuv_length);
  //hbSysFlushMem(&mem, HB_SYS_MEM_CACHE_CLEAN);

  // Step 5: Prepare storage space for the output data of the model
  int output_count;
  hbDNNGetOutputCount(&output_count, dnn_handle);
  hbDNNTensor *output = new hbDNNTensor[output_count];
  for (int i = 0; i < output_count; i++) {
    hbDNNTensorProperties &output_properties = output[i].properties;
    hbDNNGetOutputTensorProperties(&output_properties, dnn_handle, i);
    int out_aligned_size = output_properties.alignedByteSize;
    hbSysMem &mem = output[i].sysMem[0];
    hbSysAllocCachedMem(&mem, out_aligned_size);
  }

  // Step 6: Model inference
  hbDNNTaskHandle_t task_handle = nullptr;
  hbDNNInferCtrlParam infer_ctrl_param;
  HB_DNN_INITIALIZE_INFER_CTRL_PARAM(&infer_ctrl_param);
  hbDNNInfer(&task_handle,
              &output,
              &input,
              dnn_handle,
              &infer_ctrl_param);

  // Step 7: Wait for the task to end
  hbDNNWaitTaskDone(task_handle, 0);
  // Step 8: Parse model output, the sample is to obtain the top1 class of MobileNetV1
  float max_prob = -1.0;
  int max_prob_type_id = 0;
  hbSysFlushMem(&(output->sysMem[0]), HB_SYS_MEM_CACHE_INVALIDATE);
  float *data = reinterpret_cast< float *>(output->sysMem[0].virAddr);
  int *shape = output->properties.validShape.dimensionSize;
  int * aligned_shape = output->properties.alignedShape.dimensionSize;
  auto properties = output->properties;
  int offset = 1;
  if (properties.tensorLayout == HB_DNN_LAYOUT_NCHW) {
    offset = aligned_shape[2] * aligned_shape[3];
  }
  for (auto i = 0; i < shape[1] * shape[2] * shape[3]; i++) {
    float score;
    if (properties.quantiType == SHIFT) {
      score = quanti_shift(data[i * offset], properties.shift.shiftData[i]);
    } else if (properties.quantiType == SCALE) {
      score = quanti_scale(data[i * offset], properties.scale.scaleData[i]);
    } else if (properties.quantiType == NONE){
      score = data[i * offset];
    } else {
      std::cout << "quanti type error!";
      return -1;
    }
    if(score < max_prob)
      continue;
    max_prob = score;
    max_prob_type_id = i;
  }

  std::cout << "max id: " << max_prob_type_id << std::endl;
  // Release task
  hbDNNReleaseTask(task_handle);

  // Release data
  hbSysFreeMem(&(input.sysMem[0]));
  hbSysFreeMem(&(output->sysMem[0]));

  // Release the model
  hbDNNRelease(packed_dnn_handle);

  return 0;
}
To keep it simple, we directly use known constants for some data in above sample.
However, in practice, you should get the sizes and data types using the APIs such as hbDNNGetInputTensorProperties/hbDNNGetOutputTensorProperties.
Note
At the stage of preparing input data, we commented out a snippet of memcpy code, which is to prepare the input sample according to the input format of the model and copy it into input.sysMem[0].
For memory alignment rules, please refer to Section Data Layout and Alignment Rules in BPU SDK API DOC.
For more comprehensive instructions on the engineering implementation, refer to BPU SDK API DOC and Basic Sample User Guide
9.1.4. Project Compilation and Running
Combining with CMake engineering configurations as described in Project Creation, please refer to the following compilation script:
# Define gcc path for ARM
LINARO_GCC_ROOT=/opt/arm-gnu-toolchain-11.3.rel1-x86_64-aarch64-none-linux-gnu/
DIR=$(cd "$(dirname "$0")";pwd)
export CC=${LINARO_GCC_ROOT}/bin/aarch64-none-linux-gnu-gcc
export CXX=${LINARO_GCC_ROOT}/bin/aarch64-none-linux-gnu-g++

rm -rf build_arm
mkdir build_arm
cd build_arm

cmake ${DIR}

make -j8
After reading Environment Deployment, we assume that you have installed the required compiler on your dev PC, so here you only need to associate the compiler configurations in the above script with your project.
Copy and run the ARM programs in D-Robotics dev board and do not forget to copy the dependency files of the programs to the dev board. Then configure dependencies in the startup script.
For example, dependent libraries of the sample program include: libhbrt_bayes_aarch64.so and libdnn.so,
both of which are located at ~/.horizon/ddk/x5_aarch64/dnn/lib/ and must be copied to the dev board.
We recommend creating a new lib under /userdata on the board and copy the library to that location.
Thus, before putting the program into on-board running, the path information of the dependent libraries needs to be specified is as below:
export LD_LIBRARY_PATH=$LD_LIBRARY_PATH:/userdata/lib
9.1.5. Multi-model Control Strategy
In the scenarios containing multiple models, as each model need to complete the inference with limited resources, they will inevitably compete for computing resources.
To help you control the execution of multiple models, we provide control strategies for the model prioritization.
9.1.5.1. Model Preemption Control
Attention
This feature is only supported on the dev board side and is not supported by the x86 emulator.
There isn’t task preemption feature in the BPU computing unit hardware of the X5 ASICs.
Each inference task, once put to the BPU and begins model computing, it occupies the BPU until the task is completed. At this time, other tasks have to wait in line. If the BPU is occupied by a large model inference task, then other high-priority model inference tasks cannot be executed.
To fix this, we added a software feature called BPU Resource Preemption in the Runtime SDK based on model priorities.
Pay attention to the following:
When executing inference in BPU, the compiled data command model is denoted by 1 or more function calls. The function call means the atomic execution unit of the BPU, and multiple function-call tasks are queued in the hardware queue and processed in turn. A model inference task will be considered done when all of it function calls are executed.
Based on the above descriptions, it is simpler to set the function call as the preemption granularity of the BPU model task, that is, when the BPU finishes a function call, it can temporarily suspend the existing model, switch to another model, and then resume it when the latter is done. However, there are 2 problems, the first is that the function calls of the model compiled by the compiler are merged together to form a large function call and cannot be preempted. The second problem is that the execution time of each function call is relatively long or not fixed, which leads to unfixed preemption timing, affecting the preemption results.
To solve these two problems, we provide supports in both model conversion and system software. The implementation principles and operation methods are as follows:
Firstly, if you choose to process the model using the QAT scheme, then at the model compilation stage, you need to add the
max-time-per-fcoption to the extra parameter configurations in the compilation interface to set the execution time (in microseconds) for each function call. The default value is0(no limits). By setting this option, you can control the execution time of individual large function calls when they are running on-board. Suppose the execution time of a function call is10ms, andmax-time-per-fcis set to500during model compilation, then this function call will be split into 20 function calls. If you are using the PTQ scheme to process the model, you can add themax_time_per_fcparameter to the compiler-related parameters (compiler_parameters) in the YAML configuration file of the model at the model conversion stage.Secondly, the system software is designed with an environment variable,
BPLAT_CORELIMIT, used for setting the granularity of model preemption. If this variable is set to2, then the execution time of the high-priority function call equals to the processing time of the previous 2 low-priority function calls. If it is set to0, the preemption will be disabled. To execute higher-priority tasks ASAP, before running on-board, runexport BPLAT_CORELIMIT=1to set this variable to1. Thus, when the underlying layer of the system receives the function calls of a model, it will determine the priority and put those with high priorities to a separate queue, so that after a function call is finished running, the higher-priority task will be able to preempt the BPU resources.Next, as the model preemption mechanism is implemented in LibDNN, continue to specify the
hbDNNInferCtrlParam.priorityparameter provided by theinferAPI ofdnn, e.g., settingHB_DNN_PRIORITY_PREEMP(255)for theinfertask means it is a high-priority task and support preemption at function-call granularity.
9.1.6. Suggestions on Application Optimization
D-Robotics suggested application optimization strategy includes Engineering Task Scheduling and Algorithm Task Integration.
For Engineering Task Scheduling, we recommend some workflow scheduling management tools to fully utilize the parallel-processing capabilities at different task stages.
In general, an application can be divided into 3 stages: pre-processing, model inference, and post-processing output.
A simplified workflow is as follows:

After making full use of the workflow management to achieve the parallel execution of different task stages, the ideal task processing workflow can be as follows:

For Algorithm Task Integration, we recommend multi-task models.
On one hand, it can avoid the difficulties brought by the management of multi-model scheduling to a certain extent.
On the other hand, as multi-task model can fully share the computation of the backbone, it can significantly reduce the amount of computation at the entire application level compared to using independent models, and thereby achieve higher overall performance.
Multitasking is also a common application-level optimization strategy within D-Robotics and in the business practices of many collaborating customers.
9.1.7. Other Dev Tools
hrt_bin_dumpis the layer dump tool for model, whose output file in binary. To learn how to use this tool, refer to hrt_bin_dump Tool Introduction.hrt_model_execis a model execution tool that can evaluate the inference performance of the model and get the model information directly on the dev board.On one hand, it allows the user to get a realistic understanding of the model’s real performance; On the other hand, it also helps the user to learn the speed limit that the model can achieve, which is useful information in application tuning.
hrt_model_execprovides three types of functions including model inferenceinfer, model performance analysisperf, and viewing model informationmodel_info.For how to use the tool, please refer to hrt_model_exec Tool Introduction.
9.1.8. FAQ
9.1.8.1. What is BPU memory Cache?
As described in BPU SDK API DOC, BPU memory functions hbSysAllocCachedMem and hbSysAllocMem are used for allocating BPU read/write memory.
In which, a parameter called hbSysAllocCachedMem is used for allocating the cacheable memory space, and a supporting function, hbSysFlushMem, is used for refreshing the cache.
The cache mechanism is determined by the memory architecture of the BPU, as shown in the following figure. The cache between CPU and memory is used as a data cache; however, there is no cache between BPU and memory. Therefore, the misuse of the cache can cause problems in data reading/writing accuracy and efficiency.
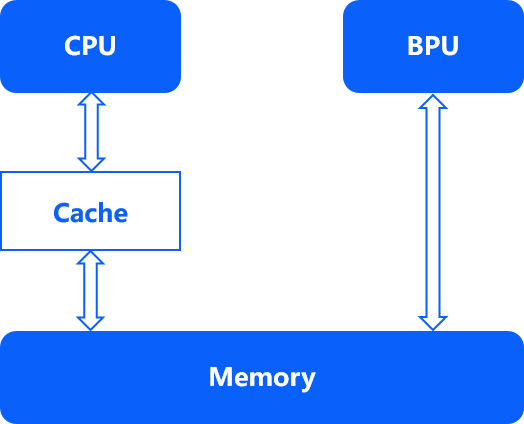
When the CPU has finished writing data, it needs to actively flush the data in the cache to the memory, otherwise the BPU will read the old data.
When the BPU has finished writing data, it also needs to actively invalidate the data in the cache, otherwise the CPU will preferentially read the old data previously cached.
In the process of continuous model inference, we recommend applying for memory with cache for the input and output to improve the CPU efficiency in repeated reading and writing.
9.1.8.2. What is the physical/virtual address in BPU memory?
In the X5 processor architecture, BPU and CPU share the memory, and a physically contiguous section of memory can be requested through the hbSysAllocCachedMem and hbSysAllocMem interfaces.
The return values of these functions are wrapped in the hbSysMem data structure, and the phyAddr and virAddr fields correspond to the physical and virtual addresses of its memory space, respectively.
As this memory space is contiguous, both physical and virtual addresses can be represented, read, and written by the first address. However, in practice, it is recommended to use virtual addresses in preference in non-essential scenarios.