2. Quick Start
Precautions
To avoid malfunction or damage to this product, please adhere to the following guidelines:
- Place the product on a stable, flat, and non-conductive surface during use.
- Do not arbitrarily move the swing arm; always return it to its initial position parallel to the housing before use.
- Avoid keeping the servo in a stalled state for an extended period to prevent overcurrent and overheating, which could affect its service life.
- Do not squeeze or twist the camera folding mechanism, and never exceed the maximum folding angle, as this may cause irreversible damage.
- When installing an SD card, remove the protective cover first, and be careful not to insert the SD card into the gap between the housing and the RDK X5.
- Damage caused by connecting incompatible devices to this product will not be covered under warranty or repair support.
- All peripheral devices used with this product must comply with relevant standards in the country of use and be clearly marked to ensure they meet safety and performance requirements.
Package Contents
- RDK X5 Magicbox with built-in 32GB TF card
- Cables:
- USB‑A to USB‑C Data Cable ×1
- USB‑C to USB‑C Data Cable ×1
System Flashing
The RDK X5 Magicbox comes pre-installed with RDK OS by default. You can refer to the Quick Start Guide Video to get started directly.
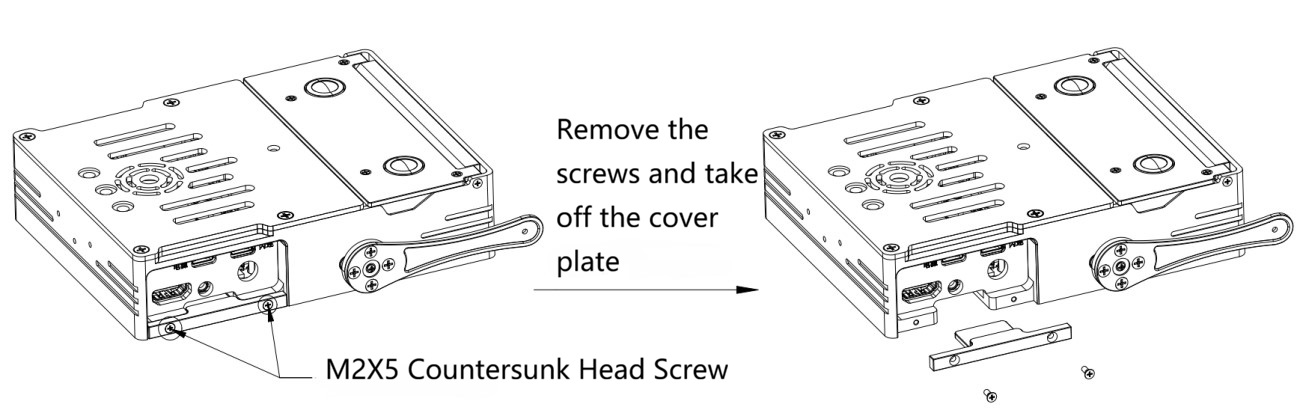
If you need to reflash the system, follow the steps below to remove the TF card and proceed with system flashing.
-
Use a screwdriver to unscrew the two screws securing the cover in a counterclockwise direction, then open the TF card cover.
-
Remove the TF card to flash the system. For detailed flashing steps, refer to System Flashing.
-
After flashing is complete, reinsert the TF card into the TF card slot inside the Magicbox, reattach the cover, and tighten the two screws to secure it.
Quick Start Guide Video
Power Supply
- Type-C port, 5V/5A DC input.
- Power the RDK X5 Magicbox using a power adapter that supports the PD 3.0 protocol via the power port.
Network Configuration
Method 1: QuickLink Configuration Instructions
-
On your PC, navigate to Control Panel → Network and Internet → Network and Sharing Center → Change adapter settings.
-
Connect your PC to the left-side Flash Link port on the RDK X5 Magicbox.
-
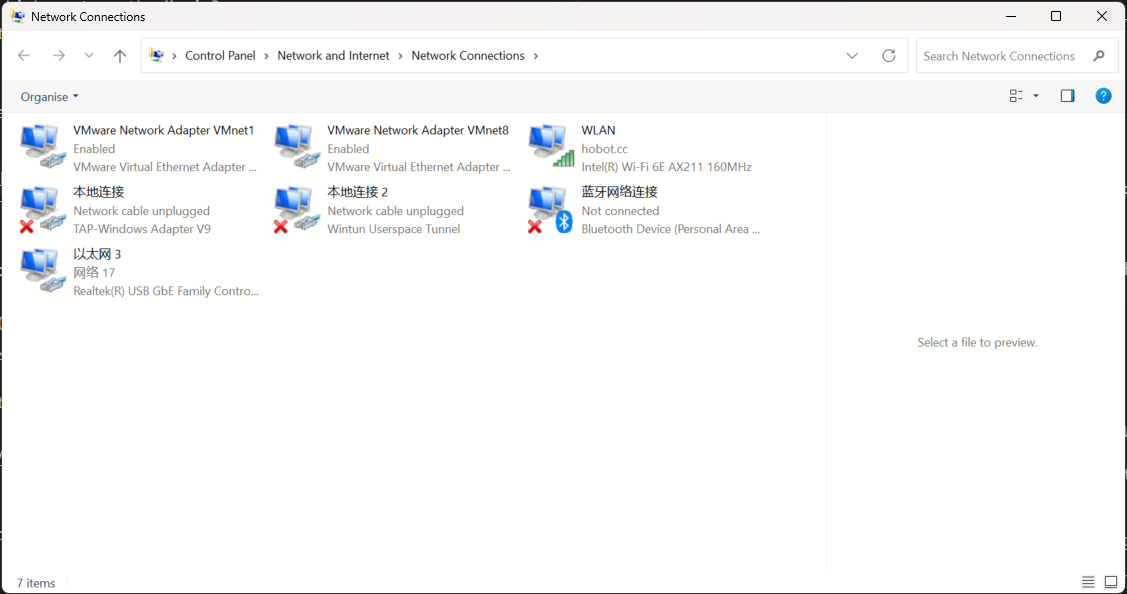
Locate the corresponding Ethernet adapter, right-click it, and select Properties.
NotePlease select the correct Ethernet adapter.
-
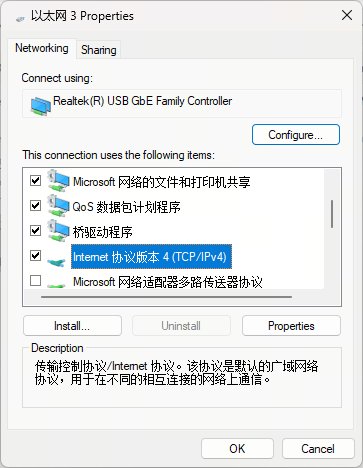
Find and double-click Internet Protocol Version 4 (TCP/IPv4).
-
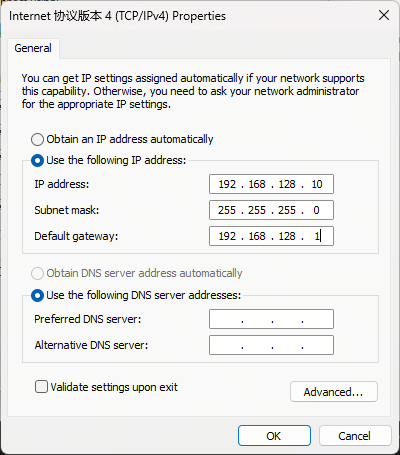
Enter the corresponding network parameters as shown in the image below, then click OK.
-
Open PowerShell and run the following command to verify connectivity to the development board:
ping 192.168.128.10.
Method 2: Wired Ethernet Port Configuration Instructions
-
On your PC, navigate to Control Panel → Network and Internet → Network and Sharing Center → Change adapter settings.
-
Connect your PC to the right-side Ethernet port on the RDK X5 Magicbox.
-
Locate the corresponding Ethernet adapter, right-click it, and select Properties.
NotePlease select the correct Ethernet adapter.
-
Find and double-click Internet Protocol Version 4 (TCP/IPv4).
-
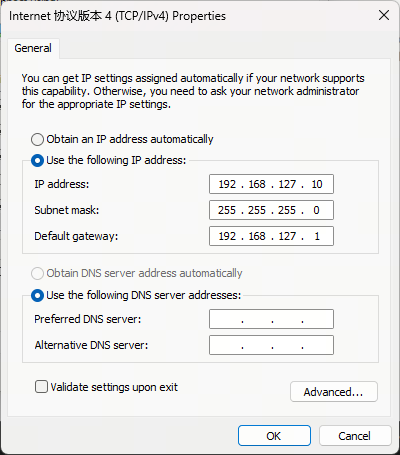
Enter the corresponding network parameters as shown in the image below, then click OK.
-
Open PowerShell and run the following command to verify connectivity to the development board:
ping 192.168.127.10.
Starting the RDK X5 Magicbox
After powering on, wait approximately 50 seconds. The white LEDs will light up sequentially, and successful startup is indicated by the white LED blinking accompanied by a startup sound.
Example Demonstrations
Use the following command to set the application auto-start switch. When set to ON, the application starts automatically upon boot. It is enabled by default.
# Enable auto-start
systemctl enable magicbox-start

# Disable auto-start
systemctl disable magicbox-start
The directions of the buttons described in this article, from left to right, are based on the RDK X5 Magicbox light strip facing the user.
Stereo Depth Estimation
-
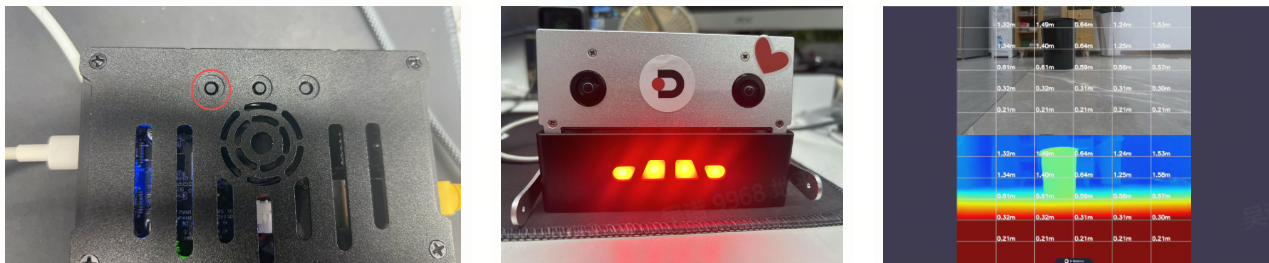
Briefly press the leftmost button, the light will turn red, and the binocular depth estimation algorithm will start.
-
How to view the algorithm's effects:
-
When using the flash connection to configure the network, access http://192.168.128.10:8000 via a browser.
-
When using the wired network port to configure the network, access http://192.168.127.10:8000 via a browser.
-
Gesture Interaction
-
Briefly press the middle button, the light will turn green, and the gesture interaction algorithm will start.
-
Hand gestures and corresponding triggered actions:
Gesture Hand Motion Triggered Action ThumbUp Thumbs-up Ears wiggle Victory "V" sign Feet lift up ThumbLeft Thumb points left Left hand raises ThumbRight Thumb points right Right hand raises Okay "OK" gesture Lights flash -
How to view the algorithm's effects:
-
When using the flash connection to configure the network, access http://192.168.128.10:8000 via a browser.
-
When using the wired network port to configure the network, access http://192.168.127.10:8000 via a browser.

-
Voice Interaction
- It is recommended to use this feature in a relatively quiet environment; otherwise, it may easily pick up other sounds from the surroundings.
- Currently, only Chinese interaction is supported.
-
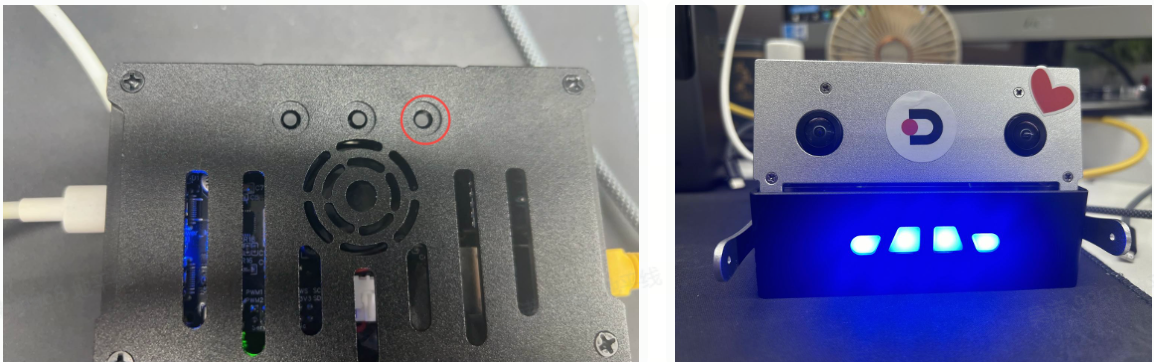
Briefly press the rightmost button, the light will turn blue, and after the voice prompt "Hello, how can I assist you?" appears, you can start a conversation.
-
Voice commands:
-
Use the voice command "End the conversation" to put the RDK X5 Magicbox into sleep mode, and the light will switch to a breathing light pattern.
-
Use the voice command "Hello, Digua" to wake it up, the light will remain steady, and you can start a conversation after waking up.
warningDue to differences in external environments and language habits, occasional recognition errors may occur.
-
-
Voice interaction process:
-
After receiving voice input, the microphone turns off, the blue lights gradually brighten one by one, and the speaker waits to broadcast the output from the large model.
-
Once the voice broadcast is complete, the microphone turns on, and the blue light remains steady without changes, ready for the next round of conversation.
-
Explore More Examples with RDK Studio
Connect the Magicbox using the RDK Studio tool to experience additional example applications. For download, installation, and usage instructions, refer to the RDK Studio User Guide.
Resource Monitoring
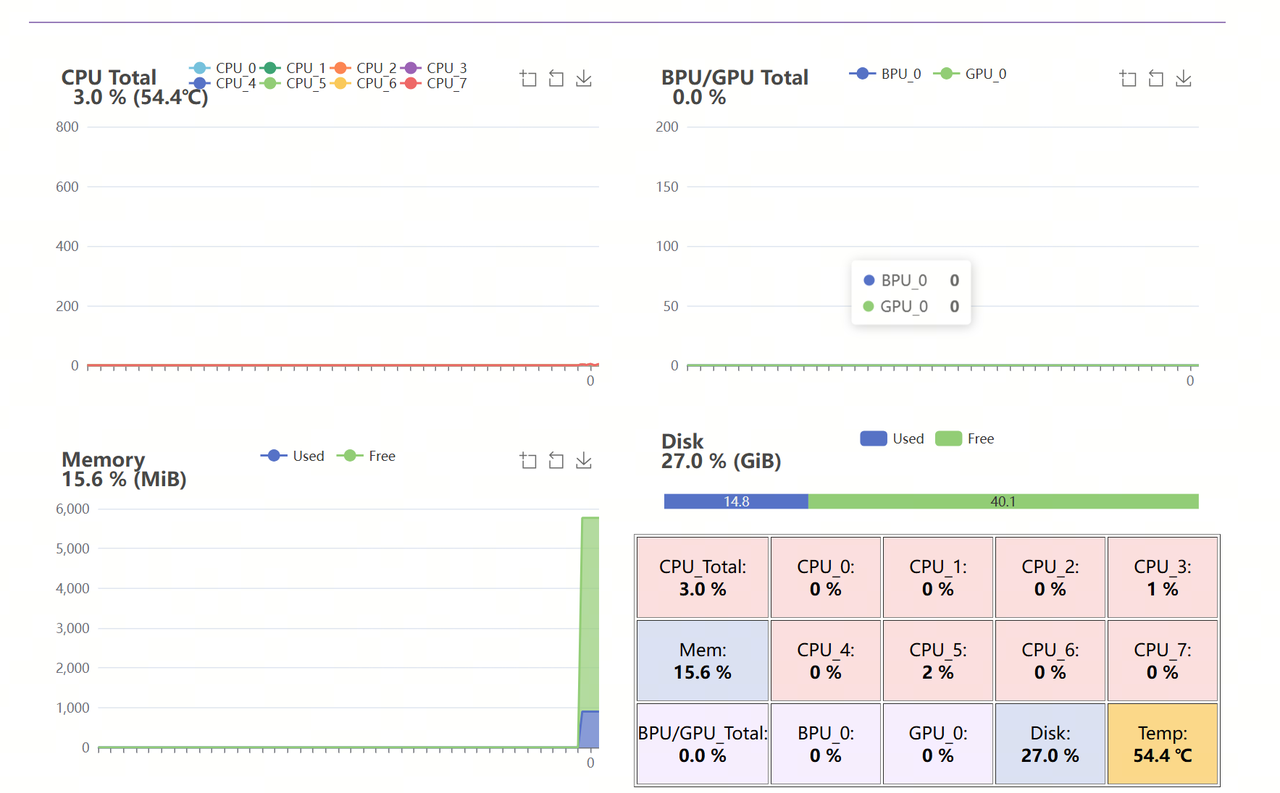
After powering on, the self-starting resource monitoring function allows you to check the resource consumption of the CPU, BPU, etc. The viewing methods are as follows:
- When using a flash connection to configure the network, access http://192.168.128.10:7999 via a browser.
- When using a wired network port to configure the network, access http://192.168.127.10:7999 via a browser.