7.1. 环境配置类
7.1.1. 如何查看当前系统的各种软件版本信息
cat /etc/version查看当前 系统 的SDK版本 和 编译 时间
# cat /etc/version
LNX6.1.12_PL5.1_V0.0.8_20240319-1108
uname -a查看内核 版本
# uname -a
Linux buildroot 6.1.12-rt7+ #1 SMP PREEMPT Tue Mar 19 11:12:22 CST 2024 aarch64 GNU/Linux
strings /dev/block/platform/by-name/uboot | grep "U-Boot 2022.10"查看uboot版本
# strings /dev/block/platform/by-name/uboot | grep "U-Boot 2022.10"
U-Boot 2022.10-g4432fbb999
U-Boot 2022.10-g4432fbb999 (Mar 19 2024 - 17:22:42 +0800)
7.1.2. 如何设置uboot的bootargs
通过
配置
临时 的 启动项, 修改 以下 命令 的 <items to add>为你 需要 的 参数,配置 后 需要 在uboot命令行 下 执行 boot命令引导 内核 启动,重启 设备 则 配置 失效:
setenv bootargs <items to add>
boot
# 例如打开kernel的日志earlycon
setenv bootargs earlycon=uart8250,mmio32,0x32120000
boot
配置
长期有效 的 启动项,修改 以下 命令 的 <items to add>为你 需要 的 参数,执行 saveenv保存配置 到 env分区,即使设备 断电 重启 也 能 保持 配置 有效。
setenv bootargs <itmes to add>
saveenv
reset
通过
配置文件 来 修改 启动项,在SDK源码 目录 的 uboot/tools路径下 创建 一个 uboot.env配置文件,按照键值 对 的 格式 写入 需要 配置 的 参数,通过 整 编译 ./bd.sh或单编uboot ./bd.sh uboot在out/product路径下会 生成ubootenv.img镜像文件。使用fastboot工具 烧写ubootenv.img,即使 设备 断电 重启 也 能 保持 配置 有效。
#fastboot烧写ubootenv
fastboot flash ubootenv ubootenv.img
注:以下
Hobot>
boot_device=emmc
bootcmd=run ab_select_cmd;run avb_boot;
dev_index=0
dev_name=mmc
ethaddr=46:a1:a3:75:e4:a4
fdtcontroladdr=8beb2680
hb_board_id=0x0202
reset_reason=COLD_BOOT
stderr=serial@32120000
stdin=serial@32120000
stdout=serial@32120000
7.1.3. 为什么程序可以手动执行,添加到/etc/init.d下自启动就不行
如果/usr/hobot/ 目录/usr/hobot/ 会S90cam-service里面
export LD_LIBRARY_PATH="/usr/hobot/lib:${LD_LIBRARY_PATH}"
或者,在source /etc/profile.d/environment.sh 把
7.2. 系统软件类
7.2.1. 如何查看系统温度,cpu 和 bpu 运行频率的统计信息
hrut_somstatus
7.2.2. 如何读取芯片uid命令
cat /sys/class/socinfo/soc_uid
7.2.3. 如何查看bpu支持的频率
cat /sys/class/devfreq/3a000000.bpu/available_frequencies
7.2.4. 如何查看cpu调度模式
cat /sys/devices/system/cpu/cpufreq/policy0/scaling_governor
7.2.5. 如何查看cpu支持的频率和当前运行的频率
cat /sys/devices/system/cpu/cpufreq/policy0/scaling_available_frequencies
cat /sys/devices/system/cpu/cpufreq/policy0/cpuinfo_cur_freq
7.2.6. 如何查看cpu降频温度
cat /sys/devices/virtual/thermal/thermal_zone1/trip_point_1_temp
7.2.7. 关闭cpu核的方法
echo 0 > /sys/devices/system/cpu/cpu1/online

# 需要关哪个CPU核,修改以下命令的 <x> 为对应数字即可
echo 0 > /sys/devices/system/cpu/cpu<x>/online
注意:cpu0 无法
关闭 cpu 核后lscpu 命令
root@buildroot:~# echo 0 > /sys/devices/system/cpu/cpu1/online
root@buildroot:~# lscpu
Architecture:             aarch64
  CPU op-mode(s):         32-bit, 64-bit
  Byte Order:             Little Endian
CPU(s):                   8
  On-line CPU(s) list:    0,2-7
  Off-line CPU(s) list:   1
......
上述
7.2.8. 中断绑定cpu核方法
注意:
下列
#绑定到CPU3,echo后的8对应CPU3,1/2/4/8/16/64/128/256分别对应CPU0-7,175是中断号
echo 8 > /proc/irq/175/smp_affinity
7.2.9. eMMC烧录器文件
eMMC的
如果
1)烧录
2)如果
3)如果
4)烧录
7.2.10. 如何查看和修改芯片寄存器
使用 devmem命令
devmem ADDRESS [WIDTH [VALUE]]

# 例如读管脚 HSIO_GPIO_00 的复用寄存器的值
devmem 0x3505005C 32
7.2.11. i2c命令使用
# 列举 I2C bus 和上面所有的设备
i2cdetect -l
# 查看 bus 1 上有哪些探测到的外设
i2cdetect -y -r 1
# 写: 0x36为I2C设备的地址, 0x5081为要写的寄存器地址, 0x01为写入的值。
i2ctransfer -f -y 1 w3@0x36 0x50 0x81 0x01
# 读: 0x36为I2C设备的地址, 0x300A为要读的寄存器地址, r3为连续读3Byte, 0x56 0x08 0x41 为读到的寄存器的值。
i2ctransfer -f -y 1 w2@0x36 0x30 0x0A r3
7.2.12. 增强驱动能力(以I2C4举例)
首先kernel/arch/arm64/boot/dts/hobot/pinmux-func.dtsi设备树
......

pconf_drv_pu_ds7_1v8: pconf-dev-pu-ds7-1v8 {
  bias-pull-up;
  power-source = <HORIZON_IO_PAD_VOLTAGE_1V8>;
  drive-strength = <7>;/*驱动强度*/
};

......

pinctrl_i2c4: i2c4grp {
  horizon,pins = <
    LSIO_I2C4_SCL  LSIO_PINMUX_3 BIT_OFFSET0  MUX_ALT0 &pconf_drv_pu_ds5_1v8
    LSIO_I2C4_SDA  LSIO_PINMUX_3 BIT_OFFSET2  MUX_ALT0 &pconf_drv_pu_ds5_1v8
  >;
};
......
编译cat /sys/kernel/debug/pinctrl/34180000.lsio_iomuxc/pinconf-pins查询
root@ubuntu:~# cat /sys/kernel/debug/pinctrl/34180000.lsio_iomuxc/pinconf-pins
Pin config settings per pin
Format: pin (name): configs
......
......
pin 47 (lsio_i2c4_scl): input bias pull down (0 ohms), input bias pull up (0 ohms), output drive strength (10 mA), input enabled, input schmitt enabled, pin output (1 level)
pin 48 (lsio_i2c4_sda): input bias pull down (2097152 ohms), input bias pull up (2097152 ohms), output drive strength (10 mA), input enabled, input schmitt enabled, pin output (1 level)
drive-strength = <2>X5平台drive-strength = <7>对应
7.2.13. 内核是否支持 PREEMPT_RT 内核 patch
支持RT Patch (rt7)。
7.2.14. 能否自定义根文件系统?
目前
7.2.15. 是否支持数字音频接口(Audio PDM)?
支持,配置
引脚
芯片

芯片
设备树
pinctrl 这部分
pinctrl_dsp_pdm_cko: pdmckogrp {
  horizon,pins = <
    DSP_PDM_CKO  DSP_PINMUX_0  BIT_OFFSET24  MUX_ALT0 &pconf_drv_pu_ds2_1v8
  >;/* PDM时钟输出的引脚配置,定义了引脚的复用功能和电源配置,使用的时候需要检查是否有复用*/
};

pinctrl_dsp_pdm_in: pdmingrp {
  horizon,pins = <
    DSP_PDM_IN0  DSP_PINMUX_0  BIT_OFFSET26  MUX_ALT0 &pconf_drv_pu_ds2_1v8
    DSP_PDM_IN1  DSP_PINMUX_0  BIT_OFFSET28  MUX_ALT0 &pconf_drv_pu_ds2_1v8
    DSP_PDM_IN2  DSP_PINMUX_0  BIT_OFFSET30  MUX_ALT0 &pconf_drv_pu_ds2_1v8
    DSP_PDM_IN3  DSP_PINMUX_1  BIT_OFFSET0  MUX_ALT0 &pconf_drv_pu_ds2_1v8
  >;/*这是PDM输入的引脚配置,定义了四个输入引脚的复用功能和电源配置,使用的时候需要检查是否有复用*/
};
pdm 绑定 dsp 部分
archband_pdm: archband_pdm@320d0000 {
      compatible = "archband,pdm-driver";
      reg = <0x320d0000 0x00010000>;
      clocks = <&dspclks X5_DSP_PDM_HMCLKA_CLK>, <&dspclks X5_DSP_PDM_APB_CLK>;
      clock-names = "pdmclk", "pdm_pclk";
      pinctrl-names = "default";
      pinctrl-0 = <&pinctrl_dsp_pdm_cko &pinctrl_dsp_pdm_in>;
      arb-syscon = <&dsp_crm_syscon 0x10>;
      arb,osr = <1>;
      dmas = <&dsp_axi_dma 20>, <&dsp_axi_dma 19>, <&dsp_axi_dma 18>, <&dsp_axi_dma 17>;
      dma-names = "rx0", "rx1", "rx2", "rx3";
      channel = <2>;
      #sound-dai-cells = <0>;
      status = "disabled";
      resets = <&dsprst DSP_PDM_RESET>;
};
打开
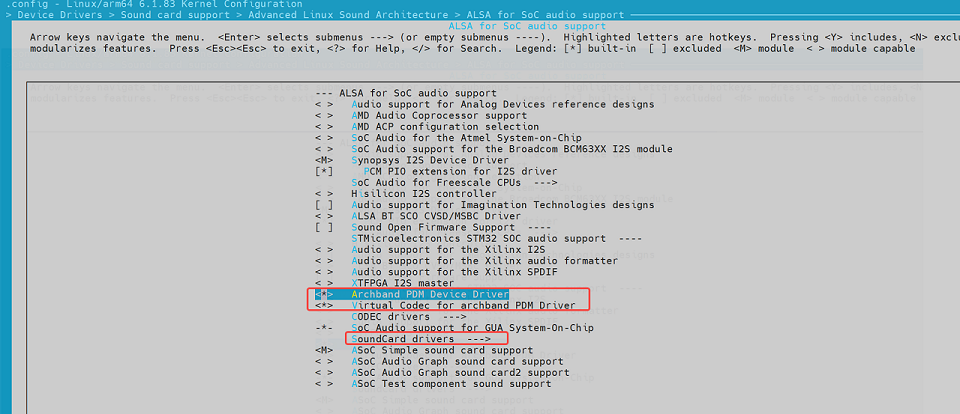
上
CONFIG_SND_ARCHBAND_PDM
CONFIG_SND_VIRT_CODEC

CONFIG_SND_SOC_HOBOT_SIMPLE_CARD
CONFIG_SND_DUPLEX_CARD
CONFIG_SND_HOBOT_SOUND_MACHINE
CONFIG_SND_HOBOT_SOUND_DUPLEX_HOST

CONFIG_SND_SIMPLE_CARD_UTILS
验证
请
modprobe designware_i2s i2s_ms=1 /*选择i2s的主从模式*/
modprobe es7210
modprobe es8156
modprobe snd-soc-hobot-sound-duplex-host
arecord –l /*查看声卡,确认pdm录制时使用的声卡*/
arecord -Dhw:1,2 -c 2 -r 16000 -f S24_LE -t wav -d 5 /userdata/test.wav	/*录制命令*/
录制
pdm使用
通道
7.2.16. 为什么fastboot烧录miniboot后无法启动
错误
fastboot flash addr:0x0 miniboot.img
问题
烧录miniboot分区
正确
fastboot flash miniboot miniboot.img
烧录miniboot以及
fastboot flash addr:0x0 miniboot_all.img
7.2.17. SDK编译时出现 internal compiler error: Illegal instruction
错误

问题
解决: 一般
7.2.18. 为什么单独编译了hbre的模块,在hbre.img中没有包含
问题
原因
7.2.19. 使用buildroot制作根文件系统时提示 you are leaving 9 commits behind
问题

问题
解决办法: 对
7.2.20. 使用buildroot制作根文件系统时提示 LD_LIBRARY_PATH Error
问题
You seem to have the current working directory in your LD_LIBRARY_PATH environment variable. This doesn’t work.

问题
解决办法: 查看~/.profile 和 ~/.bashrc 的
7.2.21. 使用buildroot制作system根文件系统,提示mount not found
问题

问题
解决办法: 制作initramfs后,把 framework/output 删除,重新
7.2.22. bd.sh lunch时找不到 utils_funcs.sh 文件
问题
./bd.sh: line 7: /home/work/x5_bjs1/utils_funcs.sh: No such file or directory
问题
SCRIPT_DIR=”$( cd “$( dirname “$(readlink -f “${BASH_SOURCE[0]}”)” )” && pwd )”
source “$SCRIPT_DIR/utils_funcs.sh”
bd.sh 是
但是
解决办法:
恢复 bd.sh 为
ln -sf build/xbuild.sh bd.sh
Linux下
执行cp命令
7.2.23. 在ZSH的shell环境下使用快捷命令模式编译提示无法找到bd.sh
问题source build/quickcmd.sh后,使用b命令

问题bd.sh位置PATH环境变量BASH_SOURCE这个
解决办法:参考 ${BASH_SOURCE[0]} equivalent in zsh? 在BASH_SOURCE这个${(%):-%x}}

7.2.24. 如果只修改内核里面的dts,可以不烧录整个镜像吗
问题: 需要
解决办法: kernel和dts一起
7.2.25. 在app目录下面增加了新的代码目录,要怎么样让它参与进整体编译
解决办法: app 目录
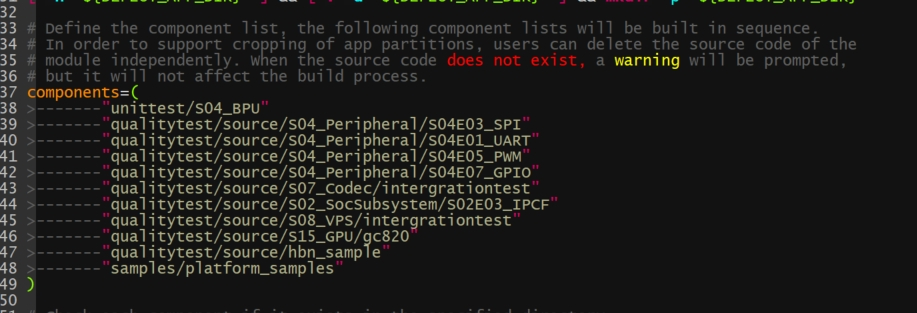
build/mk_app.sh 会
注意: app目录
7.3. 芯片规格类
7.3.1. 芯片的内存大小上限
最大
7.3.2. BPU 的内存访问模式
BPU与CPU共享内存, 在
7.4. 编解码类
7.4.1. 视频码流头部信息不正确报错
[ERROR][MM][src/vdi/linux/vdi_osal.c:174] [ERROR][869.56942][3344:3543][VideoDecoder] DecodeHeader:1554 FAILED TO DEC_PIC_HDR: ret(1), SEQERR(00005000) [ERROR][MM][src/vdi/linux/vdi_osal.c:174] [ERROR][869.56980][3344:3543][COMPONENT] Component wave_decoder will be terminated
需要
7.5. 外设类
7.5.1. 如何判断sensor硬件连接是否正常
首先
需要 使能sensor的 供电,一般 会 有 多路 供电(例如 1.8V, 2.8V等),使能 供电 的 方式 依据 开发板 的 情况 各有不同 然后
需要 使能sensor 的 MCLK, 否则sensor的i2c无法 正确 探测 到sensor
echo 1 > /sys/class/vps/mipi_host1/param/snrclk_en
echo 24000000 > /sys/class/vps/mipi_host1/param/snrclk_freq
echo 1 > /sys/class/vps/mipi_host0/param/snrclk_en
echo 24000000 > /sys/class/vps/mipi_host0/param/snrclk_freq
通过
i2cdetect -y -f <i2c_bus>命令探测sensor, 根据 硬件 设计 情况 填写 i2c_bus编号
7.5.2. ETH phy寄存器读取方法
uboot下
mii dump
mii read
7.5.3. Usb软件切换主从模式的方法
usb通过
* 利用debugfs
echo device > /sys/kernel/debug/usb/35100000.usb/mode                     #  usb3.0 port
echo host > /sys/kernel/debug/usb/35100000.usb/mode                       #  usb3.0 port

echo device > /sys/kernel/debug/usb/35300000.usb/mode                     #  usb2.0 port
echo host > /sys/kernel/debug/usb/35300000.usb/mode                       #  usb2.0 port

* 利用class/usb_role
echo device > /sys/class/usb_role/35100000.usb-role-switch/role            # usb3.0 port
echo host > /sys/class/usb_role/35100000.usb-role-switch/role              # usb3.0 port

echo device > /sys/class/usb_role/35300000.usb-role-switch/role            # usb2.0 port
echo host > /sys/class/usb_role/35300000.usb-role-switch/role              # usb2.0 port
7.6. 算法工具链类
7.6.1. 常见故障处理
7.6.1.1. hb_mapper checker 常见故障
背景hb_mapper checker )
在
故障hb_mapper checker 时
1.故障
  ERROR The shape of model input:input is [xxx] which has dimensions of 0.
  Please specify input-shape parameter.
故障
解决--input-shape "input_name input_shape" 来
2.故障
ERROR HorizonRT not support these cpu operators: {op_type}
故障
解决
3.故障
Unsupported op {op_type}
故障
解决
4.故障
  ERROR nodes:['{op_type}'] are specified as domain:xxx, which are not supported by official onnx.
  Please check whether these ops are official onnx ops or defined by yourself
故障
解决
7.6.1.2. hb_mapper makertbin常见故障
背景hb_mapper makertbin )
该
故障hb_mapper makertbin 时
1.故障
  Layer {op_name}
    xxx expect data shape range:[[xxx][xxx]], but the data shape is [xxx]
  Layer {op_name}
    Tensor xxx expects be n dimensions, but m provided
故障
解决
2.故障
ERROR There is an error in pass: {op_name}. Error message:xxx
故障
解决
3.故障
  Error There is an error in pass:constant_folding.
  Error message: Could not find an implementation for the node {op_name}
故障
解决
4.故障
  Start to parse the onnx model
  core dump
故障
解决
5.故障
  Start to calibrate/quantize the model
  core dump

  Start to compile the model
  core dump
故障
解决
6.故障
ERROR model conversion faild: Inferred shape and existing shape differ in dimension x: (n) vs (m)
故障
解决
7.故障
WARNING got unexpected input/output/sumin threshold on conv {op_name}! value: xxx
故障
解决
8.故障
ERROR hbdk-cc compile hbir model failed with returncode -n
故障
解决
9.故障
ERROR {op_type} only support 4 dim input
故障
解决
10.故障
ERROR {op_type} Not support this attribute/mode=xxx
故障
解决
11.故障
  ERROR There is no node can execute on BPU in this model,
  please make sure the model has at least one conv node which is supported by BPU.
故障
解决
12.故障
ERROR The opset version of the onnx model is n, only model with opset_version 10/11 is supported
故障
解决
13.故障
在
故障
解决
14.故障
ERROR unsupported model: BAYES-E not support excute one model on 2core simultaneously now
故障
解决
15.故障
ERROR : There is an ERROR during shape inference,···,The error model has been saved as shape_inference_fail.onnx
故障
解决.log 文件shape_inference_fail.onnx 提供
7.6.1.3. hb_model_modifier常见故障
背景hb_model_modifier 工具
故障hb_model_modifier 时
故障
ERROR Can not find value info {op_name}
故障
解决
7.6.1.4. hb_verifier常见故障
背景hb_verifier 工具
若hb_verifier 工具
若hb_verifier 工具
故障hb_verifier 时
故障
ERROR Quanti onnx and Arm result Strict check FAILED
故障
解决
7.6.1.5. hb_onnxruntime常见故障
背景hb_onnxruntime 主要
故障hb_onnxruntime 时
1.故障
  ERROR [ONNXRuntimeError] : 2:INVALID_ARGUMENT : Unexpected input data type.
  Actual: (N11onnxruntime17PrimitiveDataTypexxx), expected: (N11onnxruntime17PrimitiveDataTypexxx)
故障
解决
2.故障
  [libprotobuf FATAL google/protobuf/stubs/common.cc:83] This program was compiled against version 3.6.1 of the Protocol Buffer runtime library,
  which is not compatible with the installed version on (3.19.4).
故障
解决
7.6.1.6. libDNN常见故障
背景libDNN 主要
故障libDNN 时
1.故障
(common.h:79): HR:ERROR: op_name:xxx invalid attr key xxx
故障
解决
2.故障
(hb_dnn_ndarray.cpp:xxx): data type of ndarray do not match specified type. NDArray dtype_: n, given:m
故障
解决
3.故障
  (validate_util.cpp:xxx):tensor aligned shape size is xxx , but tensor hbSysMem memSize is xxx,
  tensor hbSysMem memSize should >= tensor aligned shape size!
故障
解决hrt_model_exec model_info查看input节点aligned shape,是aligned shape*size_of(tensor type)来libDNN版本hbDNNTensorProperties.alignedByteSize来libDNN 版本aligned shape*size_of(tensor type)来
4.故障
(bpu_model_info.cpp:xxx): HR:ERROR: hbm model input feature names must be equal to graph node input names
故障
解决
7.6.2. 模型量化及上板使用技巧
7.6.2.1. Transformer使用说明
本
在
图片
数据 为 三维数据,但地瓜 提供 的transformer都 是 以 四维数据的方式 来 进行 获取 和 处理 的,transformer只会 对 输入 数据 中 的 第0张图片做 该 操作。
AddTransformer
说明:
对
参数:
value: 对
每个 像素 做 增加 的 数值, 注意value的 取值 可以 为 负数, 如 -128。
使用
  # 对图像数据做减去128的操作
  AddTransformer(-128)

  # 对图像数据做增加127的操作
  AddTransformer(127)
MeanTransformer
说明:
对
参数:
means: 对
每个 像素 做 增加 的 数值, 注意value的 取值 可以 为 负数, 如 -128。 data_format: 输入
的layout类型,取值 范围 为[”CHW”,”HWC”], 默认 “CHW”。
使用
  # 每个像素减去128.0 输入的类型为CHW
  MeanTransformer(np.array([128.0, 128.0, 128.0]))

  # 每个像素减去不同的数值,103.94, 116.78, 123.68,输入的类型为 HWC
  MeanTransformer(np.array([103.94, 116.78, 123.68]), data_format="HWC")
ScaleTransformer
说明:
对
参数:
scale_value: 需要
乘以 的 系数,如0.0078125 或者1/128。
使用
  # 将取值范围-128~127,所有的像素的调整到-1~1之间
  ScaleTransformer(0.0078125)
  # 或者
  ScaleTransformer(1/128)
NormalizeTransformer
说明:
用于
参数:
std:输入
的 第一张 图片,需要 除以 的 数值。
使用
  # 将取值范围[-128, 127] 所有的像素的调整到-1~1之间
  NormalizeTransformer(128)
TransposeTransformer
说明:
用于
参数:
order: 对
输入 图片 做layout转换 后 的 顺序(顺序 与 原有 的layout顺序 有关)。如:HWC的 顺序 为0,1,2,需要 转为CHW时,order为(2,0,1)。
使用
  # HWC转到CHW
  TransposeTransformer((2, 0, 1))
  # CHW转到HWC
  TransposeTransformer((1, 2, 0))
HWC2CHWTransformer
说明:
用于
参数:不
使用
  # NHWC转到NCHW
  HWC2CHWTransformer()
CHW2HWCTransformer
说明:
用于
参数:不
使用
  # NCHW转到 NHWC
  CHW2HWCTransformer()
CenterCropTransformer
说明:
以
参数:
crop_size: 中心
裁剪 的 正方形 的 边长size。 data_type: 输出
结果 的 类型,取值 范围 为[”float”, “uint8”]。
使用
  # 以224*224的方式,做中心裁剪,默认输出类型为float32
  CenterCropTransformer(crop_size=224)

  # 以224*224的方式,做中心裁剪,输出类型为uint8
  CenterCropTransformer(crop_size=224, data_type="uint8")
PILCenterCropTransformer
说明:
使用PIL的
参数:
size: 中心
裁剪 的 正方形 的 边长size。
使用
  # 以224*224的方式,使用PIL的方式做中心裁剪
  PILCenterCropTransformer(size=224)
LongSideCropTransformer
说明:
用于
当
当70*(100-70)/2+70 ,即70* 85大小
参数:不
使用
LongSideCropTransformer()
PadResizeTransformer
说明:
使用
参数:
target_size:目标
大小,值为 元组,如(240,240)。 pad_value:填充
到 数组 中 的 值,默认值 为127。 pad_position:填充
的 位置,取值 范围 为[”boundary”, “bottom_right”],默认值 为 “boundary”。
使用
  # 裁剪一个大小为512*512,填充到右下角,填充值为0
  PadResizeTransformer((512, 512), pad_position='bottom_right', pad_value=0)

  # 裁剪一个大小为608*608,填充到边框,填充值为 127
  PadResizeTransformer(target_size=(608, 608))
ResizeTransformer
说明:
用于
参数:
target_size:目标
大小,值为 元组,如(240,240)。 mode:图片
处理 模式,取值 范围 为(”skimage”,”opencv”),默认值 为 “skimage”。 method:插值
的 方法,此参数 仅 在mode为skimage时 生效。取值 范围 为0-5,默认值 为1,其中: 0代表Nearest-neighbor;
1代表Bi-linear(default);
2代表Bi-quadratic;
3代表Bi-cubic;
4代表Bi-quartic;
5代表Bi-quintic。
data_type:输出
的 类型,取值 范围 为(uint8,float),默认 为float类型。当 被 设置 为uint8时,输出 类型 为uint8 ,其他 情况 为float32。 interpolation:插值
的 方法,此参数 仅 在mode为opencv时 生效。默认 为空,取值 范围 为(opencv的 插值 方式), 目前interpolation仅 支持 为空 或opencv中 的INTER_CUBIC两种 插值 方法,当interpolation为 空时,默认 使用INTER_LINEAR方式。 以下
为opencv中 支持 的 插值 方式 及 说明(目前 未 支持 的 插值 方式 将 在 后续 迭代 中 逐步 支持): INTER_NEAREST,最近
邻 插值; INTER_LINEAR,双
线性插值,当interpolation为 空时,默认 使用 这种 方法。 INTER_CUBIC,双
三次 插值4x4像素 邻域 内 的 双 立方 插值。 INTER_AREA,使用
像素 面积 关系 重 采样。它 可能 是 图像 抽取 的 首选 方法,因为 它 可以 提供 无莫尔 条纹 的 结果。但是 当 图像 被 缩放 时,它 类似 于INTER_NEAREST方法。 INTER_LANCZOS4,8x8邻域
的Lanczos插值。 INTER_LINEAR_EXACT,位
精确 双 线性插值。 INTER_NEAREST_EXACT,位
精确 最近 邻 插值。这 将 产生 与PIL、scikit-image或Matlab中 的 最近 邻 方法 相同 的 结果。 INTER_MAX,插值
代码 的 掩码。 WARP_FILL_OUTLIERS,标志,填充
所有 目标 图像 像素。如果 其中 一些 对应 于源 图像 中 的 异常 值,则 将 它们 设置 为 零。 WARP_INVERSE_MAP,标志,逆变换。
使用
  # 将输入图片大小调整为224*224,采用 opencv 的方式处理图片,插值的方式为双线性,输出为float32
  ResizeTransformer(target_size=(224, 224), mode='opencv', method=1)

  # 将输入图片大小调整为256*256,采用skimage的方式处理图片,插值的方式为双线性,输出为float32
  ResizeTransformer(target_size=(256, 256))

  # 将输入图片大小调整为256*256,采用skimage的方式处理图片,插值的方式为双线性,输出为uint8
  ResizeTransformer(target_size=(256, 256), data_type="uint8")
PILResizeTransformer
说明:
使用PIL库
参数:
size:目标
大小,值为 元组,如(240,240)。 interpolation:指定
插值 的 方式,取值 范围:(Image.NEAREST,Image.BILINEAR,Image.BICUBIC,Image.LANCZOS), 默认值 为Image.BILINEAR。 Image.NEAREST:最近
邻 采样; Image.BILINEAR:线性插值;
Image.BICUBIC:三次
样条 插值; Image.LANCZOS:高质量
下 采样 滤波器。
使用
  # 将输入图片大小调整为256*256 插值的方式为线性插值
  PILResizeTransformer(size=256)

  # 将输入图片大小调整为256*256 插值的方式为高质量下采样滤波器
  PILResizeTransformer(size=256, interpolation=Image.LANCZOS)
ShortLongResizeTransformer
说明:
按照
先
以short_size的 大小 除以 原图片 的 宽 和 高里 最小值,以 这个 值为 缩放 比例 系数。 当
缩放 比例 系数 乘以 原图片 的 宽 和 高中 的 最大值,得到 的 结果 大于long_size的 数值 时,缩放 比例 系数 将 变更 为long_size除以 原图片 的 宽 和 高中 的 最大值。 使用opencv中
的resize方法,根据 上方 得到 的 缩放 比例 系数 重新 裁剪 图片。
参数:
short_size:预期
裁剪 后 的 短边 的 长度。 long_size:预期
裁剪 后 的 长 边 的 长度。 include_im:默认值
为True,设置 为True时, 会 在 返回 时 除了 返回 处理 后 的 图片, 还会 返回 原图片。
使用
  # 短边长度为20,长边长度为100,返回处理后的图片及原图片
  ShortLongResizeTransformer(short_size=20, long_size=100)
PadTransformer
说明:
通过
参数:
size_divisor:大小
除数 ,默认值 为128。 target_size:目标
大小,默认值 为512。
使用
  # pad大小为1024*1024
  PadTransformer(size_divisor=1024, target_size=1024)
ShortSideResizeTransformer
说明:
根据
参数:
short_size:预期
的 短边 的 长度。 data_type:输出
结果 的 类型,取值 范围 为(”float”,”uint8”),默认 取值”float32”, 以 float32 类型 输出,设置 为uint8时,输出 类型 将 为uint8。 interpolation:指定
插值 的 方式,取值 范围 为 opencv 中 采用 的 插值 方式,默认 为空。 目前interpolation仅
支持 为空 或opencv中 的INTER_CUBIC两种 插值 方法,当interpolation为 空时,默认 使用INTER_LINEAR方式。 以下
为opencv中 支持 的 插值 方式 及 说明(目前 未 支持 的 插值 方式 将 在 后续 迭代 中 逐步 支持): INTER_NEAREST,最近
邻 插值; INTER_LINEAR,双
线性插值,当interpolation为 空时,默认 使用 这种 方法。 INTER_CUBIC,双
三次 插值4x4像素 邻域 内 的 双 立方 插值。 INTER_AREA,使用
像素 面积 关系 重 采样。它 可能 是 图像 抽取 的 首选 方法,因为 它 可以 提供 无莫尔 条纹 的 结果。但是 当 图像 被 缩放 时,它 类似 于INTER_NEAREST方法。 INTER_LANCZOS4,8x8邻域
的Lanczos插值。 INTER_LINEAR_EXACT,位
精确 双 线性插值。 INTER_NEAREST_EXACT,位
精确 最近 邻 插值。这 将 产生 与PIL、scikit-image或Matlab中 的 最近 邻 方法 相同 的 结果。 INTER_MAX,插值
代码 的 掩码。 WARP_FILL_OUTLIERS,标志,填充
所有 目标 图像 像素。如果 其中 一些 对应 于源 图像 中 的 异常 值,则 将 它们 设置 为 零。 WARP_INVERSE_MAP,标志,逆变换。
使用
  # 将短边大小调整为256,插值方式为双线性插值
  ShortSideResizeTransformer(short_size=256)

  # 将短边大小调整为256,插值方式为8x8像素邻域内的Lanczos插值
  ShortSideResizeTransformer(short_size=256, interpolation=Image.LANCZOS4)
PaddedCenterCropTransformer
说明:
使用
.. attention::
仅
计算
计算
系数,int((float( image_size ) / ( image_size + crop_pad ))。 计算中心size的
大小, 系数 * np.minimum( 原始 图片 的 高度, 原始 图片 的 宽度 ))。 根据
计算出来 的size大小,做 中心 裁剪。
参数:
image_size:图片
的 大小,默认值 为224。 crop_pad:中心
填充 的 大小,默认值 为32。
使用
  # 裁剪大小为240*240,填充值为32
  PaddedCenterCropTransformer(image_size=240, crop_pad=32)

  # 裁剪大小为224*224,填充值为32
  PaddedCenterCropTransformer()
BGR2RGBTransformer
说明:
将
参数:
data_format:数据格式,取值
范围 为(CHW,HWC),默认值 为CHW。
使用
  # layout为NCHW时,做BGR转为RGB
  BGR2RGBTransformer()

  # layout为NHWC时,做BGR转为RGB
  BGR2RGBTransformer(data_format="HWC")
RGB2BGRTransformer
说明:
将
参数:
data_format:数据格式,取值
范围 为(CHW,HWC),默认值 为CHW。
使用
  # layout为NCHW时,做RGB转成BGR
  RGB2BGRTransformer()

  # layout为NHWC时,做RGB转成BGR
  RGB2BGRTransformer(data_format="HWC")
RGB2GRAYTransformer
说明:
将
参数:
data_format:输入
的layout类型,取值 范围(”CHW”,”HWC”),默认 为”CHW”。
使用
  # layout为NCHW时,做RGB转成GRAY
  RGB2GRAYTransformer(data_format='CHW')

  # layout为NHWC时,做RGB转成GRAY
  RGB2GRAYTransformer(data_format='HWC')
BGR2GRAYTransformer
说明:
将
参数:
data_format:输入
的layout类型,取值 范围 [”CHW”,”HWC”],默认值 为”CHW”。
使用
  # layout为NCHW时,做BGR转成GRAY
  BGR2GRAYTransformer(data_format='CHW')

  # layout为NHWC时,做BGR转成GRAY
  BGR2GRAYTransformer(data_format='HWC')
RGB2GRAY_128Transformer
说明:
输入
参数:
data_format:输入
的layout类型,取值 范围 为[”CHW”,”HWC”],默认值 为”CHW”,此项 为 必填 项。
使用
  # layout为NCHW时,做RGB转成GRAY_128
  RGB2GRAY_128Transformer(data_format='CHW')

  # layout为NHWC时,做RGB转成GRAY_128
  RGB2GRAY_128Transformer(data_format='HWC')
RGB2YUV444Transformer
说明:
将
参数:
data_format:输入
的layout类型,取值 范围 为[”CHW”, “HWC”],默认值 为”CHW”,此项 为 必填 项。
使用
  # layout为NCHW时,做BGR转成YUV444
  BGR2YUV444Transformer(data_format='CHW')

  # layout为NHWC时,做BGR转成YUV444
  BGR2YUV444Transformer(data_format='HWC')
BGR2YUV444Transformer
说明:
将
参数:
data_format:输入
的layout类型,取值 范围 为[”CHW”,”HWC”],默认值 为 “CHW”,此项 为 必填 项。
使用
  # layout为NCHW时,做BGR转成YUV444
  BGR2YUV444Transformer(data_format='CHW')

  # layout为NHWC时,做BGR转成YUV444
  BGR2YUV444Transformer(data_format='HWC')
BGR2YUV444_128Transformer
说明:
将
参数:
data_format:输入
的layout类型,取值 范围 为[”CHW”,”HWC”],默认值 为 “CHW”,此项 为 必填 项。
使用
  # layout为NCHW时,做BGR转成YUV444_128
  BGR2YUV444_128Transformer(data_format='CHW')

  # layout为NHWC时,做BGR转成YUV444_128
  BGR2YUV444_128Transformer(data_format='HWC')
RGB2YUV444_128Transformer
说明:
将
参数:
data_format:输入
的layout类型,取值 范围 为[”CHW”,”HWC”],默认值 为”CHW”,此项 为 必填 项。
使用
  # layout为NCHW时,做RGB转成 YUV444_128
  RGB2YUV444_128Transformer(data_format='CHW')

  # layout为NHWC时,做RGB转成 YUV444_128
  RGB2YUV444_128Transformer(data_format='HWC')
BGR2YUVBT601VIDEOTransformer
说明:
将
YUV_BT601_Video_Range,某些
参数:
data_format:输入
的layout类型,取值 范围 为[”CHW”,”HWC”],默认值 为”CHW”,此项 为 必填 项。
使用
  # layout为 NCHW时,做BGR转成YUV_BT601_Video_Range
  BGR2YUVBT601VIDEOTransformer(data_format='CHW')

  # layout为NHWC时,做BGR转成YUV_BT601_Video_Range
  BGR2YUVBT601VIDEOTransformer(data_format='HWC')
RGB2YUVBT601VIDEOTransformer
说明:
将
YUV_BT601_Video_Range,某些
参数:
data_format:输入
的layout类型,取值 范围 为[”CHW”,”HWC”],默认值 为”CHW”,此项 为 必填 项。
使用
  # layout为NCHW时,做RGB转成YUV_BT601_Video_Range
  RGB2YUVBT601VIDEOTransformer(data_format='CHW')

  # layout为NHWC时,做RGB转成YUV_BT601_Video_Range
  RGB2YUVBT601VIDEOTransformer(data_format='HWC')
YUVTransformer
说明:
将
参数:
color_sequence:颜色
序列,此项 为 必填 项。
使用
  # 将BGR读入的图片转为YUV444
  YUVTransformer(color_sequence="BGR")

  # 将RGB读入的图片转为YUV444
  YUVTransformer(color_sequence="RGB")
ReduceChannelTransformer
说明:
将C通道1*3*224*224 改为1*1*224*224。 使用
参数:
data_format:输入
的layout类型,取值 范围 为[”CHW”, “HWC”],默认值 为”CHW”。
使用
  # 删除layout为NCHW的C通道
  ReduceChannelTransformer()
  # 或者
  ReduceChannelTransformer(data_format="CHW")

  # 删除layout为NHWC的C通道
  ReduceChannelTransformer(data_format="HWC")
BGR2NV12Transformer
说明:
将
参数:
data_format:输入
的layout类型,取值 范围 为[”CHW”,”HWC”],默认值 为”CHW”。 cvt_mode:cvt模式,取值
范围 为(rgb_calc,opencv),默认值 为rgb_calc。 rgb_calc,采用mergeUV的
方式 处理 图片; opencv,采用opencv的
方式 处理 图片。
使用
  # layout为NCHW时,由BGR转为NV12,采用rgb_calc模式处理图片
  BGR2NV12Transformer()
  # 或者
  BGR2NV12Transformer(data_format="CHW")

  # layout为NHWC时,由BGR转为NV12,采用opencv模式处理图片
  BGR2NV12Transformer(data_format="HWC", cvt_mode="opencv")
RGB2NV12Transformer
说明:
将
参数:
data_format:输入
的 layout 类型,取值 范围 [”CHW”, “HWC”], 默认值 为”CHW”。 cvt_mode:cvt模式,取值
范围 为(rgb_calc,opencv),默认值 为rgb_calc。 rgb_calc,采用mergeUV的
方式 处理 图片; opencv,采用opencv的
方式 处理 图片。
使用
  # layout为NCHW时,有RGB转为NV12,采用rgb_calc模式处理图片
  RGB2NV12Transformer()
  # 或者
  RGB2NV12Transformer(data_format="CHW")

  # layout为NHWC时,有RGB转为NV12,采用opencv模式处理图片
  RGB2NV12Transformer(data_format="HWC", cvt_mode="opencv")
NV12ToYUV444Transformer
说明:
将
参数:
target_size:目标
大小,值为 元组,如(240,240)。 yuv444_output_layout:yuv444输出
的layout,取值 范围 为(HWC,CHW),默认值 为”HWC”。
使用
  # layout为NCHW ,大小为768*768, nv12转yuv444
  NV12ToYUV444Transformer(target_size=(768, 768))

  # layout为NHWC ,大小为224*224, nv12转yuv444
  NV12ToYUV444Transformer((224, 224), yuv444_output_layout="HWC")
WarpAffineTransformer
说明:
用于
参数:
input_shape:输入
的shape值。 scale:乘以
的 系数。
使用
  # 大小为512*512,长边长度为1.0
  WarpAffineTransformer((512, 512), 1.0)
F32ToS8Transformer
说明:
用于
参数:不
使用
  # 输入格式从 float32转为 int8
  F32ToS8Transformer()
F32ToU8Transformer
说明:
用于
参数:不
使用
  # 输入格式从 float32 转为 uint8
  F32ToU8Transformer()
7.6.2.2. 示例YOLOv5x模型使用说明
YOLOv5x模型:
可以
从URL:yolov5-2.0 中 下载 相应 的pt文件。 在clone代码
时,请 确认 您 使用 的Tags是 v2.0,否则将 导致 转换 失败。 md5sum码:
| md5sum | File |
|---|---|
| 2e296b5e31bf1e1b6b8ea4bf36153ea5 | yolov5l.pt |
| 16150e35f707a2f07e7528b89c032308 | yolov5m.pt |
| 42c681cf466c549ff5ecfe86bcc491a0 | yolov5s.pt |
| 069a6baa2a741dec8a2d44a9083b6d6e | yolov5x.pt |
为了
更好 地 适配 后处理 代码,我们 在ONNX模型 导出 前 对Github代码 做 了 如下 修改 (代码 参见:https://github.com/ultralytics/yolov5/blob/v2.0/models/yolo.py):
    def forward(self, x):
        # x = x.copy()  # for profiling
        z = []  # inference output
        self.training |= self.export
        for i in range(self.nl):
            x[i] = self.m[i](x[i])  # conv
            bs, _, ny, nx = x[i].shape  # x(bs,255,20,20) to x(bs,3,20,20,85)
            #  x[i] = x[i].view(bs, self.na, self.no, ny, nx).permute(0, 1, 3, 4, 2).contiguous()
            x[i] = x[i].permute(0, 2, 3, 1).contiguous()
说明: 去
除了 每个 输出 分支 尾部 从4维到5维 的reshape(即 不 将channel从255拆 分成3x85),然后 将layout从NHWC转换成NCHW再 输出。 以下
左图 为 修改 前 的 模型 某一 输出 节点 的 可视化 图,右图 则 为 修改 后 的 对应 输出 节点 可视化 图。 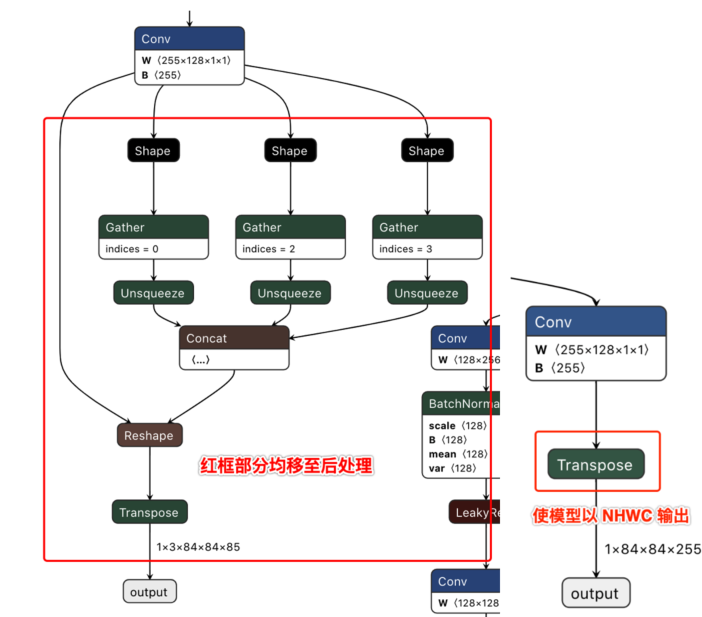
下载
完成 后 通过 脚本 https://github.com/ultralytics/yolov5/blob/v2.0/models/export.py 进行pt文件 到ONNX文件 的 转换。 注意事项
在
使用export.py脚本 时,请 注意: 由于
地瓜AI工具链 支持 的ONNX opset版本 为 10和11,请将 torch.onnx.export的opset_version参数根据 您 要 使用 的 版本 进行 修改。 将
torch.onnx.export部分的 默认 输入 名称 参数 由 'images'改为'data',与模型 转换 示例 包 的YOLOv5x示例 脚本 保持一致。 将
parser.add_argument部分中 默认 的 数据 输入 尺寸640x640改为 模型 转换 示例 包YOLOv5x示例 中 的672x672。
7.6.2.3. 模型精度调优checklist
请
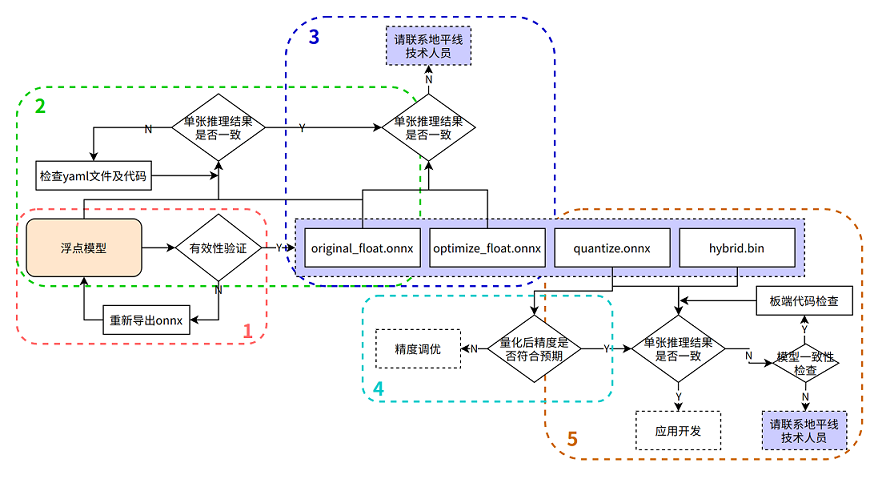
在
1. 验证浮点onnx模型的推理结果
进入
可
  from horizon_tc_ui import HB_ONNXRuntime
  import numpy as np
  import cv2

  def preprocess(input_name):
      # BGR->RGB、Resize、CenterCrop···
      # HWC->CHW
      # normalization
      return data

  def main():
      # 加载模型文件
      sess = HB_ONNXRuntime(model_file=MODEL_PATH)
      # 获取输入&输出节点名称
      input_names = [input.name for input in sess.get_inputs()]
      output_names = [output.name for output in sess.get_outputs()]
      # 准备模型输入数据
      feed_dict = dict()
      for input_name in input_names:
          feed_dict[input_name] = preprocess(input_name)

      # 原始浮点onnx,数据dtype=float32, 开始模型推理,推理的返回值是一个list,依次与output_names指定名称一一对应
      outputs = sess.run(output_names, feed_dict)

      # 后处理
      postprocess(outputs)

  if __name__ == '__main__':
      main()
2. 验证yaml配置文件以及前、后处理代码的正确性
测试 original_float.onnx 模型
使用original_float.onnx 模型,并HzPreprocess 算子数据预处理 需要data_format 和 input_type。
由于HzPreprocess节点norm_type 配置参数说明 内容,另外
理想-128 的featuremap 数据类型不需要-128 的
可
数据horizon_model_convert_sample 示例
  from horizon_tc_ui import HB_ONNXRuntime
  import numpy as np
  import cv2

  def preprocess(input_name):
      # BGR->RGB、Resize、CenterCrop···
      # HWC->CHW(通过onnx模型输入节点的具体shape来判断是否需要做layout转换)
      # normalization(若已通过yaml文件将norm操作放入了模型中,则不要在预处理中做重复操作)
      #-128(除featuremap输入外,其他类型输入均需做-128操作,即由unit8转为int8)
      return data

  def main():
      # 加载模型文件
      sess = HB_ONNXRuntime(model_file=MODEL_PATH)
      # 获取输入&输出节点名称
      input_names = [input.name for input in sess.get_inputs()]
      output_names = [output.name for output in sess.get_outputs()]
      # 准备模型输入数据
      feed_dict = dict()
      for input_name in input_names:
          feed_dict[input_name] = preprocess(input_name)
      #图像输入的模型(RGB/BGR/NV12/YUV444/GRAY),数据dtype= uint8, featuremap模型,数据dtype=float32,
      outputs = sess.run(output_names, feed_dict)

      # 后处理
      postprocess(outputs)

  if __name__ == '__main__':
      main()
3. 验证模型的图优化阶段未引入精度误差
测试 optimize_float.onnx 模型
使用optimize_float.onnx 模型,并HzPreprocess 算子data_format和 input_type;
optimize_float.onnx模型
数据horizon_model_convert_sample 示例
  from horizon_tc_ui import HB_ONNXRuntime
  import numpy as np
  import cv2

  def preprocess(input_name):
      # BGR->RGB、Resize、CenterCrop···
      # HWC->CHW(通过onnx模型输入节点的具体shape来判断是否需要做layout转换)
      # normalization(若已通过yaml文件将norm操作放入了模型中,则不要在预处理中做重复操作)
      #-128(除featuremap输入外,其他类型输入均需做-128操作,即由unit8转为int8)
      return data

  def main():
      # 加载模型文件
      sess = HB_ONNXRuntime(model_file=MODEL_PATH)
      # 获取输入&输出节点名称
      input_names = [input.name for input in sess.get_inputs()]
      output_names = [output.name for output in sess.get_outputs()]
      # 准备模型输入数据
      feed_dict = dict()
      for input_name in input_names:
          feed_dict[input_name] = preprocess(input_name)
      #图像输入的模型(RGB/BGR/NV12/YUV444/GRAY),数据dtype= uint8, featuremap模型,数据dtype=float32
      outputs = sess.run(output_names, feed_dict)

      # 后处理
      postprocess(outputs)

  if __name__ == '__main__':
      main()
4. 验证量化精度是否满足预期
测试quantized.onnx的
使用quantized.onnx 模型,并HzPreprocess 算子data_format和 input_type;
quantized.onnx模型
数据horizon_model_convert_sample 示例
  from horizon_tc_ui import HB_ONNXRuntime
  import numpy as np
  import cv2

  def preprocess(input_name):
      # BGR->RGB、Resize、CenterCrop···
      # HWC->CHW(通过onnx模型输入节点的具体shape来判断是否需要做layout转换)
      # normalization(若已通过yaml文件将norm操作放入了模型中,则不要在预处理中做重复操作)
      #-128(除featuremap输入外,其他类型输入均需做-128操作,即由unit8转为int8)
      return data

  def main():
      # 加载模型文件
      sess = HB_ONNXRuntime(model_file=MODEL_PATH)
      # 获取输入&输出节点名称
      input_names = [input.name for input in sess.get_inputs()]
      output_names = [output.name for output in sess.get_outputs()]
      # 准备模型输入数据
      feed_dict = dict()
      for input_name in input_names:
          feed_dict[input_name] = preprocess(input_name)
      #图像输入的模型(RGB/BGR/NV12/YUV444/GRAY),数据dtype= uint8,featuremap模型,数据dtype=float32
      outputs = sess.run(output_names, feed_dict)

      # 后处理
      postprocess(outputs)

  if __name__ == '__main__':
      main()
5. 确保模型编译过程无误且板端推理代码正确
使用 hb_verifier 工具
hb_verifier 工具(详细
若
若quantized.onnx与.bin模型
7.6.2.4. 模型量化yaml配置文件模板
Caffe模型量化yaml文件模板
请必选参数 的
# Copyright (c) 2020 Horizon Robotics.All Rights Reserved.

# 模型转化相关的参数
model_parameters:

  # 必选参数
  # Caffe浮点网络数据模型文件, 例如:caffe_model: './horizon_ultra_caffe.caffemodel'
  caffe_model: ''

  # 必选参数
  # Caffe网络描述文件, 例如:prototxt: './horizon_ultra_caffe.prototxt'
  prototxt: ''

  march: "bayes-e"
  layer_out_dump: False
  working_dir: 'model_output'
  output_model_file_prefix: 'horizon_x5'

# 模型输入相关参数
input_parameters:

  input_name: ""
  input_shape: ''
  input_type_rt: 'nv12'
  input_layout_rt: ''

  # 必选参数
  # 原始浮点模型训练框架中所使用训练的数据类型,可选的值为rgb/bgr/gray/featuremap/yuv444, 例如:input_type_train: 'bgr'
  input_type_train: ''

  # 必选参数
  # 原始浮点模型训练框架中所使用训练的数据排布, 可选值为 NHWC/NCHW, 例如:input_layout_train: 'NHWC'
  input_layout_train: ''

  #input_batch: 1

  # 必选参数
  # 原始浮点模型训练框架中所使用数据预处理方法,可配置:no_preprocess/data_mean/data_scale/data_mean_and_scale
  # no_preprocess 不做任何操作,对应的 mean_value  或者 scale_value 均无需配置
  # data_mean 减去通道均值mean_value,对应的 mean_value 需要配置,并注释掉scale_value
  # data_scale 对图像像素乘以data_scale系数,对应的 scale_value需要配置,并注释掉mean_value
  # data_mean_and_scale 减去通道均值后再乘以scale系数,标识下方对应的 mean_value  和 scale_value 均需配置
  norm_type: ''

  # 必选参数
  # 图像减去的均值, 如果是通道均值,value之间必须用空格分隔
  # 例如:mean_value: 128.0 或者 mean_value: 111.0 109.0 118.0
  mean_value:

  # 必选参数
  # 图像预处理缩放比例,如果是通道缩放比例,value之间必须用空格分隔,计算公式:scale = 1/std
  # 例如:scale_value: 0.0078125 或者 scale_value: 0.0078125 0.001215 0.003680
  scale_value:

# 模型量化相关参数
calibration_parameters:

  # 必选参数
  # 模型量化的参考图像的存放目录,图片格式支持Jpeg、Bmp等格式,图片来源一般是从测试集中选择100张图片,并要覆盖典型场景,不要是偏僻场景,如过曝光、饱和、模糊、纯黑、纯白等图片
  # 请根据 02_preprocess.sh 脚本中的文件夹路径来配置,例如:cal_data_dir: './calibration_data_yuv_f32'
  cal_data_dir: ''

  cal_data_type: 'float32'
  calibration_type: 'default'

# 编译器相关参数
compiler_parameters:

  compile_mode: 'latency'
  debug: False
  optimize_level: 'O3'
ONNX模型量化yaml文件模板
请必选参数 的
# Copyright (c) 2020 Horizon Robotics.All Rights Reserved.

# 模型转化相关的参数
model_parameters:

  # 必选参数
  # Onnx浮点网络数据模型文件, 例如:onnx_model: './horizon_ultra_onnx.onnx'
  onnx_model: ''

  march: "bayes-e"
  layer_out_dump: False
  working_dir: 'model_output'
  output_model_file_prefix: 'horizon_ultra'

# 模型输入相关参数
input_parameters:

  input_name: ""
  input_shape: ''
  input_type_rt: 'nv12'
  input_layout_rt: ''

  # 必选参数
  # 原始浮点模型训练框架中所使用训练的数据类型,可选的值为rgb/bgr/gray/featuremap/yuv444, 例如:input_type_train: 'bgr'
  input_type_train: ''

  # 必选参数
  # 原始浮点模型训练框架中所使用训练的数据排布, 可选值为 NHWC/NCHW, 例如:input_layout_train: 'NHWC'
  input_layout_train: ''

  #input_batch: 1

  # 必选参数
  # 原始浮点模型训练框架中所使用数据预处理方法,可配置:no_preprocess/data_mean/data_scale/data_mean_and_scale
  # no_preprocess 不做任何操作,对应的 mean_value  或者 scale_value 均无需配置
  # data_mean 减去通道均值mean_value,对应的 mean_value 需要配置,并注释掉scale_value
  # data_scale 对图像像素乘以data_scale系数,对应的 scale_value需要配置,并注释掉mean_value
  # data_mean_and_scale 减去通道均值后再乘以scale系数,标识下方对应的 mean_value  和 scale_value 均需配置
  norm_type: ''

  # 必选参数
  # 图像减去的均值, 如果是通道均值,value之间必须用空格分隔
  # 例如:mean_value: 128.0 或者 mean_value: 111.0 109.0 118.0
  mean_value:

  # 必选参数
  # 图像预处理缩放比例,如果是通道缩放比例,value之间必须用空格分隔,计算公式:scale = 1/std
  # 例如:scale_value: 0.0078125 或者 scale_value: 0.0078125 0.001215 0.003680
  scale_value:

# 模型量化相关参数
calibration_parameters:

  # 必选参数
  # 模型量化的参考图像的存放目录,图片格式支持Jpeg、Bmp等格式,图片来源一般是从测试集中选择100张图片,并要覆盖典型场景,不要是偏僻场景,如过曝光、饱和、模糊、纯黑、纯白等图片
  # 请根据 02_preprocess.sh 脚本中的文件夹路径来配置,例如:cal_data_dir: './calibration_data_yuv_f32'
  cal_data_dir: ''

  cal_data_type: 'float32'
  calibration_type: 'default'

# 编译器相关参数
compiler_parameters:

  compile_mode: 'latency'
  debug: False
  optimize_level: 'O3'
7.6.2.5. 定点.bin模型上板多batch使用说明
1.模型
转换 时,在yaml配置文件 里 通过input_batch配置batch_size; 2.上板bin模型
输入 时,以 原始 模型 维度1×3×224×224,修改input_batch为10,也 就是10×3×224×224这个 维度 举例: 准备
数据: Image图像
数据:设置 aligned_shape = valid_shape,然后按 单张 数据 准备 的 方式,把10张 图片 依次 按 顺序 写入 申请 的 内存空间; FeatureMap数据:按aligned_shape把
数据padding好,然后 按单batch数据 准备 的 方式,把10份 数据 依次 按 顺序 写入 申请 的 内存空间,模型 推理 流程 和 单batch模型 推理 流程 一致;
7.6.2.6. 自定义算子开发说明
简介
地瓜
自定义
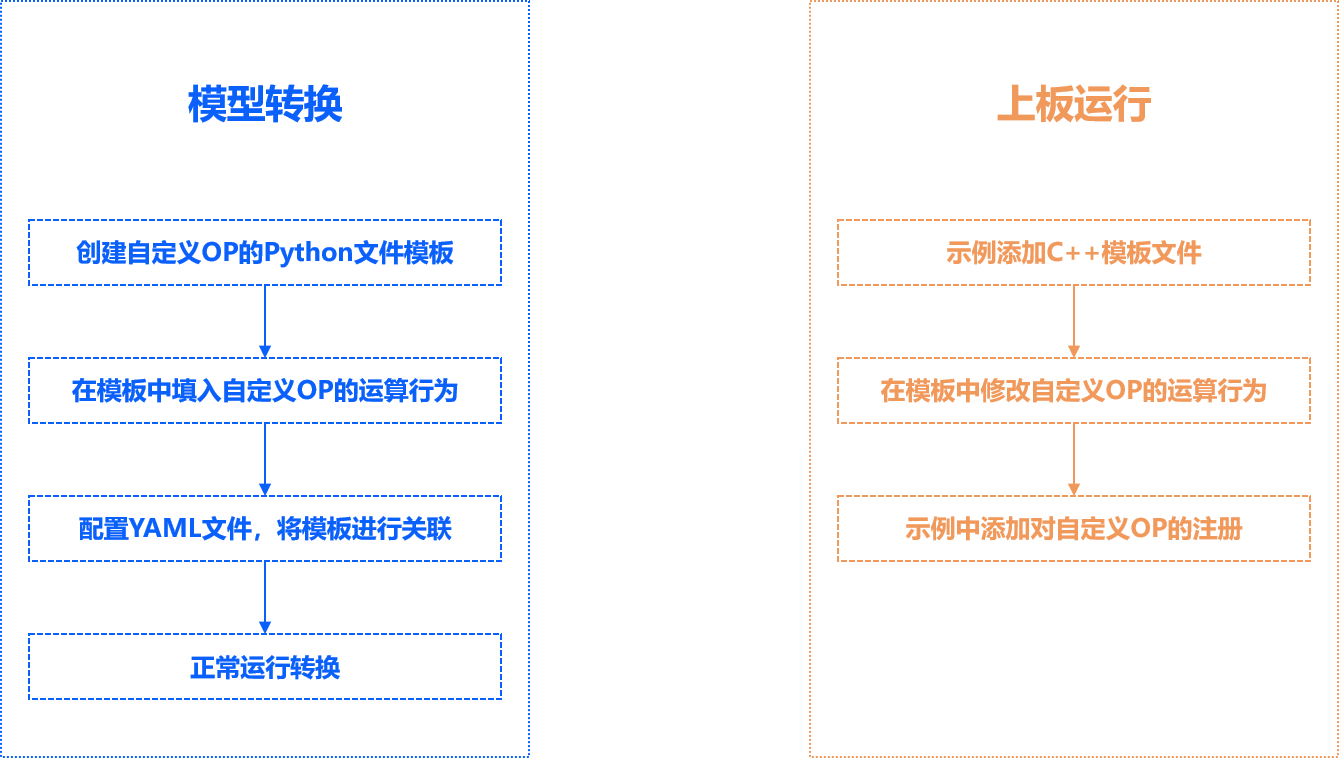
如图所示,定义
含自定义算子的模型转换
模型文件修改
在Caffe 模型ONNX 模型
Caffe 模型
原始Custom,并custom_param,示例
  layer {
    name: "hr_op"
    type: "Custom"
    bottom: "res3d_in"
    top: "res3d"
    custom_param {
      kind: "CustomIdentity"
      shape {
        dim: 1
        dim: 512
        dim: 28
        dim: 28
      }
      params: "'kernel_size': 10 \n'threshold': 0.5"
    }
  }
以上custom_param 示例
kind是自定义 算子 的 内部 实现 名称,该 自定义OP为 恒等OP,因此 命名 为 CustomIdentity,该名称 在 后续Python及C++代码 中均 会 体现。 shape是算子 的 输出 尺寸,需要 完整 指定。 params是算子 的 传入 参数 指定 形式 为 'param_name': param_value,多个参数 之间 使用 \n分隔。
在
  #...

  custom_op:
    # 自定义op的校准方式
    custom_op_method: register

    # 自定义OP的实现文件
    op_register_files: sample_custom.py
对于 Caffe 模型,以上custom_op_method 固定register。
op_register_files 是
完成
ONNX 模型
1.含有
从pytorch等
其他 框架 转换 而 来
import torch
from horizon_nn.horizon_onnx.onnx_pb import TensorProto
from torch.onnx.symbolic_helper import parse_args
from torch.onnx.utils import register_custom_op_symbolic
from torch import Tensor

model = torch.hub.load('pytorch/vision:v0.10.0', 'googlenet', pretrained=True)

def _transform_input(x: Tensor) -> Tensor:
    return x

model._transform_input = _transform_input

@parse_args("v", "v")
def horizon_pool(g, input, output_size):
    return g.op(
        'horizon.custom::PyOp', #required, ! must be 'horizon.custom' domain !
        input,
        class_name_s="GlobalAveragePool",  #required ! must match the class def name in sample_custom python file !
        compute_s="compute",  #optional, 'compute' by default
        module_s="sample_custom",  #required ! must match the file name of the "op_register_files" !
        input_types_i=[TensorProto.FLOAT],  #required
        output_types_i=[TensorProto.FLOAT],  #required
        output_shape_s=["1, 1024, 1, 1"]) #required

d_input = torch.rand(1, 3, 224, 224)
register_custom_op_symbolic('::adaptive_avg_pool2d',
                            horizon_pool,
                            opset_version=11)
torch.onnx.export(model, d_input, "googlenet_cop.onnx", opset_version=11)
直接
生成onnx模型
参考
import onnx
import numpy as np
from onnx import helper, checker, shape_inference, numpy_helper, TensorProto


def make_normal_data(shape):
    return np.random.normal(loc=0.0, scale=1.0, size=shape).astype(np.float32)


# conv
def make_simple_model():

    # create nodes
    conv_input_shape = (1, 3, 224, 224)
    conv_output_shape = (1, 3, 224, 224)

    add_param_shape = (1, 3, 224, 224)
    add_1_param_data = np.zeros(add_param_shape).astype(np.float32)
    add_2_param_data = np.ones(add_param_shape).astype(np.float32)

    conv_weight_shape = (3, 3, 3, 3)
    conv_output_shape = (1, 3, 224, 224)
    conv_weight_data = make_normal_data(conv_weight_shape)

    add_1_node = helper.make_node(
        "PyOp",  # required, 类型必须是'PyOp'
        name="add_1",  # required, 不同的op名称不能相同
        inputs=["input0", "add_1_param"],  # required, 需要是一个list, 且需要与实现文件中的输入数量保持一致
        outputs=["add_1_out"],  # required, 需要是一个list, 且需要与实现文件中的输出数量保持一致
        domain="horizon.cop1",  # required, 不同实现逻辑的自定义算子实现需要通过不同的domain名称来实现
        class_name="Cop1",  # required, 需要与自定义算子的实现文件中的class名称一致
        module="custom_op.horizon_ops",  # required, 需要与包含自定义算子的实现文件的路径一致
        compute="compute",  # required, 需要与自定义算子实现class中的计算逻辑函数一致
        input_types=[
            TensorProto.FLOAT,
            TensorProto.FLOAT,
        ],  # required, 需要是一个list, 其长度需要与该算子的inputs属性数量一致, 且与实现文件中的输入数量保持一致
        output_types=[
            TensorProto.FLOAT
        ],  # required, 需要是一个list, 其长度需要与该算子的outputs属性数量一致, 且与实现文件中的输出数量保持一致
        output_shape=["1, 3, 224, 224"],  # optional, 在模型中未添加pyop的输出 value_info时, 必须填写
    )

    add_2_node = helper.make_node(
        "PyOp",
        name="add_2",
        inputs=["input1", "add_1_out", "add_2_param"],
        outputs=["add_2_out", "output0"],
        domain="horizon.cop2",
        class_name="Cop2",
        module="custom_op.horizon_ops",
        compute='compute',
        input_types=[TensorProto.FLOAT, TensorProto.FLOAT,
                      TensorProto.FLOAT],  #required
        output_types=[TensorProto.FLOAT, TensorProto.FLOAT],  #required
        output_shape=["1, 3, 224, 224", "1, 3, 224, 224"])

    conv_1_node = helper.make_node("Conv",
                                    inputs=["add_2_out", "W0"],
                                    outputs=["output1"],
                                    dilations=(1, 1),
                                    group=1,
                                    kernel_shape=(3, 3),
                                    pads=(1, 1, 1, 1),
                                    name="conv_1")
    # nodes
    nodes = [add_1_node, add_2_node, conv_1_node]

    # inputs
    model_input_1 = helper.make_tensor_value_info("input0", TensorProto.FLOAT,
                                                  conv_input_shape)
    model_input_2 = helper.make_tensor_value_info("input1", TensorProto.FLOAT,
                                                  conv_input_shape)

    # Outputs
    model_output_1 = helper.make_tensor_value_info("output0",
                                                    TensorProto.FLOAT,
                                                    conv_output_shape)
    model_output_2 = helper.make_tensor_value_info("output1",
                                                    TensorProto.FLOAT,
                                                    conv_output_shape)

    # Intermediate tensors
    add_1_out = helper.make_tensor_value_info("add_1_out", TensorProto.FLOAT,
                                              conv_output_shape)
    add_2_out = helper.make_tensor_value_info("add_2_out", TensorProto.FLOAT,
                                              conv_output_shape)

    # create constant tensor
    W0_tensor = helper.make_tensor("W0", TensorProto.FLOAT, conv_weight_shape,
                                    conv_weight_data.flatten())

    add_1_param = helper.make_tensor("add_1_param",
                                      TensorProto.FLOAT, add_param_shape,
                                      add_1_param_data.flatten())
    add_2_param = helper.make_tensor("add_2_param",
                                      TensorProto.FLOAT, add_param_shape,
                                      add_2_param_data.flatten())

    # make graph
    graph = helper.make_graph(
        nodes,
        "simple_conv_model",
        inputs=[model_input_1, model_input_2],  # input
        outputs=[model_output_1, model_output_2],  # output
        initializer=[W0_tensor, add_1_param, add_2_param],  # initializer
        value_info=[add_1_out, add_2_out],  # value_info
    )

    # make model
    onnx_model = helper.make_model(graph,
                                    opset_imports=[
                                        helper.make_opsetid("", 11),
                                        helper.make_opsetid("horizon.cop1", 1),
                                        helper.make_opsetid("horizon.cop2", 1)
                                    ],
                                    producer_name="onnx-test")

    # shape inference
    onnx_model = shape_inference.infer_shapes(onnx_model)

    # # model check
    checker.check_model(onnx_model)

    # save model
    onnx.save(onnx_model, "custom_op.onnx")
注意:
Onnx模型
domain属性
一定 要 设置,不然的话 会 被 默认 成onnx标准domain从而 报错。不同 实现 的 自定义 算子 需要 设置 在 不同 的domain下。 module需要
与 注册 时 使用 的 注册 文件 同名。若 注册 文件 在 当前目录 的 子 文件夹 中,则 需要 修改module内容。例如: 若 sample_custom.py在当前 路径 的custom_op 文件夹 中,则 该module应 设置 为 custom_op.sample_custom。目前
仅onnx模型 支持 多种类型 的 自定义 算子,如 您 需要 在 其他 框架 中 支持 多种类型 的 自定义 算子 请 联系 地瓜 技术支持 人员。
2.与 Caffe 模型
#...

custom_op:
  # 自定义op的校准方式
  custom_op_method: register

  # 自定义OP的实现文件
  op_register_files: sample_custom.py
对于 ONNX 模型,以上custom_op_method 固定register。
op_register_files 是
完成
算子实现
在
注意:
由于
工具 在PTQ转换 过程 中 会 以 working_dir为工作 目录,我们 强烈建议 算子 实现 中 涉及 工作 目录 的 配置 时,配置 为 绝对路径, 如
需要 配置 为 相对路径,请以 working_dir为工作 目录 进行 相对路径 的 指定。
Python模板
from horizon_nn.custom.op_registration import op_implement_register, op_shape_infer_register

@op_implement_register("CustomIdentity")
class CustomIdentity(object):
    def __init__(self, kernel_size, threshold):
        self._kernel_size = kernel_size
        self._default_threshold = threshold

    def compute(self, X):
        return X

@op_shape_infer_register("CustomIdentity")
def infer_shape(inputs_shape):
    outputs_shape = inputs_shape
    return outputs_shape
custom_op示例
from horizon_nn.custom.op_registration import op_implement_register

@op_implement_register("Cop1")
class Cop1(object):
    def __init__(self, ):
        pass

    def compute(self, x1, x2):
        out = x1 + x2 + 1
        return out


@op_implement_register("Cop2")
class Cop2(object):
    def __init__(self, ):
        pass

    def compute(self, x1, x2, x3):
        out = x1 + x2 + x3 + 1
        return out, out
该op_register_files ,否则op_implement_register 注册CustomIdentity 需要kind 或者Onnx自定义OP的class_name 一致。
对于 Caffe 模型, init 函数kernel_size, threshold)都params 传入op_shape_infer_register 用于Caffe模型
对于 Onnx 模型,自定义op的shape解析module 必须custom_op.horizon_ops , 则horizon_ops ,且domain 属性
上述
含自定义算子的上板运行
在
如果
自定义算子C++模板
Runtime模板
  // custom_identity_add1.h
  #ifndef ADVANCED_SAMPLES_CUSTOM_IDENTITY_ADD1_H_
  #define ADVANCED_SAMPLES_CUSTOM_IDENTITY_ADD1_H_

  #include <string>
  #include <vector>

  #include "dnn/hb_dnn.h"
  #include "dnn/plugin/hb_dnn_layer.h"
  #include "dnn/plugin/hb_dnn_ndarray.h"

  namespace hobot {
  namespace dnn {

  Layer *Cop1_layer_creator();

  class Cop1 : public Layer {
  public:
    Cop1() = default;
    ~Cop1() override = default;

  public:
    int32_t Init(const Attribute &attributes) override;

    int32_t Forward(const std::vector<NDArray *> &bottomBlobs,
                    std::vector<NDArray *> &topBlobs,
                    const hbDNNInferCtrlParam *inferCtrlParam) override;

    std::string GetType() const override { return "Cop1"; }

    uint32_t GetInputCount() const override { return num_args_; }

  private:
    std::string custom_op_name_;
    int32_t num_args_;
  };

  }  // namespace dnn
  }  // namespace hobot

  #endif
 // custom_identity_add1.cpp
  #include "custom_identity_add1.h"

  namespace hobot {
  namespace dnn {

  Layer *Cop1_layer_creator() { return new Cop1; }

  int32_t Cop1::Init(const Attribute &attributes) {
    // unused attribute, just demonstrating
    attributes.GetAttributeValue(&custom_op_name_, "custom_op_name");
    // node's input count
    attributes.GetAttributeValue(&num_args_, "num_args");
    return 0;
  }

  int32_t Cop1::Forward(const std::vector<NDArray *> &bottomBlobs,
                        std::vector<NDArray *> &topBlobs,
                        const hbDNNInferCtrlParam *inferCtrlParam) {
    const NDArray *input0 = bottomBlobs[0];
    const NDArray *input1 = bottomBlobs[1];
    NDArray *out = topBlobs[0];

    const auto *input0_data = input0->Dptr<float>();
    const auto *input1_data = input1->Dptr<float>();

    auto *out_data = out->Dptr<float>();
    uint32_t size = out->Size();

    for (uint32_t i = 0U; i < size; i++) {
      out_data[i] = input0_data[i] + input1_data[i] + 1;
    }
    return 0;
  }
  }  // namespace dnn
  }  // namespace hobot
  // custom_identity_add2.h
  #ifndef ADVANCED_SAMPLES_CUSTOM_IDENTITY_ADD2_H_
  #define ADVANCED_SAMPLES_CUSTOM_IDENTITY_ADD2_H_

  #include <string>
  #include <vector>

  #include "dnn/hb_dnn.h"
  #include "dnn/plugin/hb_dnn_layer.h"
  #include "dnn/plugin/hb_dnn_ndarray.h"

  namespace hobot {
  namespace dnn {

  Layer *Cop2_layer_creator();

  class Cop2 : public Layer {
  public:
    Cop2() = default;
    ~Cop2() override = default;

  public:
    int32_t Init(const Attribute &attributes) override;

    int32_t Forward(const std::vector<NDArray *> &bottomBlobs,
                    std::vector<NDArray *> &topBlobs,
                    const hbDNNInferCtrlParam *inferCtrlParam) override;

    std::string GetType() const override { return "Cop2"; }

    uint32_t GetInputCount() const override { return num_args_; }

    uint32_t GetOutputCount() const override { return 2U; }

  private:
    std::string custom_op_name_;
    int32_t num_args_;
  };

  }  // namespace dnn
  }  // namespace hobot

  #endif
// custom_identity_add2.cpp
  #include "custom_identity_add2.h"

  namespace hobot {
  namespace dnn {

  Layer *Cop2_layer_creator() { return new Cop2; }

  int32_t Cop2::Init(const Attribute &attributes) {
    // unused attribute, just demonstrating
    attributes.GetAttributeValue(&custom_op_name_, "custom_op_name");
    // node's input count
    attributes.GetAttributeValue(&num_args_, "num_args");
    return 0;
  }

  int32_t Cop2::Forward(const std::vector<NDArray *> &bottomBlobs,
                        std::vector<NDArray *> &topBlobs,
                        const hbDNNInferCtrlParam *inferCtrlParam) {
    const NDArray *input0 = bottomBlobs[0];
    const NDArray *input1 = bottomBlobs[1];
    const NDArray *input2 = bottomBlobs[2];
    NDArray *out0 = topBlobs[0];
    NDArray *out1 = topBlobs[1];

    const auto *input0_data = input0->Dptr<float>();
    const auto *input1_data = input1->Dptr<float>();
    const auto *input2_data = input2->Dptr<float>();

    auto *out0_data = out0->Dptr<float>();
    auto *out1_data = out1->Dptr<float>();

    uint32_t size = out0->Size();

    for (uint32_t i = 0U; i < size; i++) {
      out0_data[i] = input0_data[i] + input1_data[i] + input2_data[i] + 1;
      out1_data[i] = out0_data[i];
    }
    return 0;
  }
  }  // namespace dnn
  }  // namespace hobot
备注:
该Cop1 和 Cop2) 需要Kind )一致, 其
bottom_blobs:自定义OP节点输入 数据。 top_blobs:自定义OP节点输出 数据。 inferCtrlParam:自定义算子 初始化 阶段 的 输入 参数。
注意: 模板
自定义算子注册
当
  #include "custom_identity_add1.h"
  #include "custom_identity_add2.h"

  hbDNNRegisterLayerCreator("Cop1", hobot::dnn::Cop1_layer_creator);
  hbDNNRegisterLayerCreator("Cop2", hobot::dnn::Cop2_layer_creator);
  ....
当
在使用前,请您确认模型的自定义算子名称与注册的算子名称是相同的。
参考