7.1. 硬件和系统
认证配件及购买链接请参考认证配件清单
详细请参考地平线RDK套件用户手册FAQ
什么是地平线RDK平台?
Horizon Robotics Developer Kits,简称地平线RDK平台,是基于地平线智能芯片打造的机器人开发者套件,包括RDK X3(旭日X3派)、RDK X3 Module(旭日X3模组)。
如何查看系统版本号
系统安装完成后,登录系统并使用命令apt list --installed | grep hobot查看系统核心功能包版本,使用cat /etc/version命令查看系统大版本号。
2.x版本(以2.0.0版本为例说明)系统信息如下:
root@ubuntu:~# apt list --installed | grep hobot

WARNING: apt does not have a stable CLI interface. Use with caution in scripts.

hobot-boot/unknown,now 2.0.0-20230530181103 arm64 [installed]
hobot-bpu-drivers/unknown,now 2.0.0-20230530181103 arm64 [installed]
hobot-camera/unknown,now 2.0.0-20230530181103 arm64 [installed]
hobot-configs/unknown,now 2.0.0-20230530181103 arm64 [installed]
hobot-display/unknown,now 2.0.0-20230530181103 arm64 [installed]
hobot-dnn/unknown,now 2.0.0-20230530181103 arm64 [installed]
hobot-dtb/unknown,now 2.0.0-20230530181103 arm64 [installed]
hobot-io-samples/unknown,now 2.0.0-20230530181103 arm64 [installed]
hobot-io/unknown,now 2.0.0-20230530181103 arm64 [installed]
hobot-kernel-headers/unknown,now 2.0.0-20230530181103 arm64 [installed]
hobot-models-basic/unknown,now 1.0.1 arm64 [installed]
hobot-multimedia-dev/unknown,now 2.0.0-20230530181103 arm64 [installed]
hobot-multimedia-samples/unknown,now 2.0.0-20230530181103 arm64 [installed]
hobot-multimedia/unknown,now 2.0.0-20230530181103 arm64 [installed]
hobot-sp-samples/unknown,now 2.0.0-20230530181103 arm64 [installed]
hobot-spdev/unknown,now 2.0.0-20230530181103 arm64 [installed]
hobot-utils/unknown,now 2.0.0-20230530181103 arm64 [installed]
hobot-wifi/unknown,now 2.0.0-20230530181103 arm64 [installed]
root@ubuntu:~#
root@ubuntu:~# cat /etc/version
2.0.0
root@ubuntu:~#
1.x版本(以1.1.6版本为例说明)系统信息如下:
root@ubuntu:~# apt list --installed | grep hobot

WARNING: apt does not have a stable CLI interface. Use with caution in scripts.

hobot-arm64-bins/unknown,now 1.1.5 arm64 [installed]
hobot-arm64-boot/unknown,now 1.1.6 arm64 [installed]
hobot-arm64-configs/unknown,now 1.1.6 arm64 [installed]
hobot-arm64-desktop/unknown,now 1.1.5 arm64 [installed]
hobot-arm64-dnn-python/unknown,now 1.1.6 arm64 [installed]
hobot-arm64-gpiopy/unknown,now 1.1.5 arm64 [installed]
hobot-arm64-hdmi-sdb/unknown,now 1.1.5 arm64 [installed]
hobot-arm64-includes/unknown,now 1.1.5 arm64 [installed]
hobot-arm64-libs/unknown,now 1.1.6 arm64 [installed]
hobot-arm64-modules/unknown,now 1.1.6 arm64 [installed]
hobot-arm64-sdb-ap6212/unknown,now 1.1.6 arm64 [installed]
hobot-arm64-srcampy/unknown,now 1.1.5 arm64 [installed]
hobot-linux-headers/unknown,now 1.1.5 arm64 [installed]
hobot-models-basic/unknown,now 1.0.1 arm64 [installed]
hobot-sp-cdev/unknown,now 1.1.6 arm64 [installed]
root@ubuntu:~#
root@ubuntu:~# cat /etc/version
x3_ubuntu_v1.1.6
root@ubuntu:~#
系统版本和RDK平台硬件对应关系
系统版本说明:
2.x版本系统:基于RDK Linux开源代码包制作,支持RDK X3、RDK X3 Module等全系列硬件。
1.x版本系统:基于闭源Linux系统制作,历史版本,仅支持RDK X3硬件。
注意
1.x版本系统无法通过apt命令直接升级到2.x版本系统,需要以烧录镜像的方式重新安装系统。
2.x版本tros.b仅支持2.x版本系统,1.x版本tros.b仅支持1.x版本系统。
摄像头插拔注意事项
严禁在开发板未断电的情况下插拔摄像头,否则非常容易烧坏摄像头模组。
串口线如何连接?
串口线一端(白色)接到RDK X3,由于接口有凹槽正反面通常不会接反,另外一端接到串口转接板,此处需要重点关注,连接图如下:

RDK X3供电有什么要求?
RDK X3通过USB Type C接口供电,并兼容QC、PD快充协议。推荐使用支持QC、PD快充协议的电源适配器,或者至少搭配5V 直流 2A的电源适配器为开发板供电。
注意,请不要使用PC机USB接口为开发板供电,否则会因供电不足造成开发板工作异常(例如RDK X3上电后, HDMI 无输出(完全黑屏),绿灯没有熄灭,连接串口后,发现系统在反复重启,无法进入操作系统)。
RDK X3是否有推荐SD卡?
建议使用高速C10 SD卡,老卡可能会存在烧录镜像无法启动问题,SD卡16G以上;
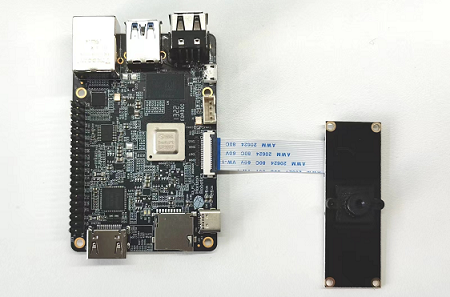
F37和GC4663 MIPI摄像头如何连接?
F37和GC4663摄像头模组通过24pin异面FPC排线跟开发板连接,注意排线两端蓝面向上插入连接器。F37摄像头连接示意图如下:
正常连接后接通电源,执行命令:
cd /app/ai_inference/03_mipi_camera_sample
sudo python3 mipi_camera.py
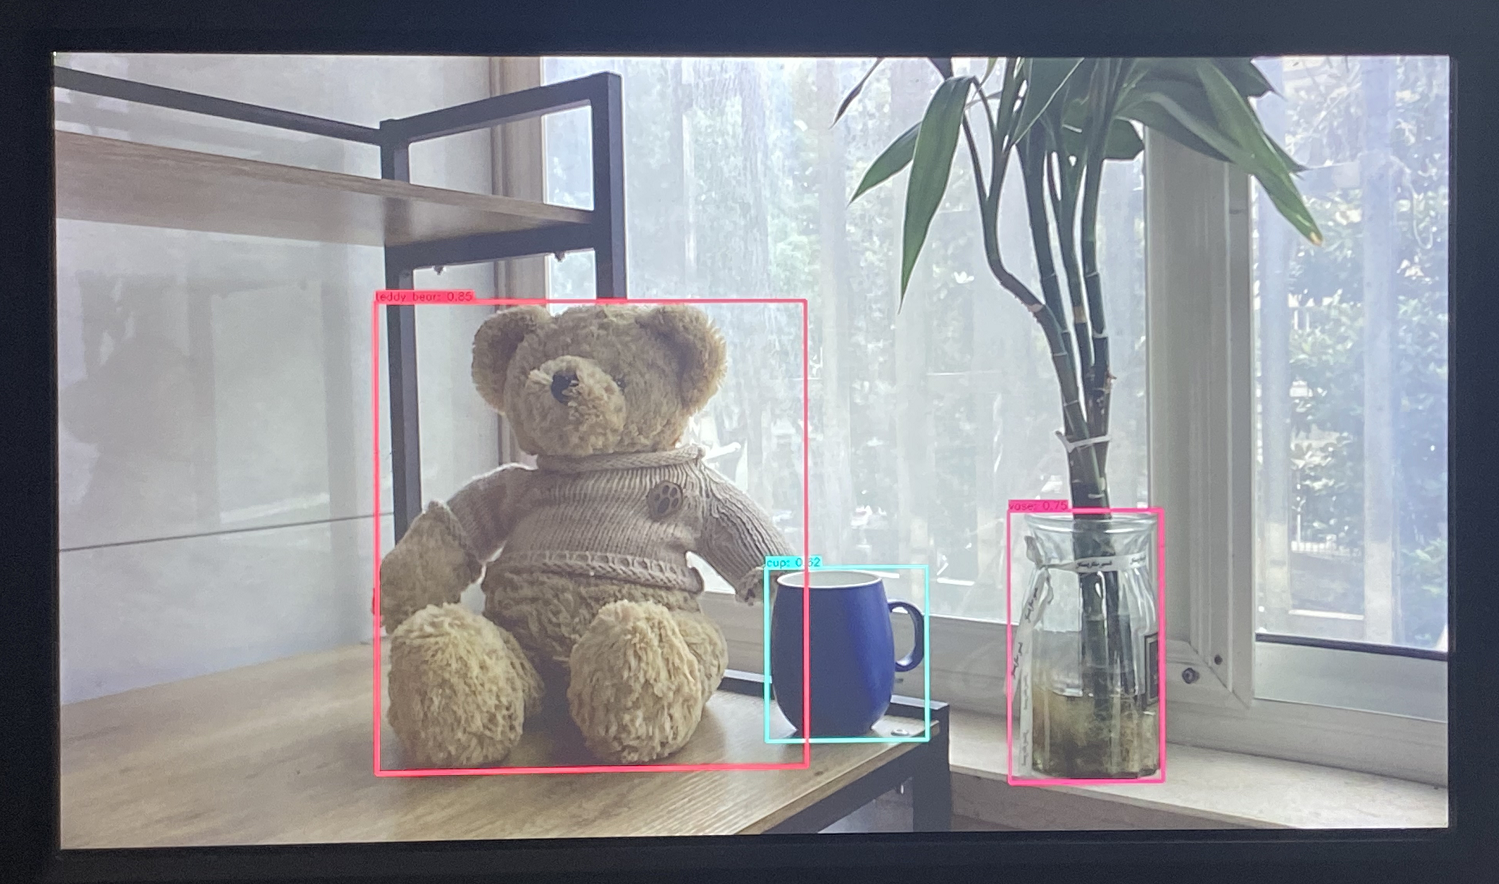
算法渲染结果的HDMI输出如下图,示例图像中检测到了teddy bear、cup和vase。
输入命令:i2cdetect -y -r 1
F37:
     0  1  2  3  4  5  6  7  8  9  a  b  c  d  e  f
00:          -- -- -- -- -- -- -- -- -- -- -- -- --
10: -- -- -- -- -- -- -- -- -- -- -- -- -- -- -- --
20: -- -- -- -- -- -- -- -- -- -- -- -- -- -- -- --
30: -- -- -- -- -- -- -- -- -- -- -- UU -- -- -- --
40: 40 -- -- -- -- -- -- -- -- -- -- -- -- -- -- --
50: -- -- -- -- -- -- -- -- -- -- -- -- -- -- -- --
60: -- -- -- -- -- -- -- -- -- -- -- -- -- -- -- --
70: -- -- -- -- -- -- -- --

GC4663:
     0  1  2  3  4  5  6  7  8  9  a  b  c  d  e  f
00:          -- -- -- -- -- -- -- -- -- -- -- -- --
10: -- -- -- -- -- -- -- -- -- -- -- -- -- -- -- --
20: -- -- -- -- -- -- -- -- -- 29 -- -- -- -- -- --
30: -- -- -- -- -- -- -- -- -- -- -- UU -- -- -- --
40: -- -- -- -- -- -- -- -- -- -- -- -- -- -- -- --
50: -- -- -- -- -- -- -- -- -- -- -- -- -- -- -- --
60: -- -- -- -- -- -- -- -- -- -- -- -- -- -- -- --
70: -- -- -- -- -- -- -- --
如何查看RDK X3的CPU、BPU等运行状态?
sudo hrut_somstatus
如何设置自启动?
通过在sudo vim /etc/rc.local文件末尾添加命令,可实现开机自启动功能,例如:
#!/bin/bash -e
#
# rc.local
#re
# This script is executed at the end of each multiuser runlevel.
# Make sure that the script will "exit 0" on success or any other
# value on error.
#
# In order to enable or disable this script just change the execution
# bits.
#
# By default this script does nothing.

#!/bin/sh

chmod a=rx,u+ws /usr/bin/sudo
chown sunrise:sunrise /home/sunrise

which "hrut_count" >/dev/null 2>&1
if [ $? -eq 0 ]; then
        hrut_count 0
fi

# Insert what you need
7.2. 应用和示例
第三方库在RDK X3上的安装/交叉编译和使用
如需交叉编译部署,请参考交叉编译环境部署
编译大型程序过程中提示编译进程被kill错误日志如何解决?
参考Swap使用教程
sudo mkdir -p /swapfile
cd /swapfile
sudo dd if=/dev/zero of=swap bs=1M count=1024
sudo chmod 0600 swap
sudo mkswap -f swap
sudo swapon swap
free
如何运行GC4633摄像头示例?
python已提供基于F37和GC4663 camera的FCOS算法示例,会自动检测camera进行算法推理。
cd /app/ai_inference/03_mipi_camera_sample
sudo python3 mipi_camera.py
然后HDMI接屏幕可以渲染图像和算法展示结果。
使用rqt_image_view查看RDK X3发布的RGB888 RAW图卡顿,甚至无法接收?
FastDDS在UDP协议层没有实现MTU分片,导致IP层进行分片,当UDP数据过大时由于常见路由器、网卡均无法缓冲大量分片,且某一分片丢失会导致重传所有分片,进而形成IP fragmentation attack,表现为同一网段机器通信卡顿。更换cycloneDDS(命令:export RMW_IMPLEMENTATION=rmw_cyclonedds_cpp),或者发送小分辨率jpeg格式图片降低传输数据量。
Linux镜像是否支持板端编译?
Linux镜像rootfs经过最小剪裁,无法支持板端编译。
Linux镜像上如何运行示例
手册中的示例是以Ubuntu系统举例介绍,示例的运行依赖python,这些示例同样可以运行在烧录Linux镜像(无python)的RDK X3上。
Ubuntu系统和Linux镜像启动示例说明
在Ubuntu系统中,启动一个示例分为三步:
1、使用source /opt/tros/setup.bash命令配置tros.b环境
2、拷贝需要的配置文件到执行路径下
3、使用ros2 run或者ros2 launch启动tros.b中的package
在Linux镜像上,这三步分别为:
1、使用export LD_LIBRARY_PATH命令配置tros.b环境
2、拷贝需要的配置文件到执行路径下
3、启动示例程序,并指定启动参数。对于使用C++编写的package,每个package对应于一个可执行程序。
下面使用算法推理示例举例,说明如何将launch脚本内容转换成Linux镜像上的命令。示例输入一张本地图片进行推理,得到渲染后的图片并保存在本地。
Ubuntu系统上启动命令
命令如下:
# 配置tros.b环境
source /opt/tros/setup.bash

# 从tros.b的安装路径中拷贝出运行示例需要的配置文件。config中为example使用的模型,回灌使用的本地图片
cp -r /opt/tros/lib/dnn_node_example/config/ .

# 使用本地jpg格式图片进行回灌预测,并存储渲染后的图片
ros2 launch dnn_node_example dnn_node_example_feedback.launch.py
launch脚本路径
此示例使用ros2 launch启动了dnn_node_example package,在RDK X3的tros.b安装路径/opt/tros/中查找launch脚本dnn_node_example_feedback.launch.py所在路径:
# find /opt/tros/ -name dnn_node_example_feedback.launch.py
/opt/tros/share/dnn_node_example/launch/dnn_node_example_feedback.launch.py
launch脚本内容
launch脚本dnn_node_example_feedback.launch.py主要内容如下:
def generate_launch_description():
    config_file_launch_arg = DeclareLaunchArgument(
        "dnn_example_config_file", default_value=TextSubstitution(text="config/fcosworkconfig.json")
    )

    img_file_launch_arg = DeclareLaunchArgument(
        "dnn_example_image", default_value=TextSubstitution(text="config/test.jpg")
    )

    # 拷贝config中文件
    dnn_node_example_path = os.path.join(
        get_package_prefix('dnn_node_example'),
        "lib/dnn_node_example")
    print("dnn_node_example_path is ", dnn_node_example_path)
    cp_cmd = "cp -r " + dnn_node_example_path + "/config ."
    print("cp_cmd is ", cp_cmd)
    os.system(cp_cmd)

    return LaunchDescription([
        config_file_launch_arg,
        img_file_launch_arg,
        # 启动单目rgb人体、人头、人脸、人手框和人体关键点检测pkg
        Node(
            package='dnn_node_example',
            executable='example',
            output='screen',
            parameters=[
                {"feed_type": 0},
                {"config_file": LaunchConfiguration(
                    'dnn_example_config_file')},
                {"image": LaunchConfiguration('dnn_example_image')},
                {"image_type": 0},
                {"dump_render_img": 1}
            ],
            arguments=['--ros-args', '--log-level', 'info']
        )
    ])
launch脚本说明
launch脚本支持通过参数dnn_example_config_file指定配置文件选择运行的算法,参数dnn_example_image指定算法推理使用的图片。示例启动时未指定,使用的是默认配置。
launch脚本中package参数指定了启动的package名为dnn_node_example,executable参数指定可执行程序名为example,parameters参数指定了传给可执行程序的参数。ros2 launch的详细使用说明参考ROS2手册。
package和可执行程序路径
在RDK X3的tros.b安装路径/opt/tros/中查找:
# find /opt/tros/ -name dnn_node_example -type d
/opt/tros/lib/dnn_node_example
/opt/tros/share/dnn_node_example

# ls /opt/tros/lib/dnn_node_example
config  example
可以看到可执行程序example在/opt/tros/lib/dnn_node_example路径下。
Linux镜像上启动可执行程序
运行上一步查找到的可执行程序,并且带上launch脚本中parameters参数:/opt/tros/lib/dnn_node_example/example --ros-args -p feed_type:=0 -p image_type:=0 -p dump_render_img:=1。
完整的Linux镜像上运行示例
# 配置tros.b环境
export LD_LIBRARY_PATH=${LD_LIBRARY_PATH}:/opt/tros/lib/

# 从tros.b的安装路径中拷贝出运行示例需要的配置文件。config中为example使用的模型,回灌使用的本地图片
cp -r /opt/tros/lib/dnn_node_example/config/ .

# 使用本地jpg格式图片进行回灌预测,并存储渲染后的图片
/opt/tros/lib/dnn_node_example/example --ros-args -p feed_type:=0 -p image_type:=0 -p dump_render_img:=1
交叉编译TogetheROS.Bot源码速度慢
tros.b的package较多,源码编译需要一些时间(8核CPU & 32G内存配置下编译完成大概需要20分钟)。有两种加速方法:
1 最小化编译
编译脚本中提供了两种编译方式,分别为all_build.sh完整编译(手册交叉编译章节中默认的编译方式)和minimal_build.sh最小化编译。其中最小化编译不编译算法示例和测试用例,编译速度快。
使用最小化编译的方法是将手册交叉编译章节中配置编译选项命令./robot_dev_config/all_build.sh替换为./robot_dev_config/minimal_build.sh。
2 手动忽略编译不需要的package
在package源码目录下生成COLCON_IGNORE文件,编译的时候将会忽略编译此package。
下载下来的package源码目录在robot_dev_config/ros2_release.repos中指定,例如下载google_benchmark_vendor时配置如下:
  ament/google_benchmark_vendor:
    type: git
    url: https://github.com/ament/google_benchmark_vendor.git
    version: 0.0.7
说明google_benchmark_vendor package源码下载在了src/ament/google_benchmark_vendor路径下,因此执行命令touch src/ament/google_benchmark_vendor/COLCON_IGNORE忽略google_benchmark_vendor package的编译。
是否支持安装使用其他版本ROS?
支持。
RDK X3上安装了tros.b之后,还可以安装使用其他版本的ROS,包括ROS1。使用时需要注意,一个终端下只能source一个版本的ROS。
此外tros.b与ROS foxy版本接口完全兼容,不需要安装ROS foxy也能够复用ROS丰富工具包。
如何查看tros.b版本
tros.b安装完成后,登录系统并使用命令apt show tros查看tros.b版本。
2.x版本(以2.0.0版本为例说明)tros.b信息如下:
root@ubuntu:~# apt show tros
Package: tros
Version: 2.0.0-20230523223852
Maintainer: kairui.wang <kairui.wang@horizon.ai>
Installed-Size: unknown
Depends: hobot-models-basic, tros-ros-base, tros-ai-msgs, tros-audio-control, tros-audio-msg, tros-audio-tracking, tros-body-tracking, tros-dnn-benchmark-example, tros-dnn-node, tros-dnn-node-example, tros-dnn-node-sample, tros-elevation-net, tros-gesture-control, tros-hand-gesture-detection, tros-hand-lmk-detection, tros-hbm-img-msgs, tros-hobot-app-xrrobot-body-tracking, tros-hobot-app-xrrobot-gesture-control, tros-hobot-codec, tros-hobot-cv, tros-hobot-falldown-detection, tros-hobot-hdmi, tros-hobot-image-publisher, tros-hobot-mot, tros-hobot-usb-cam, tros-image-subscribe-example, tros-img-msgs, tros-imu-sensor, tros-line-follower-model, tros-line-follower-perception, tros-mipi-cam, tros-mono2d-body-detection, tros-mono2d-trash-detection, tros-mono3d-indoor-detection, tros-parking-perception, tros-parking-search, tros-rgbd-sensor, tros-websocket, tros-xrrobot, tros-xrrobot-msgs
Download-Size: 980 B
APT-Manual-Installed: yes
APT-Sources: http://archive.sunrisepi.tech/ubuntu-rdk focal/main arm64 Packages
Description: TogetheROS Bot

root@ubuntu:~#
1.x版本(以1.1.6版本为例说明)tros.b信息如下:
root@ubuntu:~# apt show tros
Package: tros
Version: 1.1.6
Section: utils
Maintainer: kairui.wang <kairui.wang@horizon.ai>
Installed-Size: 1,536 MB
Pre-Depends: hhp-verify
Depends: symlinks, locales, hhp-verify, hobot-models-basic, hobot-arm64-libs (>= 1.1.6)
Apt-Sources: http://archive.sunrisepi.tech/ubuntu-ports focal/main arm64 Packages
Date: 2023-03-24_17-29-12
Download-Size: 116 MB
APT-Manual-Installed: yes
Description: TogetherROS

N: There are 7 additional records. Please use the '-a' switch to see them.
root@ubuntu:~#
1.x和2.x版本tros.b说明,以及和系统版本、RDK平台硬件对应关系
2.x版本tros.b:仅支持2.x版本系统;支持RDK X3、RDK X3 Module等全系列硬件;未来tros.b的新增功能将会发布在2.x版本tros.b;代码托管在github。
1.x版本tros.b:历史版本;仅支持1.x版本系统和RDK X3;未来1.x版本tros.b仅发布问题修复版本;代码托管在gitlab。
注意:1.x版本tros.b无法通过apt命令直接升级到2.x版本tros.b,需要以烧录镜像的方式重新安装系统后再安装2.x版本tros.b。