8.5 AI Models, Algorithms, and Toolchain
For toolchain issues, it is recommended to use the latest version first. For related download resources, please refer to: Download Resources Summary
This section mainly answers common questions related to AI model deployment, algorithm development, and algorithm toolchain usage on the D-Robotics RDK platform.
Q1: When encountering issues with the algorithm toolchain, what information should I provide when asking for help?
A: When you encounter issues with the D-Robotics algorithm toolchain and seek technical support, please provide the following complete information as much as possible to help quickly locate the problem:
- Target RDK hardware platform and processor architecture: For example, RDK X3 (BPU Bernoulli2), RDK X5 (BPU Bayes-e), Super100 (BPU Nash-e), Super100P (BPU Nash-m).
- Algorithm toolchain conversion environment information:
horizon_nnpackage version (check viapip list | grep horizon).- Python version (e.g., Py3.8, Py3.10).
- Toolchain Docker image version used (if using Docker).
- Original model file: Provide your ONNX model file (or other original format model files).
- Model conversion related files:
- The
yamlconfiguration file used during conversion. - Complete
hb_mapper make_model_logor similar log files (e.g.,hb_mapper_makertbin_log_*.log). - Calibration dataset for PTQ quantization (or its generation method and a few samples).
- The
- Board-side deployment related files:
- Board-side deployment code snippets or complete project.
- Specific error messages and logs during board-side runtime.
- RDK board system version information (obtained via the
rdkos_infocommand).
- Detailed problem reproduction steps: Clearly describe how to reproduce the issue step by step.
- Expected behavior vs. actual behavior: Describe the result you expect and the phenomenon you actually observe.
Note: Many common issues may exist in older toolchain versions and have been fixed in newer versions. It is recommended to prioritize using the officially latest released Docker images and toolchain versions.
- Docker image download and mount references:
- If the problem is complex, it is recommended to share the complete development machine conversion project, board-side deployment project, and detailed error reproduction method with technical support personnel via cloud storage or similar means.
Q2: What recommended official resources are available for AI algorithm development?
A:
- RDK User Manual - Algorithm Toolchain Chapter: This is the most fundamental and important reference material, detailing toolchain installation, usage workflow, functions and parameters of various tools, etc.
- General entry: https://developer.d-robotics.cc/rdk_doc/04_toolchain_development (Please refer to the official latest documentation)
- RDK Model Zoo (Model Repository): Official model example library containing porting, optimization, quantization, and deployment example code and tutorials for various common AI models on the RDK platform.
- GitHub repository: https://github.com/D-Robotics/rdk_model_zoo
- D-Robotics Developer Community - Resource Center: The community resource center section usually aggregates various development resources, including toolchain, SDK, example code, technical documentation, tutorial videos, etc.
- Community resource center entry: https://developer.d-robotics.cc/resource
Q3: What community algorithm resources and toolchain manuals are available for the RDK X3 (Sunrise X3 Pi) platform?
A: For algorithm development on the RDK X3 platform, you can refer to the following OpenExplorer community resources:
- RDK X3 Algorithm Toolchain Community Manual (OpenExplorer): https://developer.d-robotics.cc/api/v1/fileData/horizon_xj3_open_explorer_cn_doc/index.html
- RDK X3 OpenExplore Product Release and Related Resources Post: https://developer.d-robotics.cc/forumDetail/136488103547258769
Q4: What community algorithm resources and toolchain manuals are available for the RDK X5 platform?
A: For algorithm development on the RDK X5 platform, you can refer to the following OpenExplorer community resources:
- RDK X5 Algorithm Toolchain Community Manual (OpenExplorer): https://developer.d-robotics.cc/api/v1/fileData/x5_doc-v126cn/index.html (Please note the document version number; use the latest version)
- RDK X5 OpenExplore Product Release and Related Resources Post: https://developer.d-robotics.cc/forumDetail/251934919646096384
Q5: The algorithm toolchain Docker image is built based on Ubuntu 20.04. Will this affect running conversion outputs (such as .bin or .hbm model files) on RDK boards running Ubuntu 22.04?
A: Usually it will not affect operation.
Although the algorithm toolchain Docker images provided by D-Robotics OpenExplorer may be built based on Ubuntu 20.04, their main purpose is to provide an isolated model conversion environment containing all necessary conversion tools and dependency libraries.
The generated model files (such as .bin for PTQ, .hbm for QAT) are binary instructions and weight data targeting specific BPU architectures on RDK boards. These model files themselves are decoupled from the Ubuntu version (whether 20.04 or 22.04) of the RDK board operating system where they run, as long as the Runtime libraries on the board (such as libdnn.so and other BPU drivers and inference libraries) are compatible with the toolchain version used during model conversion.
Q6: How to deploy YOLO series models (such as YOLOv5, YOLOv8, YOLOv10) on the RDK platform?
A: D-Robotics official and community provide rich deployment tutorials and examples for YOLO series models on the RDK platform.
-
YOLOv5 deployment on RDK X3 platform:
- Full-process deployment tutorial: Full-process YOLOv5 Deployment on RDK X3
- YOLOv5s 2.0 version training and conversion: If you are using YOLOv5s tag 2.0 version, you can refer to the official toolchain getting started manual to configure the development environment, and refer to this blog for training and conversion: YOLOv5s v2.0 Training and Conversion Blog
- Higher version YOLOv5 output layer modification: If you are using higher versions of YOLOv5 (such as v5.0, v6.0, v7.0, etc., whose output layer structure differs from v2.0), you may need to modify the model output layer to meet RDK BPU post-processing requirements. Reference blog: High-version YOLOv5 Output Layer Modification Guide
- Board-side example post-processing note: The post-processing part in
/app/pydev_demo/07_yolov5_sampleon RDK systems may be directly taken from training code of a specific version, with considerable redundant computation, mainly for algorithm verification. For actual deployment pursuing performance, it is recommended to refer to optimized post-processing implementations in RDK Model Zoo. - Real-time video stream detection (TROS deployment, achieving 30fps): Quick YOLOv5 Deployment with TROS at 30fps
-
YOLOv8 deployment on RDK X3 platform:
- Python multiprocess 30fps reference: CSDN Blog - YOLOv8 RDK X3 Deployment
-
YOLOv10 deployment on Bayes architecture platforms (such as RDK X5):
- Python multithread 30fps reference: CSDN Blog - YOLOv10 Bayes Platform Deployment
-
General resources: It is strongly recommended to consult RDK Model Zoo (https://github.com/D-Robotics/rdk_model_zoo), which contains official deployment examples, pre/post-processing code, and performance optimization tips for various YOLO versions (and other mainstream models).
Q7: When deploying YOLOv5, encountering errors like can't reshape xxx in (84,84,3,85), how to resolve?
A: This error is usually caused by a mismatch between the preset number of classes (num_classes) in the post-processing code and the actual number of classes your model was trained and exported with.
For example, 85 usually represents (x, y, w, h, confidence + num_classes). If your model was trained on the COCO dataset (80 classes), then num_classes is 80, totaling 5 + 80 = 85 output channels. If you trained a model with a custom number of classes (e.g., 10 classes), then this should be 5 + 10 = 15.
- Solution: Find the YOLOv5 post-processing code file you are using (usually a Python script) and modify the defined class count parameter to match your model's actual number of classes.
- Reference: The above YOLOv5s v2.0 Training and Conversion Blog may also contain related class count modification instructions.
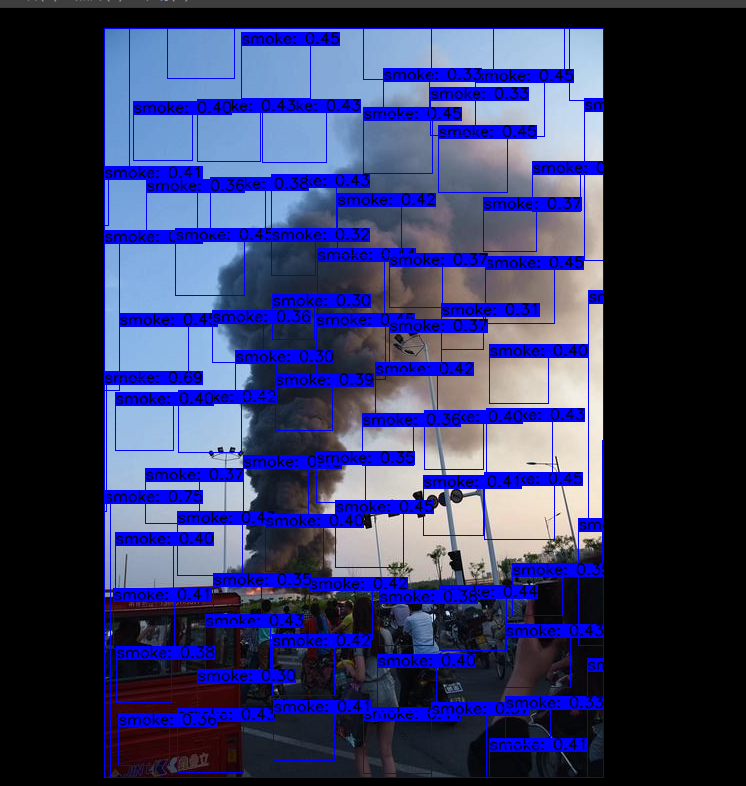
Q8: When deploying YOLOv5, detection results show a very large number of irregular detection boxes. What is the cause?
A: This is usually due to a mismatch between the ONNX model output head structure and the board-side post-processing code expectations.
- Possible cause 1: Output head not modified according to BPU requirements.
- For higher versions of YOLOv5 (e.g., above tag 2.0), the officially exported ONNX model output layer may include feature decoding parts (e.g., directly outputting detection box coordinates and class scores), or may not separate the outputs of large, medium, and small feature maps.
- D-Robotics RDK BPU deployment typically requires ONNX model outputs to be raw feature maps, with these three feature maps as independent output nodes.
- Example images (top: incorrect, bottom: partially correct but still needs adjustment):

Top image: Feature maps not separated, includes decoding. Bottom image: Feature maps separated, but may have incorrectly added Sigmoid or not converted to NHWC.
- Solution:
- You need to modify the YOLOv5 export script (usually
models/yolo.pyor similar files) to ensure when exporting the ONNX model:- Remove the detection head at the end of the model (decoding layers, NMS, etc.).
- Use three feature maps of different scales (P3, P4, P5 or corresponding layers) as independent output nodes.
- Ensure the output dimension order meets toolchain requirements (e.g., sometimes need to convert from NCHW to NHWC).
- Do not incorrectly add unnecessary activation functions (such as Sigmoid) after the final output layer unless the post-processing code explicitly requires them.
- Reference tutorial: High-version YOLOv5 Output Layer Modification Guide provides detailed modification instructions.
- You need to modify the YOLOv5 export script (usually
Q9: When deploying YOLOv5, detection results show abnormally arranged detection boxes with periodic patterns. What is the cause?
A:
- Possible cause: Output dimensions mismatch with post-processing.
- If the YOLOv5 model you use (e.g., official versions below tag 2.0) exports ONNX with each output head having 5 dimensions (e.g.,
[batch, num_anchors, grid_h, grid_w, (x,y,w,h,conf+classes)]or a flattened form like[batch, num_anchors* (5+num_classes), grid_h, grid_w]). - When the D-Robotics BPU toolchain compiles such models, if used directly, dimension processing or post-processing code expectations may cause a certain dimension to be truncated or incorrectly parsed, resulting in periodically arranged abnormal detection boxes.
- Example image:
 * Solution:
 - The recommended approach is to convert outputs to explicit 4D tensors when exporting the ONNX model (e.g., NHWC format:
[batch, grid_h, grid_w, num_anchors*(5+num_classes)]), and in board-side post-processing code, correctly parse and decode according to this NHWC output format (e.g., reshape back to 5D or perform corresponding anchor calculations). - Ensure your post-processing logic fully matches the final output dimensions and arrangement of the ONNX model.
- If the YOLOv5 model you use (e.g., official versions below tag 2.0) exports ONNX with each output head having 5 dimensions (e.g.,
Q10: When deploying YOLOv5, detection box positions are overall offset. What is the cause?
A:
- Rendering size mismatch with original image size:
- Detection box coordinates calculated by post-processing code are usually relative to the model input image size (e.g., 640x640). If you draw these coordinates directly on an original image or display canvas of a different size without corresponding scaling and translation, detection box positions will be offset.
- Solution: Ensure that before rendering detection boxes, model output coordinates are mapped back to the original image coordinate system proportionally (
original image width / model input width,original image height / model input height). If padding was applied before model input, reverse mapping also needs to account for removing padding effects.
- Anchors mismatch:
- YOLOv5 detection box decoding depends on preset anchor boxes (anchors). If one set of anchors was used during model training but a different set of anchors is used in post-processing code (or anchor order/scaling is inconsistent), decoded detection box positions and sizes will be incorrect.
- Solution: Ensure the anchor parameters used in post-processing code (usually 18 numbers representing width and height of 3 anchors per layer on 3 feature maps) are completely consistent with anchors used during model training.
Q11: When deploying YOLOv5, detection boxes abnormally cluster in the upper-left corner of the image. What could be the cause?
A:
- Possible cause: Post-processing library parameter passing issue (specifically in examples in certain system versions).
- In RDK OS 3.0.0 and above, examples such as
/app/pydev_demo/07_yolov5_samplemay use CPython-wrapped post-processing libraries. If key parameters such as model training class count are not correctly passed to the initialization or invocation interface of this post-processing library, decoding logic errors may occur, causing detection boxes to cluster in the upper-left corner. - Example image:
 * Solution:
 - Recommend using RDK Model Zoo post-processing: For YOLOv5 and similar model verification and deployment, it is strongly recommended to refer to or directly use post-processing code provided in RDK Model Zoo (https://github.com/D-Robotics/rdk_model_zoo). Model Zoo implementations are usually more robust, optimized, and work more closely with the toolchain.
- Check parameter passing: If you insist on using board example post-processing, carefully check the example code to ensure all necessary parameters (such as class count, input resolution, anchors, confidence threshold, NMS threshold, etc.) are correctly configured and passed to post-processing functions or classes.
- In RDK OS 3.0.0 and above, examples such as
Q12: When running the onboard /app/pydev_demo/07_yolov5_sample example with your own model, getting Segmentation fault, what to do?
A:
- Cause: Onboard official example programs (such as
07_yolov5_sample) are usually adapted and tested for their bundled pre-converted.binmodels. The preprocessing, model loading, BPU inference invocation, and post-processing logic of this example are all designed around that specific bundled model. - If you replace the
.binfile in the example with your own (possibly different structure, input/output, post-processing logic) YOLOv5 model without correspondingly modifying preprocessing, post-processing, or model parameter parts in the example code,Segmentation faultis very likely due to data format mismatch, memory access out of bounds, etc. - Solution:
- Do not expect it to run by simply replacing the bin file: In principle, for models you train and convert yourself, you need to write or modify a complete inference program (including preprocessing, BPU inference interface invocation, post-processing) that matches it.
- Refer to RDK Model Zoo: For common models like YOLOv5, it is strongly recommended to refer to deployment examples for corresponding models in RDK Model Zoo (https://github.com/D-Robotics/rdk_model_zoo). Model Zoo usually provides more general and clearer preprocessing and post-processing code implementations that you can adapt for your own models.
- Understand post-processing: Carefully learn YOLOv5 post-processing principles (including anchor decoding, confidence filtering, NMS, etc.), and ensure your post-processing code fully corresponds to your model output feature map format, dimensions, and content.
Q13: Model inference detects no results, or results are far worse than expected. What aspects should be checked (Pipeline check flow)?
A: When model deployment performance is poor or has no output, you need to systematically check the entire inference pipeline:
-
Data preprocessing check:
- Consistency with training: This is the most critical point. Ensure deployment preprocessing operations (such as resize method, normalization parameters, mean/variance, color space conversion like RGB/BGR, letterbox padding method and color, etc.) are completely consistent with preprocessing used during model training. Any subtle difference may cause model performance to drop sharply.
- Visualize preprocessing results: Save preprocessed image data (e.g., if input is an image, save the processed image; if numpy array, visualize it) and compare with data fed to the model during training to see if they match.
- Toolchain
yamlconfiguration: When using the D-Robotics toolchain for model conversion (PTQ), theyamlconfiguration file contains preprocessing-related parameters (such asnorm_type,mean_value,std_value, etc.). Ensure these parameters correctly "offset" preprocessing you performed before feeding calibration data to the toolchain, so the toolchain sees calibration data with input distribution consistent with before the first convolution layer during model training.
-
Model conversion process check:
- Toolchain version: Use the officially recommended latest stable algorithm toolchain version.
yamlconfiguration: Carefully check theyamlconfiguration file during model conversion to ensure all parameters (such as input node name, output node name, input data type, input layout, model type, BPU architecture, etc.) are set correctly.- Calibration dataset (PTQ):
- Quality and representativeness of calibration dataset is crucial for PTQ quantized model accuracy. The dataset should be similar to actual application scenario data distribution.
- Calibration data preprocessing as mentioned above must be consistent with deployment (or rather, calibration data fed to the toolchain should be "reverse-preprocessed" so the toolchain performs correct quantization calibration internally).
- Quantization-sensitive layer analysis: If accuracy drops significantly after PTQ, use toolchain-provided accuracy analysis tools (such as layer-by-layer comparison, dumping layer data) to locate layers sensitive to quantization, then try mixed-precision quantization (some layers use higher precision or float) or QAT (Quantization-Aware Training).
- Conversion logs: Carefully read complete logs output by the toolchain during model conversion, looking for any errors, warnings, or hints.
-
BPU inference and board-side Runtime check:
- Input data preparation: Ensure data fed to board-side BPU inference interface fully matches input format (layout, data type, shape) defined during model conversion.
- Memory management: Check input/output buffer allocation and copying for correctness; watch for memory corruption or out-of-bounds access.
- Runtime version: Ensure BPU drivers and Runtime libraries (
libdnn.so, etc.) on the board are compatible with the toolchain version used during model conversion. - API calls: Check BPU inference API call order and parameter settings for correctness.
-
Postprocessing check:
- Match with model output: Ensure post-processing code logic (such as parsing output feature maps, decoding detection boxes, applying NMS, threshold processing, etc.) fully matches format, dimensions, and meaning of actual output nodes after model conversion.
- Parameter consistency: Various parameters used in post-processing (such as anchors, class count, confidence threshold, NMS threshold, score_threshold, etc.) must be consistent with model design and training.
- Coordinate mapping: If necessary, ensure model output coordinates are correctly mapped back to original image size.
- Logic errors: Carefully check post-processing code for logic bugs.
-
End-to-end verification:
- Use known input and output: Ideally have samples from training or validation sets where you know the correct detection results (Ground Truth). Run these samples through your entire deployment pipeline and compare actual output with expected output.
- Module-by-module verification: If possible, split the entire pipeline into preprocessing, model inference, post-processing modules and verify input/output of each module separately.
Q14: How to obtain board-side hrt_* series performance analysis tools (such as hrt_model_exec, hrt_bpu_monitor, etc.)?
A: D-Robotics RDK system images, or packages released with algorithm toolchain/SDK, usually include command-line tools for board-side model execution, performance analysis, and debugging. They generally start with hrt_ (Horizon Robotics Tool).
- Search locations:
- These tools may be pre-installed in RDK system image paths such as
/usr/binor/opt/hobot/bin. - They may also be included in a subdirectory of the algorithm toolchain package you download (after extraction) (e.g.,
ddk/package/board/<target_os>/bin/or similar paths). You need to manually copy these tools to an executable path on the board (such as/usr/local/bin) or run them directly on the board by specifying their full path.
- These tools may be pre-installed in RDK system image paths such as
- Official resource post: The D-Robotics developer community usually has dedicated posts or documentation explaining how to obtain and use these board-side tools. For example, this post previously provided related information: Board-side hrt_* Tool Download and Usage Instructions (Please confirm link and content validity)
- Common tools:
hrt_model_exec: Used to execute converted.binmodels on the board for inference verification and performance testing.hrt_bpu_monitor(or performance printing parts inhrut_somstatus,bpu_predict_xN_sample): Used to monitor BPU real-time usage, frequency, temperature, and other status.- Other specific debugging tools.
Please refer to the latest RDK documentation or community resources for accurate information and download methods for these tools.
Model Quantization Errors and Solutions
hb_mapper checker (01_check.sh) Model Validation Errors
【Issue】 ERROR The shape of model input:input is [xxx] which has dimensions of 0. Please specify input-shape parameter.
- This error may occur because the model input has dynamic shape. For this error, you can use the parameter
--input-shape input_name input_shapeto specify the input node shape information.
ERROR HorizonRT not support these cpu operators: {op_type}
- This error may occur because the CPU operator used is not supported by D-Robotics. For this error, you can replace the operator according to our operator support list; if the unsupported CPU operator is a core model operator, please contact D-Robotics for development evaluation.
Unsupported op {op_type}
- This error may occur because the BPU operator used is not supported by D-Robotics. For this error, if overall model performance meets your needs, you can ignore this log; if overall model performance does not meet your expectations, you can replace the operator according to our operator support list.
ERROR nodes:['{op_type}'] are specified as domain:xxx, which are not supported by official onnx. Please check whether these ops are official onnx ops or defined by yourself
- This error may occur because the custom operator used is not supported by D-Robotics. For this error, you can replace the operator according to our operator support list or refer to custom operator development to complete custom CPU operator registration.
hb_mapper makertbin (03_build.sh) Model Conversion Errors
【Issue】Layer `{op_name}`
xxx expect data shape range:[[xxx][xxx]], but the data shape is [xxx]
Layer `{op_name}`
Tensor xxx expects be n dimensions, but m provided
- This error may occur because the
{op_name}operator exceeds support limits and falls back to CPU computation. For this error, if the performance loss from CPU operators is acceptable, you can ignore this message; if performance does not meet your requirements, you can modify this op to BPU-supported range according to our operator support list.
INFO: Layer `{op_name}` will be executed on CPU
- This error may occur because the
{op_name}operator falls back to CPU computation due to shape (CxHxW) exceeding 8192. For this error, if only a few operators fall back to CPU and overall model performance meets requirements, you can ignore this message; if performance does not meet requirements, check the operator support list and replace with other BPU operators without shape limits.
ERROR There is an error in pass: `{op_name}`. Error message:xxx
- This error may occur because the
{op_name}operator optimization failed. For this error, please collect the model and .log file and provide them to D-Robotics technical personnel for analysis.
Error There is an error in pass:constant_folding. Error message: Could not find an implementation for the node `{op_name}`
- This error may occur because this operator is not yet supported by onnxruntime. For this error, you can replace the operator according to our operator support list; if the unsupported operator is a core operator, please contact D-Robotics for development evaluation.
WARNING input shape [xxx] has length: n ERROR list index out of range
- This error may occur because non-4D model input is currently not supported. For this error, it is recommended to modify the model input to 4D (e.g., HxW -> 1x1xHxW).
Start to parse the onnx model
core dump
- This error may occur because model parsing failed (possibly because only one output/input node was assigned a name when exporting the model). For this error, it is recommended to re-export the onnx and confirm its validity (do not specify output/input name when exporting the onnx model, or assign names to each output/input node in order).
Start to calibrate/quantize the model
core dump

Start to compile the model
core dump
- This error may occur because model quantization/compilation failed. For this error, please collect the model and .log file and provide them to D-Robotics technical personnel for analysis.
ERROR model conversion faild: Inferred shape and existing shape differ in dimension x: (n) vs (m)
- This error may occur because the onnx model input shape is invalid, or the tool optimization pass has errors. For this error, please ensure the onnx model validity; if the onnx model can infer normally, please provide the model to D-Robotics technical personnel for analysis.
WARNING got unexpected input/output/sumin threshold on conv `{op_name}`! value: xxx
- This error may occur because data preprocessing is incorrect, or the node weight values are too small/large. For this error, 1. Please check whether data preprocessing is incorrect; 2. We recommend using BN operator to optimize data distribution.
ERROR hbdk-cc compile hbir model failed with returncode -n
- This error may occur because model compilation failed. For this error, please collect the model and .log file and provide them to D-Robotics technical personnel for analysis.
ERROR {op_type} only support 4 dim input
- This error may occur because the toolchain does not currently support non-4D input for this op. For this error, we recommend adjusting this op input dimension to 4D input.
ERROR {op_type} Not support this attribute/mode=xxx
- This error may occur because the toolchain does not currently support this attribute of the op. For this error, you can replace according to our operator support list or contact D-Robotics for development evaluation.
ERROR There is no node can execute on BPU in this model, please make sure the model has at least one conv node which is supported by BPU.
- This error may occur because there are no quantizable BPU nodes in the model. For this error, please ensure the onnx model validity and that the model uses at least one conv; if the above conditions are met, please collect the model and .log file and provide them to D-Robotics technical personnel for analysis.
ERROR [ONNXRuntimeError] : 9 : NOT_IMPLEMENTED : could not find a implementation for the node of `{op_name}`:{op_type}(opset)
- This error may occur because the model opset version exceeds toolchain support limits. For this error, please re-export the model and ensure
opset_version=10 or 11.
ERROR The opset version of the onnx model is n, only model with opset_version 10/11 is supported
- This error may occur because the model opset version exceeds toolchain support limits. For this error, please re-export the model and ensure
opset_version=10 or 11.
Conversion error after using run_on_bpu.
- This error may occur because specifying this operator with run_on_bpu is currently not supported.
run_on_bpucurrently only supports specifyingRelu/Softmax/pooling (maxpool, avgpool, etc.)operators at the model tail, as well as CPU*+Transpose combinations (by declaring theTransposenode name, bothCPU*+Transposecan run on BPU; CPU* specifically refers to ops supported by BPU). If the above conditions are met butrun_on_bpustill fails, please contact D-Robotics technical personnel for analysis; if the above conditions are not met, contact D-Robotics technical personnel for development evaluation.
ERROR tool limits for max output num is 32
- This error may occur because the toolchain only supports model output node count not exceeding 32. For this error, it is recommended to keep the model output node count within 32.
ERROR xxx file parse failed.
ERROR xxx does not exist in xxx.
- This error may occur because the environment configuration is incorrect. Please use the Docker environment provided by D-Robotics for quantization.
ERROR exception in command: makertbin.
ERROR cannot reshape array of size xxx into shape xxx.
- This error may occur because of abnormal data preprocessing. Please refer to preprocessing-related information in our documentation.
ERROR load cal data for input xxx error
ERROR cannot reshape array of size xxx into shape xxx
- This error may occur because of toolchain version mismatch. Please use the corresponding toolchain version in the SDK we provide.
ERROR [ONNXRuntimeError] : 1 : FAIL : Non-zero status code returned while running HzCalibration node.Name:'xxx'Status Message :CUDA error cudaErrorNoKernelImageForDevice:no kernel image is available for execution on the device
- This error may occur because of incorrect Docker loading. It is recommended to use the nvidia docker loading command when loading Docker.
[ONNXRuntimeError] : 10 : INVALID_GRAPH : Load model from xxx.onnx failed:This is an invalid model. In Node, ("xxx", HzSQuantizedPreprocess, "", -1) : ("images": tensor(int8),"xxx": tensor(int8),"xxx": tensor(int32),"xxx": tensor(int8),) -> ("xxx": tensor(int8),) , Error No Op registered for HzSQuantizedPreprocess with domain_version of 11
- This error may occur because of onnx version mismatch. Re-export the onnx with opset 10 version and use opencv method for preprocessing.
[E:onnxruntime:, sequential_executor.cc:183 Execute] Non-zero status code returned while running Resize node. Name:'xxx' Status Message: upsample.h:299 void onnxruntime::UpsampleBase::ScalesValidation(const std::vector<float>&, onnxruntime::UpsampleMode) const scales.size() == 2 || (scales.size() == 4 && scales[0] == 1 && scales[1] == 1) was false. 'Linear' mode and 'Cubic' mode only support 2-D inputs ('Bilinear', 'Bicubic') or 4-D inputs with the corresponding outermost 2 scale values being 1 in the Resize operator
- This error may occur because of onnxruntime's own issue. Batch calibration is not supported; only one-by-one calibration is possible, because the model contains reshape and dimensions do not match after batching. This does not affect the result.
ERROR No guantifiable nodes were found, and the model is not supported
- This error may occur because the model structure does not contain output nodes.
Algorithm Model Board Deployment Errors and Solutions
【Issue】(common.h:79): HR:ERROR: op_name:xxx invalid attr key xxx
- This error may occur because libDNN does not currently support a certain attribute of this op. For this error, you can replace according to our operator support list or contact D-Robotics for development evaluation.
(hb_dnn_ndarray.cpp:xxx): data type of ndarray do not match specified type. NDArray dtype_: n, given:m
- This error may occur because libDNN does not currently support this input type (we will gradually move operator constraints forward to the model conversion stage for reminders). For this error, you can replace according to our operator support list or contact D-Robotics for development evaluation.
(validate_util.cpp:xxx):tensor aligned shape size is xxx , but tensor hbSysMem memSize is xxx, tensor hbSysMem memSize should >= tensor aligned shape size!
- This error may occur because insufficient memory was allocated for input data. For this error, please use hbDNNTensorProperties.alignedByteSize to allocate memory space.
(bpu_model_info.cpp:xxx): HR:ERROR: hbm model input feature names must be equal to graph node input names
- For this error, please fully update to the latest version of the toolchain SDK development package.
Model Quantization and Board Deployment Usage Tips
Transformer Usage Instructions
This section explains the concepts and parameters of each transformer and provides reference usage examples to help you perform transformer operations.
Before reading the documentation content, please note the following:
- Image data is
3-dimensional data, but transformers provided by D-Robotics obtain and process data in4-dimensional dataformat. The transformer only performs the operation on the0thimage in the input data.
AddTransformer
Description:
Adds the value to all pixel values in the input image. This transformer converts the data format to float32 on output.
Parameters:
- value: The value to add to each pixel. Note that value can be negative, such as -128.
Usage examples:
  # Subtract 128 from image data
  AddTransformer(-128)

  # Add 127 to image data
  AddTransformer(127)
MeanTransformer
Description:
Subtracts mean_value from all pixel values in the input image.
Parameters:
-
means: The value to subtract from each pixel. Note that value can be negative, such as -128.
-
data_format: Input layout type, range ["CHW","HWC"], default "CHW".
Usage examples:
  # Subtract 128.0 from each pixel, input type is CHW
  MeanTransformer(np.array([128.0, 128.0, 128.0]))

  # Subtract different values 103.94, 116.78, 123.68 from each pixel, input type is HWC
  MeanTransformer(np.array([103.94, 116.78, 123.68]), data_format="HWC")
ScaleTransformer
Description:
Multiplies all pixel values in the input image by the data_scale coefficient.
Parameters:
- scale_value: The coefficient to multiply by, such as 0.0078125 or 1/128.
Usage examples:
  # Adjust all pixels in range -128~127 to -1~1
  ScaleTransformer(0.0078125)
  # or
  ScaleTransformer(1/128)
NormalizeTransformer
Description:
Used for normalizing the input image. This transformer converts the data format to float32 on output.
Parameters:
- std: The value to divide the first input image by.
Usage examples:
  # Adjust all pixels in range [-128, 127] to -1~1
  NormalizeTransformer(128)
TransposeTransformer
Description:
Used for layout conversion operations.
Parameters:
- order: The order after layout conversion of the input image (order relates to the original layout order). For example: HWC order is 0,1,2; when converting to CHW, order is (2,0,1).
Usage examples:
  # HWC to CHW
  TransposeTransformer((2, 0, 1))
  # CHW to HWC
  TransposeTransformer((1, 2, 0))
HWC2CHWTransformer
Description:
Used to convert NHWC to NCHW.
Parameters: Not applicable.
Usage examples:
  # NHWC to NCHW
  HWC2CHWTransformer()
CHW2HWCTransformer
Description:
Used to convert NCHW to NHWC.
Parameters: Not applicable.
Usage examples:
  # NCHW to NHWC
  CHW2HWCTransformer()
CenterCropTransformer
Description:
Crops a square image from the center of the image by direct truncation. This transformer converts the data format to float32 on output. When data_type is uint8, output is uint8.
Parameters:
-
crop_size: Side length of the center-cropped square.
-
data_type: Output result type, range ["float", "uint8"].
Usage examples:
  # Center crop to 224*224, default output type is float32
  CenterCropTransformer(crop_size=224)

  # Center crop to 224*224, output type is uint8
  CenterCropTransformer(crop_size=224, data_type="uint8")
PILCenterCropTransformer
Description:
Crops a square image from the center using PIL. This transformer converts the data format to float32 on output.
Parameters:
- size: Side length of the center-cropped square.
Usage examples:
  # Center crop to 224*224 using PIL
  PILCenterCropTransformer(size=224)
LongSideCropTransformer
Description:
Used for long-side cropping operations. This transformer converts the data format to float32 on output.
When width is greater than height, crops a center square with side equal to height, e.g., width 100, height 70, result size 70*70.
When height is greater than width, crops a center rectangle with width unchanged and height equal to half the difference plus width, e.g., width 70, height 100, result size 70*(100-70)/2+70, i.e., 70*85 rectangle.
Parameters: Not applicable.
Usage examples:
LongSideCropTransformer()
PadResizeTransformer
Description:
Enlarges the image using padding. This transformer converts the data format to float32 on output.
Parameters:
-
target_size: Target size, tuple value such as (240,240).
-
pad_value: Value to pad into the array, default 127.
-
pad_position: Padding position, range ["boundary", "bottom_right"], default "boundary".
Usage examples:
  # Crop to 512*512, pad to bottom-right corner, pad value 0
  PadResizeTransformer((512, 512), pad_position='bottom_right', pad_value=0)

  # Crop to 608*608, pad to border, pad value 127
  PadResizeTransformer(target_size=(608, 608))
ResizeTransformer
Description:
Used to resize images.
Parameters:
-
target_size: Target size, tuple value such as (240,240).
-
mode: Image processing mode, range ("skimage", "opencv"), default "skimage".
-
method: Interpolation method, effective only when mode is skimage. Range 0-5, default 1, where:
-
0 represents Nearest-neighbor;
-
1 represents Bi-linear (default);
-
2 represents Bi-quadratic;
-
3 represents Bi-cubic;
-
4 represents Bi-quartic;
-
5 represents Bi-quintic.
-
-
data_type: Output type, range (uint8, float), default float. When set to uint8, output type is uint8; otherwise float32.
-
interpolation: Interpolation method, effective only when mode is opencv. Default empty, range (opencv interpolation methods). Currently interpolation only supports empty or INTER_CUBIC in opencv. When interpolation is empty, INTER_LINEAR is used by default.
The following are opencv-supported interpolation methods and descriptions (unsupported methods will be gradually supported in future iterations):
-
INTER_NEAREST, nearest-neighbor interpolation;
-
INTER_LINEAR, bilinear interpolation, used by default when interpolation is empty.
-
INTER_CUBIC, bicubic interpolation within 4x4 pixel neighborhood.
-
INTER_AREA, resampling using pixel area relation. May be preferred for image decimation as it can provide moire-free results. But when image is scaled, it is similar to INTER_NEAREST.
-
INTER_LANCZOS4, Lanczos interpolation in 8x8 neighborhood.
-
INTER_LINEAR_EXACT, bit-exact bilinear interpolation.
-
INTER_NEAREST_EXACT, bit-exact nearest-neighbor interpolation. Produces same results as nearest-neighbor methods in PIL, scikit-image, or Matlab.
-
INTER_MAX, mask for interpolation codes.
-
WARP_FILL_OUTLIERS, flag, fill all destination image pixels. If some correspond to outliers in source image, set them to zero.
-
WARP_INVERSE_MAP, flag, inverse transform.
-
Usage examples:
  # Resize input image to 224*224, use opencv mode, bilinear interpolation, output float32
  ResizeTransformer(target_size=(224, 224), mode='opencv', method=1)

  # Resize input image to 256*256, use skimage mode, bilinear interpolation, output float32
  ResizeTransformer(target_size=(256, 256))

  # Resize input image to 256*256, use skimage mode, bilinear interpolation, output uint8
  ResizeTransformer(target_size=(256, 256), data_type="uint8")
PILResizeTransformer
Description:
Resizes images using the PIL library.
Parameters:
-
size: Target size, tuple value such as (240,240).
-
interpolation: Specifies interpolation method, range (Image.NEAREST, Image.BILINEAR, Image.BICUBIC, Image.LANCZOS), default Image.BILINEAR.
-
Image.NEAREST: Nearest-neighbor sampling;
-
Image.BILINEAR: Linear interpolation;
-
Image.BICUBIC: Cubic spline interpolation;
-
Image.LANCZOS: High-quality downsampling filter.
-
Usage examples:
  # Resize input image to 256*256, linear interpolation
  PILResizeTransformer(size=256)

  # Resize input image to 256*256, high-quality downsampling filter
  PILResizeTransformer(size=256, interpolation=Image.LANCZOS)
ShortLongResizeTransformer
Description:
Scales the input image proportionally. The new image size depends on the set parameters. Operation steps:
-
First divide short_size by the minimum of original image width and height to get the scale factor.
-
When scale factor multiplied by the maximum of original image width and height exceeds long_size, the scale factor changes to long_size divided by the maximum of original image width and height.
-
Use opencv resize method to recrop the image according to the scale factor obtained above.
Parameters:
-
short_size: Expected length of the short side after cropping.
-
long_size: Expected length of the long side after cropping.
-
include_im: Default True. When set to True, returns both the processed image and the original image.
Usage examples:
  # Short side length 20, long side length 100, return processed image and original image
  ShortLongResizeTransformer(short_size=20, long_size=100)
PadTransformer
Description:
Divides target size by the maximum of input image width or height as coefficient, then multiplies original width and height by this coefficient to resize the image. Then based on new image size, divide by size_divisor, round up, multiply by size_divisor for new width and height, generating a new image.
Parameters:
-
size_divisor: Size divisor, default 128.
-
target_size: Target size, default 512.
Usage examples:
  # Pad size 1024*1024
  PadTransformer(size_divisor=1024, target_size=1024)
ShortSideResizeTransformer
Description:
Center-crops a new image size based on current aspect ratio and expected short side length.
Parameters:
-
short_size: Expected short side length.
-
data_type: Output result type, range ("float","uint8"), default "float32" outputs float32; when set to uint8, output type is uint8.
-
interpolation: Specifies interpolation method, range opencv interpolation methods, default empty.
Currently interpolation only supports empty or INTER_CUBIC in opencv. When interpolation is empty, INTER_LINEAR is used by default.
The following are opencv-supported interpolation methods and descriptions (unsupported methods will be gradually supported in future iterations):
-
INTER_NEAREST, nearest-neighbor interpolation;
-
INTER_LINEAR, bilinear interpolation, used by default when interpolation is empty.
-
INTER_CUBIC, bicubic interpolation within 4x4 pixel neighborhood.
-
INTER_AREA, resampling using pixel area relation. May be preferred for image decimation as it can provide moire-free results. But when image is scaled, it is similar to INTER_NEAREST.
-
INTER_LANCZOS4, Lanczos interpolation in 8x8 neighborhood.
-
INTER_LINEAR_EXACT, bit-exact bilinear interpolation.
-
INTER_NEAREST_EXACT, bit-exact nearest-neighbor interpolation. Produces same results as nearest-neighbor methods in PIL, scikit-image, or Matlab.
-
INTER_MAX, mask for interpolation codes.
-
WARP_FILL_OUTLIERS, flag, fill all destination image pixels. If some correspond to outliers in source image, set them to zero.
-
WARP_INVERSE_MAP, flag, inverse transform.
-
Usage examples:
  # Resize short side to 256, bilinear interpolation
  ShortSideResizeTransformer(short_size=256)

  # Resize short side to 256, Lanczos interpolation in 8x8 pixel neighborhood
  ShortSideResizeTransformer(short_size=256, interpolation=Image.LANCZOS4)
PaddedCenterCropTransformer
Description:
Center-crops the image using padding.
Attention:
Only applicable to EfficientNet-lite related example models.
Calculation method:
-
Calculate coefficient: int((float( image_size ) / ( image_size + crop_pad )).
-
Calculate center size: coefficient * np.minimum( original image height, original image width )).
-
Perform center crop according to calculated size.
Parameters:
-
image_size: Image size, default 224.
-
crop_pad: Center padding size, default 32.
Usage examples:
  # Crop size 240*240, padding value 32
  PaddedCenterCropTransformer(image_size=240, crop_pad=32)

  # Crop size 224*224, padding value 32
  PaddedCenterCropTransformer()
BGR2RGBTransformer
Description:
Converts input format from BGR to RGB.
Parameters:
- data_format: Data format, range (CHW,HWC), default CHW.
Usage examples:
  # Convert BGR to RGB when layout is NCHW
  BGR2RGBTransformer()

  # Convert BGR to RGB when layout is NHWC
  BGR2RGBTransformer(data_format="HWC")
RGB2BGRTransformer
Description:
Converts input format from RGB to BGR.
Parameters:
- data_format: Data format, range (CHW,HWC), default CHW.
Usage examples:
  # Convert RGB to BGR when layout is NCHW
  RGB2BGRTransformer()

  # Convert RGB to BGR when layout is NHWC
  RGB2BGRTransformer(data_format="HWC")
RGB2GRAYTransformer
Description:
Converts input format from RGB to GRAY.
Parameters:
- data_format: Input layout type, range ("CHW","HWC"), default "CHW".
Usage examples:
  # Convert RGB to GRAY when layout is NCHW
  RGB2GRAYTransformer(data_format='CHW')

  # Convert RGB to GRAY when layout is NHWC
  RGB2GRAYTransformer(data_format='HWC')
BGR2GRAYTransformer
Description:
Converts input format from BGR to GRAY.
Parameters:
- data_format: Input layout type, range ["CHW","HWC"], default "CHW".
Usage examples:
  # Convert BGR to GRAY when layout is NCHW
  BGR2GRAYTransformer(data_format='CHW')

  # Convert BGR to GRAY when layout is NHWC
  BGR2GRAYTransformer(data_format='HWC')
RGB2GRAY_128Transformer
Description:
Converts input format from RGB to GRAY_128. GRAY_128 value range is (-128,127).
Parameters:
- data_format: Input layout type, range ["CHW","HWC"], default "CHW", required.
Usage examples:
  # Convert RGB to GRAY_128 when layout is NCHW
  RGB2GRAY_128Transformer(data_format='CHW')

  # Convert RGB to GRAY_128 when layout is NHWC
  RGB2GRAY_128Transformer(data_format='HWC')
RGB2YUV444Transformer
Description:
Converts input format from RGB to YUV444.
Parameters:
- data_format: Input layout type, range ["CHW", "HWC"], default "CHW", required.
Usage examples:
  # Convert BGR to YUV444 when layout is NCHW
  BGR2YUV444Transformer(data_format='CHW')

  # Convert BGR to YUV444 when layout is NHWC
  BGR2YUV444Transformer(data_format='HWC')
BGR2YUV444Transformer
Description:
Converts input format from BGR to YUV444.
Parameters:
- data_format: Input layout type, range ["CHW","HWC"], default "CHW", required.
Usage examples:
  # Convert BGR to YUV444 when layout is NCHW
  BGR2YUV444Transformer(data_format='CHW')

  # Convert BGR to YUV444 when layout is NHWC
  BGR2YUV444Transformer(data_format='HWC')
BGR2YUV444_128Transformer
Description:
Converts input format from BGR to YUV444_128. YUV444_128 value range is (-128,127).
Parameters:
- data_format: Input layout type, range ["CHW","HWC"], default "CHW", required.
Usage examples:
  # Convert BGR to YUV444_128 when layout is NCHW
  BGR2YUV444_128Transformer(data_format='CHW')

  # Convert BGR to YUV444_128 when layout is NHWC
  BGR2YUV444_128Transformer(data_format='HWC')
RGB2YUV444_128Transformer
Description:
Converts input format from RGB to YUV444_128. YUV444_128 value range is (-128,127).
Parameters:
- data_format: Input layout type, range ["CHW","HWC"], default "CHW", required.
Usage examples:
  # Convert RGB to YUV444_128 when layout is NCHW
  RGB2YUV444_128Transformer(data_format='CHW')

  # Convert RGB to YUV444_128 when layout is NHWC
  RGB2YUV444_128Transformer(data_format='HWC')
BGR2YUVBT601VIDEOTransformer
Description:
Converts input format from BGR to YUV_BT601_Video_Range.
YUV_BT601_Video_Range: Some camera input data is in YUV BT601 (Video Range) format with value range 16~235. This transformer is designed to adapt to this format.
Parameters:
- data_format: Input layout type, range ["CHW","HWC"], default "CHW", required.
Usage examples:
  # Convert BGR to YUV_BT601_Video_Range when layout is NCHW
  BGR2YUVBT601VIDEOTransformer(data_format='CHW')

  # Convert BGR to YUV_BT601_Video_Range when layout is NHWC
  BGR2YUVBT601VIDEOTransformer(data_format='HWC')
RGB2YUVBT601VIDEOTransformer
Description:
Converts input format from RGB to YUV_BT601_Video_Range.
YUV_BT601_Video_Range: Some camera input data is in YUV BT601 (Video Range) format with value range 16~235. This transformer is designed to adapt to this format.
Parameters:
- data_format: Input layout type, range ["CHW","HWC"], default "CHW", required.
Usage examples:
  # Convert RGB to YUV_BT601_Video_Range when layout is NCHW
  RGB2YUVBT601VIDEOTransformer(data_format='CHW')

  # Convert RGB to YUV_BT601_Video_Range when layout is NHWC
  RGB2YUVBT601VIDEOTransformer(data_format='HWC')
YUVTransformer
Description:
Converts input format to YUV444.
Parameters:
- color_sequence: Color sequence, required.
Usage examples:
  # Convert BGR-read image to YUV444
  YUVTransformer(color_sequence="BGR")

  # Convert RGB-read image to YUV444
  YUVTransformer(color_sequence="RGB")
ReduceChannelTransformer
Description:
Reduces C channels to a single channel. This transformer mainly targets the C channel, e.g., shape 13224224 changed to 11224224. When using, layout must align with data_format value to avoid deleting wrong channels.
Parameters:
- data_format: Input layout type, range ["CHW", "HWC"], default "CHW".
Usage examples:
  # Delete C channel when layout is NCHW
  ReduceChannelTransformer()
  # or
  ReduceChannelTransformer(data_format="CHW")

  # Delete C channel when layout is NHWC
  ReduceChannelTransformer(data_format="HWC")
BGR2NV12Transformer
Description:
Converts input format from BGR to NV12.
Parameters:
-
data_format: Input layout type, range ["CHW","HWC"], default "CHW".
-
cvt_mode: Conversion mode, range (rgb_calc, opencv), default rgb_calc.
-
rgb_calc, process image using mergeUV method;
-
opencv, process image using opencv method.
-
Usage examples:
  # Convert BGR to NV12 when layout is NCHW, use rgb_calc mode
  BGR2NV12Transformer()
  # or
  BGR2NV12Transformer(data_format="CHW")

  # Convert BGR to NV12 when layout is NHWC, use opencv mode
  BGR2NV12Transformer(data_format="HWC", cvt_mode="opencv")
RGB2NV12Transformer
Description:
Converts input format from RGB to NV12.
Parameters:
-
data_format: Input layout type, range ["CHW", "HWC"], default "CHW".
-
cvt_mode: Conversion mode, range (rgb_calc, opencv), default rgb_calc.
-
rgb_calc, process image using mergeUV method;
-
opencv, process image using opencv method.
-
Usage examples:
  # Convert RGB to NV12 when layout is NCHW, use rgb_calc mode
  RGB2NV12Transformer()
  # or
  RGB2NV12Transformer(data_format="CHW")

  # Convert RGB to NV12 when layout is NHWC, use opencv mode
  RGB2NV12Transformer(data_format="HWC", cvt_mode="opencv")
NV12ToYUV444Transformer
Description:
Converts input format from NV12 to YUV444.
Parameters:
- target_size: Target size, tuple value such as (240,240).
- yuv444_output_layout: YUV444 output layout, range (HWC,CHW), default "HWC".
Usage examples:
  # Layout NCHW, size 768*768, nv12 to yuv444
  NV12ToYUV444Transformer(target_size=(768, 768))

  # Layout NHWC, size 224*224, nv12 to yuv444
  NV12ToYUV444Transformer((224, 224), yuv444_output_layout="HWC")
WarpAffineTransformer
Description:
Used for image affine transformation.
Parameters:
-
input_shape: Input shape value.
-
scale: Multiplication coefficient.
Usage examples:
  # Size 512*512, long side length 1.0
  WarpAffineTransformer((512, 512), 1.0)
F32ToS8Transformer
Description:
Converts input format from float32 to int8.
Parameters: Not applicable.
Usage examples:
  # Convert input format from float32 to int8
  F32ToS8Transformer()
F32ToU8Transformer
Description:
Converts input format from float32 to uint8.
Parameters: Not applicable.
Usage examples:
  # Convert input format from float32 to uint8
  F32ToU8Transformer()
Example YOLOv5x Model Usage Instructions
- YOLOv5x model:
-
You can download the corresponding pt file from URL: yolov5-2.0.
When cloning the code, please confirm you are using Tags
v2.0, otherwise conversion will fail. -
md5sum codes:
| md5sum | File |
|---|---|
| 2e296b5e31bf1e1b6b8ea4bf36153ea5 | yolov5l.pt |
| 16150e35f707a2f07e7528b89c032308 | yolov5m.pt |
| 42c681cf466c549ff5ecfe86bcc491a0 | yolov5s.pt |
| 069a6baa2a741dec8a2d44a9083b6d6e | yolov5x.pt |
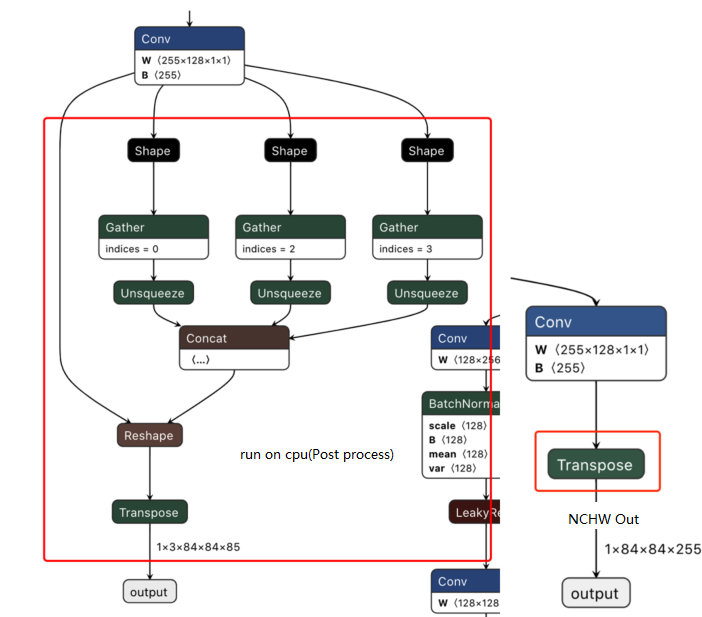
- To better adapt to post-processing code, we made the following modifications to the Github code before ONNX model export (code see: https://github.com/ultralytics/yolov5/blob/v2.0/models/yolo.py ):
    def forward(self, x):
        # x = x.copy()  # for profiling
        z = []  # inference output
        self.training |= self.export
        for i in range(self.nl):
            x[i] = self.m[i](x[i])  # conv
            bs, _, ny, nx = x[i].shape  # x(bs,255,20,20) to x(bs,3,20,20,85)
            #  x[i] = x[i].view(bs, self.na, self.no, ny, nx).permute(0, 1, 3, 4, 2).contiguous()
            x[i] = x[i].permute(0, 2, 3, 1).contiguous()
-
Note: Removed the 4D to 5D reshape at the tail of each output branch (i.e., do not split channel from 255 into 3x85), then convert layout from NHWC to NCHW before output.
The left image below shows visualization of an output node before modification; the right image shows the corresponding output node after modification.
-
After download, convert pt file to ONNX file using script https://github.com/ultralytics/yolov5/blob/v2.0/models/export.py.
-
Notes
When using the export.py script, please note:
- Since D-Robotics AI toolchain supports ONNX opset versions
10and11, please modify theopset_versionparameter oftorch.onnx.exportaccording to the version you want to use. - Change the default input name parameter of
torch.onnx.exportfrom'images'to'data', consistent with the YOLOv5x example script in the model conversion sample package. - Change the default data input size 640x640 in the
parser.add_argumentsection to 672x672 in the YOLOv5x example in the model conversion sample package.
- Since D-Robotics AI toolchain supports ONNX opset versions
Model Accuracy Tuning Checklist
Please strictly follow steps 1-5 in the diagram below for model accuracy verification and retain code and results for each step:
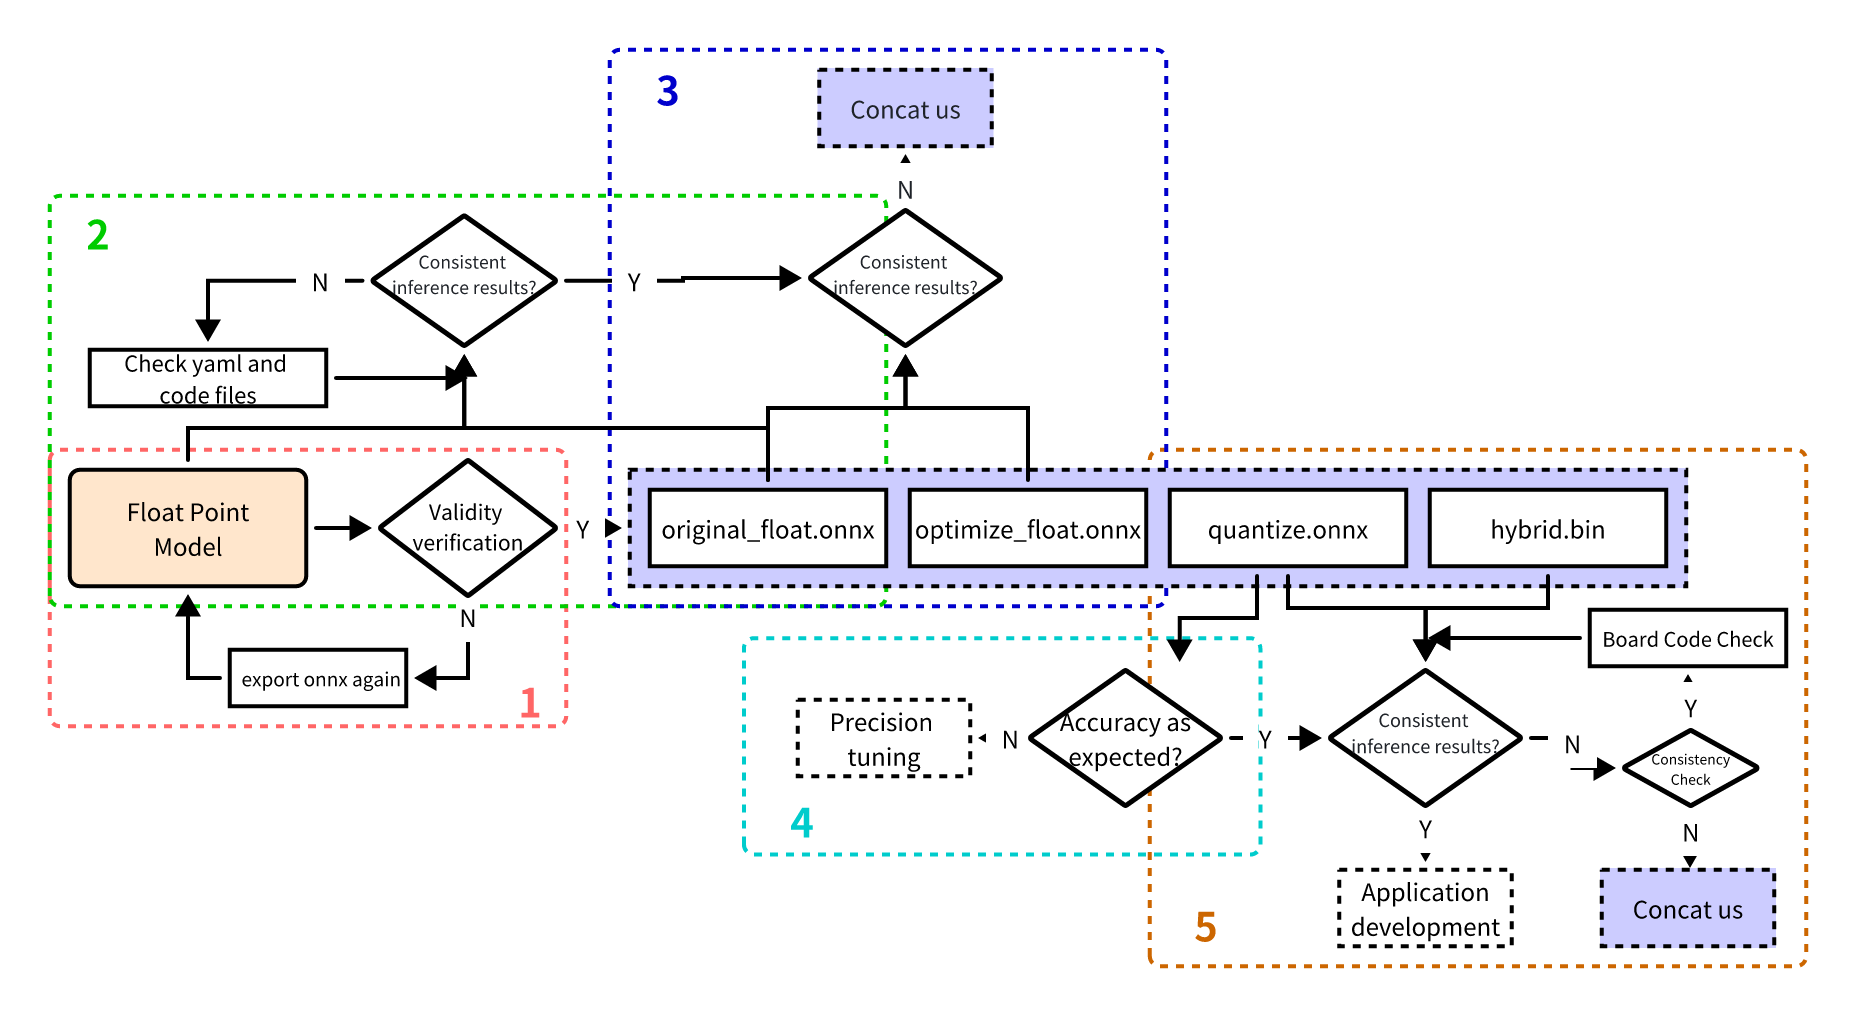
Before troubleshooting, please confirm the Docker image or conversion environment version used for current model conversion, and retain version information
1. Verify floating-point onnx model inference results
Enter the model conversion environment to test single-image results of the floating-point onnx model (specifically the onnx model exported from the DL framework). Results at this step should be completely consistent with post-training model inference results (except nv12 format, which may introduce slight differences).
Refer to the following example code steps to confirm inference steps, data preprocessing, and post-processing code for the floating-point onnx model are correct!
  from horizon_tc_ui import HB_ONNXRuntime
  import numpy as np
  import cv2

  def preprocess(input_name):
      # BGR->RGB, Resize, CenterCrop···
      # HWC->CHW
      # normalization
      return data

  def main():
      # Load model file
      sess = HB_ONNXRuntime(model_file=MODEL_PATH)
      # Get input & output node names
      input_names = [input.name for input in sess.get_inputs()]
      output_names = [output.name for output in sess.get_outputs()]
      # Prepare model input data
      feed_dict = dict()
      for input_name in input_names:
          feed_dict[input_name] = preprocess(input_name)

      # Original floating-point onnx, data dtype=float32
      outputs = sess.run_feature(output_names, feed_dict, input_offset=0)

      # Post-processing
      postprocess(outputs)

  if __name__ == '__main__':
      main()
2. Verify yaml configuration file and pre/post-processing code correctness
Test single-image results of the original_float.onnx model. Results should be completely consistent with floating-point onnx model inference results (except nv12 format; due to nv12 data loss, slight differences may be introduced).
Use the open-source tool Netron to open the original_float.onnx model and view detailed attributes of the preprocessing node HzPreprocess operator to obtain parameters needed for data preprocessing: data_format and input_type.
Due to the existence of the HzPreprocess node, preprocessing operations of the converted model may differ from the original model. This operator is added during model conversion based on configuration parameters in the yaml file (input_type_rt, input_type_train, norm_type, mean_value, scale_value). For preprocessing node generation details, refer to the norm_type configuration parameter description section in PTQ Principles and Steps. Additionally, preprocessing nodes appear in all products generated during conversion.
Ideally, this HzPreprocess node should complete the full conversion from input_type_rt to input_type_train. However, in practice the entire type conversion process requires D-Robotics AI chip hardware, but the ONNX model does not include the hardware conversion part. Therefore, the actual ONNX input type uses an intermediate type, which is the hardware processing result type of input_type_rt. Thus, for image input data types: RGB/BGR/NV12/YUV444/GRAY with data dtype=uint8, preprocessing code needs to perform -128 operation; for featuremap data type using float32, preprocessing code does not need -128 operation; original_float.onnx data layout (NCHW/NHWC) remains consistent with the original floating-point model input layout.
Refer to the following example code steps to confirm inference steps, data preprocessing, and post-processing code for the original_float.onnx model are correct!
For data preprocessing, it is recommended to refer to preprocessing steps in caffe, onnx, and other example models in the D-Robotics model conversion horizon_model_convert_sample sample package
  from horizon_tc_ui import HB_ONNXRuntime
  import numpy as np
  import cv2

  def preprocess(input_name):
      # BGR->RGB, Resize, CenterCrop···
      # HWC->CHW (determine whether layout conversion is needed based on specific shape of onnx model input node)
      # normalization (if norm operation was placed in model via yaml file, do not repeat in preprocessing)
      #-128 (for image input models, only need to perform -128 in preprocessing when using hb_session.run interface; other interfaces control via input_offset)
      return data

  def main():
      # Load model file
      sess = HB_ONNXRuntime(model_file=MODEL_PATH)
      # Get input & output node names
      input_names = [input.name for input in sess.get_inputs()]
      output_names = [output.name for output in sess.get_outputs()]
      # Prepare model input data
      feed_dict = dict()
      for input_name in input_names:
          feed_dict[input_name] = preprocess(input_name)
      # Image input models (RGB/BGR/NV12/YUV444/GRAY), data dtype= uint8
      outputs = sess.run(output_names, feed_dict, input_offset=128)
      # featuremap model, data dtype=float32, comment out the line below if model input is not featuremap!
      outputs = sess.run_feature(output_names, feed_dict, input_offset=0)
      # Post-processing
      postprocess(outputs)

  if __name__ == '__main__':
      main()
3. Verify graph optimization stage did not introduce accuracy errors
Test single-image results of the optimize_float.onnx model. Results should be completely consistent with original_float.onnx inference results.
Use the open-source tool Netron to open the optimize_float.onnx model and view detailed attributes of the preprocessing node HzPreprocess operator to obtain parameters needed for data preprocessing: data_format and input_type;
For optimize_float.onnx model inference, refer to the following example code steps to confirm inference steps, data preprocessing, and post-processing code for the optimize_float.onnx model are correct!
For data preprocessing, it is recommended to refer to preprocessing steps in caffe, onnx, and other example models in the D-Robotics model conversion horizon_model_convert_sample sample package
  from horizon_tc_ui import HB_ONNXRuntime
  import numpy as np
  import cv2

  def preprocess(input_name):
      # BGR->RGB, Resize, CenterCrop···
      # HWC->CHW (determine whether layout conversion is needed based on specific shape of onnx model input node)
      # normalization (if norm operation was placed in model via yaml file, do not repeat in preprocessing)
      #-128 (for image input models, only need to perform -128 in preprocessing when using hb_session.run interface; other interfaces control via input_offset)
      return data

  def main():
      # Load model file
      sess = HB_ONNXRuntime(model_file=MODEL_PATH)
      # Get input & output node names
      input_names = [input.name for input in sess.get_inputs()]
      output_names = [output.name for output in sess.get_outputs()]
      # Prepare model input data
      feed_dict = dict()
      for input_name in input_names:
          feed_dict[input_name] = preprocess(input_name)
      # Image input models (RGB/BGR/NV12/YUV444/GRAY), data dtype= uint8
      outputs = sess.run(output_names, feed_dict, input_offset=128)
      # featuremap model, data dtype=float32, comment out the line below if model input is not featuremap!
      outputs = sess.run_feature(output_names, feed_dict, input_offset=0)
      # Post-processing
      postprocess(outputs)

  if __name__ == '__main__':
      main()
4. Verify quantization accuracy meets expectations
Test accuracy metrics of quantized.onnx.
Use the open-source tool Netron to open the quantized.onnx model and view detailed attributes of the preprocessing node HzPreprocess operator to obtain parameters needed for data preprocessing: data_format and input_type;
For quantized.onnx model inference, refer to the following example code steps to confirm inference steps, data preprocessing, and post-processing code for the quantized.onnx model are correct!
For data preprocessing, it is recommended to refer to preprocessing steps in caffe, onnx, and other example models in the D-Robotics model conversion horizon_model_convert_sample sample package
  from horizon_tc_ui import HB_ONNXRuntime
  import numpy as np
  import cv2

  def preprocess(input_name):
      # BGR->RGB, Resize, CenterCrop···
      # HWC->CHW (determine whether layout conversion is needed based on specific shape of onnx model input node)
      # normalization (if norm operation was placed in model via yaml file, do not repeat in preprocessing)
      #-128 (for image input models, only need to perform -128 in preprocessing when using hb_session.run interface; other interfaces control via input_offset)
      return data

  def main():
      # Load model file
      sess = HB_ONNXRuntime(model_file=MODEL_PATH)
      # Get input & output node names
      input_names = [input.name for input in sess.get_inputs()]
      output_names = [output.name for output in sess.get_outputs()]
      # Prepare model input data
      feed_dict = dict()
      for input_name in input_names:
          feed_dict[input_name] = preprocess(input_name)
      # Image input models (RGB/BGR/NV12/YUV444/GRAY), data dtype= uint8
      outputs = sess.run(output_names, feed_dict, input_offset=128)
      # featuremap model, data dtype=float32, comment out the line below if model input is not featuremap!
      outputs = sess.run_feature(output_names, feed_dict, input_offset=0)
      # Post-processing
      postprocess(outputs)

  if __name__ == '__main__':
      main()
5. Ensure model compilation is error-free and board-side inference code is correct
Use the hb_model_verifier tool to verify consistency between quantized.onnx and .bin. Model outputs should at least align to 2-3 decimal places.
For hb_model_verifier tool usage (detailed introduction available), refer to the hb_model_verifier tool section in PTQ Principles and Steps.
If model consistency verification passes, carefully check board-side pre/post-processing code!
If quantized.onnx and .bin model consistency verification fails, please contact D-Robotics technical personnel.
Model Quantization yaml Configuration File Templates
RDK X3 Caffe Model Quantization yaml File Template
Please create a caffe_config.yaml file, copy the following content directly, then fill in only parameters marked as Required parameters to perform model conversion. For more parameter usage instructions, refer to the yaml Configuration File Details section.
# Copyright (c) 2020 D-Robotics.All Rights Reserved.

# Model conversion related parameters
model_parameters:

  # Required parameter
  # Caffe floating-point network data model file, e.g.: caffe_model: './horizon_x3_caffe.caffemodel'
  caffe_model: ''

  # Required parameter
  # Caffe network description file, e.g.: prototxt: './horizon_x3_caffe.prototxt'
  prototxt: ''

  march: "bernoulli2"
  layer_out_dump: False
  working_dir: 'model_output'
  output_model_file_prefix: 'horizon_x3'

# Model input related parameters
input_parameters:

  input_name: ""
  input_shape: ''
  input_type_rt: 'nv12'
  input_layout_rt: ''

  # Required parameter
  # Data type used for training in the original floating-point model training framework, optional values rgb/bgr/gray/featuremap/yuv444, e.g.: input_type_train: 'bgr'
  input_type_train: ''

  # Required parameter
  # Data layout used for training in the original floating-point model training framework, optional values NHWC/NCHW, e.g.: input_layout_train: 'NHWC'
  input_layout_train: ''

  #input_batch: 1

  # Required parameter
  # Data preprocessing method used in the original floating-point model training framework, configurable: no_preprocess/data_mean/data_scale/data_mean_and_scale
  # no_preprocess: no operation, corresponding mean_value or scale_value need not be configured
  # data_mean: subtract channel mean mean_value, corresponding mean_value needs to be configured, and scale_value commented out
  # data_scale: multiply image pixels by data_scale coefficient, corresponding scale_value needs to be configured, and mean_value commented out
  # data_mean_and_scale: subtract channel mean then multiply by scale coefficient, both corresponding mean_value and scale_value below need to be configured
  norm_type: ''

  # Required parameter
  # Mean subtracted from image, if channel mean, values must be separated by spaces
  # e.g.: mean_value: 128.0 or mean_value: 111.0 109.0 118.0
  mean_value:

  # Required parameter
  # Image preprocessing scale ratio, if channel scale ratio, values must be separated by spaces, formula: scale = 1/std
  # e.g.: scale_value: 0.0078125 or scale_value: 0.0078125 0.001215 0.003680
  scale_value:

# Model quantization related parameters
calibration_parameters:

  # Required parameter
  # Directory storing reference images for model quantization, image formats support Jpeg, Bmp, etc. Images are generally selected from test set (about 100 images) covering typical scenarios, avoiding edge cases such as overexposure, saturation, blur, pure black, pure white, etc.
  # Configure according to folder path in 02_preprocess.sh script, e.g.: cal_data_dir: './calibration_data_yuv_f32'
  cal_data_dir: ''

  cal_data_type: 'float32'
  calibration_type: 'default'
  # max_percentile: 0.99996

# Compiler related parameters
compiler_parameters:

  compile_mode: 'latency'
  debug: False
  # core_num: 2
  optimize_level: 'O3'
RDK X5 ONNX Model Quantization yaml File Template
Please create an onnx_config.yaml file, copy the following content directly, then fill in only parameters marked as Required parameters to perform model conversion. For more parameter usage instructions, refer to the yaml Configuration File Details section.
# Copyright (c) 2020 D-Robotics.All Rights Reserved.

# Model conversion related parameters
model_parameters:

  # Required parameter
  # ONNX floating-point network data model file, e.g.: onnx_model: './horizon_x3_onnx.onnx'
  onnx_model: ''

  march: "bernoulli2"
  layer_out_dump: False
  working_dir: 'model_output'
  output_model_file_prefix: 'horizon_x3'

# Model input related parameters
input_parameters:

  input_name: ""
  input_shape: ''
  input_type_rt: 'nv12'
  input_layout_rt: ''

  # Required parameter
  # Data type used for training in the original floating-point model training framework, optional values rgb/bgr/gray/featuremap/yuv444, e.g.: input_type_train: 'bgr'
  input_type_train: ''

  # Required parameter
  # Data layout used for training in the original floating-point model training framework, optional values NHWC/NCHW, e.g.: input_layout_train: 'NHWC'
  input_layout_train: ''

  #input_batch: 1

  # Required parameter
  # Data preprocessing method used in the original floating-point model training framework, configurable: no_preprocess/data_mean/data_scale/data_mean_and_scale
  # no_preprocess: no operation, corresponding mean_value or scale_value need not be configured
  # data_mean: subtract channel mean mean_value, corresponding mean_value needs to be configured, and scale_value commented out
  # data_scale: multiply image pixels by data_scale coefficient, corresponding scale_value needs to be configured, and mean_value commented out
  # data_mean_and_scale: subtract channel mean then multiply by scale coefficient, both corresponding mean_value and scale_value below need to be configured
  norm_type: ''

  # Required parameter
  # Mean subtracted from image, if channel mean, values must be separated by spaces
  # e.g.: mean_value: 128.0 or mean_value: 111.0 109.0 118.0
  mean_value:

  # Required parameter
  # Image preprocessing scale ratio, if channel scale ratio, values must be separated by spaces, formula: scale = 1/std
  # e.g.: scale_value: 0.0078125 or scale_value: 0.0078125 0.001215 0.003680
  scale_value:

# Model quantization related parameters
calibration_parameters:

  # Required parameter
  # Directory storing reference images for model quantization, image formats support Jpeg, Bmp, etc. Images are generally selected from test set (about 100 images) covering typical scenarios, avoiding edge cases such as overexposure, saturation, blur, pure black, pure white, etc.
  # Configure according to folder path in 02_preprocess.sh script, e.g.: cal_data_dir: './calibration_data_yuv_f32'
  cal_data_dir: ''

  cal_data_type: 'float32'
  calibration_type: 'default'
  # max_percentile: 0.99996

# Compiler related parameters
compiler_parameters:

  compile_mode: 'latency'
  debug: False
  # core_num: 2
  optimize_level: 'O3'
RDK X5 Caffe Model Quantization yaml File Template
Please create a caffe_config.yaml file, copy the following content directly, then fill in only parameters marked as Required parameters to perform model conversion. For more parameter usage instructions, refer to the yaml Configuration File Details section.
# Copyright (c) 2020 D-Robotics.All Rights Reserved.

# Model conversion related parameters
model_parameters:

  # Required parameter
  # Caffe floating-point network data model file, e.g.: caffe_model: './horizon_x5_caffe.caffemodel'
  caffe_model: ''

  # Required parameter
  # Caffe network description file, e.g.: prototxt: './horizon_x5_caffe.prototxt'
  prototxt: ''

  march: "bayes-e"
  layer_out_dump: False
  working_dir: 'model_output'
  output_model_file_prefix: 'horizon_x5'

# Model input related parameters
input_parameters:

  input_name: ""
  input_shape: ''
  input_type_rt: 'nv12'
  input_layout_rt: ''

  # Required parameter
  # Data type used for training in the original floating-point model training framework, optional values rgb/bgr/gray/featuremap/yuv444, e.g.: input_type_train: 'bgr'
  input_type_train: ''

  # Required parameter
  # Data layout used for training in the original floating-point model training framework, optional values NHWC/NCHW, e.g.: input_layout_train: 'NHWC'
  input_layout_train: ''

  #input_batch: 1

  # Required parameter
  # Data preprocessing method used in the original floating-point model training framework, configurable: no_preprocess/data_mean/data_scale/data_mean_and_scale
  # no_preprocess: no operation, corresponding mean_value or scale_value need not be configured
  # data_mean: subtract channel mean mean_value, corresponding mean_value needs to be configured, and scale_value commented out
  # data_scale: multiply image pixels by data_scale coefficient, corresponding scale_value needs to be configured, and mean_value commented out
  # data_mean_and_scale: subtract channel mean then multiply by scale coefficient, both corresponding mean_value and scale_value below need to be configured
  norm_type: ''

  # Required parameter
  # Mean subtracted from image, if channel mean, values must be separated by spaces
  # e.g.: mean_value: 128.0 or mean_value: 111.0 109.0 118.0
  mean_value:

  # Required parameter
  # Image preprocessing scale ratio, if channel scale ratio, values must be separated by spaces, formula: scale = 1/std
  # e.g.: scale_value: 0.0078125 or scale_value: 0.0078125 0.001215 0.003680
  scale_value:

# Model quantization related parameters
calibration_parameters:

  # Required parameter
  # Directory storing reference images for model quantization, image formats support Jpeg, Bmp, etc. Images are generally selected from test set (about 100 images) covering typical scenarios, avoiding edge cases such as overexposure, saturation, blur, pure black, pure white, etc.
  # Configure according to folder path in 02_preprocess.sh script, e.g.: cal_data_dir: './calibration_data_yuv_f32'
  cal_data_dir: ''

  cal_data_type: 'float32'
  calibration_type: 'default'
  # max_percentile: 0.99996

# Compiler related parameters
compiler_parameters:

  compile_mode: 'latency'
  debug: False
  # core_num: 2
  optimize_level: 'O3'
RDK X5 ONNX Model Quantization yaml File Template
Please create an onnx_config.yaml file, copy the following content directly, then fill in only parameters marked as Required parameters to perform model conversion. For more parameter usage instructions, refer to the yaml Configuration File Details section.
# Copyright (c) 2020 D-Robotics.All Rights Reserved.

# Model conversion related parameters
model_parameters:

  # Required parameter
  # ONNX floating-point network data model file, e.g.: onnx_model: './horizon_x5_onnx.onnx'
  onnx_model: ''

  march: "bayes-e"
  layer_out_dump: False
  working_dir: 'model_output'
  output_model_file_prefix: 'horizon_x5'

# Model input related parameters
input_parameters:

  input_name: ""
  input_shape: ''
  input_type_rt: 'nv12'
  input_layout_rt: ''

  # Required parameter
  # Data type used for training in the original floating-point model training framework, optional values rgb/bgr/gray/featuremap/yuv444, e.g.: input_type_train: 'bgr'
  input_type_train: ''

  # Required parameter
  # Data layout used for training in the original floating-point model training framework, optional values NHWC/NCHW, e.g.: input_layout_train: 'NHWC'
  input_layout_train: ''

  #input_batch: 1

  # Required parameter
  # Data preprocessing method used in the original floating-point model training framework, configurable: no_preprocess/data_mean/data_scale/data_mean_and_scale
  # no_preprocess: no operation, corresponding mean_value or scale_value need not be configured
  # data_mean: subtract channel mean mean_value, corresponding mean_value needs to be configured, and scale_value commented out
  # data_scale: multiply image pixels by data_scale coefficient, corresponding scale_value needs to be configured, and mean_value commented out
  # data_mean_and_scale: subtract channel mean then multiply by scale coefficient, both corresponding mean_value and scale_value below need to be configured
  norm_type: ''

  # Required parameter
  # Mean subtracted from image, if channel mean, values must be separated by spaces
  # e.g.: mean_value: 128.0 or mean_value: 111.0 109.0 118.0
  mean_value:

  # Required parameter
  # Image preprocessing scale ratio, if channel scale ratio, values must be separated by spaces, formula: scale = 1/std
  # e.g.: scale_value: 0.0078125 or scale_value: 0.0078125 0.001215 0.003680
  scale_value:

# Model quantization related parameters
calibration_parameters:

  # Required parameter
  # Directory storing reference images for model quantization, image formats support Jpeg, Bmp, etc. Images are generally selected from test set (about 100 images) covering typical scenarios, avoiding edge cases such as overexposure, saturation, blur, pure black, pure white, etc.
  # Configure according to folder path in 02_preprocess.sh script, e.g.: cal_data_dir: './calibration_data_yuv_f32'
  cal_data_dir: ''

  cal_data_type: 'float32'
  calibration_type: 'default'
  # max_percentile: 0.99996

# Compiler related parameters
compiler_parameters:

  compile_mode: 'latency'
  debug: False
  # core_num: 2
  optimize_level: 'O3'
X3 Multi-core BPU Usage Instructions
Since X3 has 2 BPU cores, there are single-core and dual-core model scenarios in BPU usage. For multi-core BPU usage notes, refer to: X3 Multi-core BPU Reasonable Usage Tips and Recommendations
Fixed-point .bin Model Multi-batch Board Deployment Instructions
-
- During model conversion, configure batch_size via input_batch in the yaml configuration file;
-
- For board .bin model input, using original model dimension 1×3×224×224 with input_batch set to 10, i.e., 10×3×224×224 dimension as example:
-
Data preparation:
Image data: Set
aligned_shape = valid_shape, then following single-image data preparation, write 10 images sequentially in order into the allocated memory space;FeatureMap data: Pad data according to aligned_shape, then following single-batch data preparation, write 10 batches of data sequentially in order into the allocated memory space. Model inference flow is the same as single-batch model inference flow;